2000 HONDA ODYSSEY steering
[x] Cancel search: steeringPage 227 of 352
Towing a Traile r
Handling Crosswinds and Buffeting
Crosswinds and air turbulence
caused by passing trucks can disrupt
your steering and cause trailer swaying. When being passed by a
large vehicle, keep a constant speed and steer straight ahead. Do not try
to make quick steering or braking corrections.
Backing Up
Always drive slowly and have someone guide you when backing up.
Grip the bottom of the steering
wheel; then turn the wheel to the left
to get the trailer to move to the left, and turn the wheel right to move the
trailer to the right.
Parking
Follow all normal precautions when
parking, including putting the
transmission in Park and firmly setting the parking brake. Also, place
wheel chocks at each of the trailer's
tires.
Drivin g
Page 228 of 352

Maintenance
This section explains why it is
important to keep your vehicle well
maintained and to follow basic
maintenance safety precautions.
This section also includes Maintenance Schedules for normal
driving and severe driving conditions,
a Maintenance Record, and instruc-
tions for simple maintenance tasks
you may want to take care of
yourself.
If you have the skills and tools to per-
form more complex maintenance tasks on your Honda, you may want
to purchase the Service Manual. See page 337 for information on how to
obtain a copy, or see your Honda
dealer.
Maintenance Safety....................... 226
Important Safety Precautions.. 227
Maintenance Schedule.................. 228
Required Maintenance Record.... 235
Owner Maintenance Checks........ 237
Fluid Locations............................... 238
Engine Oil....................................... 239 Adding Oil................................... 239Recommended Oil..................... 239
Synthetic Oil............................... 240
Additives..................................... 241
Changing the Oil and Filter...... 241
Cooling System.............................. 243
Adding Engine Coolant............. 243
Replacing Engine Coolant........ 245
Windshield Washers..................... 248
Automatic Transmission Fluid..... 249
Brake Fluid..................................... 250
Brake System............................ . 250
Power Steering............................... 251
Air Cleaner Element...................... 252
Hood Latch.................................... . 254
Spark Plugs..................................... 254
Replacement............................... 254
Specifications............................. 256
Battery............................................ 257
Wiper Blades.................................. 259
Air Conditioning System............... 261 Air Conditioning Filter.................. 262Drive Belts...................................... 262
Timing Belt.................................... . 263
Tires................................................ 263 Inflation....................................... 263
Inspection.................................. . 265
Maintenance............................... 266
Tire Rotation.............................. 266 Replacing Tires and Wheels.... 267
Wheels and Tires....................... 268
Winter Driving........................... 268
Snow Tires.............................. 269
Tire Chains............................. 269
Lights............................................. . 270
Headlight Aiming...................... 272
Replacing Bulbs......................... 272
Storing Your Vehicle..................... 281
Maintenanc e
Page 254 of 352
Power Steerin g
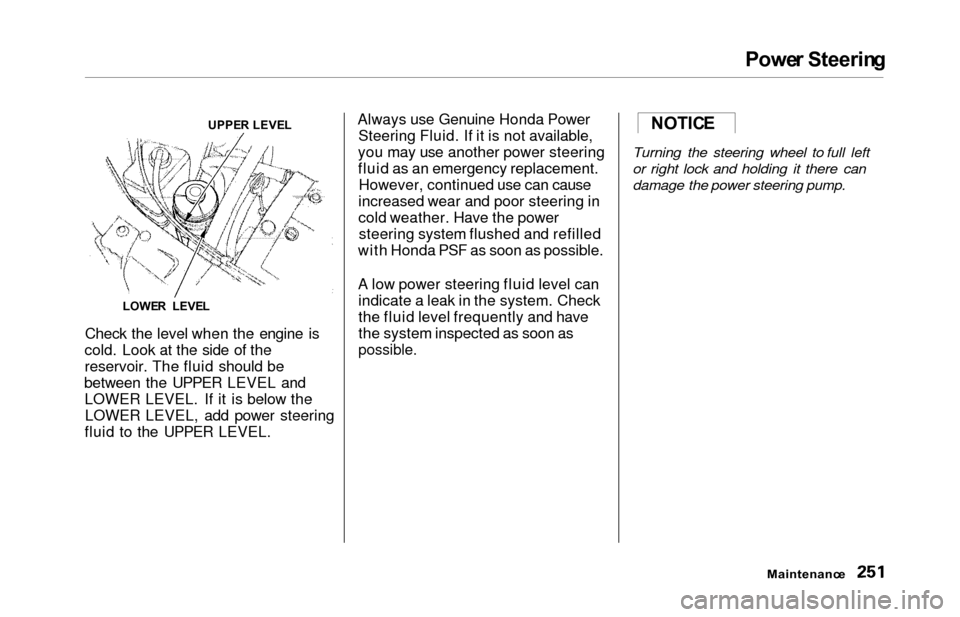
Check the level when the engine is
cold. Look at the side of the
reservoir. The fluid should be
between the UPPER LEVEL and LOWER LEVEL. If it is below theLOWER LEVEL, add power steering
fluid to the UPPER LEVEL. Always use Genuine Honda Power
Steering Fluid. If it is not available,
you may use another power steering
fluid as an emergency replacement. However, continued use can cause
increased wear and poor steering in
cold weather. Have the power steering system flushed and refilled
with Honda PSF as soon as possible.
A low power steering fluid level can indicate a leak in the system. Check
the fluid level frequently and have
the system inspected as soon as
possible.
Turning the steering wheel to full left
or right lock and holding it there can
damage the power steering pump.
Maintenanc e
UPPER LEVE L
LOWE R LEVE LNOTICE
Page 265 of 352
Air Conditionin g Filter , Driv e Belt s
Air Conditionin g Filte r
The air conditioning filter removes pollen and dust that is brought in
from the outside through the heatingand cooling system/climate control
system.
This filter should be replaced every 30,000 miles (48,000 km) under
normal conditions. It should be
replaced every 15,000 miles (24,000
km) if you drive primarily in urban areas that have high concentrations
of soot in the air from industry and
diesel-powered vehicles. Replace it
more often if air flow from the
heating and cooling system/climate control system becomes less than
usual. Have the air conditioning filter
replaced by your Honda dealer. Driv
e Belt s
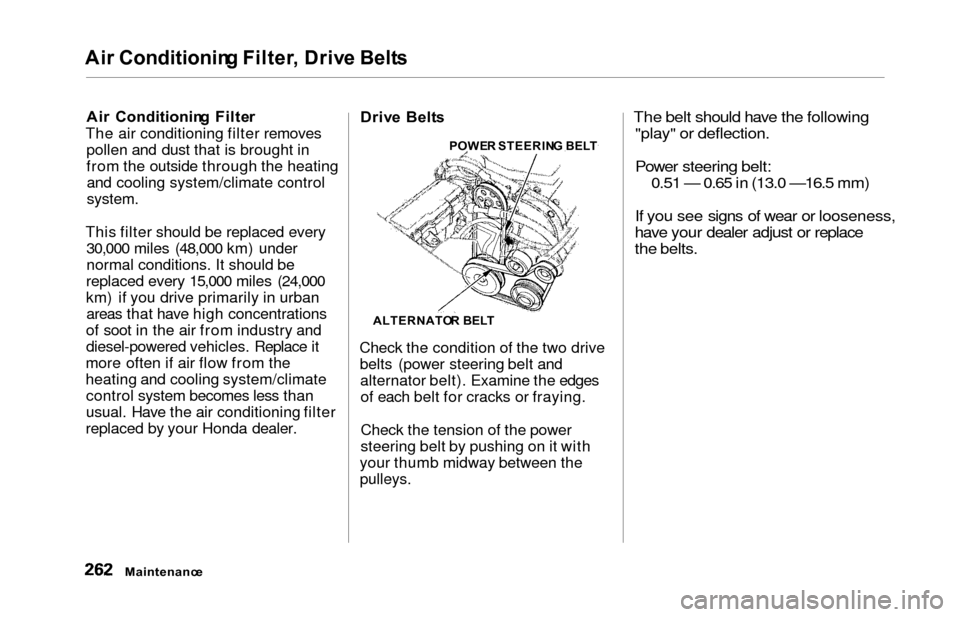
Check the condition of the two drive belts (power steering belt andalternator belt). Examine the edgesof each belt for cracks or fraying.
Check the tension of the power
steering belt by pushing on it with
your thumb midway between the
pulleys.
The belt should have the following "play" or deflection.
Power steering belt: 0.51 — 0.65 in (13.0
—16.5 mm)
If you see signs of wear or looseness,
have your dealer adjust or replace
the belts.
Maintenanc e
ALTERNATO R BEL T
POWE
R STEERIN G BEL T
Page 270 of 352
Tires
When shopping for replacement
tires, you may find that some tires
are "directional." This means they
are designed to rotate only in one direction. If you use directional tires,
they should be rotated only front-to-
back. Replacin
g Tire s an d Wheel s
The tires that came with your
vehicle were selected to match the performance capabilities of the
vehicle while providing the best combination of handling, ride
comfort, and long life. You should
replace them with radial tires of thesame size, load range, speed rating,
and maximum cold tire pressure
rating (as shown on the tire's sidewall). Mixing radial and bias-ply
tires on your vehicle can reduce its
braking ability, traction, and steering
accuracy.It is best to replace all four tires at
the same time. If that is not possible or necessary, then replace the two
front tires or the two rear tires as a pair. Replacing just one tire can
seriously affect your vehicle's han-
dling.
CONTINUED
Maintenanc e
Installing improper tires on your
vehicle can affect handling and stability. This can cause a crashin which you can be seriously
hurt or killed.
Always use the size and type of
tires recommended in this
owner's manual.
Page 276 of 352
Lights
5. Insert the new bulb into the hole,
making sure the tabs are in their
slots. Pivot the hold-down wire
back in place and clip the end into
the slot.
6. Install the rubber seal over the back of the headlight assembly.
Make sure it is right side up; it is
marked "TOP."
7. Push the electrical connector ontothe new bulb.
Turn on the headlights to test the
new bulb.
8. (Driver's side) Reinstall the air intake cover. Replacin
g th e Fron t Sid e Marker /
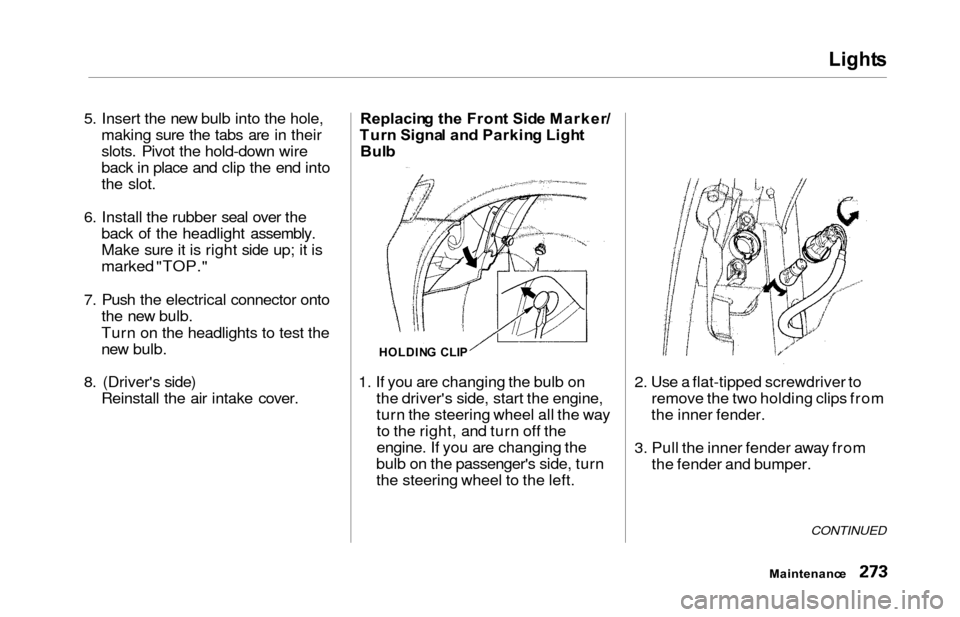
Tur n Signa l an d Parkin g Ligh t
Bul b
1. If you are changing the bulb on the driver's side, start the engine,
turn the steering wheel all the wayto the right, and turn off the
engine. If you are changing the
bulb on the passenger's side, turn
the steering wheel to the left. 2. Use a flat-tipped screwdriver to
remove the two holding clips from
the inner fender.
3. Pull the inner fender away from the fender and bumper.
CONTINUED
Maintenanc e
HOLDING CLI P
Page 321 of 352
Emergency Towin g
If you decide to tow your vehicle
with all four wheels on the ground, make sure you use a properly-designed and attached tow bar.
Prepare the vehicle for towing as described above, and leave the
ignition switch in Accessory (I) so
the steering wheel does not lock. Make sure the radio and any items
plugged into the accessory power socket are turned off so they do not
run down the battery.
The steering wheel system can be
damaged if the steering wheel is locked.
Leave the ignition switch in Accessory (I), and make sure the steering wheel
turns freely before you begin towing.
Trying to lift or tow your vehicle by the
bumpers will cause serious damage.
The bumpers are not designed to
support the vehicle's weight.
Takin g Car e o f th e Unexpecte d
NOTICE NOTIC
E
Page 342 of 352
Index
Accessories and Modifications.... 195
Accessories................................. 195
Additional Safety Precaution.... 196
Modifications............................. 196
ACCESSORY (Ignition Key Position)........................................ 79
Accessory Power Sockets............. 124
Adding Automatic Transmission
Fluid........................................ 249
Brake Fluid................................. 250
Engine Coolant........................... 243
Engine Oil.................................. 239
Power Steering Fluid................. 251
Windshield Washer Fluid......... 248
Additional Information About
Your Seat Belts........................ 45
Lap/Shoulder Belt....................... 45
Seat Belt Maintenance................ 47
Seat Belt System Components... 45
Additional Information About
Your SRS ................................
48
Additional Safet
y Precautions.... 52
How the Automatic Seat Belt
Tensioners Work..................... 50
How the SRS Indicator
Works........................................ 50
How Your Airbags Work............ 48
SRS Components......................... 48
Additives, Engine Oil..................... 24 1
Adjustments Head Restraints......................... 104
Mirrors........................................ 115
Seats............................................ 100
Steering Wheel............................ 72
Airbag (SRS)............................... 9, 4 9
Air Cleaner Element...................... 252
Air Conditioning Filter.................. 262
Air Conditioning System....... 130, 138
Maintenance............................... 261
Rear A/C Control...................... 152
Usage................................. 130, 138
Air Outlets (Vents)............... 132, 138
Air Pressure, Tires........................ 263
Alcohol in Gasoline........................ 326
Aluminum Wheels, Cleaning........ 285
Antifreeze....................................... 243
Anti-lock Brakes (ABS)
Indicator Light..................... 59 , 212Operation.................................... 211
Anti-theft, Audio System............... 186
Anti-theft Steering Column Lock.. 78
Appearance Care........................... 283
Armrests........................................ . 103
Audio Controls, Remote................ 185
Audio System........................ 155, 167
Automatic Seat Belt Tensioners.... 50
Automatic Lighting Off Feature.... 67
Automatic Speed Control................ 73
Automatic Transmission............... 204
Capacity, Fluid........................... 322
Checking Fluid Level................ 249
Shifting........................................ 205
Shift Lever Position Indicator.. 204
Shift Lever Positions................. 205
Shift Lock Release..................... 208CONTINUED