Page 130 of 352
Interior Light s
Individua l Ma p Light s
Turn on the front individual map lights by pushing the button next toeach light. Push the button again to
turn it off. You can also operate
these lights with the light control switch (see page 125).
REA R
Turn on each rear individual map
light by pushing the lens when the
ignition switch is in the
ACCESSORY (I) or ON (II) position. Push the lens again to turn it off.
You can also operate these lights with the light control switch (see
page 125). Carg
o Are a Ligh t
The cargo area light has a three- position switch. In the OFF position,
the light does not come on. In the
center position, it comes on when
you open the tailgate. In the ON position, it stays on continuously.
This light also works with the light control switch (see page 125).
Instrument s an d Control s
FRONT
OFF
O N
Page 202 of 352

Carrying Carg o
Carryin g Carg o in th e Carg o Are a
o r o n a Roo f Rac k
Distribute cargo evenly on the
floor of the cargo area, placing the heaviest items on the bottom and as far forward as possible. Tie
down items that could be thrown
about the vehicle during a crash or
sudden stop.
If you carry large items that
prevent you from closing the
tailgate, exhaust gas can enter the
passenger area. To avoid thepossibility of carbo n monoxid e
poisoning , follow the instructions
on page 53 .
If you can carry any items on a
roof rack, be sure the total weight of the rack and the items on it
does not exceed 150 Ib.
If you use an accessory roof rack,
the roof rack weight limit may be
lower. Refer to the information that came with your roof rack. Sid
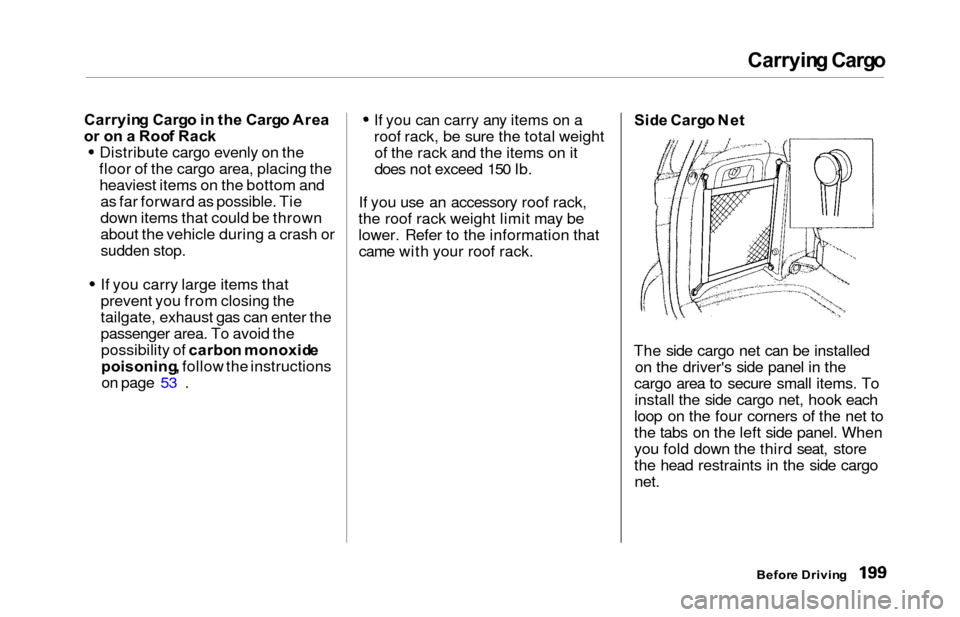
e Carg o Ne t
The side cargo net can be installed on the driver's side panel in the
cargo area to secure small items. To install the side cargo net, hook each
loop on the four corners of the net to
the tabs on the left side panel. When
you fold down the third seat, store
the head restraints in the side cargo net.
Befor e Drivin g
Page 203 of 352
Carrying Carg o
On EX model
You can use the cargo net to secure
items in the cargo area, and storesmall items between the two halves
of the net. To install the cargo net,
hook the loops on the four corners of
the net to the tabs at both sides of
the tailgate sill.
Befor e Drivin g
Cargo Ne t
Page 205 of 352

Preparing to Driv e
You should do the following checks
and adjustments every day before
you drive your vehicle.
1. Make sure all windows, mirrors, and outside lights are clean and
unobstructed. Remove frost, snow,or ice.
2. Check that the hood and tailgate are fully closed.
3. Visually check the tires. If a tire looks low, use a gauge to check its
pressure.
4. Check that any items you may be carrying with you inside are stored
properly or fastened down
securely.
5. Check the adjustment of the seat
(see page 100).
6. Check the adjustment of the inside and outside mirrors (see
page 115).
7. Check the adjustment of the steering wheel (see page 72).
8. Make sure the doors and tailgate are securely closed and locked.
9. Fasten your seat belt. Check that your passengers have fastenedtheir seat belts (see page 15). 10. Turn the ignition switch ON (II).
Check the indicator lights in the
instrument panel.
11. Start the engine (see page 203).
12. Check the gauges and indicator lights in the instrument panel (see
page 57).
Drivin g
Page 277 of 352

Lights
4. Remove the socket from the
headlight assembly by turning it
one-quarter turn counterclockwise.
5. Remove the burned out bulb from the socket by pushing it in and
turning counterclockwise until it
unlocks.
6. Install the new bulb in the socket. Turn it clockwise to lock it in place.
7. Insert the socket back into the headlight assembly. Turn it
clockwise to lock it in place.
8. Test the lights to make sure the new bulb is working.
9. Put the inner fender in place. Install the two holding clips. Lock
each clip in place by pushing on
the center. Replacin
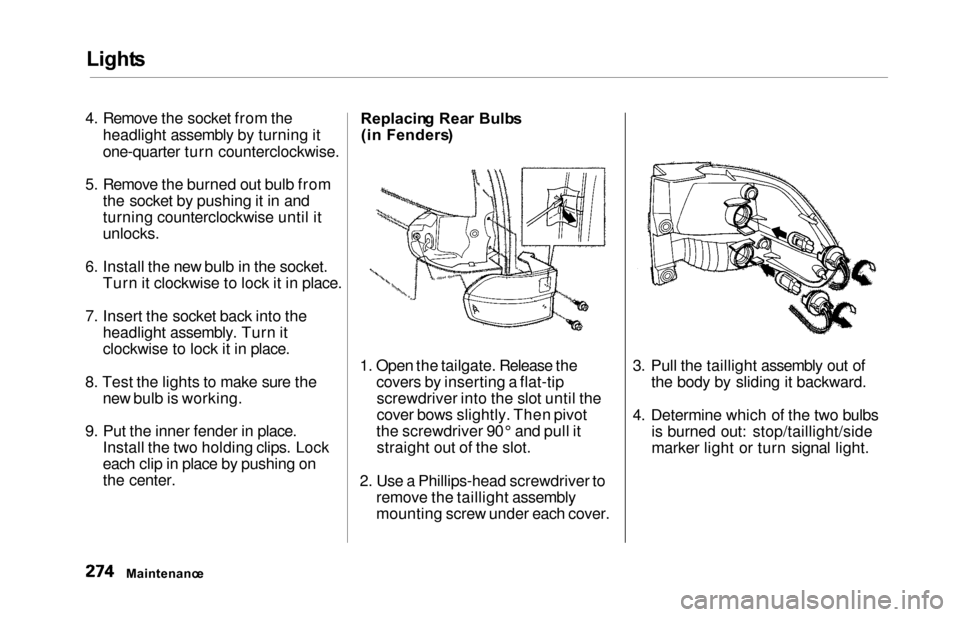
g Rea r Bulb s
(i n Fenders )
1. Open the tailgate. Release the covers by inserting a flat-tipscrewdriver into the slot until the
cover bows slightly. Then pivot
the screwdriver 90° and pull it straight out of the slot.
2. Use a Phillips-head screwdriver to remove the taillight assembly
mounting screw under each cover. 3. Pull the taillight assembly out of
the body by sliding it backward.
4. Determine which of the two bulbs is burned out: stop/taillight/side
marker light or turn signal light.
Maintenanc e
Page 278 of 352
Lights
5. Remove the socket by turning it
one-quarter turn counterclockwise.
6. Pull the bulb straight out of its
socket.
Push the new bulb straight into
the socket until it bottoms.
7. Reinstall the socket into the light assembly by turning it clockwise
until it locks.
8. Test the lights to make sure the new bulb is working.
9. When reinstalling the taillight assembly, align and pop the snap
fasteners in place. Tighten the two
mounting screws and reinstall the
covers in place. Replacin
g Rea r Bulb s
(i n Tailgate )
1. Open the tailgate. Place a cloth on the edge of the taillight cover.Remove it by carefully prying in
the notch on its edge with a small
flat-tipped screwdriver.
2. Determine which of the two bulbs is burned out: taillight or back-up
light.
3. Remove the socket by turning it one-quarter turn counterclockwise.
CONTINUED
Maintenanc e
TAILLIGHT COVE R
Page 279 of 352
Lights
4. Pull the bulb straight out of its
socket.
Push the new bulb straight into
the socket until it bottoms.
5. Insert the socket back into the light assembly. Turn it clockwise
to lock it in place.
6. Test the lights to make sure the new bulb is working.
7. Reinstall the taillight cover. Replacin
g a High-moun t Brak e
Ligh t Bul b
1. Place a cloth on the middle edge of a part of the lens on the
passenger's side. Remove a part of
the lens by carefully prying on its edge with a small flat-tipped
screwdriver.
2. Use a Phillips-head screwdriver to remove the screw under the lens. 3. Pull the light assembly out of the
tailgate.
4. Remove the socket from the light assembly by turning it one-quarter
turn counterclockwise.
5. Pull the bulb straight out of its socket.
Push the new bulb straight into
the socket until it bottoms.
Maintenanc e SCRE
W
Page 280 of 352
Lights
6. Put the socket back into the light
assembly and turn it clockwise to
lock it in place.
7. Test the light to make sure the new bulb is working.
8. Put the light assembly back into the tailgate. Install the screw and
tighten it securely. Reinstall the
lens piece.
Replacin g a Rea r Licens e Bul b
1. Remove the license light assembly by carefully prying on the left
edge of the lens with a flat-tip
screwdriver and pulling the
assembly out. 2. Remove the lens from the bulb
holder by pulling the lens while
squeezing the tabs on both sides
of the holder.
3. Pull the bulb straight out of its socket. Push the new bulb in until
it bottoms in the socket.
CONTINUED
Maintenanc e