Page 269 of 352

Tires
Maintenanc e
In addition to proper inflation,
correct wheel alignment helps to
decrease tire wear. If you find a tire
is worn unevenly, have your dealer check the wheel alignment.
The tires were properly balanced by the factory. They may need to be
rebalanced at some time before theyare worn out. Have your dealer
check the tires if you feel a consis-
tent vibration while driving. A tire should always be rebalanced if it is
removed from the wheel for repair. Make sure the installer balances the
wheels when you have new tires installed. This increases riding
comfort and tire life. Your vehicle's
original tires were dynamic or "spin"
balanced at the factory. For best results, have the installer perform adynamic balance.
On some models
Improper wheel weights can damage
your vehicle's aluminum wheels. Use only Genuine Honda wheel weights for
balancing.
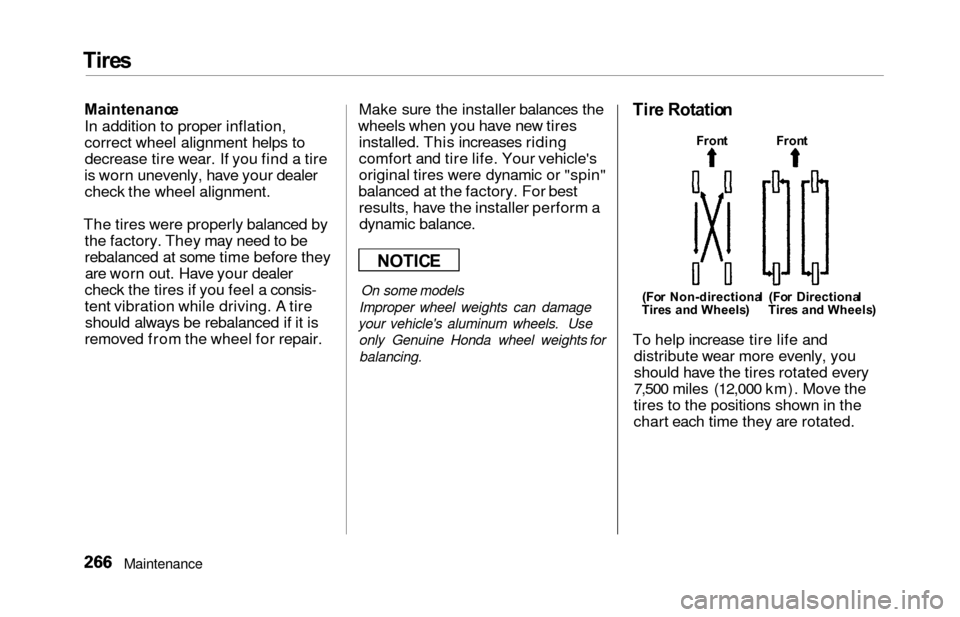
Tir e Rotatio n
(For Non-directiona l (Fo r Directiona l
Tire s an d Wheels ) Tire s an d Wheels )
To help increase tire life and
distribute wear more evenly, you
should have the tires rotated every
7,500 miles (12,000 km). Move the
tires to the positions shown in the
chart each time they are rotated.
Maintenance
NOTIC E
Front
Fron t
Page 294 of 352

Taking Car e o f th e Unexpecte d
This section covers the more-
common problems that motorists
experience with their vehicles. It
gives you information about how to safely evaluate the problem and what
to do to correct it. If the problem has stranded you on the side of the road,
you may be able to get going again. If not, you will also find instructionson getting your vehicle towed. Compact Spare Tire....................... 292
Changing a Flat Tire..................... 293
If Your Engine Won't Start........... 302 Nothing Happens or the Starter Motor OperatesVery Slowly......................... 302
The Starter Operates Normally................................ . 303
Jump Starting................................. 303
If Your Engine Overheats............. 305
Low Oil Pressure Indicator.......... 307Charging System Indicator........... 308
Malfunction Indicator Lamp ........ 309
Brake System Indicator................ 310
Fuses............................................... 311 Checking and Replacing........... 312
Emergency Towing....................... 317
Takin g Car e o f th e Unexpecte d
Page 295 of 352

Compact Spar e Tir e
Your vehicle has a compact spare
tire that takes up less space. Use thisspare tire as a temporary replace-
ment only. Get your regular tire
repaired or replaced and put back on
your vehicle as soon as you can.
Check the inflation pressure of the
compact spare tire every time you
check the other tires. It should be
inflated to: 60 psi (420 kPa , 4.2 kgf/cm
2)
Follow these precautions whenever
you are using the compact spare tire:
Do not exceed 50 mph (80 km/h)
under any circumstances.
This tire gives a harsher ride and less traction on some road sur-
faces than the regular tire. Use
greater caution while driving on
this tire. Do not mount snow chains on the
compact spare.
Do not use the compact spare tire
if you are towing a trailer.
The wheel of the compact spare
tire is designed especially to fit
your vehicle. Do not use your
spare tire on another vehicle
unless it is the same make and
model.
On EX model
Turn off the Traction ControlSystem (see page 213 ). Driving
with the compact spare tire may
activate the TCS.
The compact spare tire has a shorter
tread life than a regular tire. Replace
it when you can see the tread wear
indicator bars. The replacement
should be the same size and design
tire, mounted on the same wheel.
The compact spare tire is not
designed to be mounted on a regular
wheel, and the compact wheel is not
designed for mounting a regular tire.
Takin g Car e o f th e Unexpecte d
INDICATOR LOCATIO N MAR K
TREA D WEA R INDICATO R BA R
Page 296 of 352
Changing a Fla t Tir e
If you have a flat tire while driving,
stop in a safe place to change it.
Stopping in traffic or on the shoulder of a busy road is dangerous. Driveslowly along the shoulder until you
get to an exit or an area to stop that
is far away from the traffic lanes.
1. Park the vehicle on firm, level andnon-slippery ground away from
traffic. Put the transmission in Park. Apply the parking brake. 2. Turn on the hazard warning lights
and turn the ignition switch to
LOCK (0). Have all the
passengers get out of the vehicle
while you change the tire.
CONTINUED
Takin g Car e o f th e Unexpecte d
The vehicle can easily roll off
the jack, seriously injuring
anyone underneath.
Follow the directions for
changing a tire exactly, and never get under the vehicle
when it is supported only by the
jack.
TOOL S JAC
K VINYL BA GSPAR E TIR E
Page 299 of 352
Changing a Fla t Tir e
13. Locate the jacking point nearest
the tire you need to change. It is
pointed to by a mark molded
into the underside of the body.Place the jack under the jacking
point. Turn the end bracket
clockwise until the top of the jack
contacts the jacking point. Makesure the jacking point tab is
resting in the jack notch. 14. Use the extension and wheel
wrench as shown to raise the
vehicle until the flat tire is off the
ground.
15. Remove the wheel nuts and flattire. Temporarily place the flat tireon the ground with the outside
surface of the wheel facing up.
You could scratch the wheel if you put it face down.
Takin g Car e o f th e Unexpecte d
JACKIN
G POIN T EXTENSIO
N
WHEE L
WRENC H
Page 301 of 352
Changing a Fla t Tir e
18. Lower the vehicle to the ground
and remove the jack.19. Tighten the wheel nuts securely in
the same crisscross pattern. Have
the wheel nut torque checked at
the nearest automotive service
facility.
Tighten the wheel nuts to:8 0 lbf .
f t (10 8 N .
m , 1 1 kgf .
m )
20. Put the flat tire in the supplied
vinyl bag. This bag is stored in therear compartment on the driver'sside panel in the third row. Knot
the top of the vinyl bag.
Takin g Car e o f th e Unexpecte d
Page 302 of 352
Changing a Fla t Tir e
21. Storing the flat tire behind the third
seat
When the third seat is not folded,
the flat tire is secured behind the
third seat.
On EX model
Turn on the sliding door MAIN switch so you can open the door.
Remove the bracket and the wing
bolt from the spare tire lid by unscrewing the bracket mounting
bolt. 22. You will find a u-shaped slit on the
carpet behind the seat bottom of
the third seat. Pull up the carpet at
the slit and remove the plastic screw with a coin.
CONTINUED
Takin g Car e o f th e Unexpecte d
WIN
G BOL T
BRACKE T
BRACKE T MOUNTIN G BOL T BRACKE
T
MOUNTIN GBOLT
PLASTI C
SCRE W
BRACKE T
Page 303 of 352
Changing a Flat Tire
Adjust th
e seat-back of the third
seat to the upright position (see
page 101). Install the bracket and
the bracket mounting bolt to the attachment point as shown, and
tighten the bolt. Make sure the
bracket is securely locked.
23. Storing the Flat Tire on the Floor
When the third seat is folded, the
flat tire is secured to the floor on
top of the folded seat. Pull up thecarpet on the attachment point and
remove the plastic screw asdescribed in the previous
procedure.
Remove the wing bolt from the
bracket that is attached to the spare tire lid.
Takin g Car e o f th e Unexpecte d
BRACKE T
TIR E MOUNTIN G
WIN
G BOL T
Install the flat tire on the bracket
with the inside of the wheel facing
toward you. Put the tire mounting
wing bolt in the attachment point
through one of the five wheel nut
holes and the bracket as shown.
Poke holes in the vinyl bag. Secure
the flat tire by tightening the wing
bolt.