2000 HONDA ODYSSEY back door
[x] Cancel search: back doorPage 95 of 352
Power Slidin g Door s (E X Model )
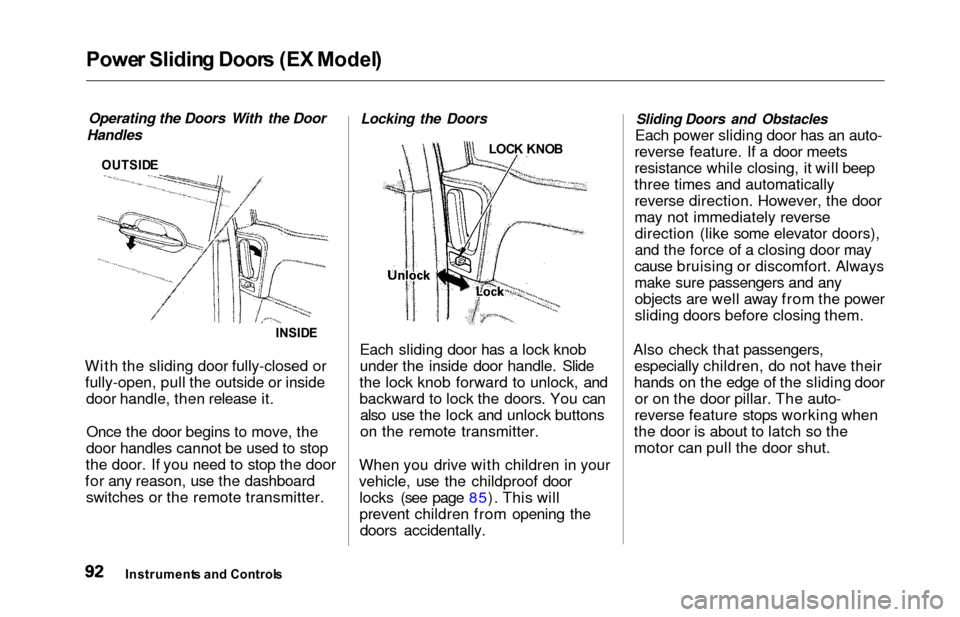
Operating the Doors With the Door
Handles
OUTSID E
INSIDE
With the sliding door fully-closed or
fully-open, pull the outside or inside door handle, then release it.
Once the door begins to move, the
door handles cannot be used to stop
the door. If you need to stop the door
for any reason, use the dashboard switches or the remote transmitter.
Locking the Doors
LOC K KNO B
Each sliding door has a lock knob
under the inside door handle. Slide
the lock knob forward to unlock, and
backward to lock the doors. You can also use the lock and unlock buttons
on the remote transmitter.
When you drive with children in your
vehicle, use the childproof door locks (see page 85). This will
prevent children from opening thedoors accidentally.
Sliding Doors and Obstacles
Each power sliding door has an auto-
reverse feature. If a door meets
resistance while closing, it will beep
three times and automatically
reverse direction. However, the door
may not immediately reverse direction (like some elevator doors),
and the force of a closing door may
cause bruising or discomfort. Always
make sure passengers and any objects are well away from the power
sliding doors before closing them.
Also check that passengers, especially children, do not have their
hands on the edge of the sliding door or on the door pillar. The auto-
reverse feature stops working when
the door is about to latch so the
motor can pull the door shut.
Instrument s an d Control s
Page 115 of 352
Powe
r Window s
Your vehicle's front windows are
electrically-powered. Turn the
ignition switch to ON (II) to raise or
lower either window.
The rear windows are also electrically-powered (see page 114).
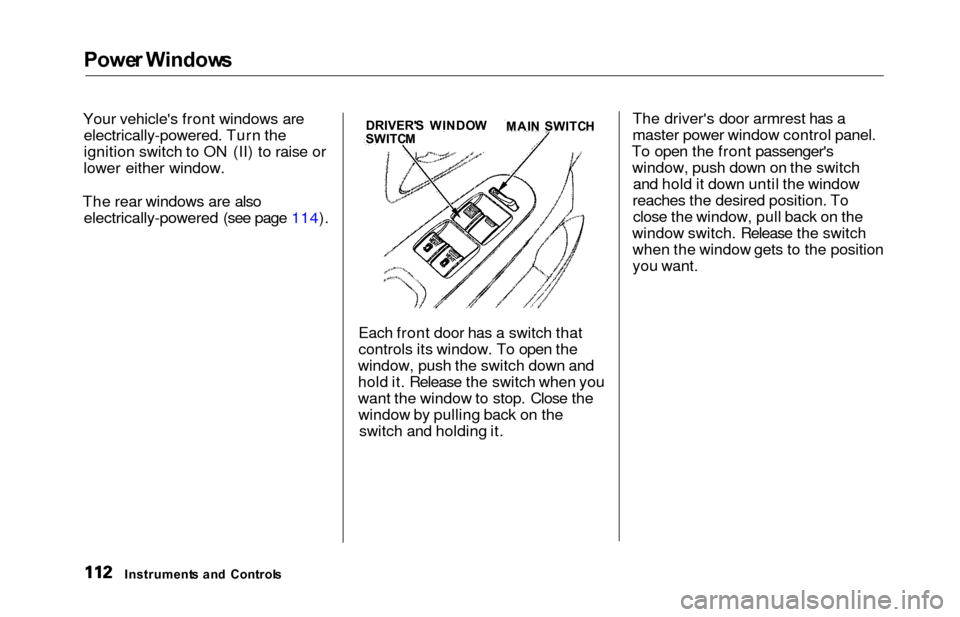
Each front door has a switch that
controls its window. To open the
window, push the switch down and
hold it. Release the switch when you
want the window to stop. Close the window by pulling back on the switch and holding it. The driver's door armrest has a
master power window control panel.
To open the front passenger's window, push down on the switch and hold it down until the window
reaches the desired position. To close the window, pull back on the
window switch. Release the switch when the window gets to the position
you want.
Instrument s an d
Control
s DRIVER'
S WINDO W
SWITC M MAI
N SWITC H
Page 117 of 352
Power Window s
The power window system has a key-
off delay function. The windows willstill operate for up to ten minutes
after you turn off the ignition.Opening either front door cancels
the delay function. You must turn
the ignition switch ON (II) again
before you can operate the windows.
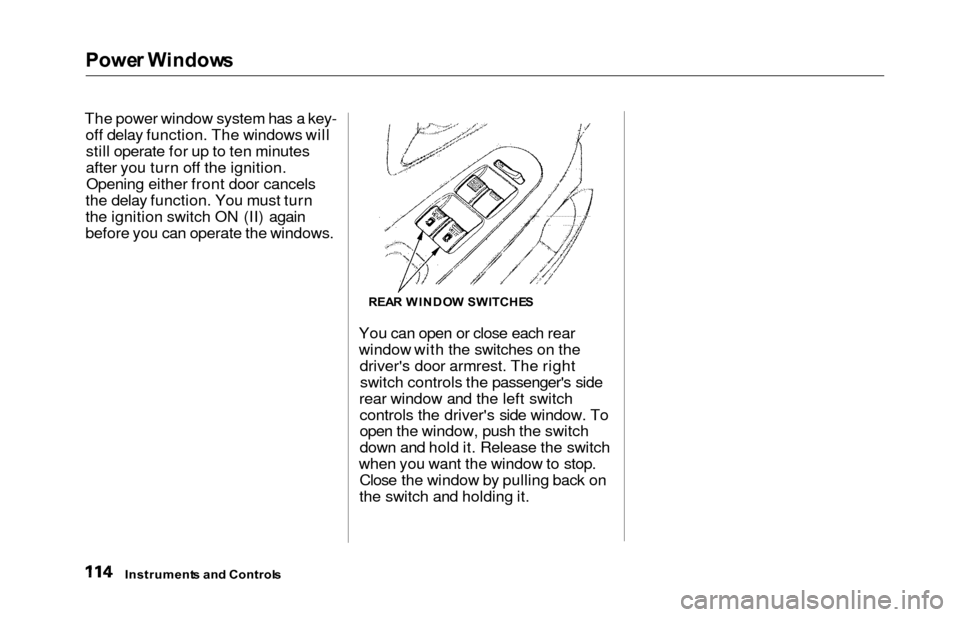
You can open or close each rear
window with the switches on thedriver's door armrest. The rightswitch controls the passenger's side
rear window and the left switch controls the driver's side window. To
open the window, push the switch
down and hold it. Release the switch
when you want the window to stop. Close the window by pulling back on
the switch and holding it.
Instrument s an d Control s
REAR WINDO W SWITCHE S
Page 193 of 352
Service Statio n Procedure s
3. Remove the fuel fill cap slowly.
You may hear a hissing sound aspressure inside the tank escapes.
Place the cap in the holder on the
fuel fill door.
4. Stop filling the tank after the fuel nozzle automatically clicks off. Do
not try to "top off" the tank, leavesome room for the fuel to expand
with temperature changes.
5. Screw the fuel fill cap back on, tighten it until it clicks several
times. If you do not properly
tighten the cap, the Malfunction
Indicator Lamp may come on (seepage 309 ).
6. Push the fuel fill door closed until it latches.Openin g th e Hoo d
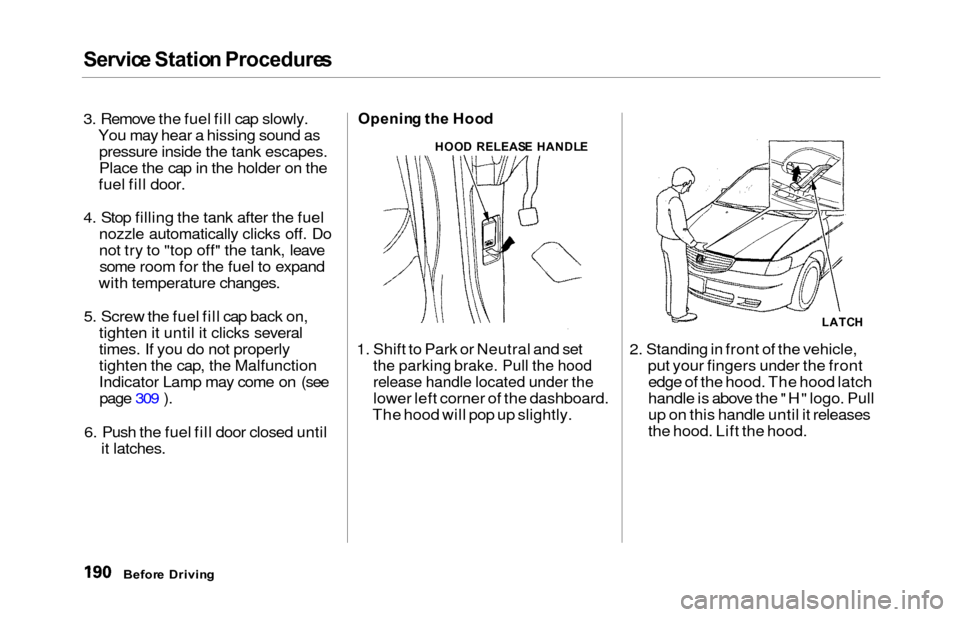
1. Shift to Park or Neutral and set
the parking brake. Pull the hood
release handle located under the
lower left corner of the dashboard.
The hood will pop up slightly. 2. Standing in front of the vehicle,
put your fingers under the frontedge of the hood. The hood latch
handle is above the "H" logo. Pull
up on this handle until it releases
the hood. Lift the hood.
Befor e Drivin g
HOOD RELEAS E HANDL E
LATCH
Page 200 of 352
Carryin
g Carg o
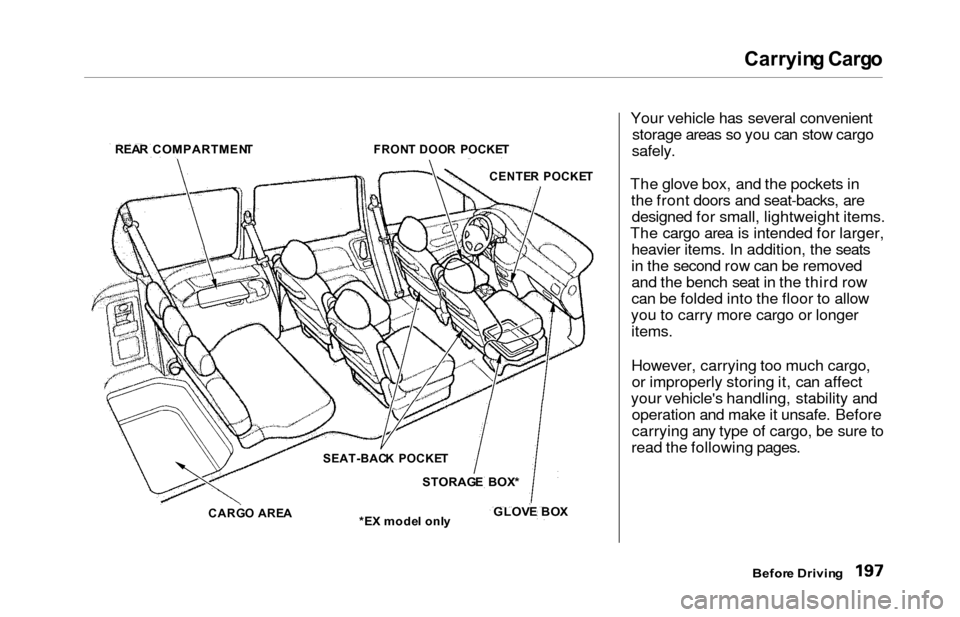
Your vehicle has several convenient storage areas so you can stow cargo
safely.
The glove box, and the pockets in the front doors and seat-backs, aredesigned for small, lightweight items.
The cargo area is intended for larger, heavier items. In addition, the seats
in the second row can be removed
and the bench seat in the third row
can be folded into the floor to allow
you to carry more cargo or longer items.
However, carrying too much cargo,or improperly storing it, can affect
your vehicle's handling, stability and operation and make it unsafe. Before
carrying any type of cargo, be sure to
read the following pages.
Before Drivin g
REA
R COMPARTMEN T
FRONT DOO R POCKE T
CENTE R POCKE T
SEAT-BAC K POCKE T
STORAG E BOX *
GLOV E BO X
*E X mode l onl y
CARG
O ARE A
Page 284 of 352
Storing You r Vehicl e
If you need to park your vehicle for
an extended period (more than one
month), there are several things you
should do to prepare it for storage.
Proper preparation helps prevent
deterioration and makes it easier to
get your vehicle back on the road. If
possible, store your vehicle indoors.
Fill the fuel tank.Change the engine oil and filter
(see page 241).
Wash and dry the exterior
completely.
Clean the interior. Make sure the
carpeting, floor mats, etc. are
completely dry.
Leave the parking brake off. Put
the transmission in Park.
Block the rear wheels.
If the vehicle is to be stored for a
longer period, it should be
supported on jackstands so the
tires are off the ground. Leave one window open slightly (if
the vehicle is being stored
indoors).
Disconnect the battery.
Support the front and rear wiper
blade arms with a folded towel or rag so they do not touch the
windshield.
To minimize sticking, apply a silicone spray lubricant to all door
and tailgate seals. Also, apply a
vehicle body wax to the painted surfaces that mate with the door
and tailgate seals.
Cover the vehicle with a
"breathable" cover, one made
from a porous material such as cotton. Nonporous materials, such
as plastic sheeting, trap moisture,
which can damage the paint.
If possible, run the engine for a
while periodically (preferably once a month).
If you store your vehicle for 12
months or longer, have your Honda
dealer perform the inspections called
for in the 24 months/30,000 miles (48,000 km) maintenance schedule
(Normal Conditions) as soon as you
take it out of storage (see page 230).
The replacements called for in the maintenance schedule are not
needed unless the vehicle hasactually reached that time or mileage.
Maintenanc e
Page 298 of 352
Changing a Fla t Tir e
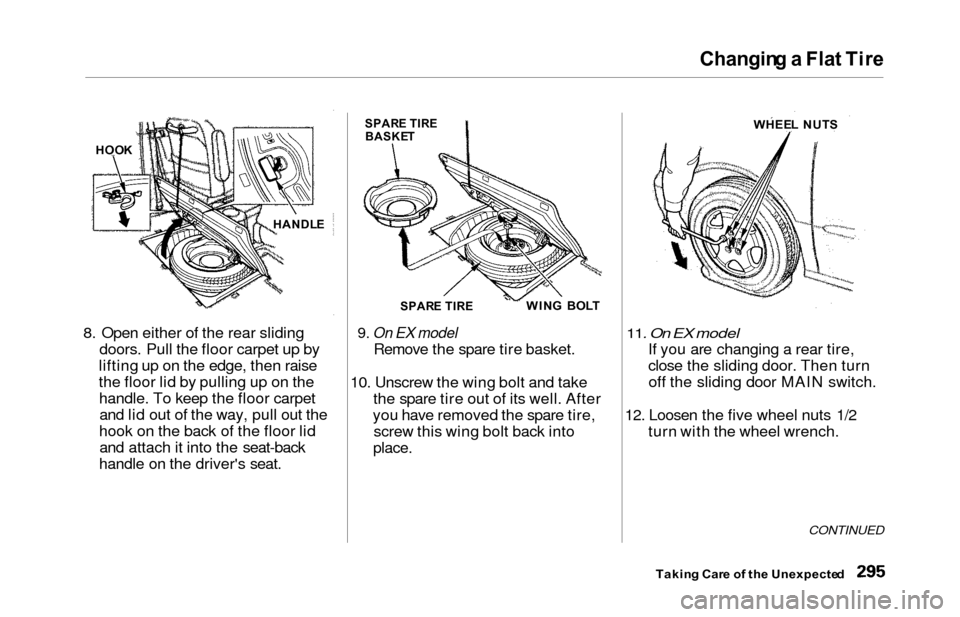
8. Open either of the rear sliding
doors. Pull the floor carpet up by
lifting up on the edge, then raise
the floor lid by pulling up on the handle. To keep the floor carpetand lid out of the way, pull out the
hook on the back of the floor lid and attach it into the seat-back
handle on the driver's seat.9. On EX model
Remove the spare tire basket.
10. Unscrew the wing bolt and take the spare tire out of its well. After
you have removed the spare tire, screw this wing bolt back into
place.
11. On EX model
If you are changing a rear tire,
close the sliding door. Then turnoff the sliding door MAIN switch.
12. Loosen the five wheel nuts 1/2 turn with the wheel wrench.
CONTINUED
Takin g Car e o f th e Unexpecte d
HOOK
WHEE L NUT S
HANDL E
SPARE TIR E
BASKE T
SPAR E TIR E
WIN G BOL T
Page 348 of 352
Index
Parking Brake................................ 116
Parking Lights................................. . 66
Parking Over Things that Burn... 209
PGM-FI System.............................. 330
Polishing and Waxing................... 285
Power
Door Locks................................... 79
Mirrors........................................ 115
Seats ........................................... 102
Sliding Doors................................ 90
Steering...................................... . 251
Windows..................................... 112
Power Sliding Doors Indicator................................. . 60, 94
Operation...................................... 90
Switches....................................... . 90
Pre-Drive Safety Checklist............. 11
Pregnancy, Using Seat Belts.......... 20
Protecting Adults............................ . 12
Additional Safety Precautions.... 20
Advice for Pregnant Women...... 20
Protecting Children........................ . 22
Protecting Infants........................ 30
Protecting Larger Children........ 39
Protecting Small Children.......... 35
Using Child Seats with
Tethers...................................... 43
Radiator Overheating.................... 305
Radio/CD Sound System.............. 167
Rear A/C Unit................................ 152
Rear Compartment........................ 122
Rear End Towing........................... 317
Rear Lights, Bulb Replacement....................... 274, 275
Rear View Mirror........................... 115
Rear Window Defogger.................. 71
Rear Windows................................ 114
Rear Window Wiper and Washer.. 70
Reclining the Seat Backs...... 101 , 103
Reclining the Second Seats.......... 101
Reclining the Third Seat .............. 101
Reminder Lights.............................. 57
Remote Audio Controls................. 185
Remote Transmitter........................ 81
Removing the Second Seats............................................ 108
Replacement Information
Air Cleaner Element.................. 252 Coolant........................................ 245
Engine Oil and Filter................. 241
Fuses........................................... 310
Light Bulbs................................. 272
Schedule..................................... 228
Spark Plugs................................. 254
Timing Belt................................. 263
Tires............................................ 267
Wiper Blades.............................. 259
Replacing Seat Belts After a Crash............................................. 47
Reserve Tank, Engine Coolant.... 193
Reverse Gear Position................... 206
Rotation, Tire................................. 266
Safety Belts................................... 8, 45
Safety Defects, Reporting*.......... 338
Safety Features.................................. 7
Air bags........................................... 9
Door Locks................................... 10
Head Restraints........................... 10
Seat Belts........................................ 8
Seats & Seat-Backs...................... 10
CONTINUED