Page 259 of 338

Light
s
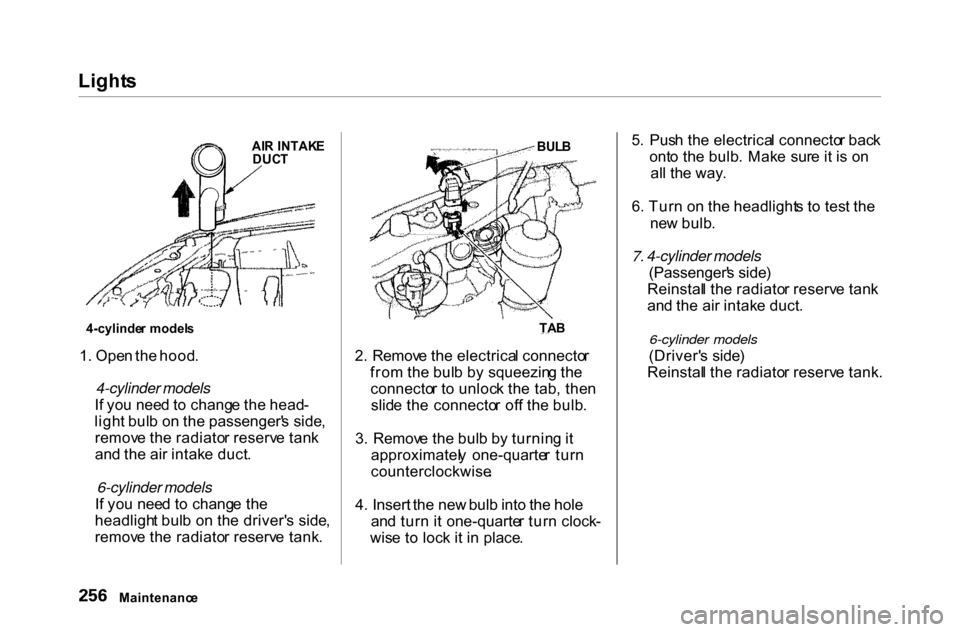
1 . Ope n th e hood .
4-cylinder models
I f yo u nee d t o chang e th e head -
ligh t bul b o n th e passenger' s side ,
remov e th e radiato r reserv e tan k
an d th e ai r intak e duct .
6-cylinder models
I f yo u nee d t o chang e th e
headligh t bul b o n th e driver' s side ,
remov e th e radiato r reserv e tank . 2
. Remov e th e electrica l connecto r
fro m th e bul b b y squeezin g th e
connecto r t o unloc k th e tab , the n
slid e th e connecto r of f th e bulb .
3 . Remov e th e bul b b y turnin g it
approximatel y one-quarte r tur n
counterclockwise .
4. Insert the new bulb into the hole
an d tur n i t one-quarte r tur n clock -
wis e t o loc k i t i n place . 5
. Pus h th e electrica l connecto r bac k
ont o th e bulb . Mak e sur e i t i s o n
al l th e way .
6 . Tur n o n th e headlight s t o tes t th e
ne w bulb .
7. 4-cylinder models
(Passenger' s side )
Reinstal l th e radiato r reserv e tan k
an d th e ai r intak e duct .
6-cylinder models
(Driver' s side )
Reinstal l th e radiato r reserv e tank .
Maintenanc e
TA
B
BUL
B
4-cylinde r model s
AI
R INTAK E
DUC T
Page 260 of 338

Light
s
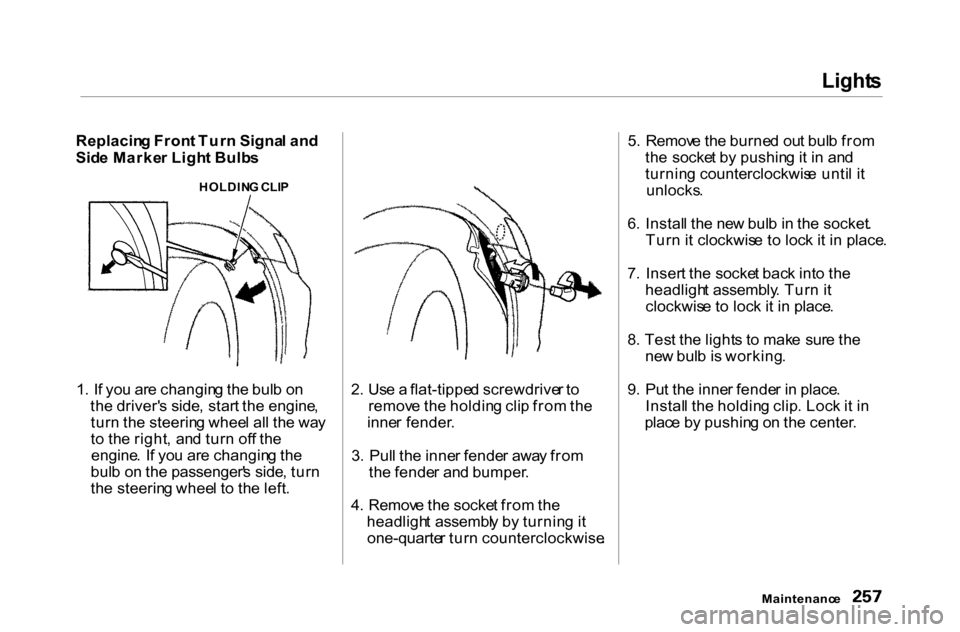
Replacin g Fron t Tur n Signa l an d
Sid e Marke r Ligh t Bulb s
1 . I f yo u ar e changin g th e bul b o n
th e driver' s side , star t th e engine ,
tur n th e steerin g whee l al l th e wa y
t o th e right , an d tur n of f th e
engine . I f yo u ar e changin g th e
bul b o n th e passenger' s side , tur n
th e steerin g whee l t o th e left . 2
. Us e a flat-tippe d screwdrive r t o
remov e th e holdin g cli p fro m th e
inne r fender .
3 . Pul l th e inne r fende r awa y fro m
th e fende r an d bumper .
4 . Remov e th e socke t fro m th e
headligh t assembl y b y turnin g it
one-quarte r tur n counterclockwise .5
. Remov e th e burne d ou t bul b fro m
th e socke t b y pushin g it i n an d
turnin g counterclockwis e unti l i t
unlocks .
6 . Instal l th e ne w bul b in th e socket .
Tur n i t clockwis e t o loc k i t i n place .
7 . Inser t th e socke t bac k int o th e
headligh t assembly . Tur n i t
clockwis e t o loc k i t i n place .
8 . Tes t th e light s t o mak e sur e th e
ne w bul b is working .
9 . Pu t th e inne r fende r i n place .
Instal l th e holdin g clip . Loc k i t i n
plac e b y pushin g o n th e center .
Maintenanc e
HOLDIN
G CLI P
Page 261 of 338

Light
s
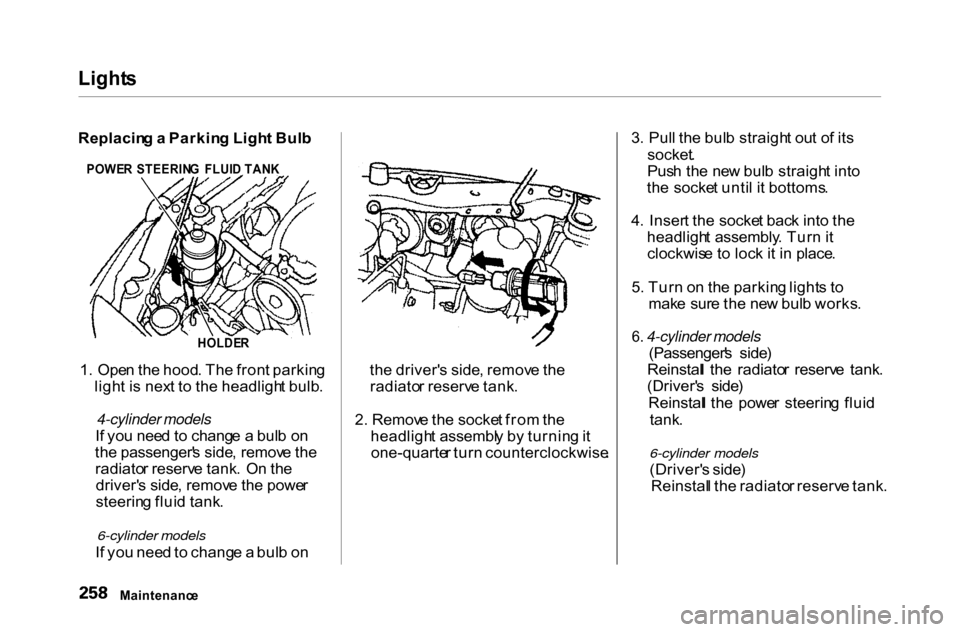
Replacin g a Parkin g Ligh t Bul b
1 . Ope n th e hood . Th e fron t parkin g
ligh t i s nex t t o th e headligh t bulb .
4-cylinder models
I f yo u nee d t o chang e a bul b o n
th e passenger' s side , remov e th e
radiato r reserv e tank . O n th e
driver' s side , remov e th e powe r
steerin g flui d tank .
6-cylinder models
I f yo u nee d to chang e a bul b o n th
e driver' s side , remov e th e
radiato r reserv e tank .
2 . Remov e th e socke t fro m th e
headligh t assembl y b y turnin g it
one-quarte r tur n counterclockwise .3
. Pul l th e bul b straigh t ou t o f it s
socket .
Pus h th e ne w bul b straigh t int o
th e socke t unti l i t bottoms .
4 . Inser t th e socke t bac k int o th e
headligh t assembly . Tur n it
clockwis e t o loc k i t i n place .
5 . Tur n o n th e parkin g light s t o
mak e sur e th e ne w bul b works .
6 . 4-cylinder models
(Passenger' s side )
Reinstal l th e radiato r reserv e tank .
(Driver' s side )
Reinstal l th e powe r steerin g flui d
tank .
6-cylinder models
(Driver' s side )
Reinstal l th e radiato r reserv e tank .
Maintenanc e
POWE
R STEERIN G FLUI D TAN K
HOLDE R
Page 262 of 338
Light
s
Replacin g Rea r Bulb s
(i n Fenders )
1 . Ope n th e trunk .
2 . Remov e th e fastene r o n th e sid e o f
th e trun k linin g b y turnin g i t
counterclockwis e wit h a coin . Pul l
th e linin g back .
3
. Determin e whic h o f th e tw o bulb s
i s burne d out : stop/tailligh t o r tur n
signal/taillight .
4
. Remov e th e socke t b y turnin g it
one-quarte r tur n counterclockwise .
5 . Pul l th e bul b straigh t ou t o f it s
socket .
Pus h th e ne w bul b straigh t int o
th e socke t unti l i t bottoms .
6 . Reinstal l th e socke t int o th e ligh t
assembl y b y turnin g it clockwis e
unti l i t locks .
7 . Tes t th e light s t o mak e sur e th e
ne w bul b is working .
8 . Reinstal l th e trun k lining . Mak e
sur e it i s installe d unde r th e edg e
o f th e trun k seal .
CONTINUED
Maintenanc e
FASTENE
R
Page 264 of 338
Light
s
4 . Remov e th e socke t b y turnin g it
one-quarte r tur n counterclockwise .
5 . Pul l th e bul b straigh t ou t o f it s
socket .
Pus h th e ne w bul b straigh t int o
th e socke t unti l i t bottoms .
6 . Reinstal l th e socke t int o th e ligh t
assembly .
7 . Tes t th e light s t o mak e sur e th e
ne w bul b is working .
8 . Reinstal l th e plasti c cove r an d
secur e it wit h th e screw . Replacin
g a Rea r Sid e Marke r
Ligh t Bul b
1 . Us e a Phillips-hea d screwdrive r t o
loose n th e sid e marke r assembl y
mountin g screw .
2 . Remov e th e assembl y fro m th e
fende r b y pullin g ou t th e bac k
edg e an d slidin g th e assembl y
backwards .
3
. Remov e th e socke t fro m th e ligh t
assembl y b y turnin g it counter -
clockwise .
4 . Remov e th e bul b fro m th e socke t
b y pullin g it straigh t out .
Instal l th e ne w bulb . Tur n o n th e
headlight s t o tes t th e bulb .
CONTINUED
Maintenanc e
SCRE
W
Page 265 of 338
Light
s
5 . Inser t th e socke t i n th e assembly .
Tur n i t clockwis e t o loc k i t i n place .
6 . Reinstal l th e sid e marke r assem -
bl y i n th e bumper . Tighte n th e
mountin g scre w securely . Replacin
g a High-moun t Brak e
Ligh t Bul b
1 . Ope n th e trun k an d remov e th e
socke t fro m th e ligh t assembl y b y
turnin g it one-quarte r tur n counter -
clockwise .
2 . Remov e th e burned-ou t bul b b y
pullin g it straigh t ou t o f th e socket .3
. Instal l th e ne w bul b an d reinstal l
th e socket . Mak e sur e th e ne w
bul b i s working .
Maintenanc e
Page 266 of 338
Light
s
Replacin g a Rea r Licens e Bul b
1 . Us e a Phillips-hea d screwdrive r t o
loose n th e tw o screw s holdin g th e
licens e plat e ligh t assembl y t o th e
bracket . Slid e th e assembl y ou t
fro m th e bracket . 2
. Remov e th e socke t fro m th e ligh t
assembl y b y turnin g it one-quarte r
tur n counterclockwise .
3 . Pul l th e bul b straigh t ou t o f it s
socket . Pus h th e ne w bul b in unti l
i t bottom s i n th e socket .
4
. Tur n o n th e parkin g light s an d
chec k tha t th e ne w bul b is
working .
5 . Pu t th e licens e ligh t assembl y in
place . Tighte n th e tw o screw s
securely .
Maintenanc e
Page 280 of 338

Changin
g a Fla t Tir e
I f yo u hav e a fla t tir e whil e driving ,
sto p in a saf e plac e to chang e it .
Stoppin g in traffi c o r o n th e shoulde r
o f a bus y roa d is dangerous . Driv e
slowl y alon g th e shoulde r unti l yo u
ge t t o a n exi t o r a n are a to sto p tha t
i s fa r awa y fro m th e traffi c lanes .
1 . Par k th e ca r o n firm , leve l an d
non-slipper y groun d awa y fro m
traffic . Pu t th e transmissio n in
Par k (automatic ) o r Revers e
(manual) . Appl y th e parkin g brake .2
. Tur n o n th e hazar d warnin g light s
an d tur n th e ignitio n switc h t o
LOC K (0) . Hav e al l th e
passenger s ge t ou t o f th e ca r whil e
yo u chang e th e tire .
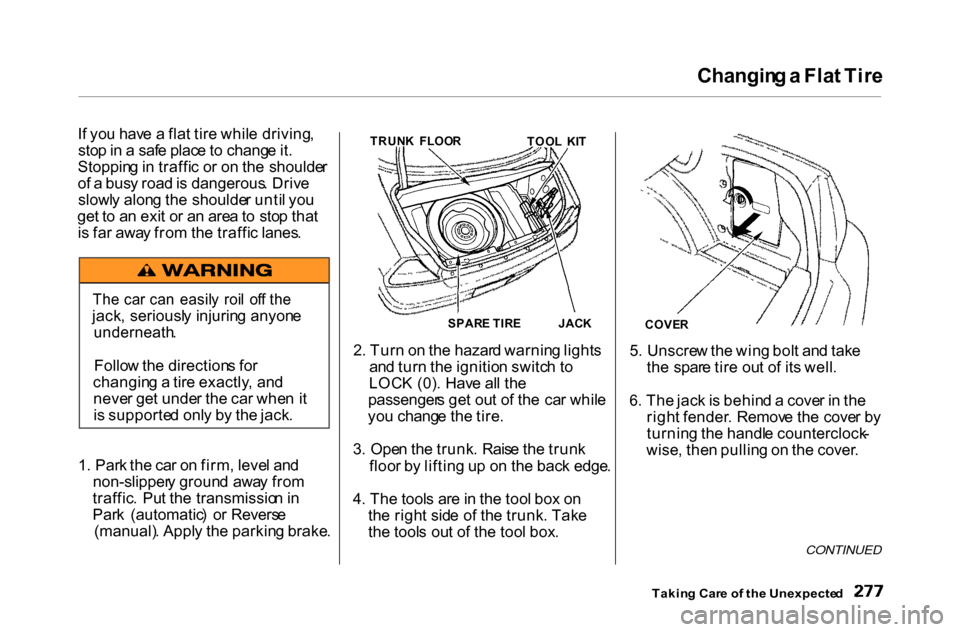
3 . Ope n th e trunk . Rais e th e trun k
floo r b y liftin g u p o n th e bac k edge .
4 . Th e tool s ar e in th e too l bo x o n
th e righ t sid e o f th e trunk . Tak e
th e tool s ou t o f th e too l box . 5
. Unscre w th e win g bol t an d tak e
th e spar e tir e ou t o f it s well .
6 . Th e jac k is behin d a cove r i n th e
righ t fender . Remov e th e cove r b y
turnin g th e handl e counterclock -
wise , the n pullin g o n th e cover .
CONTINUED
Takin g Car e o f th e Unexpecte d
Th
e ca r ca n easil y roi l of f th e
jack , seriousl y injurin g anyon e
underneath .
Follo w th e direction s fo r
changin g a tir e exactly , an d
neve r ge t unde r th e ca r whe n i t
i s supporte d onl y b y th e jack . TRUN
K FLOO R
SPAR E TIR E JACK
TOO
L KI T
COVER