Page 167 of 280

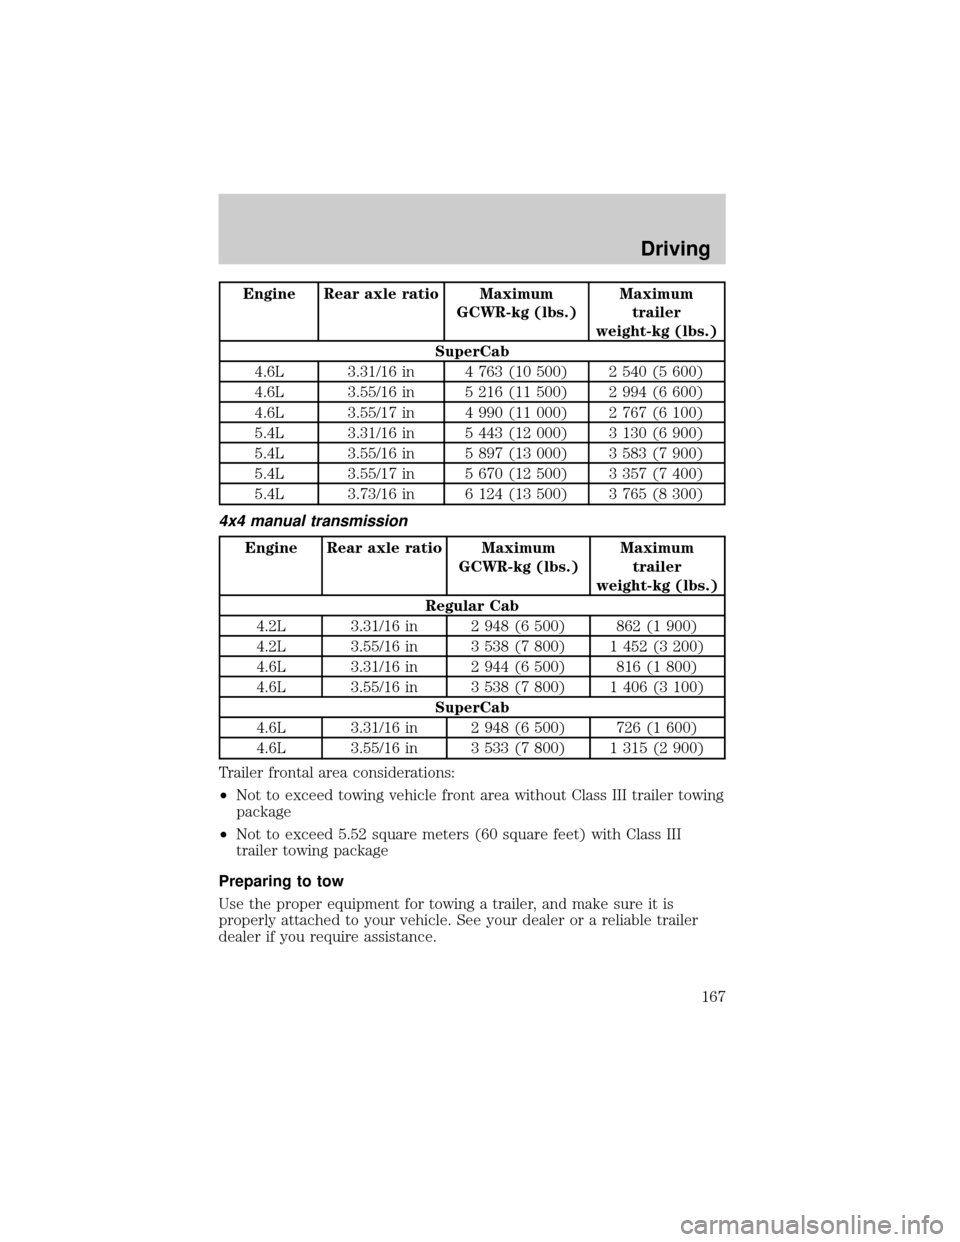
Engine Rear axle ratio Maximum
GCWR-kg (lbs.)Maximum
trailer
weight-kg (lbs.)
SuperCab
4.6L 3.31/16 in 4 763 (10 500) 2 540 (5 600)
4.6L 3.55/16 in 5 216 (11 500) 2 994 (6 600)
4.6L 3.55/17 in 4 990 (11 000) 2 767 (6 100)
5.4L 3.31/16 in 5 443 (12 000) 3 130 (6 900)
5.4L 3.55/16 in 5 897 (13 000) 3 583 (7 900)
5.4L 3.55/17 in 5 670 (12 500) 3 357 (7 400)
5.4L 3.73/16 in 6 124 (13 500) 3 765 (8 300)
4x4 manual transmission
Engine Rear axle ratio Maximum
GCWR-kg (lbs.)Maximum
trailer
weight-kg (lbs.)
Regular Cab
4.2L 3.31/16 in 2 948 (6 500) 862 (1 900)
4.2L 3.55/16 in 3 538 (7 800) 1 452 (3 200)
4.6L 3.31/16 in 2 944 (6 500) 816 (1 800)
4.6L 3.55/16 in 3 538 (7 800) 1 406 (3 100)
SuperCab
4.6L 3.31/16 in 2 948 (6 500) 726 (1 600)
4.6L 3.55/16 in 3 533 (7 800) 1 315 (2 900)
Trailer frontal area considerations:
²Not to exceed towing vehicle front area without Class III trailer towing
package
²Not to exceed 5.52 square meters (60 square feet) with Class III
trailer towing package
Preparing to tow
Use the proper equipment for towing a trailer, and make sure it is
properly attached to your vehicle. See your dealer or a reliable trailer
dealer if you require assistance.
Driving
167
Page 168 of 280

Hitches
Do not use hitches that clamp onto the vehicle's bumper or attach to the
axle. You must distribute the load in your trailer so that 10%±15% of the
total weight of the trailer is on the tongue.
Load equalizing hitch
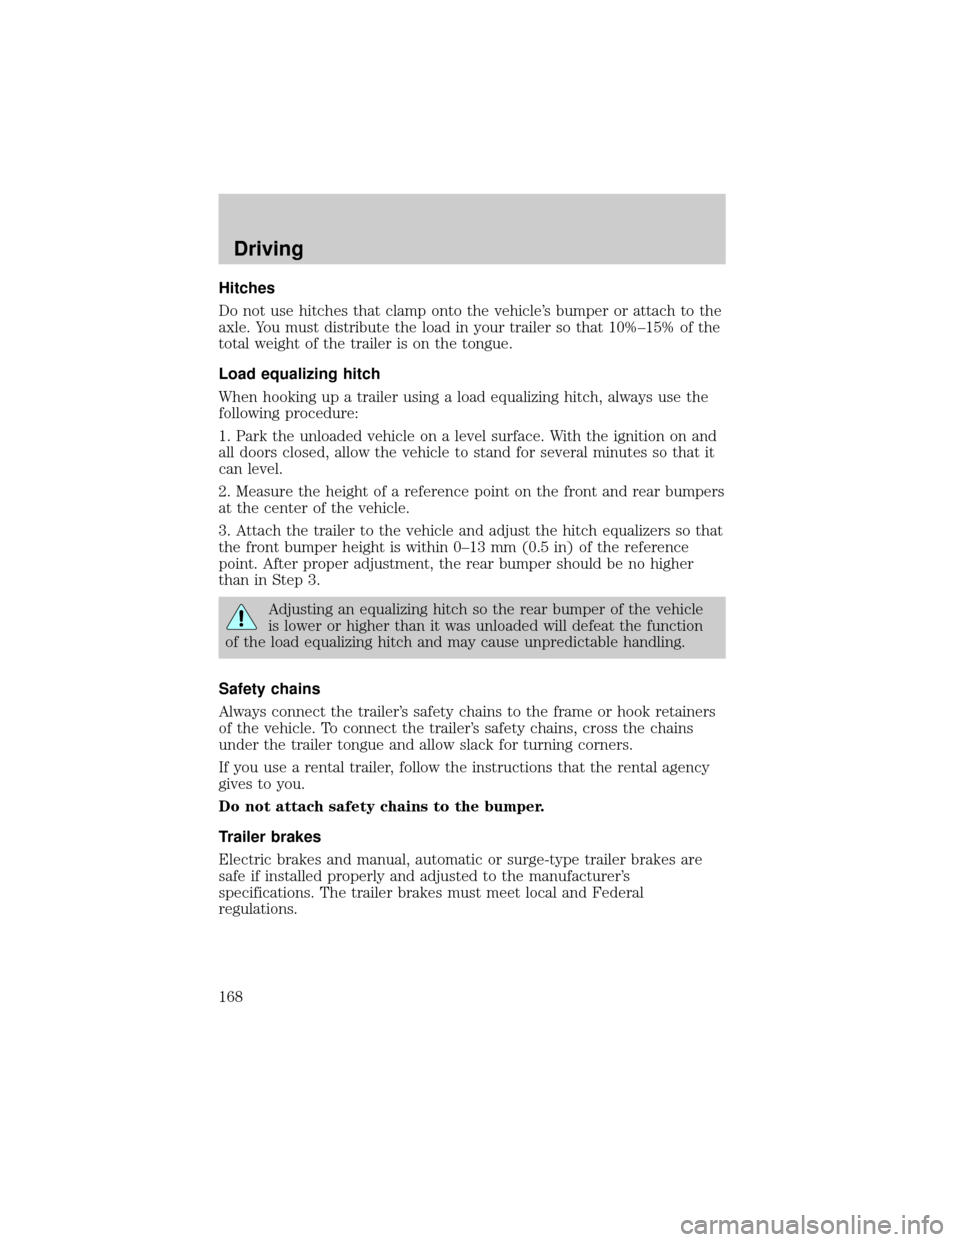
When hooking up a trailer using a load equalizing hitch, always use the
following procedure:
1. Park the unloaded vehicle on a level surface. With the ignition on and
all doors closed, allow the vehicle to stand for several minutes so that it
can level.
2. Measure the height of a reference point on the front and rear bumpers
at the center of the vehicle.
3. Attach the trailer to the vehicle and adjust the hitch equalizers so that
the front bumper height is within 0±13 mm (0.5 in) of the reference
point. After proper adjustment, the rear bumper should be no higher
than in Step 3.
Adjusting an equalizing hitch so the rear bumper of the vehicle
is lower or higher than it was unloaded will defeat the function
of the load equalizing hitch and may cause unpredictable handling.
Safety chains
Always connect the trailer's safety chains to the frame or hook retainers
of the vehicle. To connect the trailer's safety chains, cross the chains
under the trailer tongue and allow slack for turning corners.
If you use a rental trailer, follow the instructions that the rental agency
gives to you.
Do not attach safety chains to the bumper.
Trailer brakes
Electric brakes and manual, automatic or surge-type trailer brakes are
safe if installed properly and adjusted to the manufacturer's
specifications. The trailer brakes must meet local and Federal
regulations.
Driving
168
Page 169 of 280

Do not connect a trailer's hydraulic brake system directly to your
vehicle's brake system. Your vehicle may not have enough
braking power and your chances of having a collision greatly increase.
The braking system of the tow vehicle is rated for operation at the
GVWR not GCWR.
Trailer lamps
Trailer lamps are required on most towed vehicles. Make sure your
trailer lamps conform to local and Federal regulations. See your dealer or
trailer rental agency for proper instructions and equipment for hooking
up trailer lamps.
Using a step bumper (if equipped)
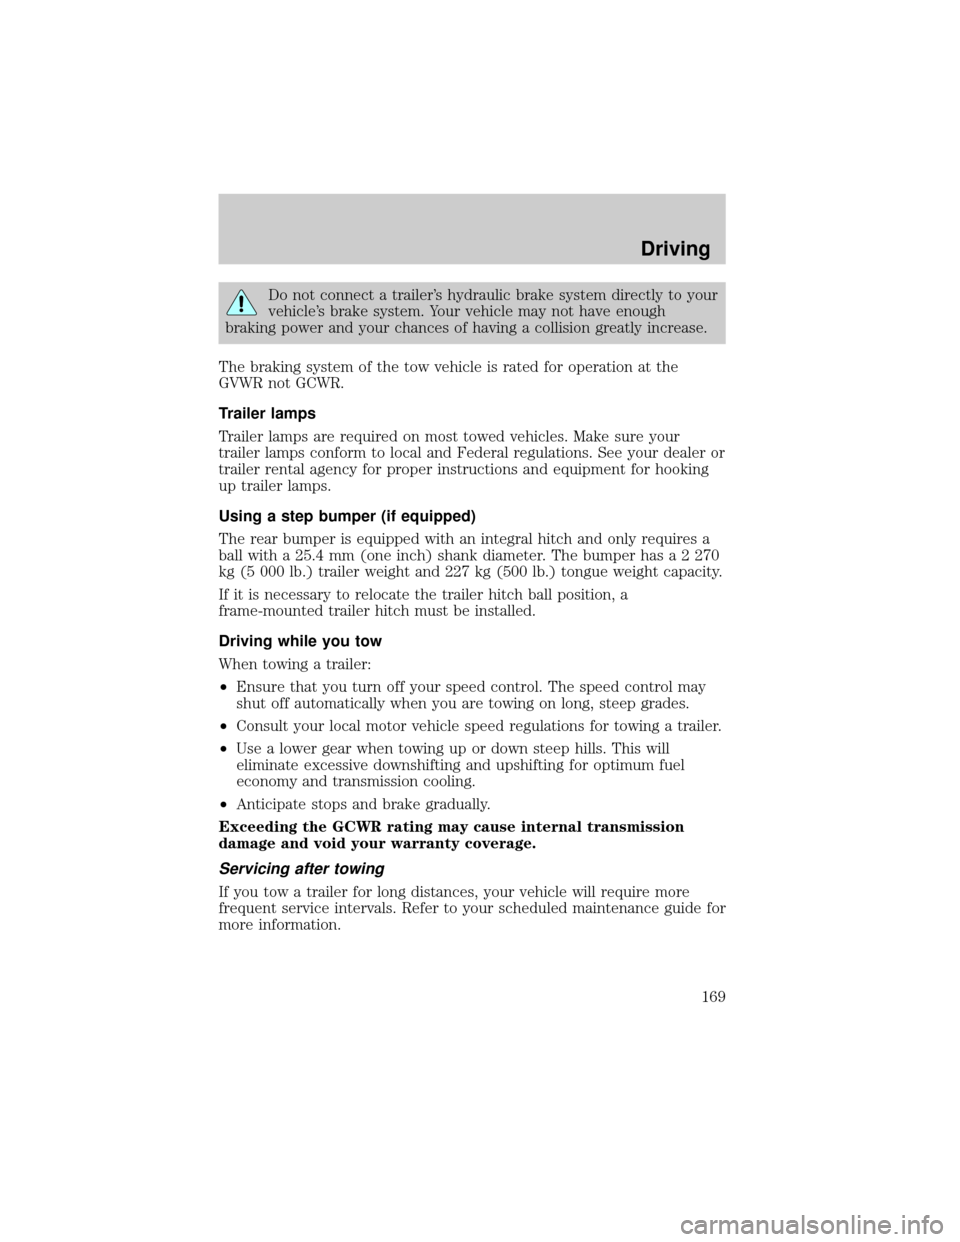
The rear bumper is equipped with an integral hitch and only requires a
ball with a 25.4 mm (one inch) shank diameter. The bumper hasa2270
kg (5 000 lb.) trailer weight and 227 kg (500 lb.) tongue weight capacity.
If it is necessary to relocate the trailer hitch ball position, a
frame-mounted trailer hitch must be installed.
Driving while you tow
When towing a trailer:
²Ensure that you turn off your speed control. The speed control may
shut off automatically when you are towing on long, steep grades.
²Consult your local motor vehicle speed regulations for towing a trailer.
²Use a lower gear when towing up or down steep hills. This will
eliminate excessive downshifting and upshifting for optimum fuel
economy and transmission cooling.
²Anticipate stops and brake gradually.
Exceeding the GCWR rating may cause internal transmission
damage and void your warranty coverage.
Servicing after towing
If you tow a trailer for long distances, your vehicle will require more
frequent service intervals. Refer to your scheduled maintenance guide for
more information.
Driving
169
Page 170 of 280

Trailer towing tips
²Practice turning, stopping and backing up before starting on a trip to
get the feel of the vehicle trailer combination. When turning, make
wider turns so the trailer wheels will clear curbs and other obstacles.
²Allow more distance for stopping with a trailer attached.
²The trailer tongue weight should be no more than 10±15% of the
loaded trailer weight.
²After you have traveled 80 km (50 miles), thoroughly check your
hitch, electrical connections and trailer wheel lug nuts.
²When stopped in traffic for long periods of time in hot weather, place
the gearshift in P (Park) (automatic transmissions) or N (Neutral)
(manual transmissions). This aids engine cooling and air conditioner
efficiency.
²Vehicles with trailers should not be parked on a grade. If you must
park on a grade, place wheel chocks under the trailer's wheels.
Launching or retrieving a boat
When backing down a ramp during boat launching or retrieval,
²Do not allow the static water level to rise above the bottom edge of
the rear bumper and
²Do not allow waves to break higher than 15 cm (6 inches) above the
bottom edge of the rear bumper.
Exceeding these limits may allow water to enter critical vehicle
components, adversely affecting driveability, emissions, reliability and
causing internal transmission damage.
Replace the rear axle lubricant anytime the axle has been submerged in
water. Rear axle lubricant quantities are not to be checked or changed
unless a leak is suspected or repair required.
Disconnect the wiring to the trailer before backing the trailer into the
water. Reconnect the wiring to the trailer after the trailer is removed
from the water.
Recreational towing (all wheels on the ground)
An example of recreational towing would be towing your vehicle behind
a Motorhome. Follow these guidelines if you have the need for
recreational towing your vehicle with all four wheels on the ground.
Driving
170
Page 181 of 280
Fuse/Relay
LocationFuse Amp
RatingPassenger Compartment Fuse
Panel Description
18 5A Instrument Illumination (Dimmer
Switch Power)
19 Ð Not Used
20 5A Audio, GEM (or CTM) Module,
Powertrain Control Module (PCM),
21 15A
Starter Relay, Clutch Switch, Fuse 20
22 10A Air Bag Module, Passenger Airbag
Deactivation Module, Climate Mode
Switch (Blower Relay)
23 10A Trailer Tow Battery Charge Relay,
Turn/Hazard Flasher, 4x4 Solenoids,
4x4 Relays, Overhead Console, 4
Wheel Anti-Lock Brake System
(4WABS) Module
24 Ð Not Used
25 Ð Not Used
26 10A Right Side Low Beam Headlamp
27 5A Foglamp Relay and Foglamp
Indicator
28 10A Left Side Low Beam Headlamp
29 5A Autolamp Module, Transmission
Overdrive Control Switch
30 30A Passive Anti Theft Transceiver,
Cluster, Ignition Coils, Powertrain
Control Module Relay
31 Ð Not Used
Relay 1 Ð Interior Lamp Relay
Relay 2 Ð Battery Saver Relay
Relay 3 Ð Not Used
Relay 4 Ð One Touch Down Window Relay
Relay 5 Ð ACC Delay Relay
Roadside emergencies
181
Page 183 of 280
The high-current fuses are coded as follows.
Fuse/Relay
LocationFuse Amp
RatingPower Distribution Box
Description
1 20A * Power Point
2 30A* Powertrain Control Module
3 30A* Headlamps/Autolamps
4 Ð Not Used
5 20A* Trailer Tow Backup/Park Lamps
6 15A* Parklamps/Autolamps, Passenger
Fuse Panel Feed Fuse #18
7 20A* Horn
8 15A* Power Door Locks
9 15A* Daytime Running Lamps (DRL), Fog
Lamps
10 20A* Fuel Pump
11 20A* Alternator Field
12 20A* Rear Auxiliary Power Point
13 15A* A/C Clutch
14 Ð Not Used
15 Ð Not Used
16 Ð Not Used
17 Ð Not Used
18 15A* Powertrain Control Module, Fuel
Injectors, Fuel Pump Relay, Idle Air
Control, Mass Air Flow Sensor
19 10A* Trailer Tow Stop and Right Turn
Lamp
20 10A* Trailer Tow Stop and Left Turn
Lamp
21 Ð Not Used
22 Ð Not Used
23 15A* HEGO Sensor, Canister Vent,
Automatic Transmission, CMS Sensor
24 Ð Not Used
Roadside emergencies
183
Page 184 of 280
Fuse/Relay
LocationFuse Amp
RatingPower Distribution Box
Description
101 30A** Trailer Tow Battery Charge
102 50/20A** Four Wheel Antilock Brake
Module/Rear Wheel Antilock Brake
Module
103 50A** Junction Block Battery Feed
104 30A** 4x4 Shift Motor & Clutch
105 40A** Climate Control Front Blower
106 20A** Inter Cooler Pump (Lightning only)
107 Ð Not Used
108 30A** Trailer Tow Electric Brake
109 Ð Not Used
110 30A** Power Windows
111 40A** Ignition Switch Battery Feed (Start
and Run Circuits)
112 30A** Drivers Power Seat, Adjustable
Pedals
113 40A** Ignition Switch Battery Feed (Run
and Accessory Circuits)
114 Ð Not Used
115 20A** Power Door Locks (SuperCrew only)
116 Ð Not Used
117 Ð Not Used
118 Ð Not Used
201 Ð Trailer Tow Park Lamp Relay
202 Ð Front Wiper Run/Park Relay
203 Ð Trailer Tow Backup Lamp Relay
204 Ð A/C Clutch Relay
205 Ð Horn Relay
206 Ð Fog Lamp Relay
207 Ð Front Washer Pump Relay
208 Ð Inter Cooler Pump Relay (Lightning
only)
Roadside emergencies
184
Page 185 of 280

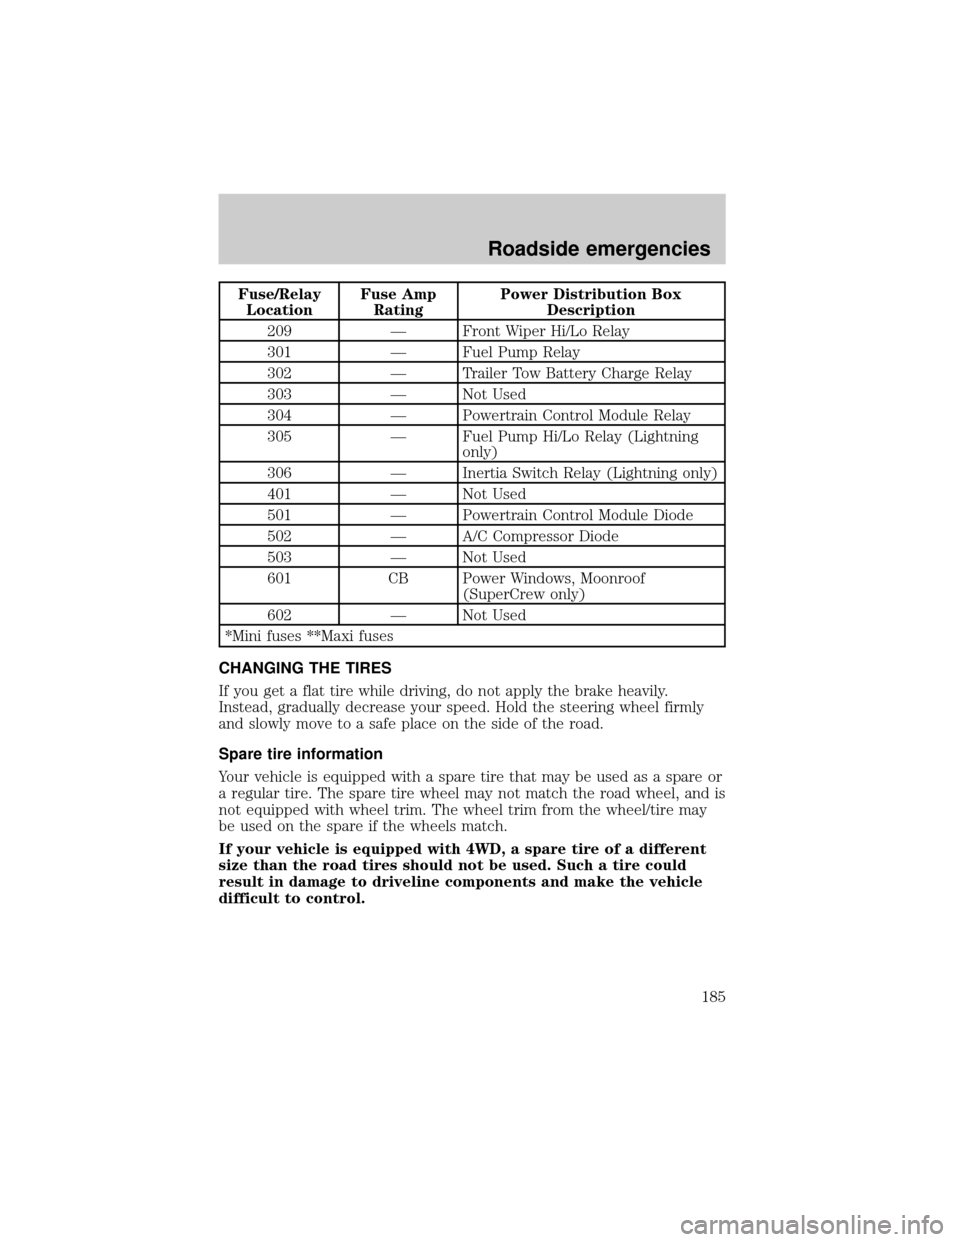
Fuse/Relay
LocationFuse Amp
RatingPower Distribution Box
Description
209 Ð Front Wiper Hi/Lo Relay
301 Ð Fuel Pump Relay
302 Ð Trailer Tow Battery Charge Relay
303 Ð Not Used
304 Ð Powertrain Control Module Relay
305 Ð Fuel Pump Hi/Lo Relay (Lightning
only)
306 Ð Inertia Switch Relay (Lightning only)
401 Ð Not Used
501 Ð Powertrain Control Module Diode
502 Ð A/C Compressor Diode
503 Ð Not Used
601 CB Power Windows, Moonroof
(SuperCrew only)
602 Ð Not Used
*Mini fuses **Maxi fuses
CHANGING THE TIRES
If you get a flat tire while driving, do not apply the brake heavily.
Instead, gradually decrease your speed. Hold the steering wheel firmly
and slowly move to a safe place on the side of the road.
Spare tire information
Your vehicle is equipped with a spare tire that may be used as a spare or
a regular tire. The spare tire wheel may not match the road wheel, and is
not equipped with wheel trim. The wheel trim from the wheel/tire may
be used on the spare if the wheels match.
If your vehicle is equipped with 4WD, a spare tire of a different
size than the road tires should not be used. Such a tire could
result in damage to driveline components and make the vehicle
difficult to control.
Roadside emergencies
185