Page 335 of 429

6-11
Before closing the hood, be sure all the filler caps are on
properly then follow these steps:
1. Lift the hood to relieve pressure on the hood prop.
2. Remove the hood prop from the slot in the hood.
3. Return the prop to its retainer.
4. Let the hood down and close it firmly.
Engine Oil
If the LOW ENG OIL
LEVEL message appears
on the instrument panel,
it means you need to check
your engine oil level
right away.
For more information, see ªLow Engine Oil Level
Messageº in the Index.
You should check your engine oil level regularly; this is
an added reminder.
Checking Engine Oil
It's a good idea to check your engine oil every time you
get fuel. In order to get an accurate reading, the oil must
be warm and the vehicle must be on level ground.
The engine oil dipstick is
located at the front of the
engine compartment, near
the center. The dipstick
handle has a bright,
yellow loop design for
easy identification.
Turn off the engine and give the oil several minutes to
drain back into the oil pan. If you don't, the oil dipstick
might not show the actual level.
Pull out the dipstick and clean it with a paper towel or
cloth, then push it back in all the way. Remove it again,
keeping the tip down, and check the level.
Page 339 of 429

6-15
How to Reset the Change Engine Oil Message
1. With the ignition key in RUN but the engine off,
fully push and release the accelerator pedal slowly
three times within five seconds.
2. Turn the key to OFF.
If the CHANGE ENGINE OIL message comes
back on, the engine oil life monitor has not reset.
Repeat the procedure.
What to Do with Used Oil
Did you know that used engine oil contains certain elements
that may be unhealthy for your skin and could even cause
cancer? Don't let used oil stay on your skin for very long.
Clean your skin and nails with soap and water, or a good hand
cleaner. Wash or properly throw away clothing or rags
containing used engine oil. (See the manufacturer's warnings
about the use and disposal of oil products.)
Used oil can be a real threat to the environment. If you
change your own oil, be sure to drain all free
-flowing oil
from the filter before disposal. Don't ever dispose of oil by
putting it in the trash, pouring it on the ground, into
sewers, or into streams or bodies of water. Instead, recycle
it by taking it to a place that collects used oil. If you have
a problem properly disposing of your used oil, ask your
dealer, a service station or a local recycling center for help.
Engine Air Cleaner/Filter
The air cleaner is located at the front of the engine
compartment, on the driver's side of the vehicle, under
the engine coolant reservoir.
Checking or Replacing the Air Cleaner/Filter
1. Unlatch the two hooks on top of the
air cleaner housing.
2. Turn back the air inlet panel and rest it on top of the
housing. The air intake tube is designed to flex back;
you do not need to disconnect it.
Page 340 of 429

6-16
3. After replacing the air cleaner filter, seat the tabs on
the bottom of the panel into the slots at the bottom.
4. Latch the hooks to secure the panel in place. If the
panel moves easily, check that the tabs are seated
correctly in the slots.
CAUTION:
Operating the engine with the air cleaner/filter
off can cause you or others to be burned. The air
cleaner not only cleans the air, it stops flame if
the engine backfires. If it isn't there, and the
engine backfires, you could be burned. Don't
drive with it off, and be careful working on the
engine with the air cleaner/filter off.
NOTICE:
If the air cleaner/filter is off, a backfire can cause a
damaging engine fire. And, dirt can easily get into
your engine, which will damage it. Always have the
air cleaner/filter in place when you're driving.
Passenger Compartment
Air Filter Replacement
Passenger compartment air, both outside air and
recirculated air, is routed through a passenger
compartment filter, which is part of a two
-piece filter
system. The filter removes certain contaminants from
the air, including pollen and dust particles, as well as
odors such as exhaust or fuel fumes. Reductions in
airflow, which may occur more quickly in dusty areas,
indicate that the filter needs to be replaced early. For
how often to change the air filter, see ªScheduled
Maintenanceº in the Index.
The access panel for the passenger compartment air
filter is located in the back of the glove box.
Page 342 of 429

6-18
Automatic Transaxle Fluid
When to Check and Change
A good time to check your automatic transaxle fluid
level is when the engine oil is changed.
Change both the fluid and filter every 50,000 miles
(83 000 km) if the vehicle is mainly driven under one or
more of these conditions:
�In heavy city traffic where the outside temperature
regularly reaches 90�F (32�C) or higher.
�In hilly or mountainous terrain.
�When doing frequent trailer towing.
�Uses such as found in taxi, police or delivery service.
If you do not use your vehicle under any of
these conditions, change the fluid and filter at
100,000 miles (166 000 km).
See ªScheduled Maintenance Servicesº in the Index.
How to Check
Because this operation can be a little difficult, you may
choose to have this done at the dealership service department.
If you do it yourself, be sure to follow all the instructions
here, or you could get a false reading on the dipstick.
NOTICE:
Too much or too little fluid can damage your
transaxle. Too much can mean that some of the
fluid could come out and fall on hot engine parts
or exhaust system parts, starting a fire. Be sure to
get an accurate reading if you check your
transaxle fluid.
Wait at least 30 minutes before checking the transaxle
fluid level if you have been driving:
�When outside temperatures are above 90�F (32�C).
�At high speed for quite a while.
�In heavy traffic
-- especially in hot weather.
�While pulling a trailer.
To get the right reading, the fluid should be at normal
operating temperature, which is 180�F to 200�F
(82�C to 93�C).
Get the vehicle warmed up by driving about 15 miles
(24 km) when outside temperatures are above 50�F
(10�C). If it's colder than 50�F (10�C), you may have
to drive longer.
Page 343 of 429
6-19
Checking the Fluid Level
Prepare your vehicle as follows:
�Park your vehicle on a level place. Keep the
engine running.
�With the parking brake applied, place the shift lever
in PARK (P).
�With your foot on the brake pedal, move the shift
lever through each gear range, pausing for about
three seconds in each range. Then, position the shift
lever in PARK (P).
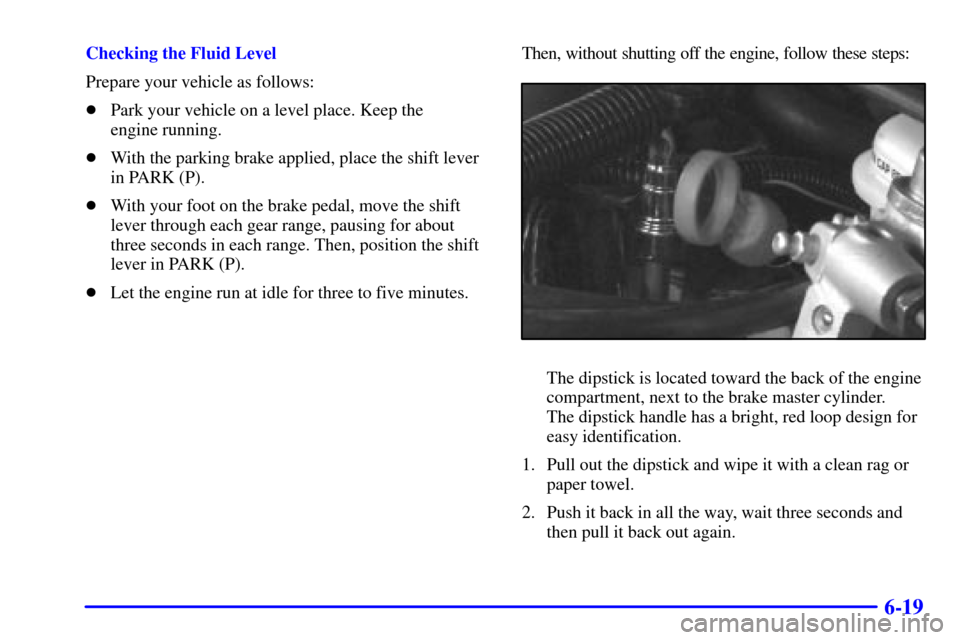
�Let the engine run at idle for three to five minutes.Then, without shutting off the engine, follow these steps:
The dipstick is located toward the back of the engine
compartment, next to the brake master cylinder.
The dipstick handle has a bright, red loop design for
easy identification.
1. Pull out the dipstick and wipe it with a clean rag or
paper towel.
2. Push it back in all the way, wait three seconds and
then pull it back out again.
Page 346 of 429

6-22 What to Use
Use a mixture of one-half clean, drinkable water and
one
-half DEX-COOL� coolant which won't damage
aluminum parts. If you use this coolant mixture, you
don't need to add anything else.
CAUTION:
Adding only plain water to your cooling system
can be dangerous. Plain water, or some other
liquid like alcohol, can boil before the proper
coolant mixture will. Your vehicle's coolant
warning system is set for the proper coolant
mixture. With plain water or the wrong mixture,
your engine could get too hot but you wouldn't
get the overheat warning. Your engine could
catch fire and you or others could be burned.
Use a 50/50 mixture of clean, drinkable water
and DEX
-COOL� coolant.
NOTICE:
If you use an improper coolant mixture, your
engine could overheat and be badly damaged.
The repair cost wouldn't be covered by your
warranty. Too much water in the mixture can
freeze and crack the engine, radiator, heater core
and other parts.
If you have to add coolant more than four times a year,
have your dealer check your cooling system.
NOTICE:
If you use the proper coolant, you don't have to
add extra inhibitors or additives which claim to
improve the system. These can be harmful.
Page 347 of 429
6-23 Checking Coolant
The engine coolant reservoir is located on the driver's
side of the vehicle, above the engine air cleaner/filter.
The vehicle must be on a level surface. When your
engine is cold, the coolant level should be at the FULL
COLD mark, or a little higher. When your engine is
warm, the level should be above the FULL COLD mark
or a little higher.
If the LOW COOLANT
LEVEL message comes on
and stays on, it means
you're low on
engine coolant.
Adding Coolant
If you need more coolant, add the proper DEX
-COOL�
coolant mixture at the coolant recovery tank.
CAUTION:
Turning the radiator pressure cap when the
engine and radiator are hot can allow steam and
scalding liquids to blow out and burn you badly.
With the coolant recovery tank, you will almost
never have to add coolant at the radiator.
Never turn the radiator pressure cap
-- even a
little
-- when the engine and radiator are hot.
Add coolant mixture at the recovery tank, but be careful
not to spill it.
Page 348 of 429

6-24
CAUTION:
You can be burned if you spill coolant on hot
engine parts. Coolant contains ethylene glycol,
and it will burn if the engine parts are hot
enough. Don't spill coolant on a hot engine.
Occasionally check the coolant level in the radiator. For
information on how to add coolant to the radiator, see
ªCooling Systemº in the Index.
Radiator Pressure Cap
NOTICE:
Your radiator cap is a 15 psi (105 kPa)
pressure
-type cap and must be tightly installed to
prevent coolant loss and possible engine damage
from overheating. Be sure the arrows on the cap
line up with the overflow tube on the radiator
filler neck.
Power Steering Fluid
The power steering fluid
reservoir is located to the
right of the windshield
washer fluid reservoir, at
the back of the
engine compartment.
When to Check Power Steering Fluid
It is not necessary to regularly check power steering fluid
unless you suspect there is a leak in the system or you hear
an unusual noise. A fluid loss in this system could indicate
a problem. Have the system inspected and repaired.