Page 138 of 365
yellowblue
2-75
LOW WASHER FLUID
This message is displayed
when the vehicle is low on
windshield washer fluid.
The message is only
displayed for 60 seconds
at the start of each
ignition cycle.
For more information see, ªWindshield Washer Fluidº in
the Index.LOW TIRE PRESSUREThe low tire pressure
system monitors the
inflation pressure of your
vehicle's tires.
If one or more of the tires is low, the LOW TIRE
PRESSURE message in the systems monitor will be
displayed and a warning chime will sound.
When you have checked the tire pressures, be sure to
reset the tire pressure monitor. See ªTiresº in the Index.
Page 139 of 365
yellowblue
2-76
SERVICE VEHICLE SOON
This message will come
on if you have a certain
emissions
-related
vehicle problems.
These problems may not be so obvious and may not
affect vehicle performance or durability. Consult a
qualified dealership for necessary repairs to maintain top
vehicle performance. The message will come on briefly
when your ignition is turned on to show you that it is
working properly.TRUNK OPEN
This message will appear if
the trunk is not completely
closed and the ignition is
ON. If you are in a forward
or reverse gear position you
will also hear four chimes.
HIGHBEAM OUT
If this message appears, you
may have a problem with
your high
-beam headlamps.
The message will stay on approximately 60 seconds.
Have your vehicle serviced as soon as possible.
SeeªBulb Replacementº in the Index.
Page 140 of 365

yellowblue
2-77
Driver Information
Center (DIC) (Option)
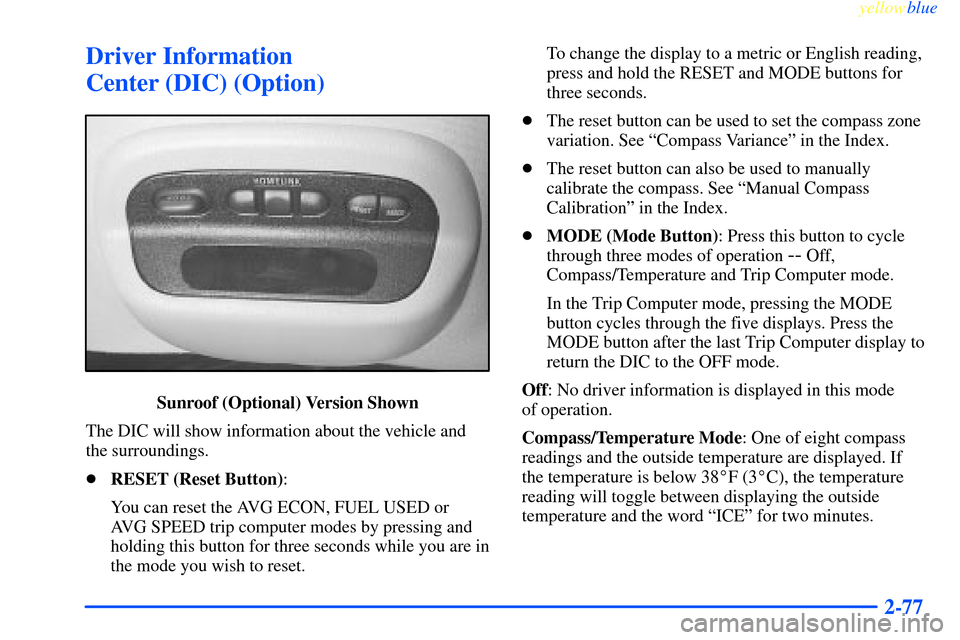
Sunroof (Optional) Version Shown
The DIC will show information about the vehicle and
the surroundings.
�RESET (Reset Button):
You can reset the AVG ECON, FUEL USED or
AVG SPEED trip computer modes by pressing and
holding this button for three seconds while you are in
the mode you wish to reset.To change the display to a metric or English reading,
press and hold the RESET and MODE buttons for
three seconds.
�The reset button can be used to set the compass zone
variation. See ªCompass Varianceº in the Index.
�The reset button can also be used to manually
calibrate the compass. See ªManual Compass
Calibrationº in the Index.
�MODE (Mode Button): Press this button to cycle
through three modes of operation
-- Off,
Compass/Temperature and Trip Computer mode.
In the Trip Computer mode, pressing the MODE
button cycles through the five displays. Press the
MODE button after the last Trip Computer display to
return the DIC to the OFF mode.
Off: No driver information is displayed in this mode
of operation.
Compass/Temperature Mode: One of eight compass
readings and the outside temperature are displayed. If
the temperature is below 38�F (3�C), the temperature
reading will toggle between displaying the outside
temperature and the word ªICEº for two minutes.
Page 141 of 365

yellowblue
2-78 Compass Variance
Compass variance is the difference between magnetic
north and geographic north. In some areas of the
country, the difference is great enough to cause the
compass to give false readings. If this occurs, the
compass variance must be set.
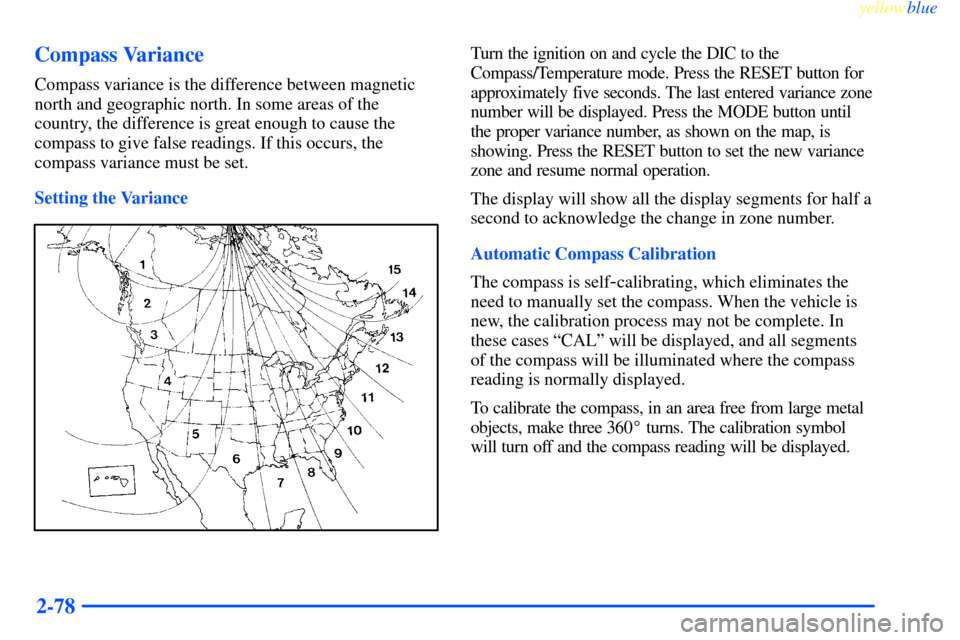
Setting the Variance
Turn the ignition on and cycle the DIC to the
Compass/Temperature mode. Press the RESET button for
approximately five seconds. The last entered variance zone
number will be displayed. Press the MODE button until
the proper variance number, as shown on the map, is
showing. Press the RESET button to set the new variance
zone and resume normal operation.
The display will show all the display segments for half a
second to acknowledge the change in zone number.
Automatic Compass Calibration
The compass is self
-calibrating, which eliminates the
need to manually set the compass. When the vehicle is
new, the calibration process may not be complete. In
these cases ªCALº will be displayed, and all segments
of the compass will be illuminated where the compass
reading is normally displayed.
To calibrate the compass, in an area free from large metal
objects, make three 360� turns. The calibration symbol
will turn off and the compass reading will be displayed.
Page 142 of 365

yellowblue
2-79
Manual Compass Calibration
If the compass appears erratic and the calibration
symbol does not appear, you must manually put the
compass into the calibration mode.
Turn the ignition on and cycle the DIC to the
Compass/Temperature mode. Press the RESET button
for at least 10 seconds until the calibration symbol
appears and all segments of the compass display are
illuminated. Release the button and complete three 360�
turns in an area free from large metal objects. The
calibration symbol will turn off and the compass reading
will be displayed.
Error Displays
�An error of the vehicle's speed sensor or fuel sender
will cause ª
-E-º to be displayed.
�In the absence of vehicle communications, a double
dash ª
--º is displayed.
If one of these error messages appear, see your dealer.
Trip Computer
There are five trip computer displays which may be
stepped through by pushing the MODE button.
The information will appear in the following order:
�AVG ECON (Average Fuel Economy): This shows
the average fuel economy since the last reset.
�INST ECON (Instantaneous Fuel Economy):
This shows fuel economy for the most recent second
of driving.
�RANGE (Trip Range): This shows the estimated
distance that can be traveled with the remaining fuel.
The fuel economy used to calculate range is based on
the last few hours of driving.
�FUEL USED (Trip Fuel Used): This shows the
accumulated fuel used since the last reset.
�AVG SPEED (Average Speed): This shows the
average speed since the last reset.
Resetting the Trip Computer
Press and hold the RESET button for at least two
seconds. The reset is acknowledged with the display
showing all segments on for a period of half a second.
A reset can only be done in AVG ECON, FUEL USED
and AVG SPEED displays.
Page 143 of 365
Page 144 of 365

3-
yellowblue
3-1
Section 3 Comfort Controls and Audio Systems
In this section, you'll find out how to operate the comfort control and audio systems offered with your vehicle.
Be sure to read about the particular systems supplied with your vehicle.
3
-2 Comfort Controls
3
-2 Manual Single Zone Climate Control
3
-4 Dual ComforTemp Climate Control
(If Equipped)
3
-6 Air Conditioning
3
-6 Heating
3
-6 Ventilation
3
-6 Defogging and Defrosting
3
-7 Rear Window Defogger
3
-8 Ventilation System
3
-9 Audio Systems
3
-9 Setting the Clock for Systems
without Radio Data System
3
-9 Setting the Clock for Systems
with Radio Data System
3
-10 AM-FM Stereo
3
-12 AM-FM Stereo with Cassette Tape Player
with Radio Data System (RDS) and Automatic
Tone Control (If Equipped)3
-21 AM-FM Stereo with Compact Disc Player
with Radio Data System (RDS) and
Automatic Tone Control (If Equipped)
3
-27 AM-FM Stereo with Cassette Tape and
Compact Disc Player with Radio Data System
(RDS) and Automatic Tone Control
(If Equipped)
3
-35 Theft-Deterrent Feature
3
-35 Theft-Deterrent Feature (If Equipped)
RDS Radios
3
-35 Audio Steering Wheel Controls (If Equipped)
3
-36 Understanding Radio Reception
3
-37 Tips About Your Audio System
3
-38 Care of Your Cassette Tape Player
3
-39 Care of Your Compact Discs
3
-39 Care of Your Compact Disc Player
3
-40 Backglass Antenna
3
-40 Vehicle Customization Settings
Page 145 of 365

yellowblue
3-2
Comfort Controls
Manual Single Zone Climate Control
With this system, you can control the heating, cooling
and ventilation in your vehicle. The system works best if
you keep your windows closed while using it.
Fan Knob
The knob on the left side of the climate control panel controls
the fan speed. To turn the fan off, turn the knob to OFF.
If airflow seems very low when the fan knob is turned to
the highest setting, regardless of the mode setting, your
passenger compartment air filter (if equipped) may need
to be replaced. See ªMaintenance Scheduleº in the Index.Temperature Knob
The center knob on the control panel changes the
temperature of the air coming through the system. Turn
this knob toward red (clockwise) for warmer air. Turn it
toward blue (counterclockwise) for cooler air.
Mode Knob
The right knob on the control panel has several settings
to control the direction of airflow:
UPPER: This setting directs air through the
instrument panel outlets.
BI-LEVEL: This setting directs air two ways.
Half of the air is directed through the instrument panel
outlets. Most of the remaining air is directed through the
floor vents and a little to the windshield defroster and
side window outlets.
LOWER: This setting sends most of the air
through the ducts near the floor. The remaining air
comes out of the defroster and side window outlets.