Page 6 of 392
Table of Contents (cont'd)
Maintenance Schedule Service and Appearance Care
Section
7
Section
6
Scheduled Maintenance
Owner Checks and Services
Periodic Maintenance InspectionsRecommended Fluids and Lubricants
Maintenance Records
Fuel
Checking Fluids and Lubricants
GM Oil Life System™ (If Equipped)
Engine Air Cleaner/Filter
Passenger Compartment Air Filter
Brakes
Bulb ReplacementWindshield Wiper Blade Replacement
Tires and Wheels
Appearance Care
Electrical System/Fuses and Circuit Breakers
Capacities and Specifications
Normal Maintenance Replacement Parts
Page 235 of 392
4-40 When You Are Ready to Leave After
Parking on a Hill
1. Apply your regular brakes and hold the pedal down
while you:
�Start your engine;
�Shift into a gear; and
�Release the parking brake.
2. Let up on the brake pedal.
3. Drive slowly until the trailer is clear of the chocks.
4. Stop and have someone pick up and store the chocks.
Maintenance When Trailer Towing
Your vehicle will need service more often when you're
pulling a trailer. See the Maintenance Schedule for more
on this. Things that are especially important in trailer
operation are automatic transaxle fluid (don't overfill),
engine oil, drive belt, cooling system and brake system.
Each of these is covered in this manual, and the Index
will help you find them quickly. If you're trailering,
it's a good idea to review this information before you
start your trip.
Check periodically to see that all hitch nuts and bolts
are tight.
Engine Cooling When Trailer Towing
Your cooling system may temporarily overheat during
severe operating conditions. See ªEngine Overheatingº
in the Index.
Page 278 of 392
6-16 Engine Oil Additives
Don't add anything to your oil. The recommended oils
with the starburst symbol are all you will need for good
performance and engine protection.
When to Change Engine Oil (Vehicles
Without the GM Oil Life System�)
If any one of these is true for you, use the short trip/city
maintenance schedule:
�Most trips are less than 5 to 10 miles (8 to 16 km).
This is particularly important when outside
temperatures are below freezing.
�Most trips include extensive idling (such as frequent
driving in stop
-and-go traffic).
�Most trips are through dusty areas.
�You frequently tow a trailer or use a carrier on top of
your vehicle.
�The vehicle is used for delivery service, police, taxi
or other commercial application.
Driving under these conditions causes engine oil to
break down sooner. If any one of these is true for your
vehicle, then you need to change your oil and filter
every 3,000 miles (5 000 km) or 3 months
-- whichever
occurs first.If none of them is true, use the long trip/highway
maintenance schedule. Change the oil and filter every
7,500 miles (12 500 km) or 12 months
-- whichever
occurs first. Driving a vehicle with a fully warmed
engine under highway conditions causes engine oil to
break down slower.
When to Change Engine Oil (Vehicles With
the GM Oil Life System� Option)
If so equipped, your vehicle has a computer that lets you
know when to change your engine oil. This is not based
on mileage, but on engine revolutions and engine
operating temperature. When the computer has
calculated that the oil needs changing, the GM Oil Life
System� will indicate that a change is necessary.
The mileage between oil and filter changes will vary
depending on how you drive your vehicle
-- usually
between 3,000 miles (5 000 km) and 7,500 miles
(12 500 km) since your last oil and filter change.
Under severe conditions, the system may come on
before 3,000 miles (5 000 km). Never drive your vehicle
more than 7,500 miles (12 500 km) or 12 months
(whichever occurs first) without an oil change.
The system won't detect dust in the oil. So, if you drive
in a dusty area, be sure to change your oil and filter
every 3,000 miles (5 000 km) or sooner. Remember to
reset the Oil Life System whenever the oil is changed.
Page 281 of 392
6-19
3. Replace the air filter.
4. Reattach the air intake hose.
5. Reinstall the air cleaner housing cover.
Refer to the Maintenance Schedule to determine when to
replace the air filter.
See ªScheduled Maintenance Servicesº in the Index.
CAUTION:
Operating the engine with the air cleaner/filter
off can cause you or others to be burned. The air
cleaner not only cleans the air, it stops flame if
the engine backfires. If it isn't there, and the
engine backfires, you could be burned. Don't
drive with it off, and be careful working on the
engine with the air cleaner/filter off.
NOTICE:
If the air cleaner/filter is off, a backfire can cause
a damaging engine fire. And, dirt can easily get
into your engine, which will damage it.
Always have the air cleaner/filter in place when
you're driving.
Page 282 of 392
6-20 Passenger Compartment Air Filter
Passenger compartment air, both outside air and
recirculated air, is routed through a passenger
compartment filter, which is part of a three piece filter
system. The filter removes certain particles from the air,
including pollen and dust particles. Reductions in
airflow, which may occur more quickly in dusty areas,
indicate that the filter needs to be replaced early.
The particle filter is located inside the air control
module with an access panel underneath the instrument
panel near the accelerator pedal. The filter should be
replaced as part of routine scheduled maintenance. See
ªMaintenance Scheduleº in the Index for replacement
intervals. See your dealer for details on changing
the filter.
Once you remove your filter, if you choose not to
replace it, it will not damage your vehicle.
However, the air will no longer be filtered.
Page 284 of 392
6-22
Automatic Transaxle Fluid
When to Check and Change
A good time to check your automatic transaxle fluid
level is when the engine oil is changed.
Change both the fluid and filter every 50,000 miles
(83 000 km) if the vehicle is mainly driven under one or
more of these conditions:
�In heavy city traffic where the outside temperature
regularly reaches 90�F (32�C) or higher.
�In hilly or mountainous terrain.
�When doing frequent trailer towing.
�Uses such as found in taxi, police or delivery service.
If you do not use your vehicle under any of these
conditions, change the fluid and filter at
100,000 miles (166 000 km).
See ªScheduled Maintenance Servicesº in the Index.
How to Check
Because this operation can be a little difficult,
you may choose to have this done at the dealership
service department.
If you do it yourself, be sure to follow all the instructions
here, or you could get a false reading on the dipstick.
NOTICE:
Too much or too little fluid can damage your
transaxle. Too much can mean that some of the
fluid could come out and fall on hot engine parts
or exhaust system parts, starting a fire. Be sure to
get an accurate reading if you check your
transaxle fluid.
Wait at least 30 minutes before checking the transaxle
fluid level if you have been driving:
�When outside temperatures are above 90�F (32�C).
�At high speed for quite a while.
�In heavy traffic
-- especially in hot weather.
�While pulling a trailer.
Page 286 of 392
6-24
2. Push it back in all the way, wait three seconds and
then pull it back out again.
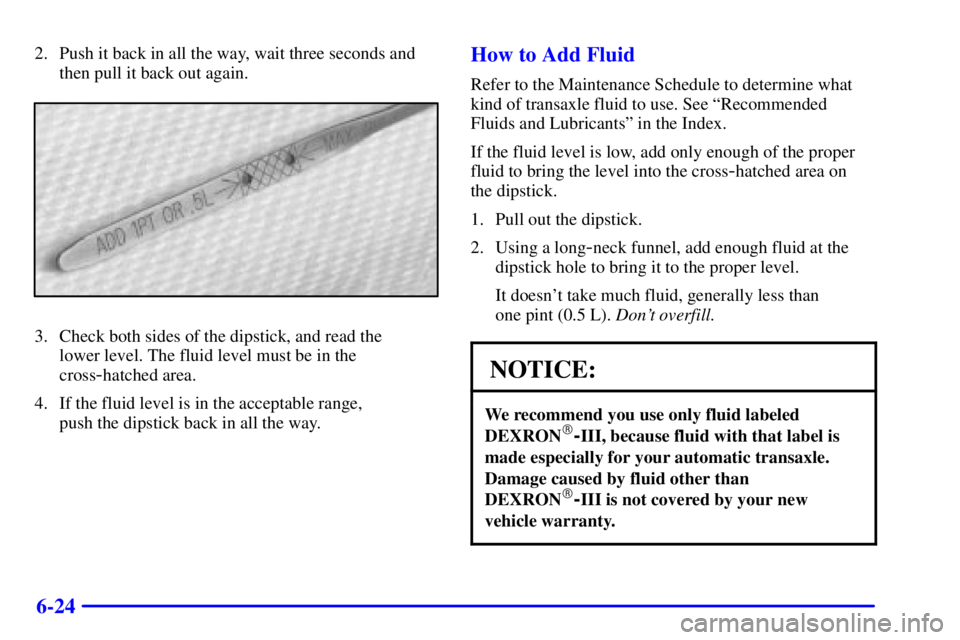
3. Check both sides of the dipstick, and read the
lower level. The fluid level must be in the
cross
-hatched area.
4. If the fluid level is in the acceptable range,
push the dipstick back in all the way.
How to Add Fluid
Refer to the Maintenance Schedule to determine what
kind of transaxle fluid to use. See ªRecommended
Fluids and Lubricantsº in the Index.
If the fluid level is low, add only enough of the proper
fluid to bring the level into the cross
-hatched area on
the dipstick.
1. Pull out the dipstick.
2. Using a long
-neck funnel, add enough fluid at the
dipstick hole to bring it to the proper level.
It doesn't take much fluid, generally less than
one pint (0.5 L). Don't overfill.
NOTICE:
We recommend you use only fluid labeled
DEXRON�-III, because fluid with that label is
made especially for your automatic transaxle.
Damage caused by fluid other than
DEXRON
�-III is not covered by your new
vehicle warranty.
Page 293 of 392
6-31
There are only two reasons why the brake fluid level in
the reservoir might go down. The first is that the brake
fluid goes down to an acceptable level during normal
brake lining wear. When new linings are put in, the fluid
level goes back up. The other reason is that fluid is
leaking out of the brake system. If it is, you should have
your brake system fixed, since a leak means that sooner
or later your brakes won't work well, or won't work
at all.
So, it isn't a good idea to ªtop offº your brake fluid.
Adding brake fluid won't correct a leak. If you add fluid
when your linings are worn, then you'll have too much
fluid when you get new brake linings. You should add
(or remove) brake fluid, as necessary, only when work is
done on the brake hydraulic system.
CAUTION:
If you have too much brake fluid, it can spill on
the engine. The fluid will burn if the engine is hot
enough. You or others could be burned, and your
vehicle could be damaged. Add brake fluid only
when work is done on the brake hydraulic system.
When your brake fluid falls to a low level, your brake
warning light will come on. A chime will sound if you
try to drive with this warning light on. See ªBrake
System Warning Lightº in the Index.
What to Add
When you do need brake fluid, use only DOT
-3 brake
fluid. Use new brake fluid from a sealed container only.
Refer to ªRecommended Fluids and Lubricantsº in the
Maintenance Schedule.
Always clean the brake fluid reservoir cap and the area
around the cap before removing it. This will help keep
dirt from entering the reservoir.
CAUTION:
With the wrong kind of fluid in your brake
system, your brakes may not work well, or they
may not even work at all. This could cause a
crash. Always use the proper brake fluid.