Page 14 of 392
1-2
Seats and Seat Controls
This part tells you about the seats -- how to adjust them,
and also about memory seats, reclining seatbacks and
head restraints.
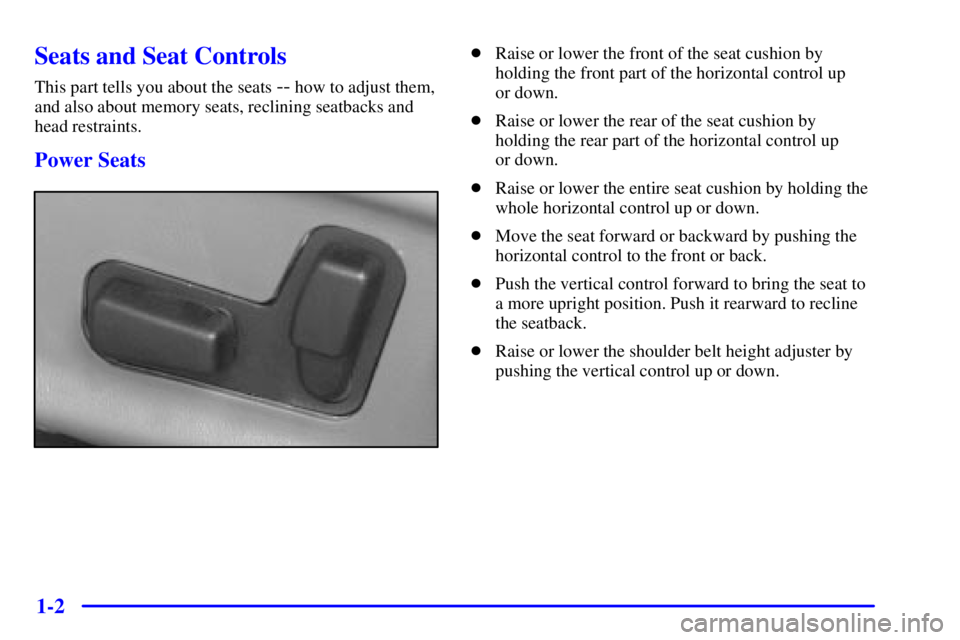
Power Seats
�Raise or lower the front of the seat cushion by
holding the front part of the horizontal control up
or down.
�Raise or lower the rear of the seat cushion by
holding the rear part of the horizontal control up
or down.
�Raise or lower the entire seat cushion by holding the
whole horizontal control up or down.
�Move the seat forward or backward by pushing the
horizontal control to the front or back.
�Push the vertical control forward to bring the seat to
a more upright position. Push it rearward to recline
the seatback.
�Raise or lower the shoulder belt height adjuster by
pushing the vertical control up or down.
Page 15 of 392
1-3 4-Way Power Lumbar Control (Option)
If you have this option, the
driver's and passenger's
seatback lumbar support
can be adjusted four ways
by moving the single switch
located on the side of
the seat.
To increase or decrease support, hold the switch forward
or rearward. To move the lumbar up or down, hold the
switch upward or downward.
Memory Seat and Mirrors (If Equipped)
If your vehicle has this
feature, the controls on the
driver's door panel are used
to program and recall
previous settings.
You can use this function to save your seat cushion
positions (including the shoulder belt height adjuster),
lumbar, mirror adjustment, personal choice settings,
comfort controls and radio settings. Activate the
MEMORY button (1 or 2) which corresponds to the
appropriate DRIVER # identified by your remote
keyless entry transmitter. For more information,
see ªDriver Information Center, Personal Choice
Programmingº in the Index.
Page 26 of 392

1-14
4. Push the latch plate into the buckle until it clicks.
Pull up on the latch plate to make sure it is secure.
If the belt isn't long enough, see ªSafety Belt
Extenderº at the end of this section.
Make sure the release button on the buckle is
positioned so you would be able to unbuckle the
safety belt quickly if you ever had to.The lap part of the belt should be worn low and snug on
the hips, just touching the thighs. In a crash, this applies
force to the strong pelvic bones. And you'd be less likely
to slide under the lap belt. If you slid under it, the belt
would apply force at your abdomen. This could cause
serious or even fatal injuries. The shoulder belt should go
over the shoulder and across the chest. These parts of the
body are best able to take belt restraining forces.
The safety belt locks if there's a sudden stop or crash, or
if you pull the belt very quickly out of the retractor.
Shoulder Belt Height Adjuster
Before you begin to drive, move the shoulder belt height
adjuster to the height that is right for you.
Using the power seat control, raise or lower the shoulder
belt height adjuster by pushing the vertical control up
or down.
Adjust the height so that the shoulder portion of the
belt is centered on your shoulder. The belt should be
away from your face and neck, but not falling off
your shoulder.
Page 52 of 392
1-40
A forward-facing child restraint (C-E) positions
a child upright to face forward in the vehicle.
These forward
-facing restraints are designed to
help protect children who are from 20 to 40 lbs.
(9 to 18 kg) and about 26 to 40 inches
(66 to 102 cm) in height, or up to around four years
of age. One type, a convertible restraint, is
designed to be used either as a rear
-facing infant
seat or a forward
-facing child seat.
Page 119 of 392
2-54 Garage Door Opener Compartment
The garage door opener storage area is located in the
headliner near the reading lamps. The following chart
and instructions will help you install your garage door
opener in the overhead storage area.
1. Push the extended tab (above the GARAGE button)
or insert a screwdriver between the tab and outer
edge of the cover. The garage door opener cover will
flip down.
2. Remove the square height adapters from the cover.
Refer to the chart to determine the number and
location of the height adapters for your garage door
opener. If your unit does not appear on the chart,
you will have to try different adapter number and
location combinations.
Page 122 of 392

2-57
3. Place the height adapters on the proper peg using the
suggested combinations or by lining up the height
adapters and the transmitter button on your garage
door opener.
4. Use the Velcro� found in the storage area and attach
the garage door opener securely inside the console.
Line up the transmitter button with the
height adapters.
5. Close the cover and test the GARAGE button.
If your garage door opener doesn't work after it is
installed, try another combination.
Front Storage Armrest
You may have a fold-down armrest between the front
seats that opens into a storage area. To open it, pull up
on the lever at the front edge. Inside are cupholders that
can be flipped forward for use with the armrest cover
closed. There is also a removable coinholder and a
storage area for cassette tapes and compact discs.
Front Center Console (Option)
Your vehicle may have a center console that has two
storage compartments. The front of the console has two
cupholders that can be unfolded for use. In addition you
can flip the center of the console forward to use the
built
-in writing surface on top of the lid.
You will also find an auxiliary power outlet located
inside the storage compartment and one on the lower
front edge of the console. These outlets can be used for
accessories requiring electrical power, such as a cellular
phone or fax machine. See ªAuxiliary Power Outletsº in
the Index.
The console also contains a removeable coinholder as
well as storage for cassette tapes and compact discs.
Page 148 of 392

2-83
NOTICE:
Although the HUD image appears to be near the
front of the vehicle, do not use it as a parking aid.
The HUD was not designed for that purpose.
If you try to use the display as a marker for the
front of your vehicle, such as in a parking lot, you
may misjudge distance and hit an obstacle or
another vehicle.
The HUD controls
are located in the
overhead console.1. Start your engine and slide the HUD dimmer control
all the way up.
The brightness of the HUD image is determined by
whether the headlamps are on or off, and where you
have the HUD dimmer control set.
2. Adjust the seat to your driving position. Slide the
image height adjuster control all the way up, raising
the image as far as possible.
3. Now slide the image height adjuster control down so
the image is as low as possible but still in full view.
4. Slide the dimmer control downward until the HUD
image is no brighter than necessary.
To turn the HUD display off, slide the dimmer control
all the way down.
If the sun comes out, the sky becomes cloudy, or if you
turn your headlamps on, you may need to adjust the
HUD brightness using the dimmer control. Polarized
sunglasses could make the HUD image harder to see.
To change the display from English to metric units,
push the ENG/MET button located to the left of the
steering column.
Page 149 of 392

2-84 Care of the HUD
Clean the inside of the windshield as necessary to
remove any dirt or film that reduces the sharpness or
clarity of the HUD image.
To clean the HUD lens, spray household glass cleaner
on a soft, clean cloth. Gently wipe and dry the HUD
lens. Do not spray cleaner directly on the lens to avoid
cleaner leaking inside the unit.
If You Can't See The HUD Image When the
Ignition is On
If the ignition is on and you can't see the HUD image,
check to see if:
�The headlamps are on.
�Something is covering the HUD unit.
�The HUD dimmer control is adjusted properly.
�The HUD image is adjusted to the proper height.
�A fuse is blown. See ªFuses and Circuit Breakersº in
the Index.
Keep in mind that your windshield is part of the HUD
system. If you ever have to have your windshield
replaced, be sure to get one that is designed for HUD or
your HUD image may look blurred or out of focus.
Driver Information Center (DIC)
(If Equipped)
Your vehicle may be equipped with a Driver
Information Center (DIC). The DIC will display
information about how your vehicle is functioning,
as well as warning messages if a system problem
is detected.
The following buttons are
on the DIC control panel
which is located to the left
of the steering column:

If you have this option, the
drivers and passengers
seatback lumbar support
can be adjusted four ways
by moving the single switch
located on the side of
the")
 positions
a child upright to face forward in the vehicle.
These forward
-facing restraints are designed to
help protect children who are from 20 to 40 lbs")
