2000 BMW 323Ci CONVERTIBLE light
[x] Cancel search: lightPage 156 of 199

156n
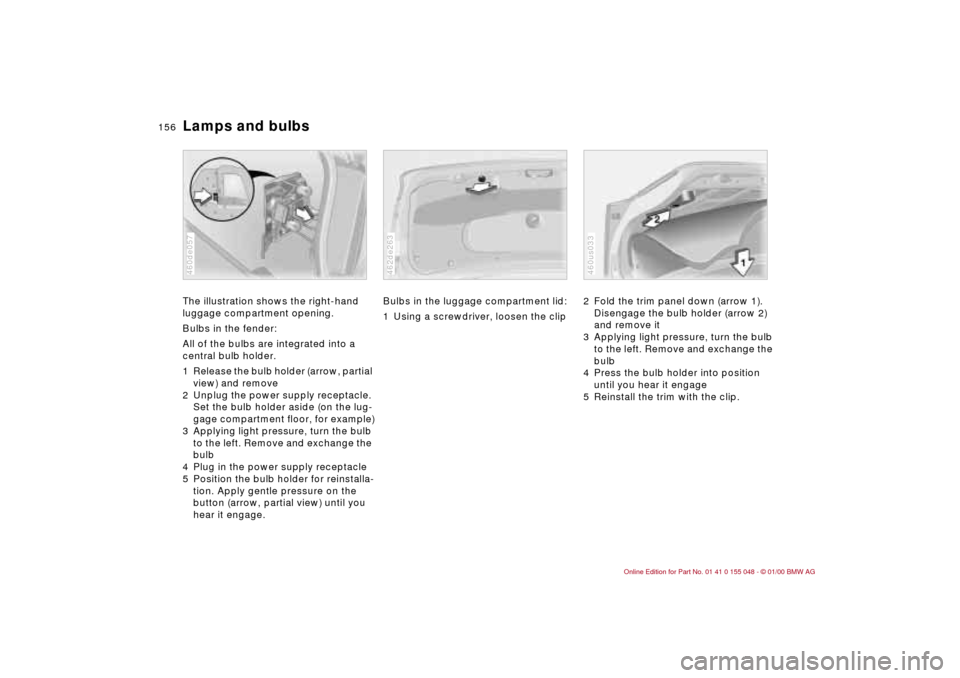
Lamps and bulbsThe illustration shows the right-hand
luggage compartment opening.
Bulbs in the fender:
All of the bulbs are integrated into a
central bulb holder.
1 Release the bulb holder (arrow, partial
view) and remove
2 Unplug the power supply receptacle.
Set the bulb holder aside (on the lug-
gage compartment floor, for example)
3 Applying light pressure, turn the bulb
to the left. Remove and exchange the
bulb
4 Plug in the power supply receptacle
5 Position the bulb holder for reinstalla-
tion. Apply gentle pressure on the
button (arrow, partial view) until you
hear it engage.460de057
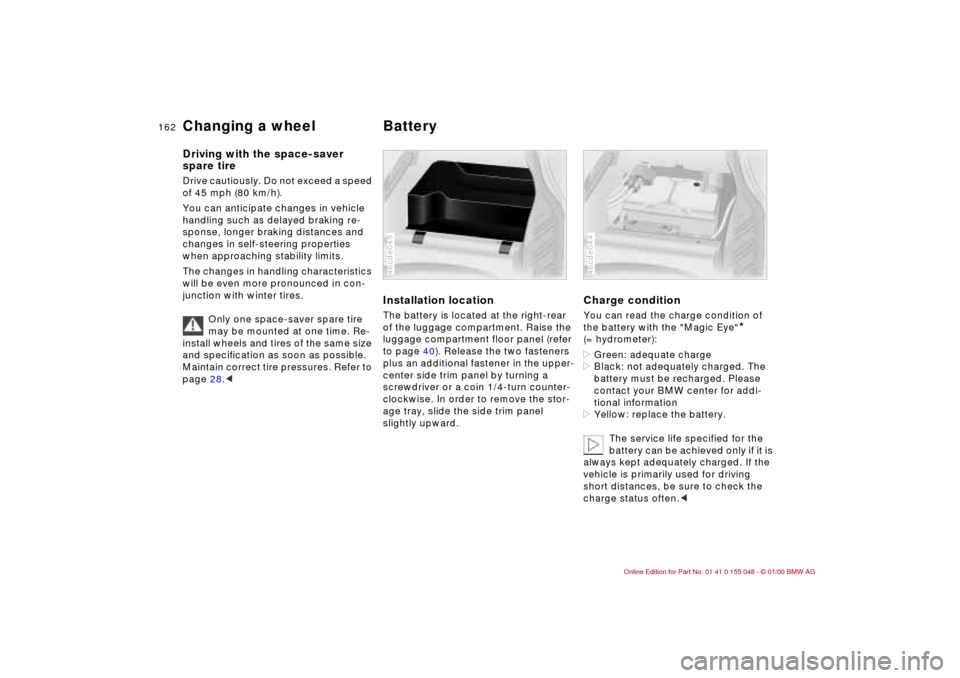
Bulbs in the luggage compartment lid:
1 Using a screwdriver, loosen the clip 462de263
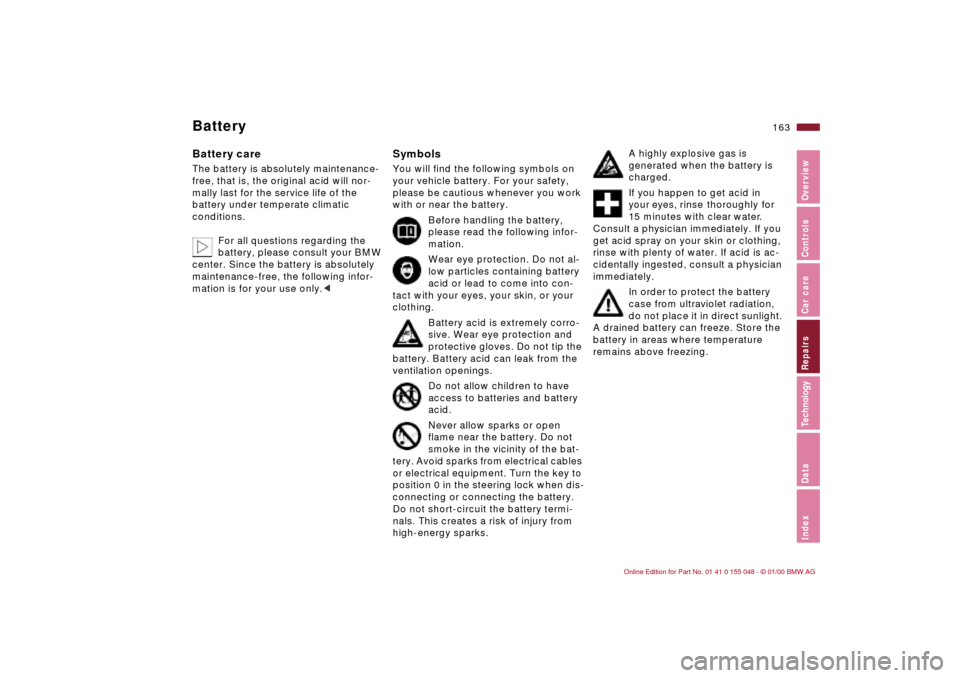
2 Fold the trim panel down (arrow 1).
Disengage the bulb holder (arrow 2)
and remove it
3 Applying light pressure, turn the bulb
to the left. Remove and exchange the
bulb
4 Press the bulb holder into position
until you hear it engage
5 Reinstall the trim with the clip.460us033
Page 161 of 199

161n
IndexDataTechnologyRepairsCar careControlsOverview
Changing a wheel9 Position the new wheel or the
space-saver spare tire on the hub
and screw at least two lug bolts fin-
ger-tight into opposite bolt holes
10 Screw in the remaining lug bolts.
Tighten all the bolts snugly
11 Lower the jack and remove it from
beneath the vehicle
12 Tighten the lug bolts in a diagonal
pattern462de266
13 If your wheels are equipped with full
wheel covers
*, place the wheel
cover with the valve opening over
the valve (arrow). Use both hands to
press the cover securely onto the
rim
14 Check and correct the tire's inflation
pressure at the earliest possibility.
For vehicles with RDC (Tire Pres-
sure Control)*:
After mounting the space-saver
spare tire or correcting the inflation
pressure, reactivate the system.
Refer to page 89.
Only use original BMW full wheel
covers, otherwise, the trim piece
may not fit securely. The full wheel
cover may not be installed on the
space-saver spare tire, since this could
damage the cover.<
462de279
The vehicle jack is designed for
changing wheels only. Do not at-
tempt to raise another vehicle model
with it or to raise any load of any kind.
To do so could cause accidents and
personal injury.
To ensure continued safety, have the
solid fit of the lug bolts [torque: 72 lbft
(100 Nm)] checked using a calibrated
torque wrench.<
When storing the wheel, take care to
ensure that you do not damage the
retaining pin in the spare tire recess.
If light-alloy wheels other than original
BMW light-alloy wheels have been
mounted, it may be necessary to use
different lug bolts for those wheels.
Replace the defective tire as soon as
possible and have the new wheel/tire
balanced.
Page 162 of 199

162n
Changing a wheel Battery Driving with the space-saver
spare tireDrive cautiously. Do not exceed a speed
of 45 mph (80 km/h).
You can anticipate changes in vehicle
handling such as delayed braking re-
sponse, longer braking distances and
changes in self-steering properties
when approaching stability limits.
The changes in handling characteristics
will be even more pronounced in con-
junction with winter tires.
Only one space-saver spare tire
may be mounted at one time. Re-
install wheels and tires of the same size
and specification as soon as possible.
Maintain correct tire pressures. Refer to
page 28.<
Installation locationThe battery is located at the right-rear
of the luggage compartment. Raise the
luggage compartment floor panel (refer
to page 40). Release the two fasteners
plus an additional fastener in the upper-
center side trim panel by turning a
screwdriver or a coin 1/4-turn counter-
clockwise. In order to remove the stor-
age tray, slide the side trim panel
slightly upward.46cde045
Charge conditionYou can read the charge condition of
the battery with the "Magic Eye"
*
(= hydrometer):
>Green: adequate charge
>Black: not adequately charged. The
battery must be recharged. Please
contact your BMW center for addi-
tional information
>Yellow: replace the battery.
The service life specified for the
battery can be achieved only if it is
always kept adequately charged. If the
vehicle is primarily used for driving
short distances, be sure to check the
charge status often.<
46cde044
Page 163 of 199

163n
IndexDataTechnologyRepairsCar careControlsOverview
BatteryBattery careThe battery is absolutely maintenance-
free, that is, the original acid will nor-
mally last for the service life of the
battery under temperate climatic
conditions.
For all questions regarding the
battery, please consult your BMW
center. Since the battery is absolutely
maintenance-free, the following infor-
mation is for your use only.<
SymbolsYou will find the following symbols on
your vehicle battery. For your safety,
please be cautious whenever you work
with or near the battery.
Before handling the battery,
please read the following infor-
mation.
Wear eye protection. Do not al-
low particles containing battery
acid or lead to come into con-
tact with your eyes, your skin, or your
clothing.
Battery acid is extremely corro-
sive. Wear eye protection and
protective gloves. Do not tip the
battery. Battery acid can leak from the
ventilation openings.
Do not allow children to have
access to batteries and battery
acid.
Never allow sparks or open
flame near the battery. Do not
smoke in the vicinity of the bat-
tery. Avoid sparks from electrical cables
or electrical equipment. Turn the key to
position 0 in the steering lock when dis-
connecting or connecting the battery.
Do not short-circuit the battery termi-
nals. This creates a risk of injury from
high-energy sparks.
A highly explosive gas is
generated when the battery is
charged.
If you happen to get acid in
your eyes, rinse thoroughly for
15 minutes with clear water.
Consult a physician immediately. If you
get acid spray on your skin or clothing,
rinse with plenty of water. If acid is ac-
cidentally ingested, consult a physician
immediately.
In order to protect the battery
case from ultraviolet radiation,
do not place it in direct sunlight.
A drained battery can freeze. Store the
battery in areas where temperature
remains above freezing.
Page 175 of 199

175n
IndexDataTechnologyRepairsCar careControlsOverview
Interior rearview mirror with automatic dimmer
*
The interior rearview mirror with auto-
matic dimming feature reduces glare by
adapting the intensity of the reflected
images to correspond to levels of light
registered by the unit's sensors. The
mirror reverts to its undimmed setting
as soon as the light source disappears.
One light sensor is mounted on the front
of the mirror housing. This sensor, the
one that is directed forward, measures
light intensity in the area ahead of the
vehicle. The second sensor is inte-
grated within the mirror's glass. The
electronic control system compares the
light intensity from front and rear. The
difference provides the basic parameter
used to modulate an electrical current
and induce chemical changes in a semi-
solid layer incorporated in the lens.46cus036
The semisolid reacts chemically to this
electrical current, dimming the mirror
through an infinitely-variable range
(electrochromic technology).
As a result, it is no longer necessary to
dim the mirror manually, and the driver
can concentrate completely on traffic
conditions.
Page 176 of 199

176n
Rain sensor
*
Depending on how wet the windshield
is, the rain sensor controls the opera-
tion of the windshield wipers.
Infrared light is carried along the sur-
face of the windshield in an optical con-
ductor in such a manner that it is re-
flected completely when the windshield
is dry. The quantity of reflected light is
measured.
If there is moisture on the glass, the
amount of light reflected is reduced
since the infrared light at the surface of
the windshield can escape. The quan-
tity of reflected light is thus a means of
gauging the degree of wetness on the
windshield.390de133
When the system is set to the "Intermit-
tent" wiper speed, the wipers react im-
mediately – if water is splashed onto the
windshield by vehicles traveling ahead
of you, for example. As a result, the rain
sensor contributes to driving safety and
comfort.
Page 179 of 199

179n
IndexDataTechnologyRepairsCar careControlsOverview
Rollover protection syste
m
Xenon lamps
*
The rollover protection system offers
additional protection apart from the air-
bags and safety belts. The system has
highly sensitive sensors that react im-
mediately upon detecting an unstable
vehicle condition, i.e. when the vehicle
is tilted to a critical degree, or if the
wheels are not making proper ground
contact. In this kind of situation, the
protective bar in each rear head
restraint is triggered.
Xenon lamps illuminate the side and
front areas of the vehicle with signifi-
cantly more brightness and uniformity
than the traditional halogen lamp.
In a xenon lamp, an electric arc re-
places the filament in order to generate
intense illumination. A gas mixture in a
quartz glass tube with metal vapor is
ignited by a high electric voltage. The
arc that is generated is then sustained
by a lower voltage. When the lamp is
turned on there is a brief warm-up
period. Maximum brightness is attained
in approx. 15 seconds.
390de134
Xenon lamps provide significantly im-
proved visibility, especially during ad-
verse weather and poor driving condi-
tions e.g. driving at night in heavy rain
or through road repair areas where
there are no lane markers.
Vehicles with xenon lamps are equipped
with automatic headlamp range control.
As a result, the highway is always opti-
mally lighted, regardless of road condi-
tions, and drivers in oncoming traffic are
not blinded.
Xenon lamps make a significant contri-
bution to highway safety since pedestri-
ans and other highway users, bicyclists
and motorcyclists in the right lane, are
more easily detected.
Page 191 of 199

Everything from A to Z
191n
IndexDataTechnologyRepairsCar careControlsOverview
Cigarette lighter104
Clock84
Cockpit16
Code, refer to the Radio
Owner's Manual
Coin box, cup holder103
Combination switch77
Compression182
Computer85
Configure settings60
Consumption86
Consumption display83
Convertible top
care144
electrical defect166
Convertible top
compartment panel41
Convertible top operation,
fully automatic convertible
top49
Coolant118, 135, 185
antifreeze118
Coolant temperature
gauge83
Cooling system185
Cornering Brake Control
(CBC)21, 115
Cruise control80
Cruising range86
Curb weight184
Current check indicator20
DDash lighting91
Dashboard16
Data
dimensions183
engine182
technical182
weights184
Daytime-driving lamp
switch91
Defrost setting97
Defrosting the
windows97, 98
Digital clock84
Dimensions183
Dipstick, engine oil133
Disc brakes116
Displacement182
Display lighting91
Displays18
Distance warning87
Diversity Antenna174
Door key32
Door locks, care118
Doors
emergency actuation34
remote control35
unlocking and locking34
Drive belts186
Driving hints113
Driving in winter118Driving lamps91
DSC (Dynamic Stability
Control)22, 88, 173
EElectric power windows44
Electrical accessories,
failure165
Electrical system186
Electronic vehicle
immobilizer33
Elements of operation16
Emergency actuation
doors34
fuel filler door165
fully automatic convertible
top166
Emergency closure166
Energy Control82
Engine compartment130
Engine coolant135, 185
Engine data182
Engine oil
capacity185
consumption133
pressure20
quality134
specifications134
viscosity134
Engine oil level21
check133Engine speed182
Engine, starting70
Entry to the rear56
Exterior mirrors58
Eyes169
FFailure messages84
Fault displays84
Fault, ABS115
Filler cap cover26
Filling capacities185
Filling the washer
reservoir185
First-aid kit25
Flashlight99
Flat tire123, 159
Fog lamps92
bulb replacement155
"Follow-Me-Home"
lamps91
Footbrake116
Footwell lamps92
bulb replacement158
Front seat adjustment53
Frost protection,
radiator135
Fuel27
gauge83
preparation182
quality27
Fuel consumption86