2000 AUDI ALLROAD mirror controls
[x] Cancel search: mirror controlsPage 6 of 306

----------------------------------------------TABLE OFCONT ENTS
I GENERAL ILLUSTRATION
General illustration 0 0 0. • • • 8
Warning and indicator lights 10
I SAFETY
FIRST
W elcome ... 0 0 0 •• •• 13
Safety first 0 0
• 0 • 0 0 0 0 • 0 •
13
Safety belts
• . . 0 0 0 • 0 0
14
Airbag system 0 ••••••• 0 0 • • • • • • • 25
Child safety ........ 0 • 0 0 0 0 0 0 0 0 0 44
I CONTROLS AND EQUIPMENT
Keys 0 0 0 0 0 0 0 0 0 0 0 •••• ••••• 0 0 • • 0
56
Power locks 0 0 0 0
Power windows
Mirrors 0 •• 0 0 0 •••
Head restraints
Front seats 0 0 0 •
0.- . 0 0 0 • • 59
69
• •• - •••• 0 ••• 0 72
75
•• 0 •• 0 76
Memory for front seats , .... 0 •• 0 81
Center armrest 0 0 0 0 0 0 0 0 0 •••••• 0 85 Rear
seats 0 0 •• 0 •• 0 • • • • • •
86
Luggage compartment , 0 0 88
Rear facing child seat bench 0 0 0 0 0 92
Ski sack 0 0 0 0 0 0 0 0 0 0 0 0 0 0 0 0.
96
Adjustable steering column
(tilt and telescopic) 0 0 0 0 • 0 0
98
Pedals 0 0 • 0 0 0 0 0 0 0 0 0 0 0 0 0 0 0 0 0 0 0 , 1 02
Parking brake lever 0 • 0 0 0 0 0 0 0 •• 0 1 03
5-speed automatic transmission
(Trptronic ®) 0 0 0 0 0 0 0 0 0 0 • 0 0 0 0 0. 0 • 104
Acoustic park assist
112
Ignition switch 0 0 0 0 0 0 0
1 13
Starting procedures . 0 • • 114
Stopping engine 0 0 0 0 0 0 • • • 115
Instrument cluster 0 0 0 0 0 0 116
Service Interval Display
121
Warning I Indic ator lights 0 0 0 0 0 0 • 122
On Board Diagnostic system 0 0 0 128
Driver information system 0 • 0 • • • 130
Menu display 0 0 0 0 0 0 0 0 0 0 0 0 0
0 131
Rear lid I door open indicator 0 0 0 137
Outside air temp erature 0 • 0 0 0 0 0 0 137 Radio
frequency display 13
8
Auto-Check system 0 0 0 o 0 138
Speed warning . 0 0 0 • 0 0 • • • • 0 • 0 0 144
Tr ip computer 0 0 0 0 0 0 •• 0
146
Switches 0 • 0 •• 0 0 0 0 • 0 0 0 0 148
Ride height adjustment
(4 Level Air Suspension) 0
153
Turn signals,
headlight dimmer switch lever 0 0 156
Cruise control 0 0 0 0 0 0 0 0 0 0 0 0 0 0 0 • • 158
Wiper and washer system 0 ••• 0 0 150
Climate controls 0 0 0 0 0 0 0 0 0 0 0 • 0 152
Power roof 0 0 0 0 0 0 0 • 0 0 0 0 0 • • • • • • 168
Int erior lights, reading lights 171
Luggage compartment light 0 0 0 0 172
Audi Homelink ®
Uni versal Transmitter . 0 0 • • • •
173
Sun visors 00 00 00 00 ... • .. •
177
Sun shade 0 0 0 0 0 0 0 0 •• , • • • ••• 0 0 177
Glo ve compartment
Coat hooks
Ashtray 178
179
180
5
Page 10 of 306

1
2
3
4 5
6
7
8
9
10
11 12
13 14
15
16
17 Power
window switches
Door handle
Power locking switch
Light switch
Air vents
Turn signals I headlight dimmer switch lever ...
Cruise control ................. .............
Instrument illumination
Horn, driver's airbag •••••
0 •• 0 •• 0 0 •• 0 ••• 0 ••• 0
Radio I CD I buttons ................
........
Radio I CD I telephone buttons ...............
Instrument cluster ....... ... ... ... ... .. .....
Warning I indi cator lights ••••••••
0 0
••••••••••
Windshield wiper I washer lever ..............
Tri p computer function control switch .........
Steering lock I ignition I starter switch
Switch for the Electronic Stability Program (i::SP)
Switches for the ride heigh t adjustment and
level display •••••••••••••••
0 •• 0 •• 0 0 •• 0 0 ••••
Emergenc y flasher
Cup holder
Glove compartment (lockable)
Front passenger's airbag
Radio Page
69
59 62
148 165
15 6
15 8
149
25
185
18 6
11 6
12 2
16 0
146
113
15 2
15 3
15 2
18 2
17 8
25 -------GE NERA L ILLUST
RATION
Page
18 Thumb wheel for seat heating
150
19 Switch for rear window defogger 151
20 Climate controls
162
21 Ashtray ...................................
180
Cigarette lighter ............................ 181
22 Gearshift lever or
Selector lever ..............................
104
23 Adjuster control for outside mirrors
72
24 Parking brake lever
103
25 Navigation System switch or
Cup holder
•••••••••••••••• 0 •••• 0 •••• 0 •••••
182
26 Storage compartment
27 Service wallet compartment
183
28 Adjustable steering wheel
98
29 Data Link Connector (DLC) for On Board
Diagnostics (OBD)
128
30 Release lever for engine hood 231
31 Memory for driver's seat
81
Notes
• Some features mentioned are standard equipment on some
models only and options on others.
• For technical reasons, the arrangement of the switches and indi
cator /warning lights may differ. The govern ing factor is the symbol
on the switch itself.
9
Page 74 of 306
---------------------CONTROLS AND
EQUIPMENT
�W ARNING
• The right hand outside mirror
has a convex (curved) surface. Re
member that vehicles or other ob
jects seen in a convex mirror will
appear smaller and farther away
than when seen in a flat mirror. If
you use this mirror to estimate dis
tances of following vehicles when
changing lanes, you could esti
mate incorrectly and cause an ac
cident.
• Whenever possible, use the in
side mirror to determine the actual
distance and size of vehicles or
other objects seen in the convex
mirror. Adj
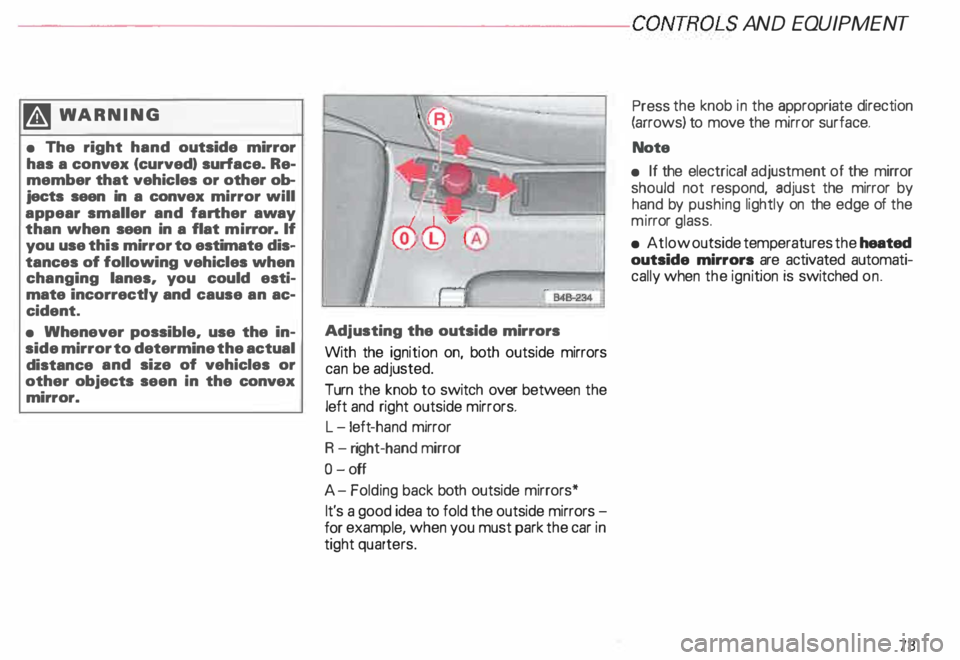
usting the outside mirrors
With the ignition on, both outside mirrors
can be adjusted.
Turn the knob to switch over between the
left and right outside mirrors.
L -l eft -hand mirror
R -right-hand mirror
0- off
A- Folding back both outside mirrors*
It's a good idea to fold the outside mirrors
for example, when you must park the car in
tight quarters. Press
the knob in the appropriate direction
(arrows) to move the mirror surface.
Note
• If the electrical adjustment of the mirror
should not respond, adjust the mirror by
hand by pushing lightly on the edge of the
mi rror glass.
• At low outside temperatures the heated
outside mirrors are activated automati
cally when the ignition is switched on.
73
Page 75 of 306
CONTROLS AND EQUIPMENT---------------------
Folding down of the outside
mirror passenger•s side1l
When you move the selector lever I gear
shift lever into R (Reverse), the outside mir
ror on the passenger's side will tilt slightly
downwards, provided you have switched to
the right-hand outside mirror.
This makes it possible to see the edge of
the curb when parking your vehicle. The
mirror will return to its original position as
soon as you move the selector lever I gear
shift lever out of R (Reverse), or if you
switch the remote control back to the driv
er's outside mirror.
1 l Only on
vehicles with memory for driver's seat.
74 Memory*
The setting of the outside mirrors is auto
matically stored in the memory for the driv
er's seat adjustment together with the seat
position.
Memory function for driver's seat and out
side mirrors see page 81.
Adjust the mirrors os described and then
store this setting together with your seating
position memory.
Page 83 of 306
CONTROLS AND
EQUIPMENT---------------------
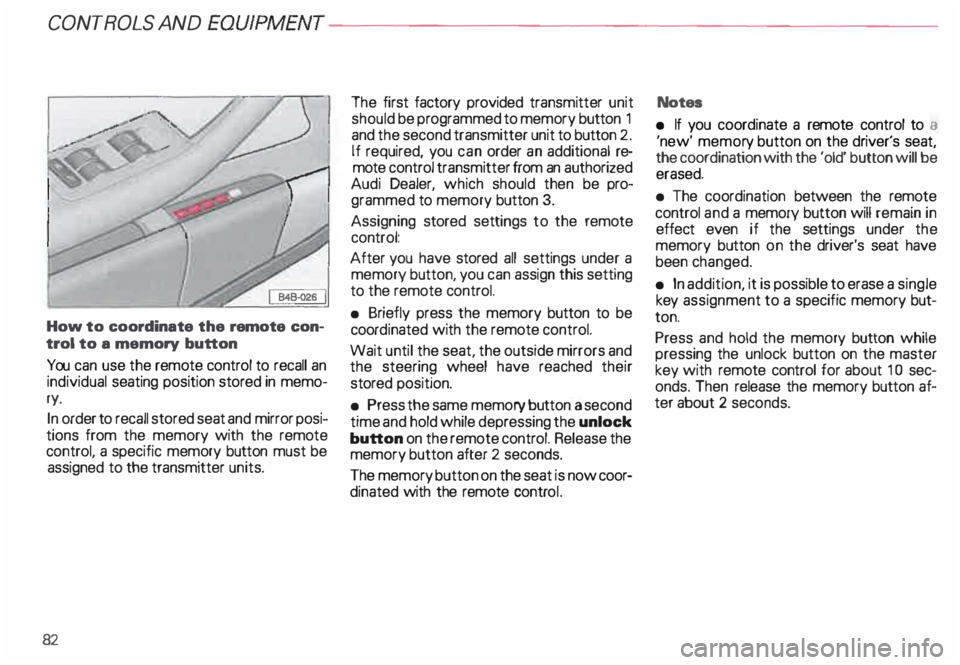
How to coordinate the remote con
trol to a memory button
You can use the remote control to recall an
individual seating position stored in memo
ry.
In order to recall stored seat and mirror posi
tions from the memory with the remote
control, a specific memory button must be
assigned to the transmitter units.
82 The
first factory provided transmitter unit
should be programmed to memory button 1
and the second transmitter unit to button 2.
If required, you can order an additional re
mote control transmitter from an authorized
Audi Dealer, which should then be pro
grammed to memory button 3.
Assigning stored settings to the remote
control:
After you have stored all settings under a
memory button, you can assign this setting
to the remote control.
• Briefly press the memory button to be
coord inated with the remote control.
Wait until the seat, the outside mirrors and
the steering wheel have reached their
stored position.
• Press the same memory button a second
time and hold while depressing the unlock
button on the remote control. Release the
memory button after 2 seconds.
The memory button on the seat is now coor
dinated with the remote control. Notes
• If you coordinate a remote control to a
'new' memor y button on the driver's seat,
the coordination with the 'old' button will be
erased.
• The coordination between the remote
control and a memory button will remain in
effect even if the settings under the
memory button on the driver's seat have
been changed.
• In addition, it is possible to erase a single
key assignment to a specific memory but
ton.
Press and hold the memory button while
pressing the unlock button on the master
key with remote control for about 1 0 sec
onds. Then release the memory button af
ter about 2 seconds.
Page 85 of 306
CONTROLS AND EQ
UIPMEN T---------------------
Retrieving using the
memory buttons
• With the passenger's door open, de
press and release the desired memory but
ton. The seat will automatically adjust to the
stored position.
• If the door has been closed, you must
then depress and hold the memory button
until the seat has reached its stored posi
tion.
Note
You can not reca ll the stored seat adjust
ment for the front passenger's seat using
the remote control in the master key.
84 Emergency
Off
In an emergency, you can interrupt
any retrieval procedure by
• pressing the '"STOP'" button (see il
lustration on page 81 and 83). or
• tapping one of the memory buttons.
Pushing the"ON/OFF"button to the OFF
position only switches off the Memory. The
stored settings will not be erased.
It's a good idea to turn the Memory off if the
vehicle is going to be used temporarily by a
driver whose driving position will not be
memorized.
The advantage is that the personal settings
that have already been memorized will re
main intact and will not change each time
the vehicle is unlocked using the remote
control. Note
The memory function is switched off when
the STOP button is pressed. The word
''OFF" lights up if the headlights are
switched on. However, the programmed
seat, outside mirrors and steering wheel
positions remain stored in the memory.
Page 195 of 306
VEHICLE OPERA
TION-----------------------
Operate your vehicle safely
The condition of the vehicle is es
sential for driving safety.
Therefore, always be sure to observe the
following points before you drive off:
• Check lights and turn signals.
• Check fuel level.
• Adjust the mirrors.
• Make sure that all lights and all
windows are clean.
• Make sure the air Intake slot be
tween the engine hood and the
windshield is free of leaves, snow
and ice.
• Check warning and indicator
lights when starting the engine.
For driving safety, always follow the speci
fied maintenance intervals in your Mainte
nance booklet -especially for changing
the brake fluid, see page 242.
Yo ur personal driving style and your
attitude affect driving safety to a
very great extent.
19 4 Therefore,
for your own safety:
• Wear your safety belts and wear
them properly, even if you're just
driving in the city or to the corner
store -see page 14.
• Make sure that all passengers are
wearing their safety belts properly,
even those sitting in the rear -
see page 14.
Passengers not wearing safety belts endan
ger not only themselves in case of an acci
dent, but also the driver and other passen
gers.
• Make sure that children always sit
on the rear seat properly restrained
by a res traint system appropriate
for their size and age.
• Never transport a child in a rear
facing child or infant seat on the
front passenger seat.
• Adjust your seat so that you can
easily reach all controls as far away
from the airbag as possible but no
closer than 10 in. (25 em) -
see page 76. •
The seating position is very im
portant for the airbag performance
- see page 29.
• Always adjust the head restra ints
to the correct height.
For maximum protection, the upper edge of
the head restraints should be at least at
eye level, or higher .
• Always make sure that the move
ment of the pedals is not restricted
In any way-see page 102.
• Store luggage and light items
properly
in the luggage compartment
see page 88.
of the roof - see page 191.
• If you drink, do not drive.
The use of alcohol, drugs and certain medi
cations will seriously impair perception,
reactions and driving ability, and substan
tially increase the risk of an accident and
personal injury.
Page 303 of 306

ALP
HABETICAL INDEX
Safety belts ... ...... ... ... . _ . . 14
- Belt tensioner . . . . . . . . . . . 24
Safety compliance sticker . . . . . . 290
Seat belts and older children . . . . . 49
Seating capacity .... .. ... .. _.. . . 19
Seats ............ ... .. ..• .. , . 76
Secondary key . . . . . . •. _. • • . . 56
Securing a child seat . . . . . . . . . .
51
Securing luggage . . . . . . . . • . , . 89
Self-lev eling suspension . . • 123
Service interval display . . . . • • • . . 12 1
Service literature wallet .. .• .• .. 18 3
Service Repair Manuals . . • • 293
Setting a date . . . . . . . . . . . • • . . 135
Setting the menu ..... ... .. . _ . . 131
Setting the time I date . . . . . . 118
SID EGUARD . . . . . . .
. . . 39
•
Ski sack ........... •.••.••• ••.. 96
Sliding roof ........ _ ..• .. _ .... 168
Sliding I prop-up roof . . . . .• .. , . 168
Snow chains . . . . . • • • . .
261
Socket . .. . .. • . .. •
. • . . .. . .
181
Solar roof ...
Spare wheel
302 16
6, 170
. . 266 Spark
plugs .... _ ..... _ .. .. . _ . . 249
Speed range . . . . ..•.. . , 193
Speedometer . . . . . . . • . .
119
Starter switch . . . . . . . . . . . • . • . . 113
Starti ngmenu ..... ... ... ... .. 131
Starting procedures . . . . . .. , , 114
Starting with jumper cables ..... 278
Steering lock . . . . . . . . . . . , , • • • 113
Steering wheel .......... ••• .. _. 98
- Tiptronic . . . . . . . . . . . .
106
Steering wheel with Audio
controls . . . . . . . . . . . . . . . . . . . . 18 5
Stopping engine . . . . . . . . .
115
Storage compartmen t light . . . . . 178
Storage compartments . . . . . . . . . 182
Storing outside mirror setting . . . . 81
Storing seat position . . . . . . . . 81, 83
Storing steering wheel position . . 81
Sun shade . . . . . . . . . . . . . . . . . • . . 177
Sun visors . . . . . . . . . . . . . . . . . . 177
Sunr oof . . . . . . . . . . . . . . . . . • •.. 168
_Suspension, self-leveling . . . . . . . 123
Switches . . . . . .
148 Ta
chometer ••.. .• ••• ... •.
• . . 117
I • • • 57
286
... .. 190
Ta
g ......... ... ..... .. .
Tec hnical data ...•
Te lephone ..... .
Te mper ature gauge
Tie-down hooks ... ..
.. . 118
Tilt and telescopic steering wheel
Tiptronic ......... _ .. _ .. _ .. .. .
- steering wheel . . . . .•• . , ..
lire .
89
98
10 5
106
- Pressure . . . . . • • . . • . . 253
- Replacement .. _ . . . . . . 255,
259
- Rotation . . . .
254
- Specification • • . . . . •
256
-W ear ....... 254
lire qualit y grading information . . 258
Tires . . . . . . . . . . . . . .
252
Too ls . . . . . . . . . . . . . . . . . • . . • . • 264
Tow ing........... • ..... ... • 281
To wing anchor ages • • . . . . . 281
Tra iler towing . . . . . . •• .. , • . .• • 208
- Driving instructions __ ... ... . 210