Page 9 of 55
20-61
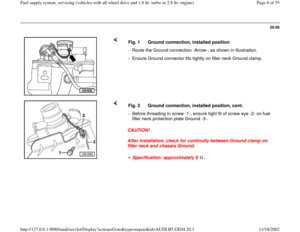
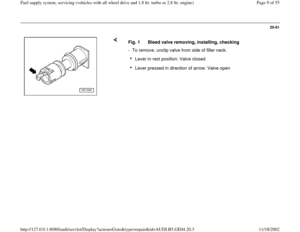
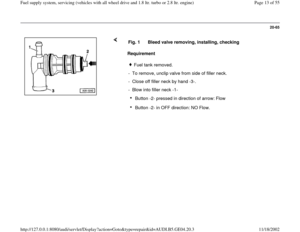
Fig. 1 Bleed valve removing, installing, checking
- To remove, unclip valve from side of filler neck.
Lever in rest position: Valve closed Lever pressed in direction of arrow: Valve open
Pa
ge 9 of 55 Fuel su
pp
ly system, servicin
g (vehicles with all wheel drive and 1.8 ltr. turbo or 2.8 ltr. en
gine
)
11/18/2002 htt
p://127.0.0.1:8080/audi/servlet/Dis
play?action=Goto&t
yp
e=re
pair&id=AUDI.B5.GE04.20.3
Page 10 of 55
20-62
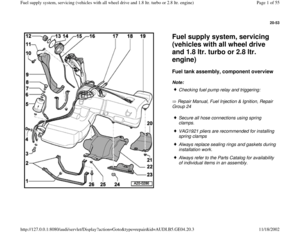
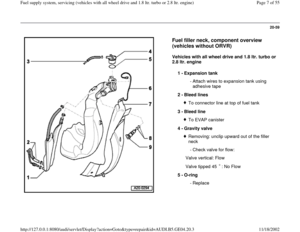
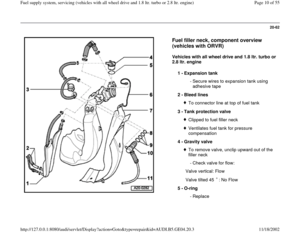
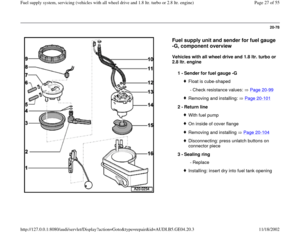
Fuel filler neck, component overview
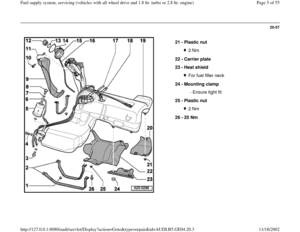
(vehicles with ORVR)
Vehicles with all wheel drive and 1.8 ltr. turbo or
2.8 ltr. engine
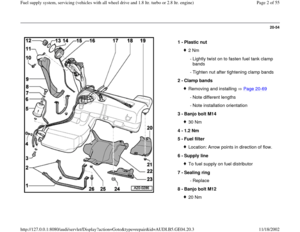
1 -
Expansion tank
- Secure wires to expansion tank using
adhesive tape
2 -
Bleed lines
To connector line at top of fuel tank
3 -
Tank protection valve Clipped to fuel filler neckVentilates fuel tank for pressure
compensation
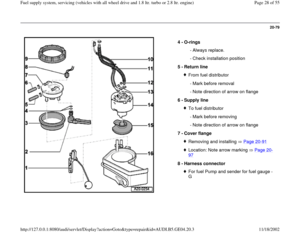
4 -
Gravity valve To remove valve, unclip upward out of the
filler neck
- Check valve for flow:
Valve vertical: Flow
Valve tilted 45 : No Flow
5 -
O-ring
-Replace
Pa
ge 10 of 55 Fuel su
pp
ly system, servicin
g (vehicles with all wheel drive and 1.8 ltr. turbo or 2.8 ltr. en
gine
)
11/18/2002 htt
p://127.0.0.1:8080/audi/servlet/Dis
play?action=Goto&t
yp
e=re
pair&id=AUDI.B5.GE04.20.3
Page 11 of 55
20-63
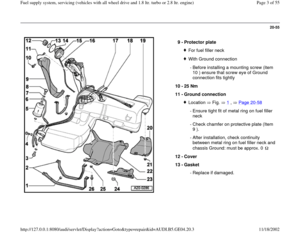
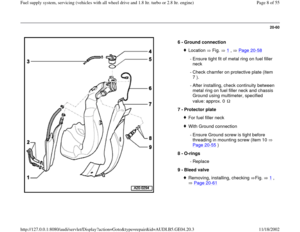
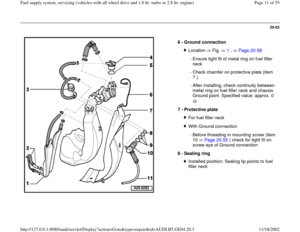
6 -
Ground connection
Location Fig. 1
, Page 20
-58
- Ensure tight fit of metal ring on fuel filler
neck
- Check chamfer on protective plate (item
7 ).
- After installing, check continuity between
metal ring on fuel filler neck and chassis
Ground point. Specified value: approx. 0
7 -
Protective plate
For fuel filler neckWith Ground connection
- Before threading in mounting screw (item
10 Page 20
-55
) check for tight fit on
screw eye of Ground connection
8 -
Sealing ring
Installed position: Sealing lip points to fuel
filler neck
Pa
ge 11 of 55 Fuel su
pp
ly system, servicin
g (vehicles with all wheel drive and 1.8 ltr. turbo or 2.8 ltr. en
gine
)
11/18/2002 htt
p://127.0.0.1:8080/audi/servlet/Dis
play?action=Goto&t
yp
e=re
pair&id=AUDI.B5.GE04.20.3
Page 12 of 55
20-64
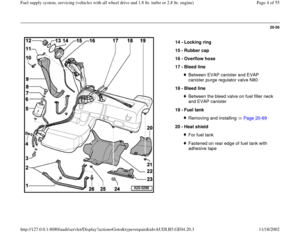
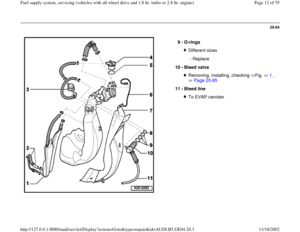
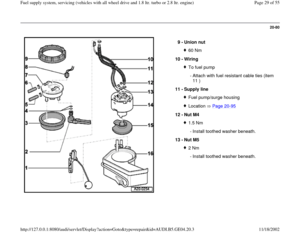
9 -
O-rings
Different sizes
-Replace
10 -
Bleed valve Removing, installing, checking Fig. 1
,
Page 20
-65
11 -
Bleed line
To EVAP canister
Pa
ge 12 of 55 Fuel su
pp
ly system, servicin
g (vehicles with all wheel drive and 1.8 ltr. turbo or 2.8 ltr. en
gine
)
11/18/2002 htt
p://127.0.0.1:8080/audi/servlet/Dis
play?action=Goto&t
yp
e=re
pair&id=AUDI.B5.GE04.20.3
Page 13 of 55
20-65
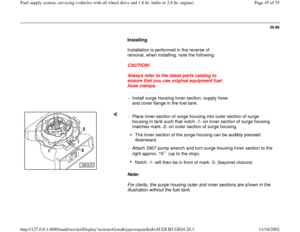
Requirement Fig. 1 Bleed valve removing, installing, checking
Fuel tank removed.
- To remove, unclip valve from side of filler neck.
- Close off filler neck by hand -3-.
- Blow into filler neck -1- Button -2- pressed in direction of arrow: Flow Button -2- in OFF direction: NO Flow.
Pa
ge 13 of 55 Fuel su
pp
ly system, servicin
g (vehicles with all wheel drive and 1.8 ltr. turbo or 2.8 ltr. en
gine
)
11/18/2002 htt
p://127.0.0.1:8080/audi/servlet/Dis
play?action=Goto&t
yp
e=re
pair&id=AUDI.B5.GE04.20.3
Page 14 of 55
20-66
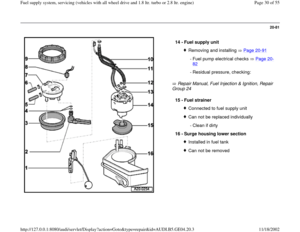
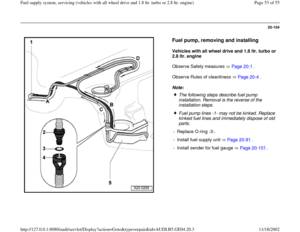
Fuel tank, draining
Vehicles with all wheel drive and 1.8 ltr. turbo
or 2.8 ltr. engine
WARNING!
Fire hazard! Do NOT have anything in the
area that can ignite gasoline!
Observe Safety measures Page 20
-1 .
Observe Rules of cleanliness Page 20
-4 .
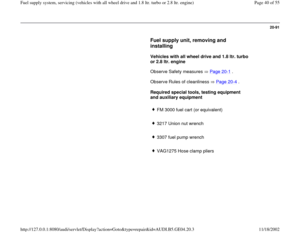
Required equipment
FM 3000 fuel storage cart (or equivalent)
Pa
ge 14 of 55 Fuel su
pp
ly system, servicin
g (vehicles with all wheel drive and 1.8 ltr. turbo or 2.8 ltr. en
gine
)
11/18/2002 htt
p://127.0.0.1:8080/audi/servlet/Dis
play?action=Goto&t
yp
e=re
pair&id=AUDI.B5.GE04.20.3
Page 15 of 55
20-67
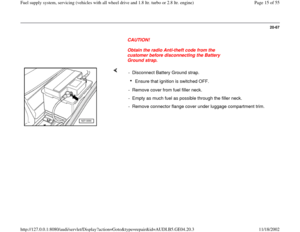
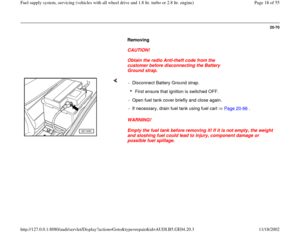
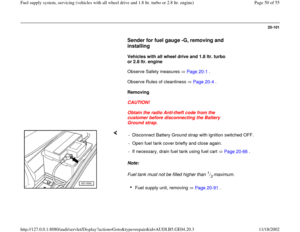
CAUTION!
Obtain the radio Anti-theft code from the
customer before disconnecting the Battery
Ground strap.
- Disconnect Battery Ground strap.
Ensure that ignition is switched OFF.
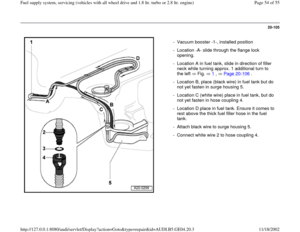
- Remove cover from fuel filler neck.
- Empty as much fuel as possible through the filler neck.
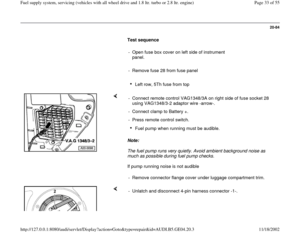
- Remove connector flange cover under luggage compartment trim.
Pa
ge 15 of 55 Fuel su
pp
ly system, servicin
g (vehicles with all wheel drive and 1.8 ltr. turbo or 2.8 ltr. en
gine
)
11/18/2002 htt
p://127.0.0.1:8080/audi/servlet/Dis
play?action=Goto&t
yp
e=re
pair&id=AUDI.B5.GE04.20.3
Page 16 of 55
20-68
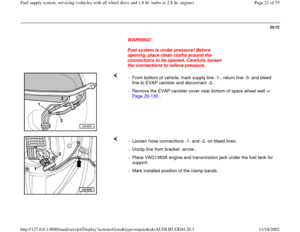
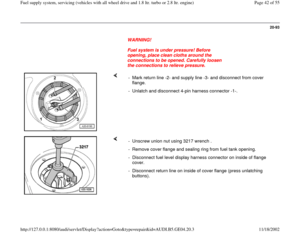
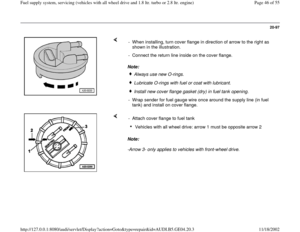
WARNING!
Fuel system is under pressure! Before
opening, place clean cloths around the
connections to be opened. Carefully loosen
the connections to relieve pressure.
- Mark return line -2-, supply line -3- and remove cover flange.
- Unlatch and disconnect 4-pin harness connector -1-.
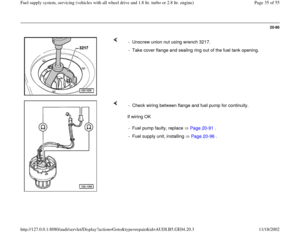
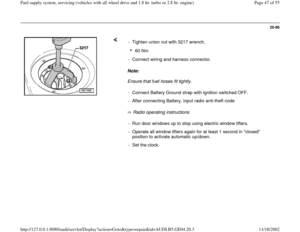
- Unscrew union nut using 3217 wrench.
- Remove cover flange and sealing ring from fuel tank opening.
- Pump remaining fuel through the flange opening.
Pa
ge 16 of 55 Fuel su
pp
ly system, servicin
g (vehicles with all wheel drive and 1.8 ltr. turbo or 2.8 ltr. en
gine
)
11/18/2002 htt
p://127.0.0.1:8080/audi/servlet/Dis
play?action=Goto&t
yp
e=re
pair&id=AUDI.B5.GE04.20.3


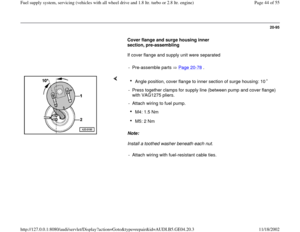
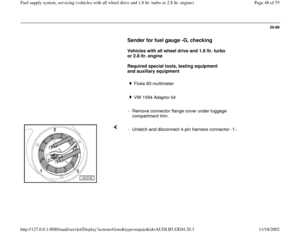


Vehicles with all wheel drive and 1.8 ltr. turbo or
2.8 ltr. engine
1 -
Expansion tank
- Secure wires to expansion tank us")
.
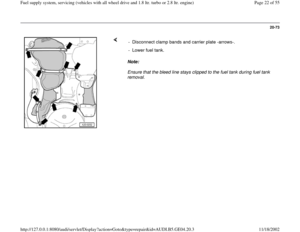
- After installing, che")


