1999 TOYOTA LAND CRUISER length
[x] Cancel search: lengthPage 37 of 202
New L/C100(U)45
CAUTION
Persons should ride in their seats
properly wearing their seat belts
whenever the vehicle is moving.
Otherwise, they are much more likely
to suffer serious bodily injury or
death in the event of sudden braking
or a collision.
When using the seat belts, observe
the following: �Use the belt for only one person at
a time. Do not use a single belt for
two or more peopleÐeven children.
� Avoid reclining the seatbacks too
much. The seat belts provide maxi-
mum protection when the seatbacks
are in the upright position. (Refer
to the seat adjustment instructions.)
� Be careful not to damage the belt
webbing or hardware. Take care that
they do not get caught or pinched
in the seat or doors.
� Inspect the belt system periodically.
Check for cuts, fraying, and loose
parts. Damaged parts should be re-
placed. Do not disassemble or
modify the system.
�Keep the belts clean and dry. If
they need cleaning, use a mild soap
solution or lukewarm water. Never
use bleach, dye, or abrasive clean-
ersÐthey may severely weaken the
belts. (See ºCleaning the interiorº
in Part 5.)
� Replace the belt assembly (includ-
ing bolts) if it has been used in a
severe impact. The entire assembly
should be replaced even if damage
is not obvious.
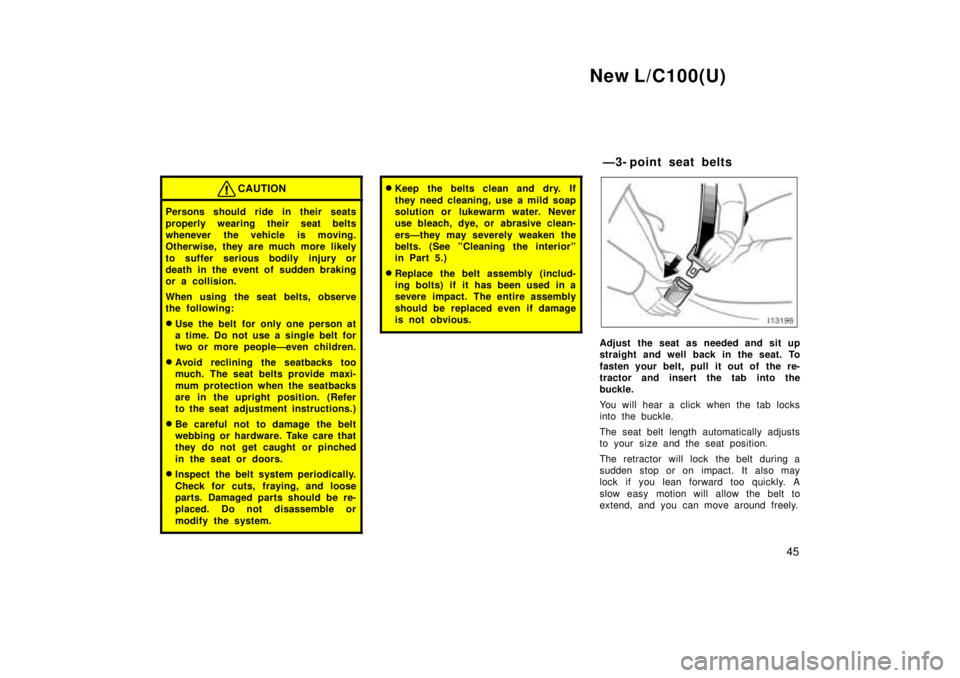
Adjust the seat as needed and sit up
straight and well back in the seat. To
fasten your belt, pull it out of the re-
tractor and insert the tab into the
buckle.
You will hear a click when the tab locks
into the buckle.
The seat belt length automatically adjusts
to your size and the seat position.
The retractor will lock the belt during a
sudden stop or on impact. It also may
lock if you lean forward too quickly. A
slow easy motion will allow the belt to
extend, and you can move around freely.Ð3- point seat belts
Page 40 of 202
New L/C100(U)
48
Ð2- point seat belt
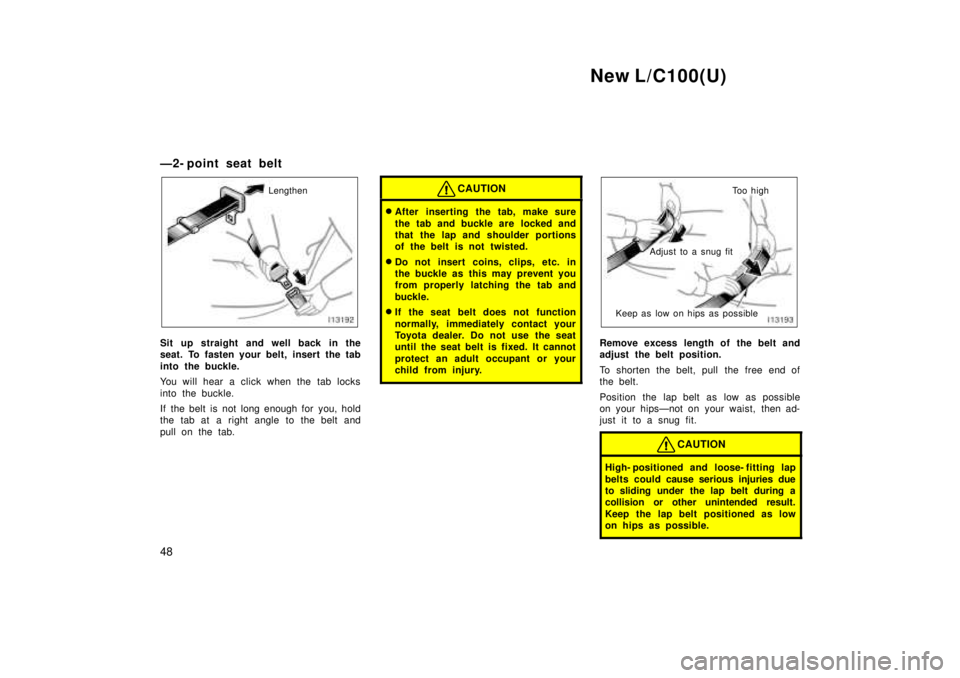
Lengthen
Sit up straight and well back in the
seat. To fasten your belt, insert the tab
into the buckle.
You will hear a click when the tab locks
into the buckle.
If the belt is not long enough for you, hold
the tab at a right angle to the belt and
pull on the tab.
CAUTION
�
After inserting the tab, make sure
the tab and buckle are locked and
that the lap and shoulder portions
of the belt is not twisted.
� Do not insert coins, clips, etc. in
the buckle as this may prevent you
from properly latching the tab and
buckle.
� If the seat belt does not function
normally, immediately contact your
Toyota dealer. Do not use the seat
until the seat belt is fixed. It cannot
protect an adult occupant or your
child from injury.
To o h i g h
Adjust to a snug fit
Keep as low on hips as possible
Remove excess length of the belt and
adjust the belt position.
To shorten the belt, pull the free end of
the belt.
Position the lap belt as low as possible
on your hipsÐnot on your waist, then ad-
just it to a snug fit.
CAUTION
High- positioned and loose- fitting lap
belts could cause serious injuries due
to sliding under the lap belt during a
collision or other unintended result.
Keep the lap belt positioned as low
on hips as possible.
Page 41 of 202
New L/C100(U)49
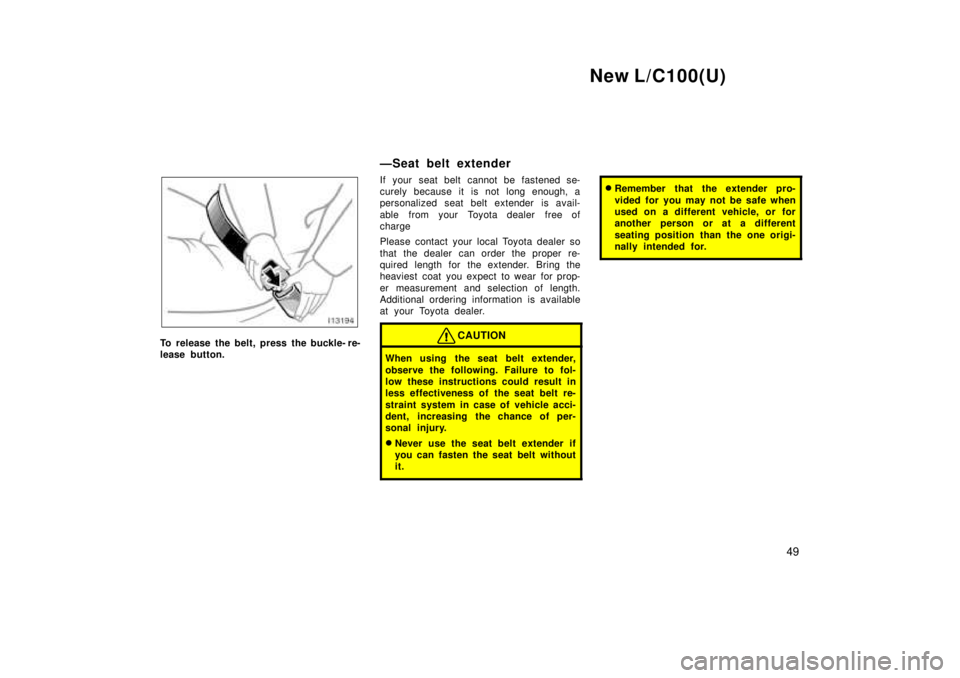
To release the belt, press the buckle- re-
lease button. ÐSeat belt extender
If your seat belt cannot be fastened se-
curely because it is not long enough, a
personalized seat belt extender is avail-
able from your Toyota dealer free of
charge
Please contact your local Toyota dealer so
that the dealer can order the proper re-
quired length for the extender. Bring the
heaviest coat you expect to wear for prop-
er measurement and selection of length.
Additional ordering information is available
at your Toyota dealer.CAUTION
When using the seat belt extender,
observe the following. Failure to fol-
low these instructions could result in
less effectiveness of the seat belt re-
straint system in case of vehicle acci-
dent, increasing the chance of per-
sonal injury. �
Never use the seat belt extender if
you can fasten the seat belt withoutit.
�Remember that the extender pro-
vided for you may not be safe when
used on a different vehicle, or for
another person or at a different
seating position than the one origi-
nally intended for.
Page 68 of 202
New L/C100(U)
76
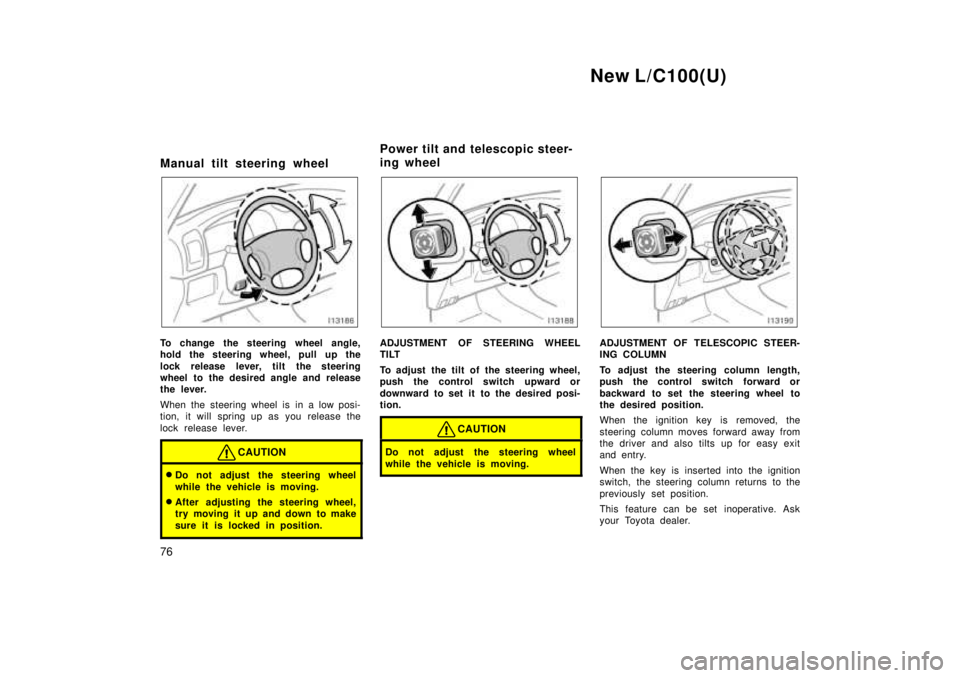
Manual tilt steering wheel
To change the steering wheel angle,
hold the steering wheel, pull up the
lock release lever, tilt the steering
wheel to the desired angle and release
the lever.
When the steering wheel is in a low posi-
tion, it will spring up as you release the
lock release lever.
CAUTION
�
Do not adjust the steering wheel
while the vehicle is moving.
� After adjusting the steering wheel,
try moving it up and down to make
sure it is locked in position.
ADJUSTMENT OF STEERING WHEEL
TILT
To adjust the tilt of the steering wheel,
push the control switch upward or
downward to set it to the desired posi-
tion.
CAUTION
Do not adjust the steering wheel
while the vehicle is moving.
ADJUSTMENT OF TELESCOPIC STEER-
ING COLUMN
To adjust the steering column length,
push the control switch forward or
backward to set the steering wheel to
the desired position.
When the ignition key is removed, the
steering column moves forward away from
the driver and also tilts up for easy exit
and entry.
When the key is inserted into the ignition
switch, the steering column returns to the
previously set position.
This feature can be set inoperative. Ask
your Toyota dealer.
Power tilt and telescopic steer-
ing wheel
Page 166 of 202
New L/C100(U)
174
NOTICE
Do not use axle- mounted hitches as they can cause damage to the axlehousing, wheel bearings, wheels ortires. Also, never install a hitch which
may interfere with the normal functionof an Energy Absorbing Bumper, if soequipped.
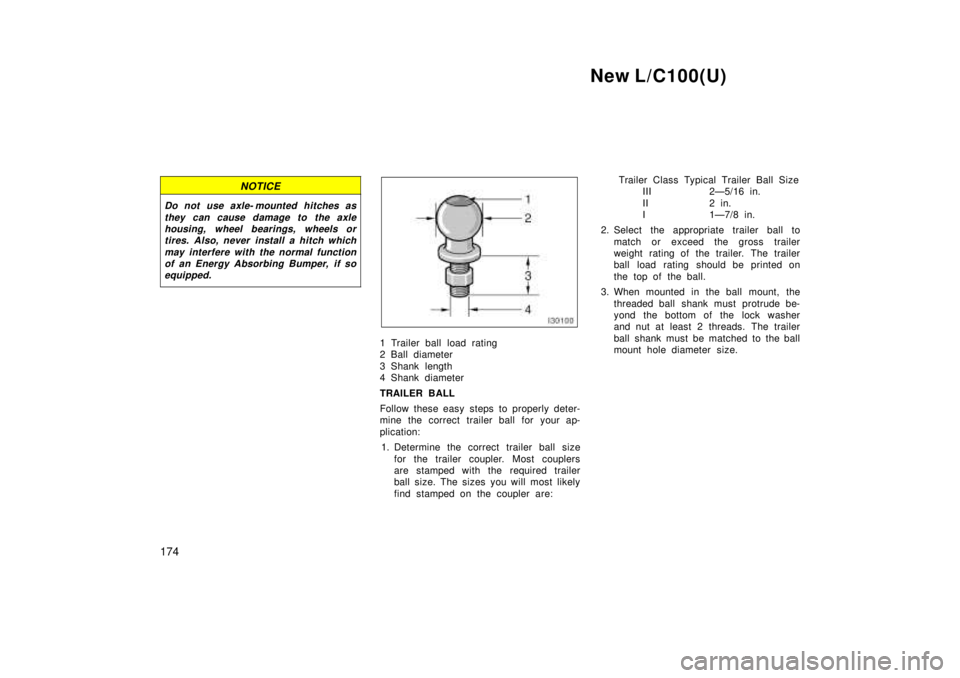
1 Trailer ball load rating
2 Ball diameter
3 Shank length
4 Shank diameter
TRAILER BALL
Follow these easy steps to properly deter-
mine the correct trailer ball for your ap-
plication:
1. Determine the correct trailer ball size for the trailer coupler. Most couplers
are stamped with the required trailer
ball size. The sizes you will most likely
find stamped on the coupler are: Trailer Class Typical Trailer Ball Size
III 2Ð5/16 in.
II 2 in. I1 Ð7/8 i n.
2. Select the appropriate trailer ball to match or exceed the gross trailer
weight rating of the trailer. The trailer
ball load rating should be printed on
the top of the ball.
3. When mounted in the ball mount, the threaded ball shank must protrude be-
yond the bottom of the lock washer
and nut at least 2 threads. The trailer
ball shank must be matched to the ball
mount hole diameter size.
Page 168 of 202

New L/C100(U)
176
TIRES
� Ensure that your vehicle's tires are
properly inflated. Adjust the tire pres-
sure indicated below:
Tire pressure, kPa (kgf/cm 2
or bar, psi)
Front 220 (2.2, 32)
Rear 240 (2.4, 35)
� The trailer tires should be inflated to
the pressure recommended by the trail-
er manufacturer in respect to the total
trailer weight.
TRAILER LIGHTS � Trailer lights must comply with federal,
state/provincial and local regulations.
See your local recreational vehicle
dealer or rental agency for the correct
type of wiring and relays for your trail-
er. Check for correct operation of the
turn signals and stop lights each time
you hitch up. Direct splicing may dam-
age your vehicle's electrical system
and cause a malfunction of your lights.
BREAK- IN SCHEDULE
� Toyota recommends that you do not
tow a trailer with a new vehicle or a
vehicle with any new power train com-
ponent (engine, transmission, differen-
tial, wheel bearing, etc.) for the first
800 km (500 miles) of driving. MAINTENANCE
� If you tow a trailer, your vehicle will
require more frequent maintenance due
to the additional load. For this
information, please refer to the
scheduled maintenance information in
the ºScheduled Maintenance Guideº or
ºOwner 's Manual Supplementº.
� Retighten all fixing bolts of the towing
ball and bracket after approximately
1000 km (600 miles) of trailer driving.
PRE- TOWING SAFETY CHECK � Check that your vehicle remains level
when a loaded or unloaded trailer is
hitched. Do not drive if the vehicle has
an abnormal nose- up or nose- down
condition, and check for improper
tongue load, overload, worn suspension
or other possible causes.
� Make sure the trailer cargo is securely
loaded so that it cannot shift.
� Check that your rear view mirrors con-
form to any applicable federal, state/
provincial or local regulation. If not,
install the rear view mirrors required
for towing purpose. TRAILER TOWING TIPS
When towing a trailer, your vehicle will
handle differently than when not tow-
ing. The three main causes of vehicle-
trailer accidents are driver error, exces-
sive speed and improper trailer loading.
Keep these in mind when towing:
� Before starting out, check operation of
the lights and all vehicle- trailer connec-
tions. After driving a short distance,
stop and recheck the lights and con-
nections. Before actually towing a trail-
er, practice turning, stopping and back-
ing with a trailer in an area away from
traffic until you learn the feel.
� Because stopping distance may be in-
creased, vehicle- to- vehicle distance
should be increased when towing a
trailer. For each 16 km/h (10 mph) of
speed, allow at least one vehicle and
trailer length between you and the ve-
hicle ahead. Avoid sudden braking as
you may skid, resulting in jackknifing
and loss of control. This is especially
true on wet or slippery surfaces.
Page 169 of 202

New L/C100(U)177
�
Avoid jerky starts or sudden accelera-
tion.
� Avoid jerky steering and sharp turns.
The trailer could hit your vehicle in a
tight turn. Slow down before making a
turn to avoid the necessity of sudden
braking.
� Remember that when making a turn,
the trailer wheels will be closer than
the vehicle wheels to the inside of the
turn. Therefore, compensate for this by
making a larger than normal turning
radius with your vehicle.
� Backing with a trailer is difficult and
requires practice. Grip the bottom of
the steering wheel and move your hand
to the left to move the trailer to the
left. Move your hand to the right to
move the trailer to the right. (This pro-
cedure is generally opposite to that
when backing without a trailer). Also,
just turn the steering wheel a little at
a time, avoiding sharp or prolonged
turning. Have someone guide you when
backing to reduce the risk of an acci-
dent. �
Crosswinds and rough roads will ad-
versely affect handling of your vehicle
and trailer, causing sway. Pay attention
to the rear from time to time to pre-
pare yourself for being passed by large
trucks or buses, which may cause your
vehicle and trailer to sway. If swaying
happens, firmly grip the steering wheel
and reduce speed immediately but
gradually. Never increase speed. Steer
straight ahead. If you make no extreme
correction with the steering or brakes,
the vehicle and trailer will stabilize it-
self.
� Be careful when passing other ve-
hicles. Passing requires considerable
distance. After passing a vehicle, do
not forget the length of your trailer and
be sure you have plenty of room be-
fore changing lanes.
� In order to maintain engine braking effi-
ciency, do not use the ºDº position. �
Because of the added load of the trail-
er, your vehicle's engine may overheat
on hot days (at temperatures over 305C [85 5F]) when going up a long or
steep grade with a trailer. If the engine
coolant temperature gauge indicates
overheating, immediately turn off the air
conditioning (if in use), pull off the road
and stop in a safe spot. Refer to ºIf
your vehicle overheatsº in Part 4 of
this manual.
� Always place wheel blocks under both
the vehicle and trailer wheels when
parking. Apply the parking brake firmly.
Put the transmission in ºPº. Avoid park-
ing on a slope with a trailer, but if it
cannot be avoided, do so only after
performing the following:
1. Apply the brakes and hold.
2. Have someone place wheel blocks under both the vehicle and trailer
wheels.
3. When the wheel blocks are in place, release your brakes slowly until the
blocks absorb the load.
4. Apply the parking brake firmly.
5. Shift into ºPº and turn off the en- gine.
Page 170 of 202
New L/C100(U)
178 When restarting out after parking on a
slope:
1. With the transmission in ºPº posi- tion, start the engine. Be sure to
keep the brake pedal depressed.
2. Shift into the º2º, ºLº or ºRº position.
3. Release the parking brake and brake pedal and slowly pull or back
away from the wheel blo cks. Stop
and apply your brakes.
4. Have someone retrieve the blo cks.
CAUTION
�Do not exceed 72 km/h (45 mph) or
the posted towing speed limit,
whichever is lower. Because insta-
bility (swaying) of a towing vehicle-
trailer combination usually in-
creases as the speed increases, ex-
ceeding 72 km/h (45 mph) may
cause loss of control.
� Slow down and downshift before
descending steep or long downhill
grades. Do not make sudden down-
shifts.
� Avoid holding the brake pedal down
too long or too frequently. This
could cause the brakes to overheat
and result in reduced braking effi-
ciency.
Getting more kilometers/mileage from a
liter/gallon of fuel is easy±just take it
easy. It will help make your vehicle last
longer, too. Here are some specific tips
on how to save money on both fuel and
repairs:
� Keep your tires inflated at the cor-
rect pressure. Underinflation causes
tire wear and wastes fuel. See Chapter
7- 2 for instructions.
� Do not carry unneeded weight in
your vehicle. Excess weight puts a
heavier load on the engine, causing
greater fuel consumption.
� Avoid lengthy warm- up idling. Once
the engine is running smoothly, begin
drivingÐbut gently. Remember, howev-
er, that on cold winter days this may
take a little longer.
� Accelerate slowly and smoothly.
Avoid jackrabbit starts.
� Avoid long engine idling. If you have
a long wait and you are not in traffic,
it is better to turn off the engine and
start again later
� Avoid engine overrevving. Use a gear
position suitable for the road on which
you are travelling
How to save fuel and make
your vehicle last longer, too