1999 TOYOTA LAND CRUISER ECO mode
[x] Cancel search: ECO modePage 8 of 202

New L/C100(U)
16
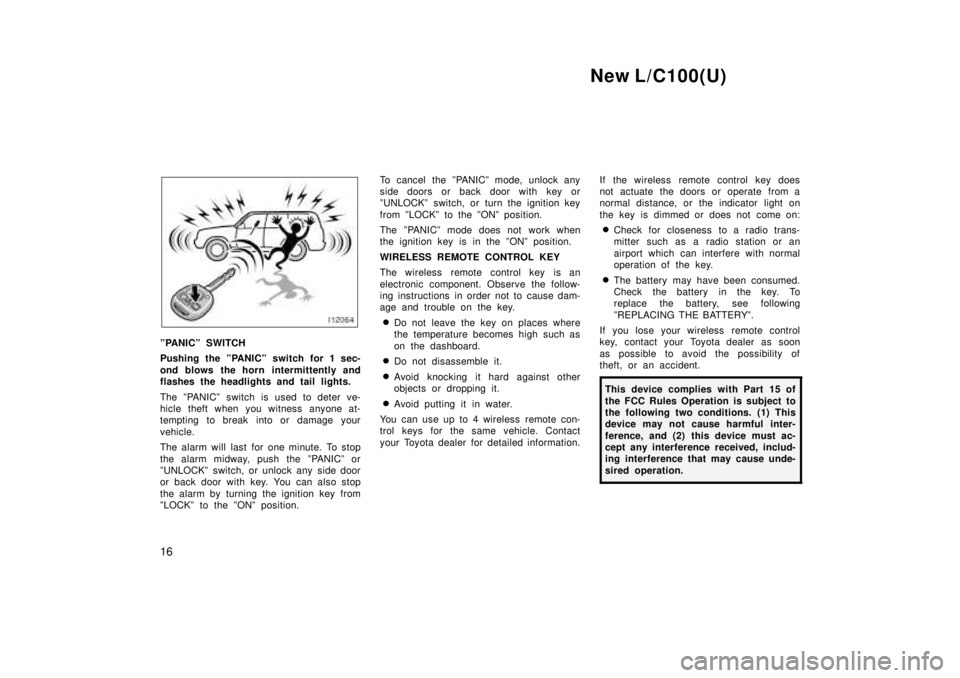
ºPANICº SWITCH
Pushing the ºPANICº switch for 1 sec-
ond blows the horn intermittently and
flashes the headlights and tail lights.
The ºPANICº switch is used to deter ve-
hicle theft when you witness anyone at-
tempting to break into or damage your
vehicle.
The alarm will last for one minute. To stop
the alarm midway, push the ºPANICº or
ºUNLOCKº switch, or unlock any side door
or back door with key. You can also stop
the alarm by turning the ignition key from
ºLOCKº to the ºONº position. To cancel the ºPANICº mode, unlock any
side doors or back door with key or
ºUNLOCKº switch, or turn the ignition key
from ºLOCKº to the ºONº position.
The ºPANICº mode does not work when
the ignition key is in the ºONº position.
WIRELESS REMOTE CONTROL KEY
The wireless remote control key is an
electronic component. Observe the follow-
ing instructions in order not to cause dam-
age and trouble on the key.
� Do not leave the key on places where
the temperature becomes high such as
on the dashboard.
� Do not disassemble it.
� Avoid knocking it hard against other
objects or dropping it.
� Avoid putting it in water.
You can use up to 4 wireless remote con-
trol keys for the same vehicle. Contact
your Toyota dealer for detailed information. If the wireless remote control key does
not actuate the doors or operate from a
normal distance, or the indicator light on
the key is dimmed or does not come on:
� Check for closeness to a radio trans-
mitter such as a radio station or an
airport which can interfere with normal
operation of the key.
� The battery may have been consumed.
Check the battery in the key. To
replace the battery, see following
ºREPLACING THE BATTERYº.
If you lose your wireless remote control
key, contact your Toyota dealer as soon
as possible to avoid the possibility of
theft, or an accident.
This device complies with Part 15 of
the FCC Rules Operation is subject to
the following two conditions. (1) This
device may not cause harmful inter-
ference, and (2) this device must ac-
cept any interference received, includ-
ing interference that may cause unde-
sired operation.
Page 92 of 202

New L/C100(U)
100
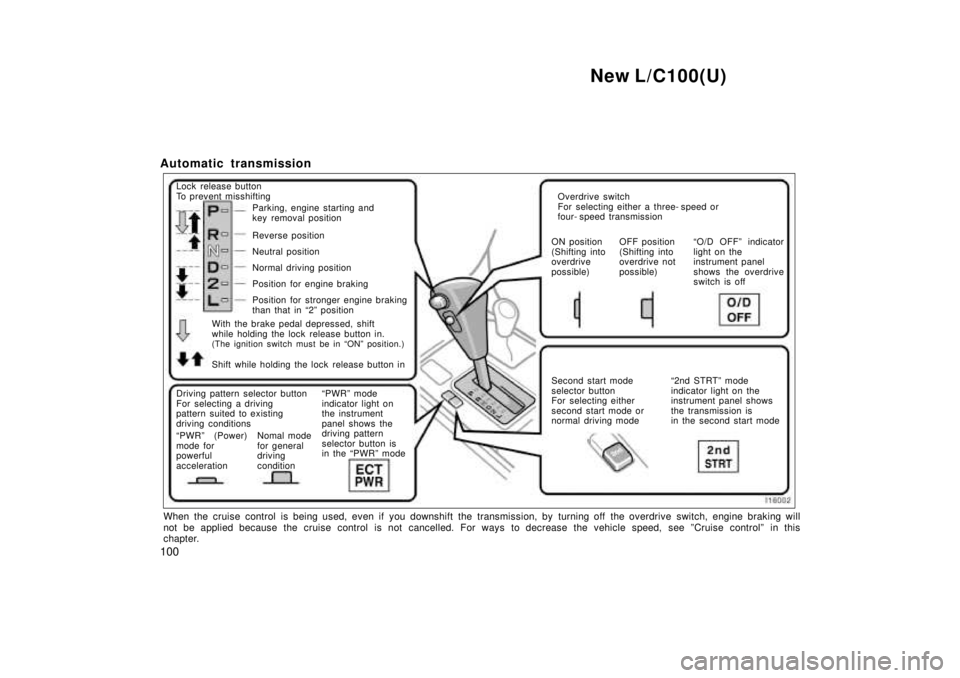
Automatic transmission
Lock release button
To prevent misshifting
Parking, engine starting and
key removal position
Reverse position
Neutral position
Normal driving position
Position for engine braking
Position for stronger engine braking
than that in 2º position
Driving pattern selector button
For selecting a driving
pattern suited to existing
driving conditions
PWRº (Power)
mode for
powerful
acceleration Nomal mode
for general
driving
conditionPWRº mode
indicator light on
the instrument
panel shows the
driving pattern
selector button is
in the PWRº mode Overdrive switch
For selecting either a three- speed or
four- speed transmission
ON position
(Shifting into
overdrive
possible) OFF position
(Shifting into
overdrive not
possible) O/D OFFº indicator
light on the
instrument panel
shows the overdrive
switch is off
Second start mode
selector button
For selecting either
second start mode or
normal driving mode 2nd STRTº mode
indicator light on the
instrument panel shows
the transmission is
in the second start mode
Shift while holding the lock release button in
With the brake pedal depressed, shift
while holding the lock release button in.
(The ignition switch must be in ONº position.)
When the cruise control is being used, even if you downshift the transmi ssion, by turning off the overdrive switch, engine braking will
not be applied because the cruise control is not cancelled. For ways to decrease the vehicle speed, see ºCruise controlº in this
chapter.
Page 95 of 202

New L/C100(U)103
CAUTION
Always keep your foot on the brake
pedal while stopped with the engine
running. This prevents the vehicle
from creeping.
NOTICE
Do not hold the vehicle on an up-grade with the accelerator pedal. Itcan cause the transmission to over-heat. Always use the brake pedal or
parking brake.
(g) Rocking your vehicle if stuck
CAUTION
If your vehicle becomes stuck in
snow, mud, sand, etc., then you may
attempt to rock the vehicle free by
moving it forward and backward. Do
not attempt this procedure if people
or objects are anywhere near the ve-
hicle. During the rocking operation
the vehicle may suddenly move for-
ward or backward as it becomes un-
stuck, causing injury or damage to
nearby people or objects.
NOTICE
If you rock your vehicle, observe thefollowing precautions to prevent dam-age to the transmission and other parts.
�Do not depress the accelerator ped-
al while shifting the selector leveror before the transmission is com-
pletely shifted to forward or reversegear.
�Do not race the engine and avoid
spinning the wheels.
�If your vehicle remains stuck afterrocking the vehicle several times,
consider other ways such as tow-ing.
(h) Driving in ºPWRº (Power) mode
In the ºPWRº mode, the transmission is
shifted up and down at a higher vehicle
speed than in the Normal mode and a
more powerful acceleration is achieved. To
set the ºPWRº mode, push in the driving
pattern selector button. The ºPWRº mode
indicator light comes on.
For ordinary driving, Toyota recommends
using the Normal mode to improve fuel
economy.
(i) If you cannot shift the selector le- ver out of ºPº position
If you cannot shift the selector lever from
the ºPº position even though the brake
pedal is depressed, use the shift lock
override button. For instructions, see ºIf
you cannot shift automatic transmission
selector leverº in Part 4.
Page 96 of 202

New L/C100(U)
104
(j) Driving in º2nd STRTº (second
start) mode
In the º2nd STRTº (Second start) mode,
the transmission system shifts up from
second gear. Use this mode when starting
your vehicle in sand, mud, ice or snow.
To set the º2nd STRTº mode, push the
º2ndº button. In the º2nd STRTº mode, the
º2nd STRTº indicator light comes on.
The ºPWRº mode is automatically can-
celled when you push the º2ndº button.
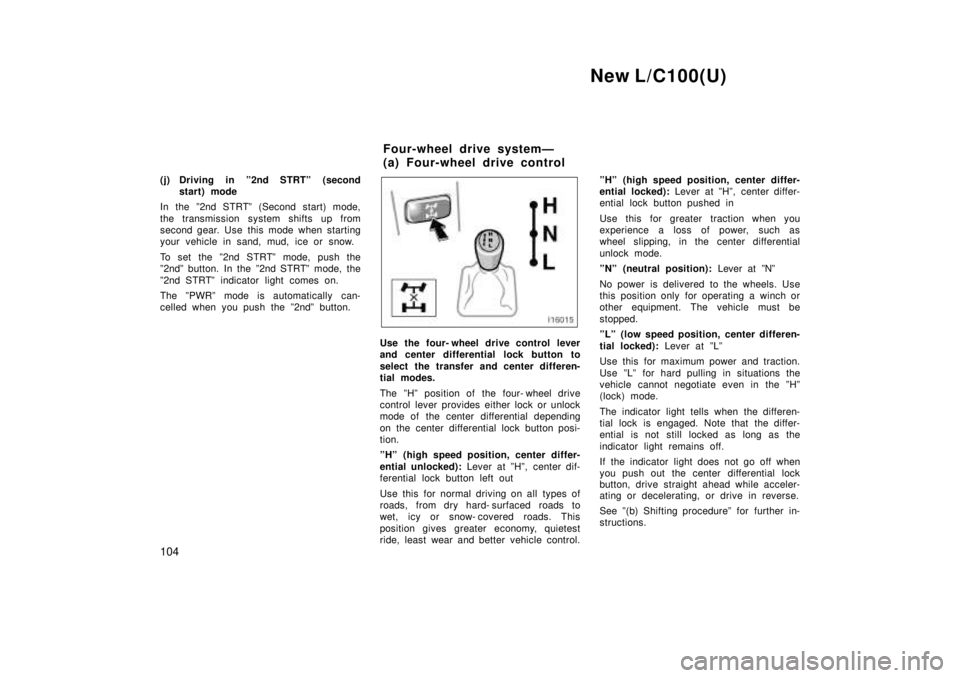
Use the four- wheel drive control lever
and center differential lock button to
select the transfer and center differen-
tial modes.
The ºHº position of the four- wheel drive
control lever provides either lock or unlock
mode of the center differential depending
on the center differential lock button posi-
tion.
ºHº (high speed position, center differ-
ential unlocked): Lever at ºHº, center dif-
ferential lock button left out
Use this for normal driving on all types of
roads, from dry hard- surfaced roads to
wet, icy or snow- covered roads. This
position gives greater economy, quietest
ride, least wear and better vehicle control. ºHº (high speed position, center differ-
ential locked):
Lever at ºHº, center differ-
ential lock button pushed in
Use this for greater traction when you
experience a loss of power, such as
wheel slipping, in the center differential
unlock mode.
ºNº (neutral position): Lever at ºNº
No power is delivered to the wheels. Use
this position only for operating a winch or
other equipment. The vehicle must be
stopped.
ºLº (low speed position, center differen-
tial locked): Lever at ºLº
Use this for maximum power and traction.
Use ºLº for hard pulling in situations the
vehicle cannot negotiate even in the ºHº
(lock) mode.
The indicator light tells when the differen-
tial lock is engaged. Note that the differ-
ential is not still locked as long as the
indicator light remains off.
If the indicator light does not go off when
you push out the center differential lock
button, drive straight ahead while acceler-
ating or decelerating, or drive in reverse.
See º(b) Shifting procedureº for further in-
structions.
Four-wheel drive systemÐ
(a) Four-wheel drive control
Page 104 of 202

New L/C100(U)
11 2
This section describes some of the basic
features on Toyota audio systems. Some
information may not pertain to your sys-
tem.
Your audio system works when the ignition
key is in the ºACCº or ºONº position.
TURNING THE SYSTEM ON AND OFF
Push ºPWR´VOLº to turn the audio system
on and off.
Push ºAM´FMº, ºTAPEº or ºCDº to turn on
that function without pushing ºPWR´VOLº.
You can turn on each player by inserting
a cassette tape or compact disc.
You can turn off each player by ejecting
the cassette tape or compact disc. If the
audio system was previously off, then the
entire audio system will be turned off
when you eject the cassette tape or com-
pact disc. If the another function was pre-
viously playing, it will come on again.
SWITCHING BETWEEN FUNCTIONS
Push ºAM´FMº, ºTAPEº or ºCDº if the sys-
tem is already on but you want to switch
from one function to another.
TONE AND BALANCE
For details about your system's tone and
balance controls, see the description of
your own system.
Tone
How good an audio program sounds to
you is largely determined by the mix of
the treble, midrange, and bass levels. In
fact, different kinds of music and vocal
programs usually sound better with differ-
ent mixes of treble, midrange, and bass.
Balance
A good balance of the left and right stereo
channels and of the front and rear sound
levels is also important.
Keep in mind that if you are listening to
a stereo recording or broadcast, changing
the right/left balance will increase the vol-
ume of one group of sounds while de-
creasing the volume of another.
YOUR RADIO ANTENNA
Lowering the antenna
To lower a power antenna, push the º
�º
(down) switch. Also, the antenna automati-
cally goes down when the radio mode is
switched off to turn on the cassette tape
player or compact disc player, turning off
the audio system by pushing ºPWR´VOLº
or turning the ignition key to ºLOCKº posi-
tion.
Some models also have an antenna
printed on the inside of the right side
quarter window.
NOTICE
�To prevent damage to the antenna,
make sure it is retracted beforedriving your Toyota through an au-
tomatic car wash.
�On models with glass antenna, at- taching the film (especially conduc-tive or metallic type) on the right
side quarter window will noticeablyreduce the sensitivity of the radio.
ÐUsing your audio system:
some basics
Page 109 of 202

New L/C100(U)11 7
Dolby
�
B NR*
If you are listening to a tape that was
recorded with Dolby � B Noise Reduction,
push the button marked with the double- D
symbol. The double- D symbol will appear
on the display. Push the button again to
turn off Dolby � B NR.
The Dolby NR mode reduces tape noise
by about 10 dB. For best sound reproduc-
tion, play your tapes with this button on
or off according to the mode used for
recording the tape. * : Dolby noise reduction manufactured under license from
Dolby Laboratories Licensing Corporation. ºDOLBYº and the
double D symbol
are trademarks of Dolby Laboratories
Licensing Corporation.
MTL (Metal) Display
If a metal or chrome equivalent cassette
tape is put in the cassette player, the
player will automatically adapt to it and
ºMTLº will appear on the display. PROG (Program)
Push ºPROGº to select the other side of
a cassette tape. The display indicates
which side is currently selected (º
º indi-
cates top side, º
º indicates bottom
side).
Auto- reverse feature: After the cassette
player reaches the end of a tape side, it
automatically reverses and begins to play
the other side. This is true whether the
cassette was playing or fast forwarding.
PWR´VOL (Power´Volume)
Push ºPWR´VOLº to turn the audio system
on and off. Turn ºPWR´VOLº to adjust the
volume.
RAND (Random)
There are two random featuresÐyou can
either listen to the tracks on all the com-
pact discs in the magazine in random or-
der, or only listen to the tracks on a
specific compact disc in random order. Random playing for the tracks on a disc:
Quickly push and release ºRANDº. ºRANDº
will appear on the display. The disc you
are listening to will play in random order.
If you hear a beep, you held the button
too long, and the player will play all the
tracks in the magazine in random order.
To turn off the random feature, push the
ºRANDº a second time.
Compact disc auto changer onlyÐ
Random playing for all the tracks in the
magazine:
Push and hold ºRANDº until you hear a
beep. ºD´RANDº will appear on the display
and the player will perform all the tracks
on all the discs in the magazine in ran-
dom order. To turn off the random feature,
push ºRANDº a second time.
RPT (Repeat)
Cassette Player
Push ºRPTº while the track is playing.
ºRPTº will appear on the display. When
the track ends, it will automatically be
rewound and replayed. This process will
be continued until you push the button
again to turn off the repeat feature.
There must be at least 3 seconds of blank
space between tracks in order for the re-
peat feature to work correctly.
Page 111 of 202

New L/C100(U)11 9
SEEK (Seeking)
Radio
In the seek mode, the radio finds and
plays the next station up or down the
station band.
To seek a station, push and hold the º
�º
or º �º side of ºSEEKº until you hear a
beep. Do this again to find another sta-
tion.
Cassette Player
By using this button, you can skip up or
down to a different track.
You can skip up to nine tracks at a time.
Push the up or down side of the button.
ºFF 1º or ºREW 1º will appear on the
display.
Next, push either side of the track button
until the number on the display reaches
the number of tracks you want to skip. If
you push the button ten times, the skip
feature will be turned off. When counting the number of tracks you
want to rewind, remember to count the
current track as well. For example, if you
want to rewind to a song that is two be-
fore the song you are listening to, push
on the down side of the button until ºREW
3º appears on the display.
If you have pushed the track button more
than you wanted to, push the other side
of the button. The track number will be
reduced.
The track number you select is not valid
if it is higher than the number of tracks
remaining on the current cassette side.
� After the beginning of the tape is
reached, the player will automatically
start playing the same side.
� After the end of the tape is reached,
the player will automatically reverse
sides and start playing the other side.
There must be at least 3 seconds of blank
space between tracks for the track button
to work correctly. In addition, the feature
may not work well with some spoken
word, live, or classical recordings. SKIP
The skip feature allows you to fast for-
ward past long stretches of blank tape.
This is especially useful at the end of
cassettes.
Push ºSKIPº. ºSKIPº will appear on the
display. The cassette player will keep
track of how much blank space it plays.
Any time it has played about 10 seconds
of blank tape, it will automatically fast
forward to the next track and begin to
play.
Push the button a second time to turn off
the skip feature.
ST (Stereo reception) display
Your radio automatically changes to stereo
reception when a stereo broadcast is re-
ceived. ºSTº appears on the display. If the
signal becomes weak, the radio reduces
the amount of channel separation to prev-
ent the weak signal from creating noise.
If the signal becomes extremely weak, the
radio switches from stereo to mono recep-
tion.
Page 112 of 202

New L/C100(U)
120
TA P E
Push ºTAPEº to switch from radio or com-
pact disc operation to cassette operation.
If the audio system is off, you can turn
on the cassette player by pushing ºTAPEº.
In both cases, a cassette must already be
loaded in the player.
TRACK (Track up/down button):
Compact disc player
By using this button, you can skip up or
down to a different track.
Push either side of the track button until
the number of the track you want to listen
to appears on the display. If you want to
return to the beginning of the current
track, push the down side of the button
one time, quickly.
TUNE (Tuning)
Your Toyota has an electronic tuning radio
(ETR). Push and release the º
�º (up) or
º � º (down) side of ºTUNEº to step up or
down the station band. (If you hear a
beep, you held the button too long and
the radio will go into the seek mode.)
NOTICE
To ensure the correct audio system
operation:
�Be careful not to spill beveragesover the audio system.
�Do not put anything other than acassette tape or Compact Disc into
the slot.
�The use of cellular phone inside ornear the vehicle may cause a noise
from the speakers of the audio sys-tem which you are listening to. However, this does not indicate a
malfunction.
RADIO RECEPTION
Usually, a problem with radio reception
does not mean there is a problem with
your radioÐit is just the normal result of
conditions outside the vehicle.
For example, nearby buildings and terrain
can interfere with FM reception. Power
lines or telephone wires can interfere with
AM signals. And of course, radio signals
have a limited range, and the farther you
are from a station, the weaker its signal
will be. In addition, reception conditions
change constantly as your vehicle moves. Here are some common reception prob-
lems that probably do not indicate a prob-
lem with your radio: FM
Fading and drifting stationsÐGenerally, the
effective range of FM is about 40 km (25
miles). Once outside this range, you may
notice fading and drifting, which increase
with the distance from the radio transmit-
ter. They are often accompanied by distor-
tion.
Multi- pathÐFM signals are reflective,
making it possible for two signals to reach
your antenna at the same time. If this
happens, the signals will cancel each oth-
er out, causing a momentary flutter or
loss of reception.
Static and flutteringÐThese occur when
signals are blocked by buildings, trees, or
other large objects. Increasing the bass
level may reduce static and fluttering.
Station swappingÐIf the FM signal you
are listening to is interrupted or weak-
ened, and there is another strong station
nearby on the FM band, your radio may
tune in the second station until the origi-
nal signal can be picked up again.
ÐCar audio system operating
hints