1999 TOYOTA LAND CRUISER rear lights
[x] Cancel search: rear lightsPage 15 of 202
New L/C100(U)23
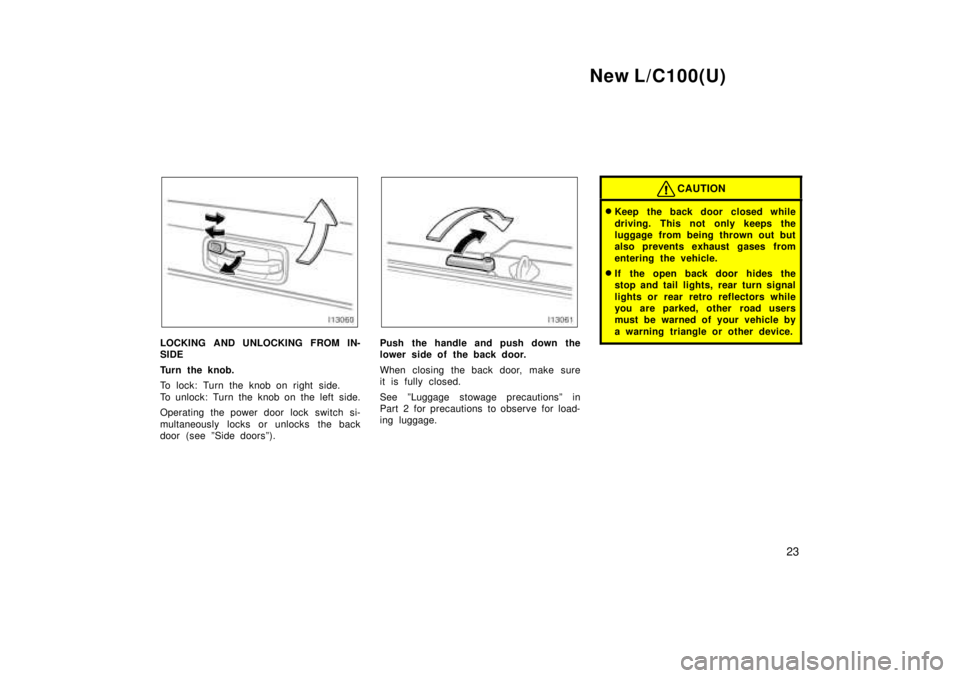
LOCKING AND UNLOCKING FROM IN-
SIDE
Turn the knob.
To lock: Turn the knob on right side.
To unlock: Turn the knob on the left side.
Operating the power door lock switch si-
multaneously locks or unlocks the back
door (see ºSide doorsº).Push the handle and push down the
lower side of the back door.
When closing the back door, make sure
it is fully closed.
See ºLuggage stowage precautionsº in
Part 2 for precautions to observe for load-
ing luggage.
CAUTION
�Keep the back door closed while
driving. This not only keeps the
luggage from being thrown out but
also prevents exhaust gases from
entering the vehicle.
� If the open back door hides the
stop and tail lights, rear turn signal
lights or rear retro reflectors while
you are parked, other road users
must be warned of your vehicle by
a warning triangle or other device.
Page 71 of 202
New L/C100(U)79
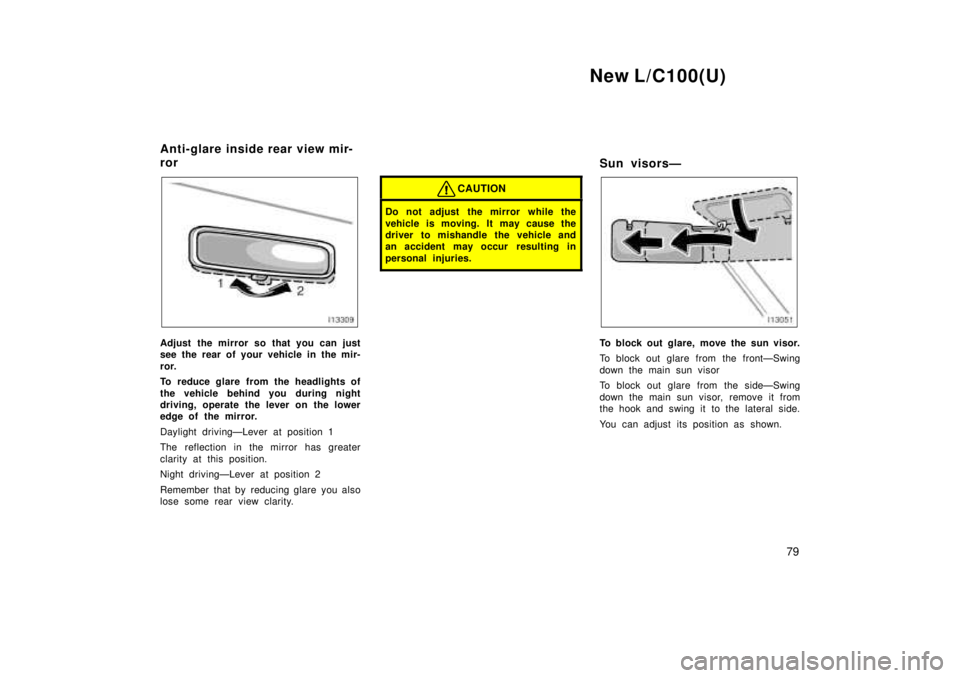
Adjust the mirror so that you can just
see the rear of your vehicle in the mir-
ror.
To reduce glare from the headlights of
the vehicle behind you during night
driving, operate the lever on the lower
edge of the mirror.
Daylight drivingÐLever at position 1
The reflection in the mirror has greater
clarity at this position.
Night drivingÐLever at position 2
Remember that by reducing glare you also
lose some rear view clarity.
CAUTION
Do not adjust the mirror while the
vehicle is moving. It may cause the
driver to mishandle the vehicle and
an accident may occur resulting in
personal injuries.
Sun visorsÐ
To block out glare, move the sun visor.
To block out glare from the frontÐSwing
down the main sun visor
To block out glare from the sideÐSwing
down the main sun visor, remove it from
the hook and swing it to the lateral side.
You can adjust its position as shown.
Anti-glare inside rear view mir-
ror
Page 73 of 202

New L/C100(U)81
Part 1
OPERATION OF
INSTRUMENTS AND
CONTROLSÐ
Chapter 1- 4
Lights, Wipers and Defogger �
Headlight and turn signals
�Emergency flashers
�Instrument panel light control
�Front fog lights
�Interior lights
�Personal lights
�Center interior and personal lights
�Ignition switch light
�Windshield wipers and washer
�Rear window wiper and washer
�Rear window defogger
�Outside rear view mirror heaters
Headlight and turn signals
HEADLIGHTS
To turn on the following lights: Twist
the headlight/turn signal lever knob.
Position 1ÐParking, tail, license plate,
side marker and instrument panel lights
Position 2ÐHeadlights and all of the
above
Position 3 (ºAUTOº)ÐHeadlights and/or all
of the above
They automatically turn on or off depend-
ing on the darkness of the surroundings.
Manually twist the knob to the position 2
to turn on the headlights if they are need-
ed immediately when entering a dark tun-
nel, parking structure, etc.The automatic light control sensor is on
the top of the passenger 's side instrument
panel.
Do not place anything on the instrument
panel, and/or do not affix anything on the
windshield to block this sensor.
If you feel that the automatic light control
comes into operation too early or too late,
have the sensor adjusted by your Toyota
dealer.
Page 75 of 202
New L/C100(U)83
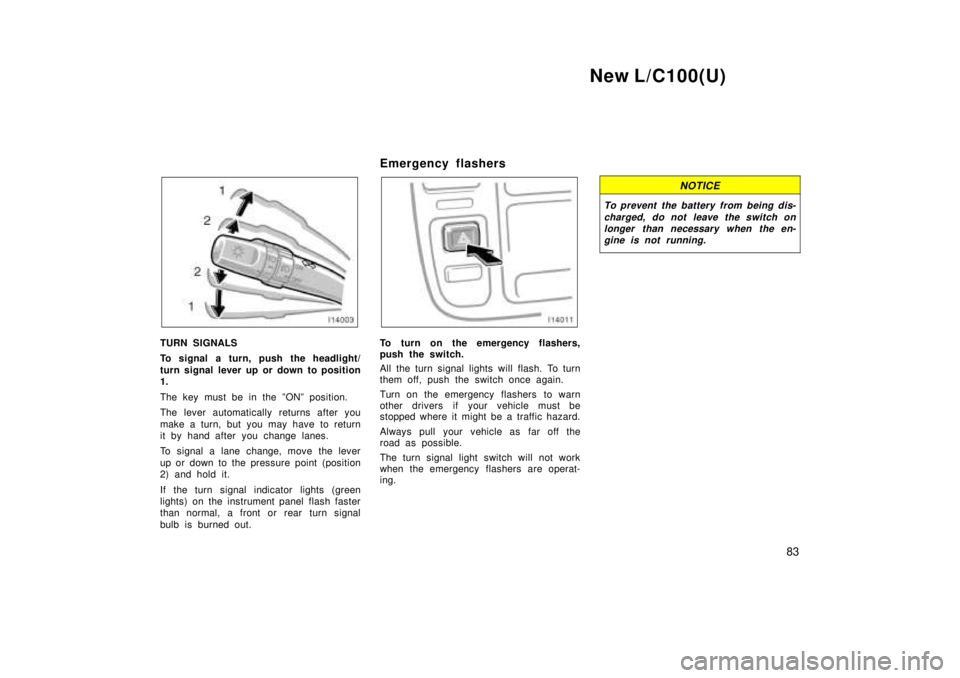
TURN SIGNALS
To signal a turn, push the headlight/
turn signal lever up or down to position 1.
The key must be in the ºONº position.
The lever automatically returns after you
make a turn, but you may have to return
it by hand after you change lanes.
To signal a lane change, move the lever
up or down to the pressure point (position
2) and hold it.
If the turn signal indicator lights (green
lights) on the instrument panel flash faster
than normal, a front or rear turn signal
bulb is burned out. Emergency flashersTo turn on the emergency flashers,
push the switch.
All the turn signal lights will flash. To turn
them off, push the switch once again.
Turn on the emergency flashers to warn
other drivers if your vehicle must be
stopped where it might be a traffic hazard.
Always pull your vehicle as far off the
road as possible.
The turn signal light switch will not work
when the emergency flashers are operat-
ing.
NOTICE
To prevent the battery from being dis-
charged, do not leave the switch onlonger than necessary when the en- gine is not running.
Page 77 of 202
New L/C100(U)85
To turn on the interior light, slide the
switch.
The interior light switch has the following
positions:
ºONºÐKeeps the light on all the time.
ºOFFºÐTurns the light off.
ºDOORºÐ
ÐCenter: Turn the light on when any of
side doors and back door are opened.
ÐRear: Turn the light on when any of the
rear side doors and back door areopened.
ILLUMINATED ENTRY SYSTEM
CenterÐ
With the switch in the ºDOORº position,
the light comes on when either side or
back door is opened. After all the doors
are closed, the light remains on for a
certain time and then goes out.
However, in the following cases, the light
goes out immediately:
� All the doors are closed when the igni-
tion key is in ºACCº, ºONº or ºSTARTº
position.
� The ignition key is turned to ºACCº,
ºONº or ºSTARTº when the light is stillon. �
All the doors are locked when the light
is still on.
� One front side door will be closed with
the lock knob pushed forward while the
other doors are locked.
INTERIOR LIGHTS CUT OFF OPERATION
When the ignition switch is ºOFFº and any
interior lights in the vehicle stay lighting
on, the lights will cut off automatically
after 30 minutes.
You can cancel the cut off operation by: � Turning the key to the ºACCº position.
� Opening or closing any of side doors
and back door
� Turning off all the ºONº lights.
All the lights are cut off when all the
doors are locked by key or wireless re-
mote control key.
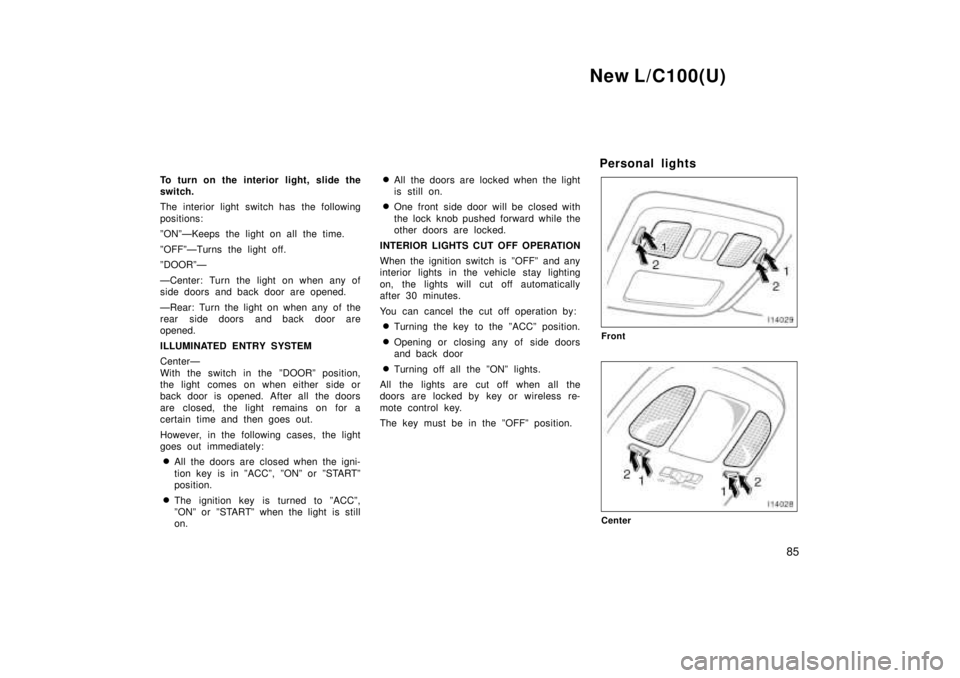
The key must be in the ºOFFº position. Personal lights
Front
Center
Page 159 of 202
New L/C100(U)167
Part 3
STARTING AND DRIV-
ING �
Before starting the engine
�How to start the engine
�Tips for driving in various
conditions
�Off- road driving precautions
�Winter driving tips
�Tr ailer towing
�How to save fuel and make your
vehicle last longer, too
Before starting the engine
1. Check the area around the vehicle be- fore entering it.
2. Adjust seat position, seatback angle, head restraint height and steering
wheel angle.
3. Adjust inside and outside rear view mirrors.
4. Lock all doors.
5. Fasten seat belts. 1. Apply the parking brake firmly.
2. Turn off unnecessary lights and acces-
sories.
3. Put the selector lever in ºPº. If you need to restart the engine while the
vehicle is moving, put the selector le-
ver in ºNº. A starter safety device will
prevent the starter from operating if the
selector lever is in any drive position.
4. Depress the brake pedal and hold it to the floor until driving off.
How to start the engine±
(a) Before cranking
Page 168 of 202

New L/C100(U)
176
TIRES
� Ensure that your vehicle's tires are
properly inflated. Adjust the tire pres-
sure indicated below:
Tire pressure, kPa (kgf/cm 2
or bar, psi)
Front 220 (2.2, 32)
Rear 240 (2.4, 35)
� The trailer tires should be inflated to
the pressure recommended by the trail-
er manufacturer in respect to the total
trailer weight.
TRAILER LIGHTS � Trailer lights must comply with federal,
state/provincial and local regulations.
See your local recreational vehicle
dealer or rental agency for the correct
type of wiring and relays for your trail-
er. Check for correct operation of the
turn signals and stop lights each time
you hitch up. Direct splicing may dam-
age your vehicle's electrical system
and cause a malfunction of your lights.
BREAK- IN SCHEDULE
� Toyota recommends that you do not
tow a trailer with a new vehicle or a
vehicle with any new power train com-
ponent (engine, transmission, differen-
tial, wheel bearing, etc.) for the first
800 km (500 miles) of driving. MAINTENANCE
� If you tow a trailer, your vehicle will
require more frequent maintenance due
to the additional load. For this
information, please refer to the
scheduled maintenance information in
the ºScheduled Maintenance Guideº or
ºOwner 's Manual Supplementº.
� Retighten all fixing bolts of the towing
ball and bracket after approximately
1000 km (600 miles) of trailer driving.
PRE- TOWING SAFETY CHECK � Check that your vehicle remains level
when a loaded or unloaded trailer is
hitched. Do not drive if the vehicle has
an abnormal nose- up or nose- down
condition, and check for improper
tongue load, overload, worn suspension
or other possible causes.
� Make sure the trailer cargo is securely
loaded so that it cannot shift.
� Check that your rear view mirrors con-
form to any applicable federal, state/
provincial or local regulation. If not,
install the rear view mirrors required
for towing purpose. TRAILER TOWING TIPS
When towing a trailer, your vehicle will
handle differently than when not tow-
ing. The three main causes of vehicle-
trailer accidents are driver error, exces-
sive speed and improper trailer loading.
Keep these in mind when towing:
� Before starting out, check operation of
the lights and all vehicle- trailer connec-
tions. After driving a short distance,
stop and recheck the lights and con-
nections. Before actually towing a trail-
er, practice turning, stopping and back-
ing with a trailer in an area away from
traffic until you learn the feel.
� Because stopping distance may be in-
creased, vehicle- to- vehicle distance
should be increased when towing a
trailer. For each 16 km/h (10 mph) of
speed, allow at least one vehicle and
trailer length between you and the ve-
hicle ahead. Avoid sudden braking as
you may skid, resulting in jackknifing
and loss of control. This is especially
true on wet or slippery surfaces.
Page 181 of 202

New L/C100(U)209
Tire surface and wheel nuts
Check the tires carefully for cuts, damage
or excessive wear. See Chapter 7- 2 for
additional information. When checking the
tires, make sure no nuts are missing, and
check the nuts for looseness. Tighten
them if necessary.
Tire rotation
Rotate the tires every 12000 km (7500
miles). See Chapter 7- 2 for additional in-
formation.
Fluid leaks
Check underneath for leaking fuel, oil, wa-
ter or other fluid after the vehicle has
been parked for a while. If you smell fuel
fumes or notice any leak, have the cause
found and corrected immediately.
Doors and engine hood
Check that all doors and back door oper-
ate smoothly and all latches lock securely.
Make sure the engine hood secondary
latch secures the hood from opening when
the primary latch is released.
INSIDE THE VEHICLE
Items listed below should be checked
regularly, e.g. while performing periodic
services, cleaning the vehicle, etc.
Lights
Make sure the headlights, stop lights, tail
lights, turn signal lights, and other lights
are all working. Check headlight aim.
Service reminder indicators and warning
buzzers
Check that all service reminder indicators
and warning buzzers function properly.
Steering wheel
Be alert for changes in steering condition,
such as hard steering or strange noise.
Seats
Check that all front seat controls such as
seat adjusters, seatback recliner, etc. op-
erate smoothly and that all latches lock
securely in any position. Check that the
head restraint move up and down smooth-
ly and that the locks hold securely in any
latched position. For folding- down rear
seatbacks, swing- up rear seat cushions
and detachable third seats, check that the
latches lock securely.Seat belts
Check that the seat belt system such as
buckles, retractors and anchors operate
properly and smoothly. Make sure that the
belt webbing is not cut, frayed, worn or
damaged.
Accelerator pedal
Check the pedal for smooth operation and
uneven pedal effort or catching.
Brake pedal
Check the pedal for smooth operation and
that the pedal has the proper clearance.
Check the brake booster function.
Brakes
At a safe place, check that the brakes do
not pull to one side when applied.
Parking brake
Check that the lever has the proper travel
and that, on a safe incline, your vehicle
is held securely with only the parking
brake applied.