Page 16 of 656

MAINTENANCE AND LUBRICATION 0B-3
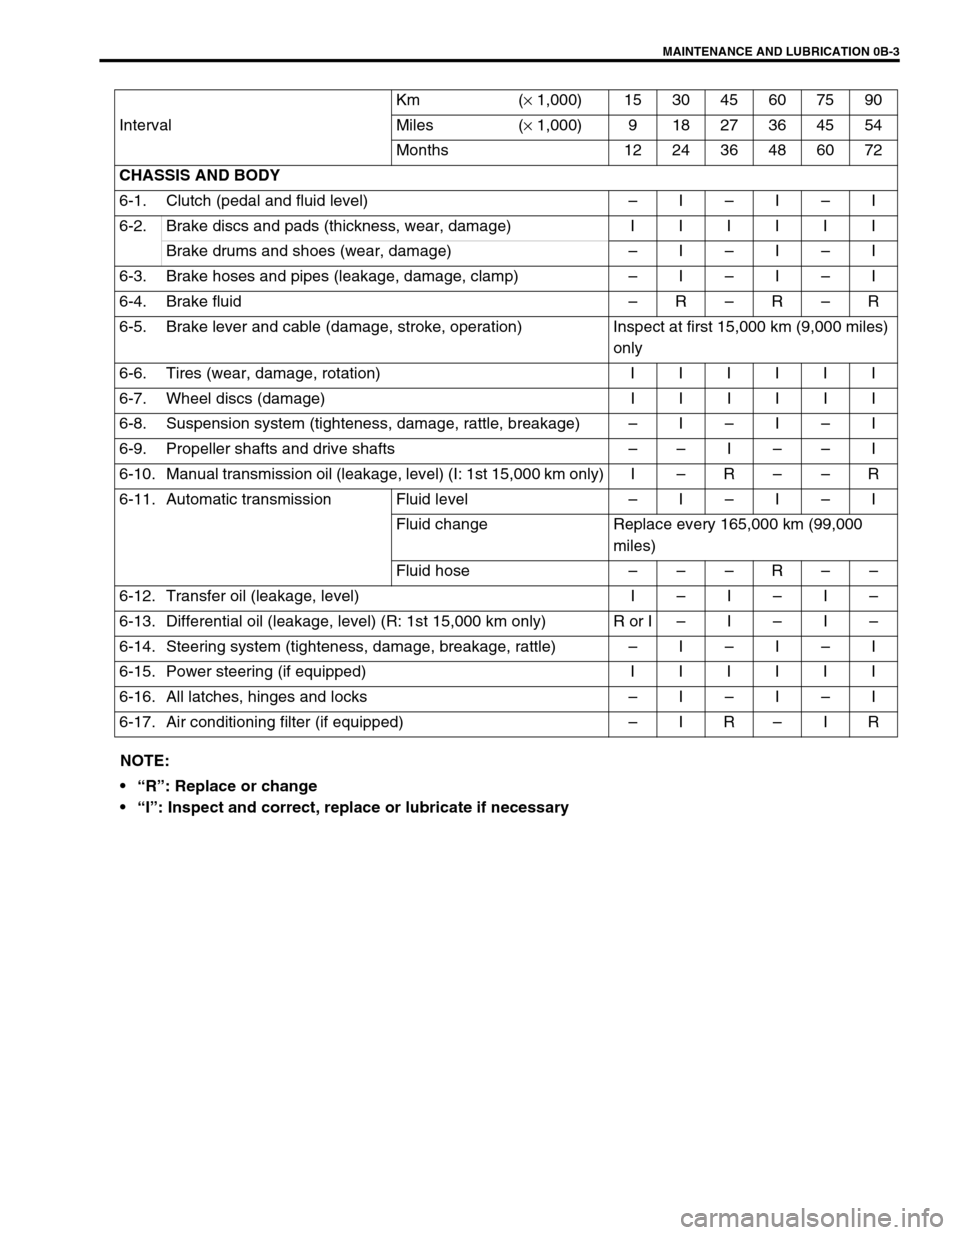
IntervalKm (× 1,000) 153045607590
Miles (× 1,000) 9 18 27 36 45 54
Months 12 24 36 48 60 72
CHASSIS AND BODY
6-1. Clutch (pedal and fluid level)–I–I–I
6-2.Brake discs and pads (thickness, wear, damage) IIIIII
Brake drums and shoes (wear, damage)–I–I–I
6-3. Brake hoses and pipes (leakage, damage, clamp)–I–I–I
6-4. Brake fluid–R–R–R
6-5. Brake lever and cable (damage, stroke, operation) Inspect at first 15,000 km (9,000 miles)
only
6-6.Tires (wear, damage, rotation) IIIIII
6-7.Wheel discs (damage) IIIIII
6-8. Suspension system (tighteness, damage, rattle, breakage)–I–I–I
6-9. Propeller shafts and drive shafts––I––I
6-10. Manual transmission oil (leakage, level) (I: 1st 15,000 km only) I–R––R
6-11. Automatic transmission Fluid level –I–I–I
Fluid change Replace every 165,000 km (99,000
miles)
Fluid hose–––R––
6-12. Transfer oil (leakage, level) I–I–I–
6-13. Differential oil (leakage, level) (R: 1st 15,000 km only) R or I–I–I–
6-14. Steering system (tighteness, damage, breakage, rattle)–I–I–I
6-15.Power steering (if equipped) IIIIII
6-16. All latches, hinges and locks–I–I–I
6-17. Air conditioning filter (if equipped)–IR–IR
NOTE:
“R”: Replace or change
“I”: Inspect and correct, replace or lubricate if necessary
Page 56 of 656

AIR CONDITIONING (OPTIONAL) 1B-31
INSPECTION
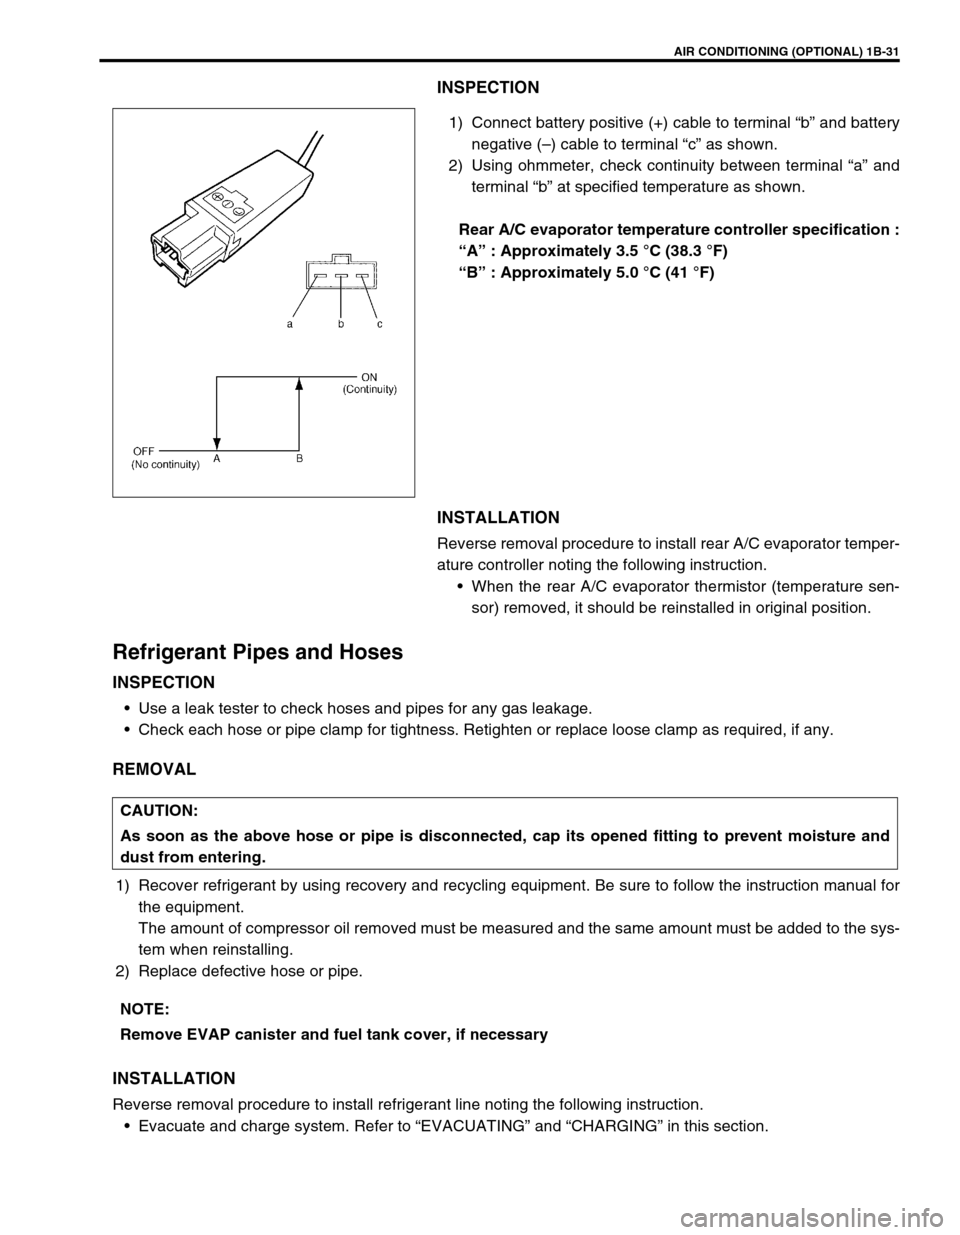
1) Connect battery positive (+) cable to terminal “b” and battery
negative (–) cable to terminal “c” as shown.
2) Using ohmmeter, check continuity between terminal “a” and
terminal “b” at specified temperature as shown.
Rear A/C evaporator temperature controller specification :
“A” : Approximately 3.5 °C (38.3 °F)
“B” : Approximately 5.0 °C (41 °F)
INSTALLATION
Reverse removal procedure to install rear A/C evaporator temper-
ature controller noting the following instruction.
When the rear A/C evaporator thermistor (temperature sen-
sor) removed, it should be reinstalled in original position.
Refrigerant Pipes and Hoses
INSPECTION
Use a leak tester to check hoses and pipes for any gas leakage.
Check each hose or pipe clamp for tightness. Retighten or replace loose clamp as required, if any.
REMOVAL
1) Recover refrigerant by using recovery and recycling equipment. Be sure to follow the instruction manual for
the equipment.
The amount of compressor oil removed must be measured and the same amount must be added to the sys-
tem when reinstalling.
2) Replace defective hose or pipe.
INSTALLATION
Reverse removal procedure to install refrigerant line noting the following instruction.
Evacuate and charge system. Refer to “EVACUATING” and “CHARGING” in this section.
CAUTION:
As soon as the above hose or pipe is disconnected, cap its opened fitting to prevent moisture and
dust from entering.
NOTE:
Remove EVAP canister and fuel tank cover, if necessary
Page 67 of 656
1B-42 AIR CONDITIONING (OPTIONAL)
5) Using special tool, remove circlip.
Special tool
(A) : 09900-06107
6) Remove magnet clutch lead wire clamp screw, and remove
magnet clutch read wire ground terminal.
7) Remove magnet clutch with puller.
8) Remove circlip using special tool.
Special tool
(A) : 09900-06107
9) Remove magnet clutch coil (1).
INSTALLATION
1) Install magnet clutch coil (2).
2) Using special tool, install new circlip (1) as shown.
Special tool
(A) : 09990-06107
3) Install clamp portion and ground terminal of lead wire.
NOTE:
Be careful not to damage pulley when tapping magnet
clutch.
1. Puller
2. Compressor
NOTE:
Protrusion on under side of magnet clutch coil (2) must
match hole in compressor assembly (3) to prevent move-
ment and correctly locate lead wire.
Page 102 of 656

FRONT DRIVE SHAFT/SHAFT BEARING, OIL SEAL 4A2-3
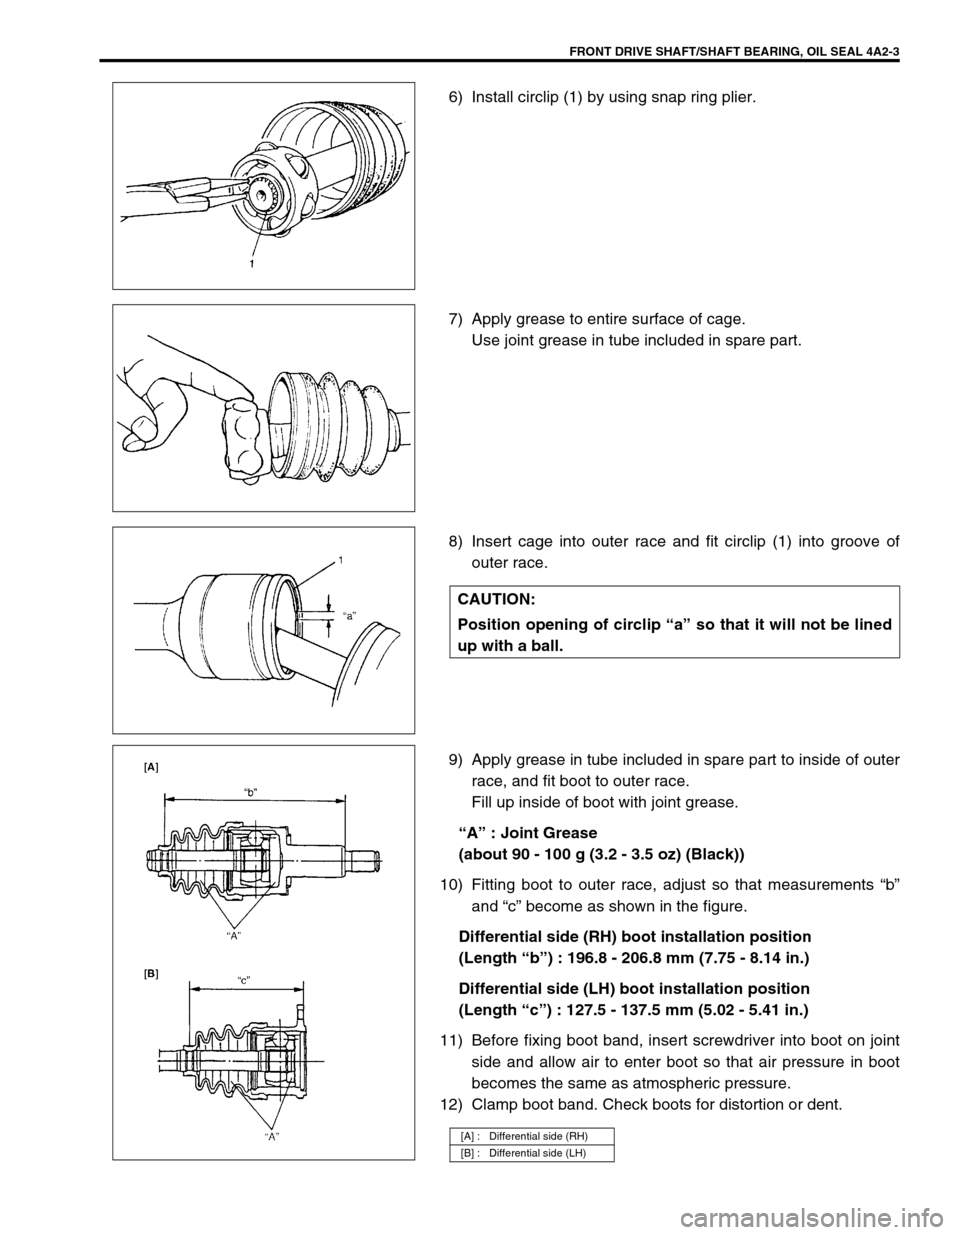
6) Install circlip (1) by using snap ring plier.
7) Apply grease to entire surface of cage.
Use joint grease in tube included in spare part.
8) Insert cage into outer race and fit circlip (1) into groove of
outer race.
9) Apply grease in tube included in spare part to inside of outer
race, and fit boot to outer race.
Fill up inside of boot with joint grease.
“A” : Joint Grease
(about 90 - 100 g (3.2 - 3.5 oz) (Black))
10) Fitting boot to outer race, adjust so that measurements “b”
and “c” become as shown in the figure.
Differential side (RH) boot installation position
(Length “b”) : 196.8 - 206.8 mm (7.75 - 8.14 in.)
Differential side (LH) boot installation position
(Length “c”) : 127.5 - 137.5 mm (5.02 - 5.41 in.)
11) Before fixing boot band, insert screwdriver into boot on joint
side and allow air to enter boot so that air pressure in boot
becomes the same as atmospheric pressure.
12) Clamp boot band. Check boots for distortion or dent.
CAUTION:
Position opening of circlip “a” so that it will not be lined
up with a ball.
[A] : Differential side (RH)
[B] : Differential side (LH)
Page 111 of 656
5A-4 BRAKES PIPE/HOSE/MASTER CYLINDER
For RH steering vehicle
[D]: View D 1. E-ring
[a]: Clamp a 2. Flexible hose
[b]: Clamp b 3. Hose washer
[c]: Clamp d 4. Hose bolt
T: Top side 5. Brake caliper
F: Front side 6. 2 way joint
Page 112 of 656
BRAKES PIPE/HOSE/MASTER CYLINDER 5A-5
For LH steering vehicle
[D]: View D 1. E-ring
[a]: Clamp a 2. Flexible hose
[b]: Clamp b 3. Hose washer
[d]: Clamp d 4. Hose bolt
T: Top side 5. Brake caliper
F: Front side 6. 2 way joint
Page 120 of 656
PARKING AND REAR BRAKE 5C-3
On-Vehicle Service
Parking Brake CableBrake Drum
INSPECTION
Brake drum
Inspect drum for cleanliness. Check wear of its braking surface by
measuring its inside diameter.
Whenever brake drums are removed, they should be thoroughly
cleaned and inspected for cracks, scores, deep grooves.Brake dram inside diameter “a ”
S ta n dard : 2 54 mm (9.99 in .)
S erv ic e L im it : 2 56 m m ( 10.07 i n.)
1. Parking brake switch 6. Equalizer 11. Color ring 16. Crossmember 21. Parking brake cable nut
2. Parking brake lever 7. Pin 12. Cable 17. Chassis frame Tightening torque
3. Parking brake lever bolt 8. Equalizer 13. Grommet 18. Hanger
4. Floor 9. Adjust rod 14. Bolt 19. Rear axle
5. Locking nut 10. Coupler 15. Clamp (if equipped) 20. G-sensor (if equipped)
Page 126 of 656

ANTILOCK BRAKE SYSTEM (ABS) 5E2-1
5E2
SECTION 5E2
ANTILOCK BRAKE SYSTEM (ABS)
CONTENTS
General Description ..................................... 5E2-3
Components/Parts Location ....................... 5E2-3
ABS Hydraulic Unit/control Module
Assembly .................................................... 5E2-4
Self-diagnosis function ........................... 5E2-4
Fail-safe function .................................... 5E2-5
Diagnosis ...................................................... 5E2-5
Precautions in Diagnosing Troubles .......... 5E2-5
ABS Diagnostic Flow Table ........................ 5E2-6
ABS Warning Lamp Check ........................ 5E2-9
EBD Warning Lamp (Brake Warning Lamp)
Check ......................................................... 5E2-9
Diagnostic Trouble Code (DTC) Check
(Using ABS Warning Lamp) ..................... 5E2-10
Diagnostic Trouble Code (DTC) Check
(Using SUZUKI Scan Tool) ...................... 5E2-11
Diagnostic Trouble Code (DTC)
Clearance ................................................. 5E2-11
Diagnostic Trouble Code (DTC) Table ..... 5E2-12
System Circuit .......................................... 5E2-14Table-A ABS Warning Lamp Circuit Check
– Lamp Does Not Come “ON” at Ignition
Switch ON ................................................ 5E2-15
Table-B ABS Warning Lamp Circuit Check
– Lamp Comes “ON” Steady.................... 5E2-16
Table-C ABS Warning Lamp Circuit Check
– The Lamp Flashes Continuously While
Ignition Switch Is ON ................................ 5E2-17
Table-D Code (DTC) Is Not Outputted
Even with Diagnosis Switch Terminal
Connected to Ground............................... 5E2-18
Table-E EBD Warning Lamp (Brake
Warning Lamp) Check – Lamp Comes
“ON” Steady ............................................. 5E2-19
DTC C1015 (DTC 15) – G Sensor Circuit
and 4WD Lamp Circuit ............................. 5E2-20
DTC C1021 (DTC 21), DTC C1022
(DTC 22) – Right-Front Wheel Speed
Sensor Circuit or Sensor Ring ................. 5E2-22
DTC C1025 (DTC 25), DTC C1026
(DTC 26) – Left-Front Wheel Speed WARNING:
For vehicles equipped with Supplemental Restraint (Air Bag) System:
Service on and around the air bag system components or wiring must be performed only by an
authorized SUZUKI dealer. Refer to “Air Bag System Components and Wiring Location View” under
“General Description” in air bag system section in order to confirm whether you are performing ser-
vice on or near the air bag system components or wiring. Please observe all WARNINGS and “Ser-
vice Precautions” under “On-Vehicle Service” in air bag system section before performing service
on or around the air bag system components or wiring. Failure to follow WARNINGS could result in
unintentional activation of the system or could render the system inoperative. Either of these two
conditions may result in severe injury.
Technical service work must be started at least 90 seconds after the ignition switch is turned to the
“LOCK” position and the negative cable is disconnected from the battery. Otherwise, the system
may be activated by reserve energy in the Sensing and Diagnostic Module (SDM).
NOTE:
For the descriptions (items) not found in this section, refer to Section 5E1 of the Service Manual
mentioned in the FOREWORD of this manual.
All brake fasteners are important attaching parts in that they could affect the performance of vital
parts and systems, and/or could result in major repair expense. They must be replaced with one of
same part number or with an equivalent part if replacement becomes necessary. Do not use a
replacement part of lesser quality or substitute design. Torque values must be used as specified
during reassembly to assure proper retention of all parts. There is to be no welding as it may result
in extensive damage and weakening of the metal.