1999 SUZUKI GRAND VITARA Switch light
[x] Cancel search: Switch lightPage 433 of 656
7B1-24 AUTOMATIC TRANSMISSION (4 A/T)
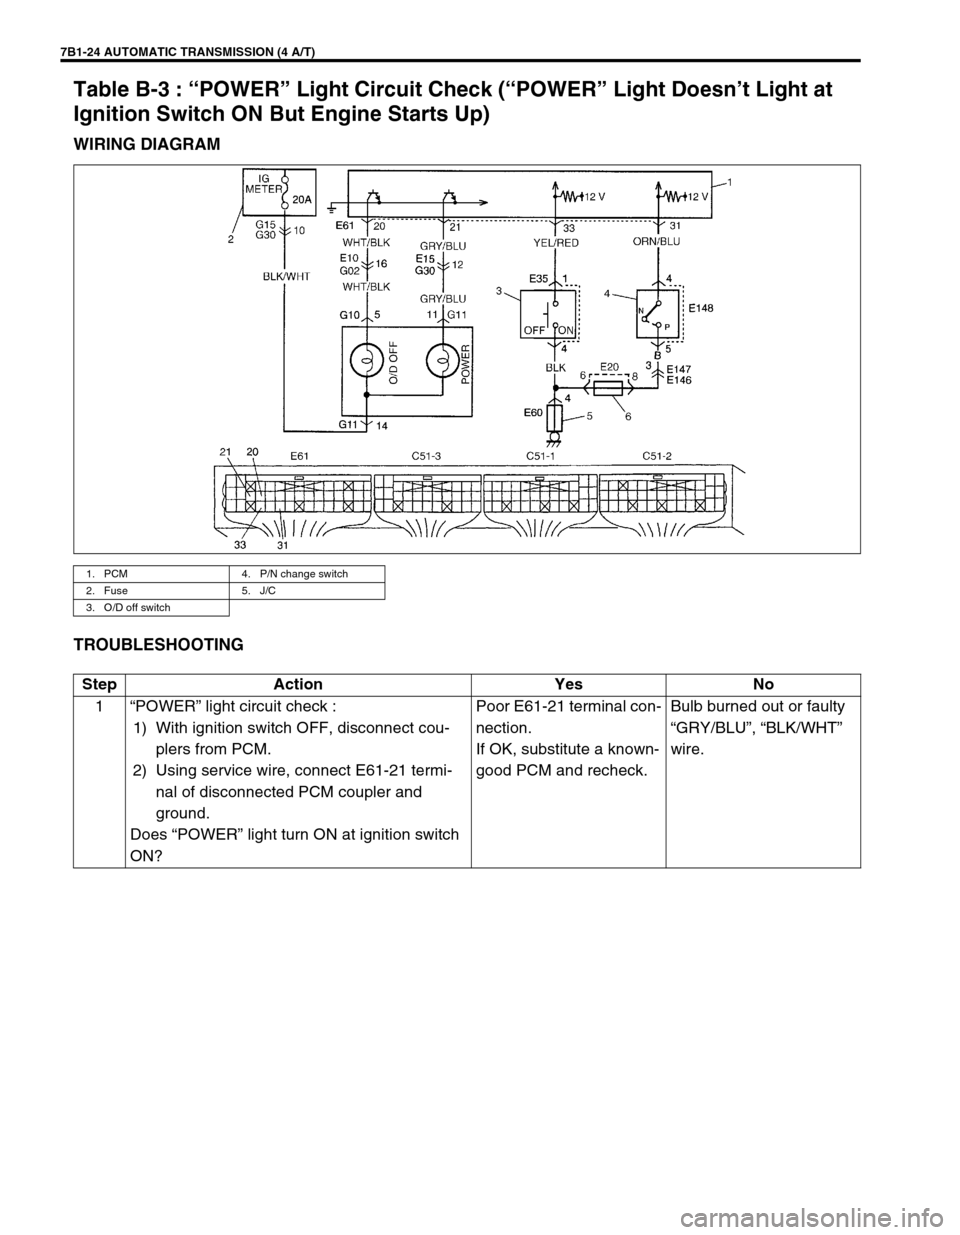
Table B-3 : “POWER” Light Circuit Check (“POWER” Light Doesn’t Light at
Ignition Switch ON But Engine Starts Up)
WIRING DIAGRAM
TROUBLESHOOTING
1. PCM 4. P/N change switch
2. Fuse 5. J/C
3. O/D off switch
Step Action Yes No
1“POWER” light circuit check :
1) With ignition switch OFF, disconnect cou-
plers from PCM.
2) Using service wire, connect E61-21 termi-
nal of disconnected PCM coupler and
ground.
Does “POWER” light turn ON at ignition switch
ON?Poor E61-21 terminal con-
nection.
If OK, substitute a known-
good PCM and recheck.Bulb burned out or faulty
“GRY/BLU”, “BLK/WHT”
wire.
Page 434 of 656

AUTOMATIC TRANSMISSION (4 A/T) 7B1-25
Table B-4 : “POWER” Light Circuit Check (“POWER” Light Comes ON
Steadily)
WIRING DIAGRAM
Refer to “TABLE B-3” in this section.
TROUBLESHOOTING
[A] for Step 1/[B] for Step 4Step Action Yes No
1 Check Power/Normal change switch position.
Is switch button at Normal position?Go to Step 2. Set Power/Normal
change switch at Nor-
mal position.
2 Check lamp circuit for short.
1) Turn ignition switch OFF and disconnect PCM
connectors.
2) Turn ignition switch ON.
Does “POWER” lamp come ON steadily?“GRY/BLU” circuit
shorted to ground.Go to Step 3.
3 Check Power/Normal change switch circuit.
1) Check resistance between terminal E61-31 of dis-
connected PCM connector and body ground with
P/N change switch OFF.
Is continuity indicated?Go to Step 4. Check PCM ground
circuit for open.
If ground circuit is OK,
substitute a known-
good PCM and
recheck.
4 Check Power/Normal change switch for operation.
1) Remove Power/Normal change switch.
2) Check continuity between switch terminals “4” and
“5” under each condition below.
Normal position: No continuity
Power position: Continuity.
Is check result satisfactory?“ORN/BLU” circuit
shorted to ground.Replace Power/Normal
change switch.
Page 477 of 656

7E-4 DIFFERENTIAL (FRONT)
Flow table
Step Action Yes No
1 Turn ON ignition switch (but engine at stop) and
check malfunction indicator lamp.
Does lamp light up?Go to step 2. A trouble has occurred
at some place. Repair
it referring to
MALFUNCTION INDI-
CATOR LAMP
(“CHECK ENGINE”
LAMP) CHECK in
DIAGNOSIS of Sec-
tion 6.
2 Check 4WD switch circuit.
Turn ignition switch ON and check that voltage
between terminal C51-3-7 and terminal C51-3-17
(ground) is as follows.
When transfer shift lever is in N or 2H : 10 – 14 V
When transfer shift lever is in 4L or 4H : 0 – 1 V
Is the check result satisfactory?Go to step 3. Check 4WD switch
(refer to Section 7A),
“BLK/ORN” and “BLK”
circuits of 4WD switch.
If OK, substitute a
known-good ECM
(PCM) and recheck.
3 Check power supply.
1) Turn ignition switch ON.
2) Check voltage between C51-1-9 and C51-3-17
(ground). The check results should be as follows.
When transfer shift lever is in N or 2H : 0 – 1 V
When transfer shift lever is in 4L or 4H : 10 – 14 V
Is the check result satisfactory?Go to step 4. Check “RED” circuit. If
it is OK, substitute a
known-good ECM
(PCM) and recheck.
4 Check air pump assembly circuit.
1) Check for proper connection to air pump assem-
bly at all terminals.
2) Turn ignition switch ON.
3) Check voltage between C51-3-18 and C51-3-17
(ground). The check result should be as follows.
When transfer shift lever is in 2H or N : 0 – 1 V
When transfer shift lever is in 4L or 4H (more than
4 seconds after shifted to 4L or 4H) : 10 – 14 V
Is the check result satisfactory?Go to step 5. Check air pump
assembly referring to
“ON-VEHICLE SER-
VICE”, and then
“PNK” circuit.
If OK, substitute a
known-good ECM
(PCM) and recheck.
5 Check 4WD indicator lamp circuit.
1) Turn ignition switch ON.
2) Check voltage between E61-19 and C51-3-17
(ground). The check result should be as follows.
When transfer shift lever is in 2H or N : 10 – 14 V
When transfer shift lever is in 4L or 4H : 0 – 1 V
Is the check result satisfactory?4WD control system is
in good condition.Check “ORN/BLK” cir-
cuit (including indica-
tor lamp and
combination meter).
If OK, substitute a
known-good ECM
(PCM) and recheck.
Page 510 of 656
BODY ELECTRICAL SYSTEM 8-1
6F1
6F2
6G
6H
6K
7A
8
6K
7C1
7D
7E
7F
8A
8D
8E
9
10
10A
10B
SECTION 8
BODY ELECTRICAL SYSTEM
Wiring System
(Harnesses, Connectors, Fuses, Relay, Switches, Grounds, System Circuit Diagram) .......... Section 8A
Lighting System .............................................................................................................................. Section 8B
Instrumententation and Driver Information .................................................................................. Section 8C
Windows, Mirrors, Security and Locks ......................................................................................... Section 8D
Immobilizer Control System............................................................................................................Section 8F
CONTENTS
General Description .......................................... 8-3
WARNING:
For vehicles equipped with Supplemental Restraint (Air Bag) System:
Service on and around the air bag system components or wiring must be performed only by an
authorized SUZUKI dealer. Refer to “Air Bag System Components and Wiring Location View” under
“General Description” in air bag system section in order to confirm whether you are performing ser-
vice on or near the air bag system components or wiring. Please observe all WARNINGS and “Ser-
vice Precautions” under “On-Vehicle Service” in air bag system section before performing service
on or around the air bag system components or wiring. Failure to follow WARNINGS could result in
unintentional activation of the system or could render the system inoperative. Either of these two
conditions may result in severe injury.
Technical service work must be started at least 90 seconds after the ignition switch is turned to the
“LOCK” position and the negative cable is disconnected from the battery. Otherwise, the system
may be activated by reserve energy in the Sensing and Diagnostic Module (SDM).
NOTE:
For the descriptions (items) not found in this section, refer to the same section of the Service Manual
mentioned in FOREWORD of this manual.
Page 512 of 656

INSTRUMENTATION/DRIVER INFORMATION 8C-1
8C
SECTION 8C
INSTRUMENTATION/DRIVER INFORMATION
CONTENTS
General Description ........................................8C-2
Combination Meter ........................................8C-2
On-vehicle Service ..........................................8C-4
Fuel Meter/Fuel Gauge Unit ..........................8C-4
Fuel level sensor (sender gauge) ..............8C-4
Engine Coolant Temperature (ECT) Meter
and Sensor ....................................................8C-5Engine coolant temperature sensor .......... 8C-5
Oil Pressure Light ......................................... 8C-5
Oil pressure switch .................................... 8C-5
Brake Warning Light ..................................... 8C-5
Brake fluid level switch .............................. 8C-5
WARNING:
For vehicles equipped with Supplemental Restraint (Air Bag) System:
Service on and around the air bag system components or wiring must be performed only by an
authorized SUZUKI dealer. Refer to “Air Bag System Components and Wiring Location View” under
“General Description” in air bag system section in order to confirm whether you are performing ser-
vice on or near the air bag system components or wiring. Please observe all WARNINGS and “Ser-
vice Precautions” under “On-Vehicle Service” in air bag system section before performing service
on or around the air bag system components or wiring. Failure to follow WARNINGS could result in
unintentional activation of the system or could render the system inoperative. Either of these two
conditions may result in severe injury.
Technical service work must be started at least 90 seconds after the ignition switch is turned to the
“LOCK” position and the negative cable is disconnected from the battery. Otherwise, the system
may be activated by reserve energy in the Sensing and Diagnostic Module (SDM).
NOTE:
For the descriptions (items) not found in this section, refer to the same section of the Service Manual
mentioned in the FOREWORD of this manual.
Page 516 of 656

INSTRUMENTATION/DRIVER INFORMATION 8C-5
Engine Coolant Temperature (ECT) Meter and
Sensor
Engine coolant temperature sensor
REMOVAL AND INSTALLATION
Refer to “ECT SENSOR” in Section 6E2.
Oil Pressure Light
Oil pressure switch
REMOVAL AND INSTALLATION
Refer to “OIL PRESSURE CHECK” in Section 6A2.
Brake Warning Light
Brake fluid level switch
INSPECTION
Use an ohmmeter to check switch for continuity.
If found defective, replace switch (reservoir).
Brake fluid level switch specification
OFF position (float up) : No continuity
ON position (float down) : Continuity
Page 524 of 656

CRUISE CONTROL SYSTEM 8E-3
Cruise Control System
The cruise control system is a device which maintains a preset vehicle speed while driving at a high speed, e.g.,
on a highway. It allows the driver to drive his vehicle at a constant speed of 40 km/h (25 mile/h) or higher without
depressing the accelerator pedal (constant cruising). The system also has such functions as to change the vehi-
cle speed without operating the accelerator pedal (but using SET COAST and ACCEL RESUME switches), can-
cel cruise control (CANCEL switch) and resume the speed in memory automatically after cruise control is
cancelled (ACCEL RESUME switch). The system mainly consists of a vehicle speed sensor, an actuator
assembly incorporated with control module, cruise main switch, SET COAST switch, ACCEL RESUME switch
and CANCEL switch, etc.
Cruise control system circuit
Refer to Section 8A.
1. Cruise main switch 6. PCM / ECM
1-1 Cruise main switch indicator lamp 7. Stop lamp switch (with brake pedal position switch)
2.“CRUISE” Indicator light 8. Clutch pedal position switch (M/T vehicle)
3. SET COAST/ACCEL RESUME/CANCEL switch 9. Automatic transmission
4. Vehicle speed sensor 10. Transmission range switch (Park/Neutral position switch) (A/T vehicle)
5. Cruise control actuator assembly (with control module)
Page 525 of 656

8E-4 CRUISE CONTROL SYSTEM
Components and functions
Component Function
Cruise control actuator
assembly with control mod-
uleCruise control module:
Executes centralized control by means of a microcomputer over all functions
including setting a constant speed, resuming it, setting coast, limiting minimum
speed and cancelling cruise control.
Cruise control actuator (stepping motor & clutch) :
Actuates accelerator pedal through cruise cable and arm according to a signal
from cruise control module to control vehicle speed.
Cruise main switch This switch has a momentary contact type button to turn the cruise control
system ON and OFF.
SET COAST switch When this switch is rotated (ON) and then released (OFF) while vehicle is run-
ning at a speed 40 km/h (25 mile/h) or higher, vehicle speed at that OFF
moment is stored in memory and it is maintained (constant cruising).
Rotating this switch (ON) continuously during constant cruising keeps slowing
down vehicle speed as long as it is ON. When it is released (OFF), vehicle
speed at that moment is stored in memory and vehicle starts constant cruising.
ACCEL RESUME switch When this switch is rotated (ON) during constant cruising, vehicle speed keeps
increasing as long as it is ON. When it is released (OFF), vehicle speed at that
moment is stored in memory and vehicle starts constant cruising. If vehicle
speed is higher than 40 km/h (25 mile/h) after cruise control is cancelled, turn-
ing this switch ON momentarily will resume the speed at which vehicle was run-
ning before cancellation.
CANCEL switch When this switch is pressed (ON), cruise control (accelerator pedal control) is
cancelled.
Vehicle speed sensor (VSS) The vehicle speed sensor (VSS) is mounted on the transfer or transmission.
The VSS converts vehicle speed into pulse signal and send it to the cruise con-
trol module.
Stop lamp switch The stop lamp switch has 2 contact points. One contact point closes when the
brake pedal is depressed to light the stop lamp and provides a voltage signal to
the cruise control module. This signal, when inputted cancels cruise control
(sets the accelerator pedal free).
The other contact point (brake pedal position switch) opens when the brake
pedal is depressed, to shut off the power to the magnetic clutch in the actuator,
thereby cancelling cruise control (setting the accelerator pedal free).
This switch is installed to cancel cruise control (constant cruising) without fail.
Clutch pedal position switch
(M/T vehicle only)When the clutch pedal is depressed, the clutch pedal position switch closes and
provides a ground signal to cruise control module.
The cruise control module cancels cruise control (accelerator pedal control)
when this signal is inputted.
Transmission range switch
(Park/Neutral position switch)
(A/T vehicle only)When the selector lever is places in either “P” or “N” position, the transmission
range switch closes and provides a ground signal to cruise control module. The
cruise control module cancels cruise control (accelerator pedal control) when
this signal is inputted.
PCM – Throttle opening sig-
nal (4 A/T vehicle only)Throttle opening signal is inputted from PCM.
From this signal, the cruise control module detects the throttle opening and
uses it as one of the factors to output the overdrive and TCC OFF command sig-
nal to PCM.