Page 382 of 656

ENGINE AND EMISSION CONTROL SYSTEM (SEQUENTIAL MULTIPORT FUEL INJECTION FOR H27 ENGINE) 6E2-49
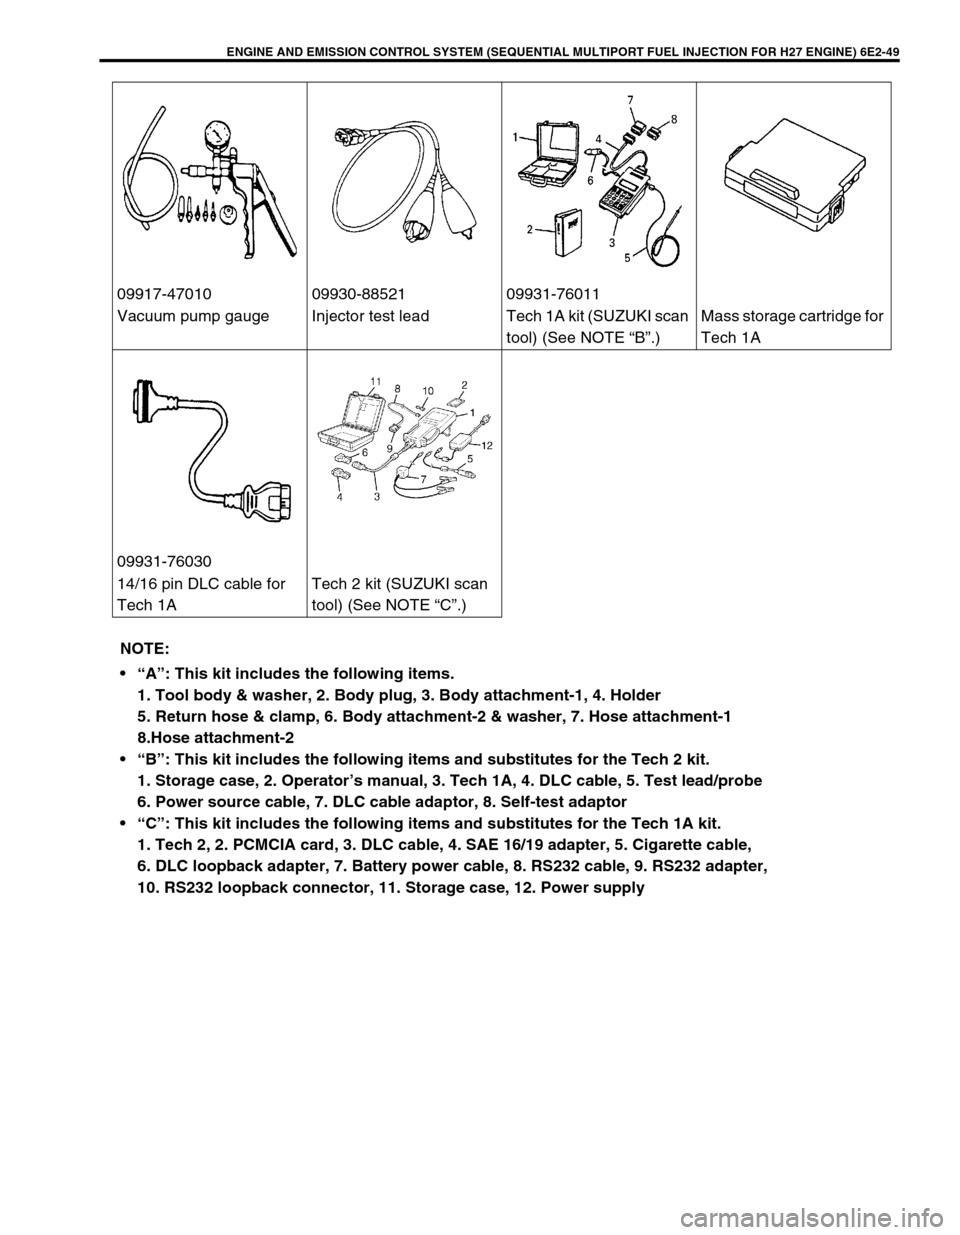
09917-47010 09930-88521 09931-76011
Vacuum pump gauge Injector test lead Tech 1A kit (SUZUKI scan
tool) (See NOTE “B”.)Mass storage cartridge for
Tech 1A
09931-76030
14/16 pin DLC cable for
Tech 1ATech 2 kit (SUZUKI scan
tool) (See NOTE “C”.)
NOTE:
“A”: This kit includes the following items.
1. Tool body & washer, 2. Body plug, 3. Body attachment-1, 4. Holder
5. Return hose & clamp, 6. Body attachment-2 & washer, 7. Hose attachment-1
8.Hose attachment-2
“B”: This kit includes the following items and substitutes for the Tech 2 kit.
1. Storage case, 2. Operator’s manual, 3. Tech 1A, 4. DLC cable, 5. Test lead/probe
6. Power source cable, 7. DLC cable adaptor, 8. Self-test adaptor
“C”: This kit includes the following items and substitutes for the Tech 1A kit.
1. Tech 2, 2. PCMCIA card, 3. DLC cable, 4. SAE 16/19 adapter, 5. Cigarette cable,
6. DLC loopback adapter, 7. Battery power cable, 8. RS232 cable, 9. RS232 adapter,
10. RS232 loopback connector, 11. Storage case, 12. Power supply
Page 383 of 656
6E2-50 ENGINE AND EMISSION CONTROL SYSTEM (SEQUENTIAL MULTIPORT FUEL INJECTION FOR H27 ENGINE)
Page 387 of 656

6F2-4 IGNITION SYSTEM (FOR H27 ENGINE)
Diagnosis
Diagnostic Flow Table
Condition Possible Cause Correction
Engine cranks, but will
not start or hard to
start (No spark)Blown fuse for ignition coil assembly Replace.
Loose connection or disconnection of lead wire Connect securely.
Faulty spark plug (s) Replace.
Faulty ignition coil assembly (s) Replace.
Faulty CMP sensor Replace.
Faulty ECM (or PCM) Replace.
Maladjusted ignition timing Adjust.
Poor fuel economy or
engine performanceIncorrect ignition timing Adjust.
Faulty spark plug(s) Replace.
Faulty ignition coil assembly (s) Replace.
Faulty CMP sensor Replace.
Faulty ECM (or PCM) Replace.
Faulty knock sensor Replace.
Step Action Yes No
1Was “ENGINE DIAGNOSTIC FLOW TABLE” in
Section 6-1 performed?Go to Step 2. Go to “ENGINE DIAG-
NOSTIC FLOW TABLE” in
Section 6-1.
2 Ignition Spark Test
1) Check all spark plug for condition and type,
referring to “SPARK PLUG” in this section.
2) If OK, perform ignition spark test, referring
to “IGNITION SPARK CHECK” in this sec-
tion.
Is spark emitted from all spark plugs?Go to Step 8. Go to Step 3.
3 Diagnostic Trouble Code (DTC) Check
1) Check DTC stored in ECM (or PCM), refer-
ring to “DIAGNOSTIC TROUBLE CODE
(DTC) CHECK” in Section 6E2.
Is DTC stored?Go to applicable flow table
corresponding to that
code No. in Section 6E2.Go to Step 4.
4 Electrical Connection Check
1) Check ignition coil assemblies for electrical
connection.
Are they connected securely?Go to Step 5. Connect securely.
5 Ignition Coil Assembly Power Supply, Ground
and Trigger Signal Circuits Check
1) Check these circuits for open and short.
Are circuits in good condition?Go to Step 6. Repair or replace.
6 Ignition Coil Assembly Check
1) Substitute a known-good ignition coil
assembly and then repeat Step 2.
Is check result of Step 2 satisfactory?Malfunction of ignition coil
assembly.Go to Step 7.
Page 404 of 656
EXHAUST SYSTEM 6K-1
6K
SECTION 6K
EXHAUST SYSTEM
CONTENTS
On-Vehicle Service..........................................6K-2Components.................................................. 6K-2
CAUTION:
Be sure to use UNLEADED FUEL for the catalytic converter equipped vehicle. Use of LEADED FUEL
will affect performance of the catalytic converter adversely to a great extent.
NOTE:
For the descriptions (items) not found in this section, refer to the same section of service manual
mentioned in the FOREWORD of this manual.
Page 418 of 656

AUTOMATIC TRANSMISSION (4 A/T) 7B1-9
Precaution in Diagnosing Trouble
•Don’t disconnect couplers from PCM (ECM), battery cable
from battery, PCM ground wire harness from engine or main
fuse before checking the diagnosis information (DTC, freeze
frame data, etc.) stored in PCM memory. Such disconnec-
tion will clear memorized information in PCM memory.
•Using SUZUKI scan tool or also generic scan tool for vehicle
without monitor connector, the diagnostic information stored
in PCM memory can be checked and cleared as well. Before
its use, be sure to read Operator’s (Instruction) Manual sup-
plied with it carefully to have good understanding of its func-
tions and usage.
•Priorities for diagnosing troubles
If two or more diagnostic trouble codes (DTCs) are stored,
proceed to the flow table of the DTC which was detected
earliest in the order and follow the instruction in that table.
If no instructions are given, troubleshoot diagnostic trouble
codes according to the following priorities.
–Diagnostic trouble codes (DTCs) other than DTC P0171/
P0172/P0174/P0175 (Fuel system too lean/too rich), DTC
P0300/P0301/P0302/P0303/P0304/P0305/P0306 (Misfire
detected) and DTC P0400 (EGR flow malfunction)
–DTC P0171/P0172/P0174/P0175 (Fuel system too lean/too
rich) and DTC P0400 (EGR flow malfunction)
–DTC P0300/P0301/P0302/P0303/P0304/P0305/P0306
(Misfire detected)
•Be sure to read “PRECAUTIONS FOR ELECTRICAL CIR-
CUIT SERVICE” in Section 0A before inspection and
observe what is written there.
•PCM replacement
When substituting a known-good PCM, check for following
conditions.
Neglecting this check may result in damage to a good PCM.
–All relays and actuators have resistance of specified value.
–MAF sensor, MDP sensor, TP sensor and fuel tank pres-
sure sensor are in good condition. Also, the power circuit of
these sensors is not shorted to the ground.
Page 479 of 656

7E-6 DIFFERENTIAL (FRONT)
4WD Control System Inspection
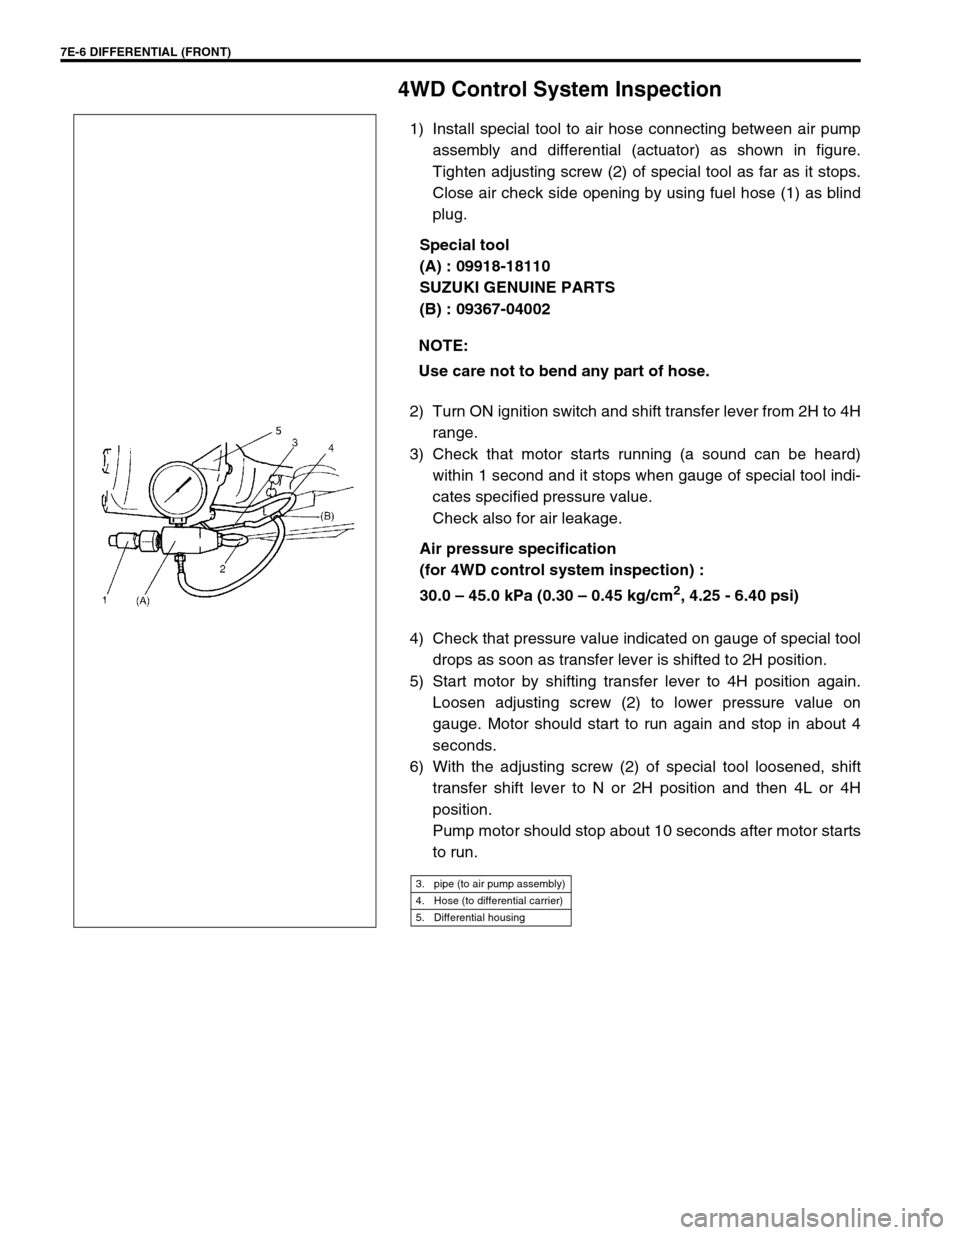
1) Install special tool to air hose connecting between air pump
assembly and differential (actuator) as shown in figure.
Tighten adjusting screw (2) of special tool as far as it stops.
Close air check side opening by using fuel hose (1) as blind
plug.
Special tool
(A) : 09918-18110
SUZUKI GENUINE PARTS
(B) : 09367-04002
2) Turn ON ignition switch and shift transfer lever from 2H to 4H
range.
3) Check that motor starts running (a sound can be heard)
within 1 second and it stops when gauge of special tool indi-
cates specified pressure value.
Check also for air leakage.
Air pressure specification
(for 4WD control system inspection) :
30.0 – 45.0 kPa (0.30 – 0.45 kg/cm
2, 4.25 - 6.40 psi)
4) Check that pressure value indicated on gauge of special tool
drops as soon as transfer lever is shifted to 2H position.
5) Start motor by shifting transfer lever to 4H position again.
Loosen adjusting screw (2) to lower pressure value on
gauge. Motor should start to run again and stop in about 4
seconds.
6) With the adjusting screw (2) of special tool loosened, shift
transfer shift lever to N or 2H position and then 4L or 4H
position.
Pump motor should stop about 10 seconds after motor starts
to run. NOTE:
Use care not to bend any part of hose.
3. pipe (to air pump assembly)
4. Hose (to differential carrier)
5. Differential housing
Page 512 of 656

INSTRUMENTATION/DRIVER INFORMATION 8C-1
8C
SECTION 8C
INSTRUMENTATION/DRIVER INFORMATION
CONTENTS
General Description ........................................8C-2
Combination Meter ........................................8C-2
On-vehicle Service ..........................................8C-4
Fuel Meter/Fuel Gauge Unit ..........................8C-4
Fuel level sensor (sender gauge) ..............8C-4
Engine Coolant Temperature (ECT) Meter
and Sensor ....................................................8C-5Engine coolant temperature sensor .......... 8C-5
Oil Pressure Light ......................................... 8C-5
Oil pressure switch .................................... 8C-5
Brake Warning Light ..................................... 8C-5
Brake fluid level switch .............................. 8C-5
WARNING:
For vehicles equipped with Supplemental Restraint (Air Bag) System:
Service on and around the air bag system components or wiring must be performed only by an
authorized SUZUKI dealer. Refer to “Air Bag System Components and Wiring Location View” under
“General Description” in air bag system section in order to confirm whether you are performing ser-
vice on or near the air bag system components or wiring. Please observe all WARNINGS and “Ser-
vice Precautions” under “On-Vehicle Service” in air bag system section before performing service
on or around the air bag system components or wiring. Failure to follow WARNINGS could result in
unintentional activation of the system or could render the system inoperative. Either of these two
conditions may result in severe injury.
Technical service work must be started at least 90 seconds after the ignition switch is turned to the
“LOCK” position and the negative cable is disconnected from the battery. Otherwise, the system
may be activated by reserve energy in the Sensing and Diagnostic Module (SDM).
NOTE:
For the descriptions (items) not found in this section, refer to the same section of the Service Manual
mentioned in the FOREWORD of this manual.
Page 513 of 656
8C-2 INSTRUMENTATION/DRIVER INFORMATION
General Description
Combination Meter
1. Tachometer 8. Multifunction indicator light 15. Charge warning light
2. Speedometer 9. Turn signal pilot light (RH) 16. Brake fluid level, parking brake and EBD warning light
3. Fuel level meter 10. AIR BAG warning light 17. POWER indicator light (A/T vehicle only)
4. Engine coolant temperature meter 11. O/D OFF light (A/T vehicle only) 18. CRUISE indicator light
5. Turn signal pilot light (LH) 12. Fasten seat belt light (if equipped) 19. Immobilizer warning light (if equipped)
6. 4WD indicator 13. High beam light 20. Shift position indicator (A/T vehicle, if equipped)
7. ABS warning light 14. Engine oil pressure warning light