1999 SUZUKI GRAND VITARA check transmission fluid
[x] Cancel search: check transmission fluidPage 315 of 656
6A2-28 ENGINE MECHANICAL (H27 ENGINE)
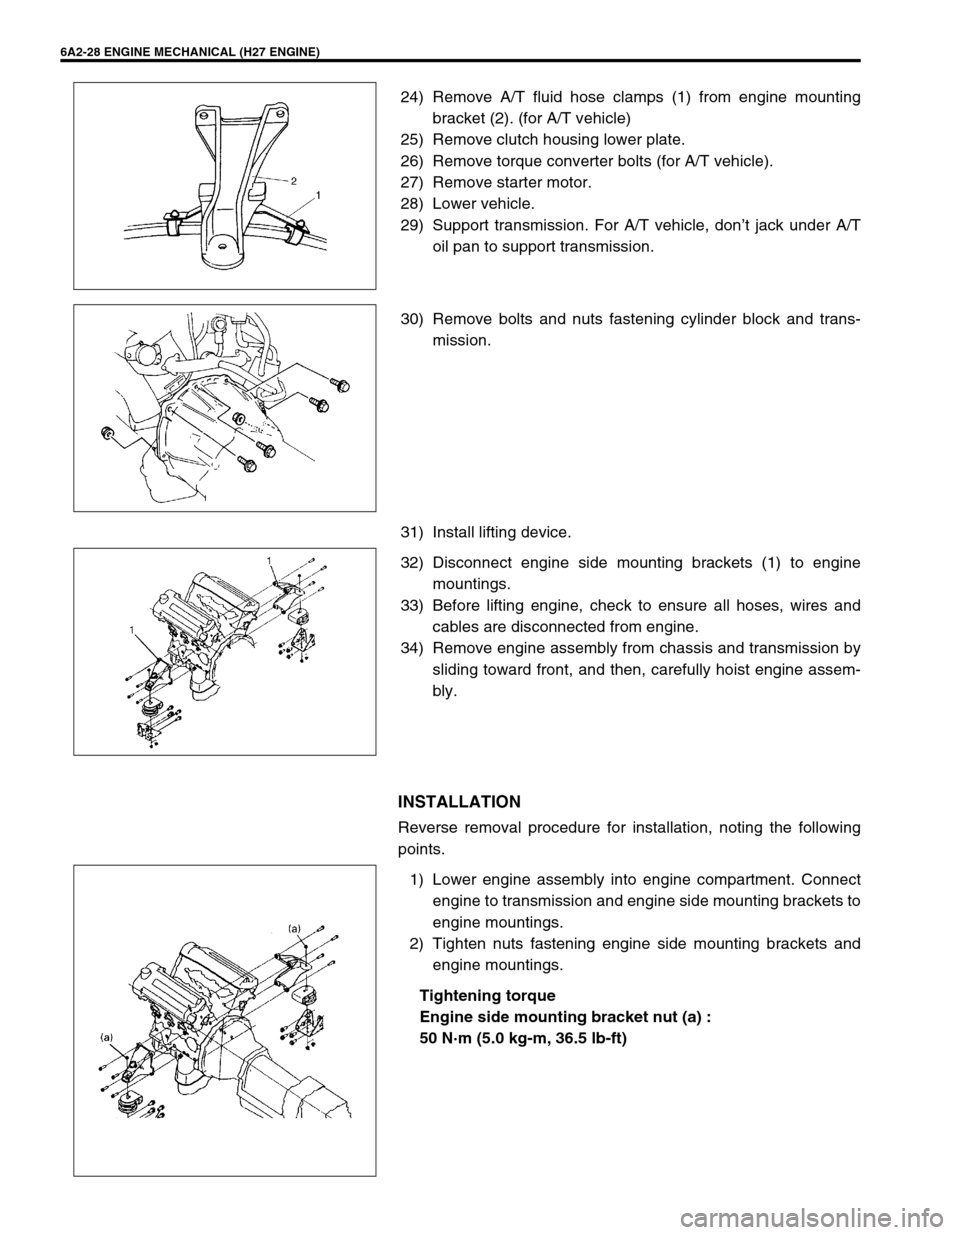
24) Remove A/T fluid hose clamps (1) from engine mounting
bracket (2). (for A/T vehicle)
25) Remove clutch housing lower plate.
26) Remove torque converter bolts (for A/T vehicle).
27) Remove starter motor.
28) Lower vehicle.
29) Support transmission. For A/T vehicle, don’t jack under A/T
oil pan to support transmission.
30) Remove bolts and nuts fastening cylinder block and trans-
mission.
31) Install lifting device.
32) Disconnect engine side mounting brackets (1) to engine
mountings.
33) Before lifting engine, check to ensure all hoses, wires and
cables are disconnected from engine.
34) Remove engine assembly from chassis and transmission by
sliding toward front, and then, carefully hoist engine assem-
bly.
INSTALLATION
Reverse removal procedure for installation, noting the following
points.
1) Lower engine assembly into engine compartment. Connect
engine to transmission and engine side mounting brackets to
engine mountings.
2) Tighten nuts fastening engine side mounting brackets and
engine mountings.
Tightening torque
Engine side mounting bracket nut (a) :
50 N·m (5.0 kg-m, 36.5 lb-ft)
Page 316 of 656
ENGINE MECHANICAL (H27 ENGINE) 6A2-29
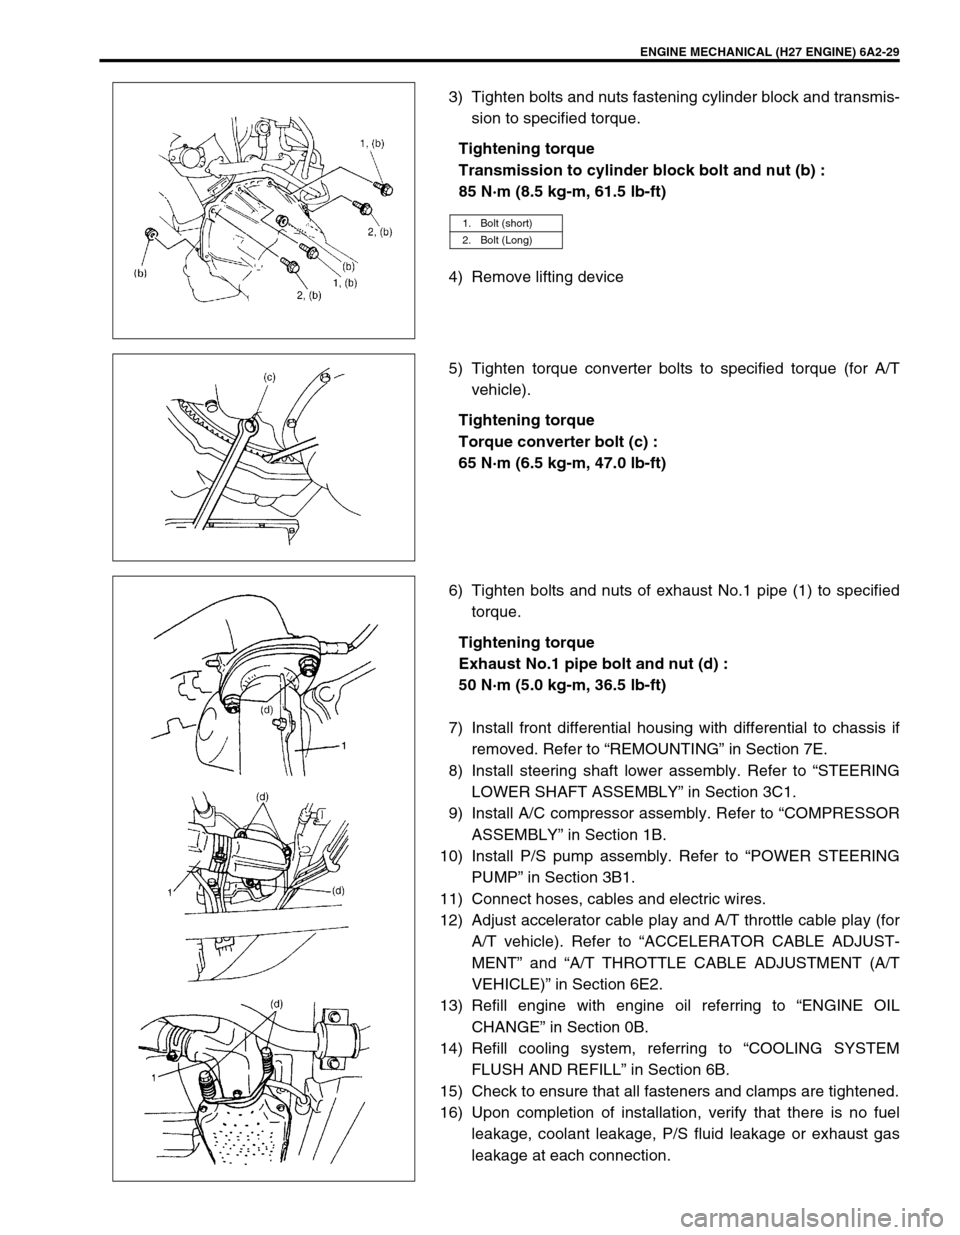
3) Tighten bolts and nuts fastening cylinder block and transmis-
sion to specified torque.
Tightening torque
Transmission to cylinder block bolt and nut (b) :
85 N·m (8.5 kg-m, 61.5 lb-ft)
4) Remove lifting device
5) Tighten torque converter bolts to specified torque (for A/T
vehicle).
Tightening torque
Torque converter bolt (c) :
65 N·m (6.5 kg-m, 47.0 lb-ft)
6) Tighten bolts and nuts of exhaust No.1 pipe (1) to specified
torque.
Tightening torque
Exhaust No.1 pipe bolt and nut (d) :
50 N·m (5.0 kg-m, 36.5 lb-ft)
7) Install front differential housing with differential to chassis if
removed. Refer to “REMOUNTING” in Section 7E.
8) Install steering shaft lower assembly. Refer to “STEERING
LOWER SHAFT ASSEMBLY” in Section 3C1.
9) Install A/C compressor assembly. Refer to “COMPRESSOR
ASSEMBLY” in Section 1B.
10) Install P/S pump assembly. Refer to “POWER STEERING
PUMP” in Section 3B1.
11) Connect hoses, cables and electric wires.
12) Adjust accelerator cable play and A/T throttle cable play (for
A/T vehicle). Refer to “ACCELERATOR CABLE ADJUST-
MENT” and “A/T THROTTLE CABLE ADJUSTMENT (A/T
VEHICLE)” in Section 6E2.
13) Refill engine with engine oil referring to “ENGINE OIL
CHANGE” in Section 0B.
14) Refill cooling system, referring to “COOLING SYSTEM
FLUSH AND REFILL” in Section 6B.
15) Check to ensure that all fasteners and clamps are tightened.
16) Upon completion of installation, verify that there is no fuel
leakage, coolant leakage, P/S fluid leakage or exhaust gas
leakage at each connection.
1. Bolt (short)
2. Bolt (Long)
Page 423 of 656
7B1-14 AUTOMATIC TRANSMISSION (4 A/T)
Diagnostic Trouble Code Table
Refer to the same item in Section 6-1.
Fail Safe Table
Refer to the same item in Section 6-1.
Visual Inspection
Visually check following parts and systems.
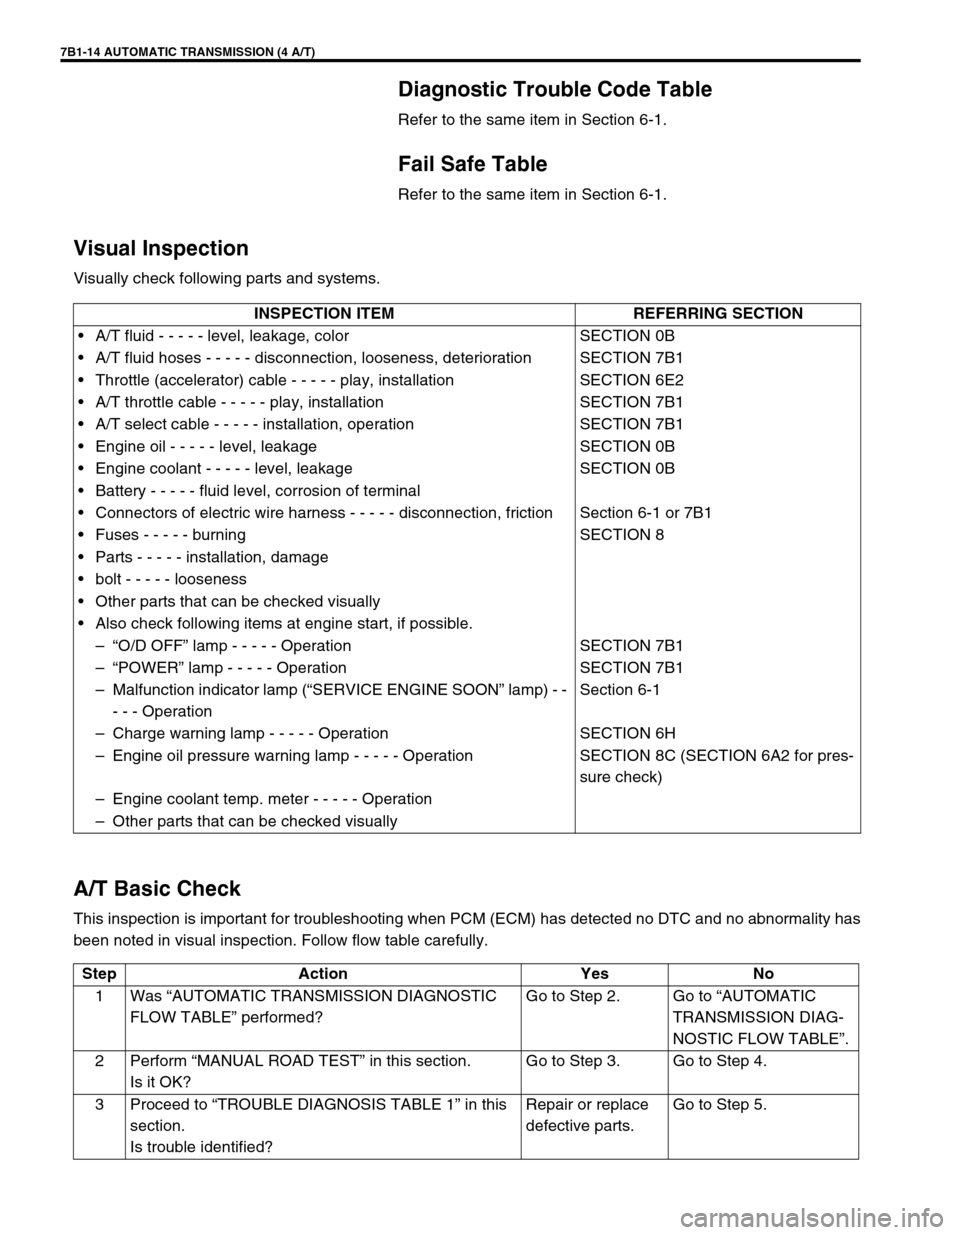
A/T Basic Check
This inspection is important for troubleshooting when PCM (ECM) has detected no DTC and no abnormality has
been noted in visual inspection. Follow flow table carefully.INSPECTION ITEM REFERRING SECTION
•A/T fluid - - - - - level, leakage, color SECTION 0B
•A/T fluid hoses - - - - - disconnection, looseness, deterioration SECTION 7B1
•Throttle (accelerator) cable - - - - - play, installation SECTION 6E2
•A/T throttle cable - - - - - play, installation SECTION 7B1
•A/T select cable - - - - - installation, operation SECTION 7B1
•Engine oil - - - - - level, leakage SECTION 0B
•Engine coolant - - - - - level, leakage SECTION 0B
•Battery - - - - - fluid level, corrosion of terminal
•Connectors of electric wire harness - - - - - disconnection, friction Section 6-1 or 7B1
•Fuses - - - - - burning SECTION 8
•Parts - - - - - installation, damage
•bolt - - - - - looseness
•Other parts that can be checked visually
•Also check following items at engine start, if possible.
–“O/D OFF” lamp - - - - - Operation SECTION 7B1
–“POWER” lamp - - - - - Operation SECTION 7B1
–Malfunction indicator lamp (“SERVICE ENGINE SOON” lamp) - -
- - - OperationSection 6-1
–Charge warning lamp - - - - - Operation SECTION 6H
–Engine oil pressure warning lamp - - - - - Operation SECTION 8C (SECTION 6A2 for pres-
sure check)
–Engine coolant temp. meter - - - - - Operation
–Other parts that can be checked visually
Step Action Yes No
1Was “AUTOMATIC TRANSMISSION DIAGNOSTIC
FLOW TABLE” performed?Go to Step 2. Go to “AUTOMATIC
TRANSMISSION DIAG-
NOSTIC FLOW TABLE”.
2Perform “MANUAL ROAD TEST” in this section.
Is it OK?Go to Step 3. Go to Step 4.
3Proceed to “TROUBLE DIAGNOSIS TABLE 1” in this
section.
Is trouble identified?Repair or replace
defective parts.Go to Step 5.
Page 426 of 656
AUTOMATIC TRANSMISSION (4 A/T) 7B1-17
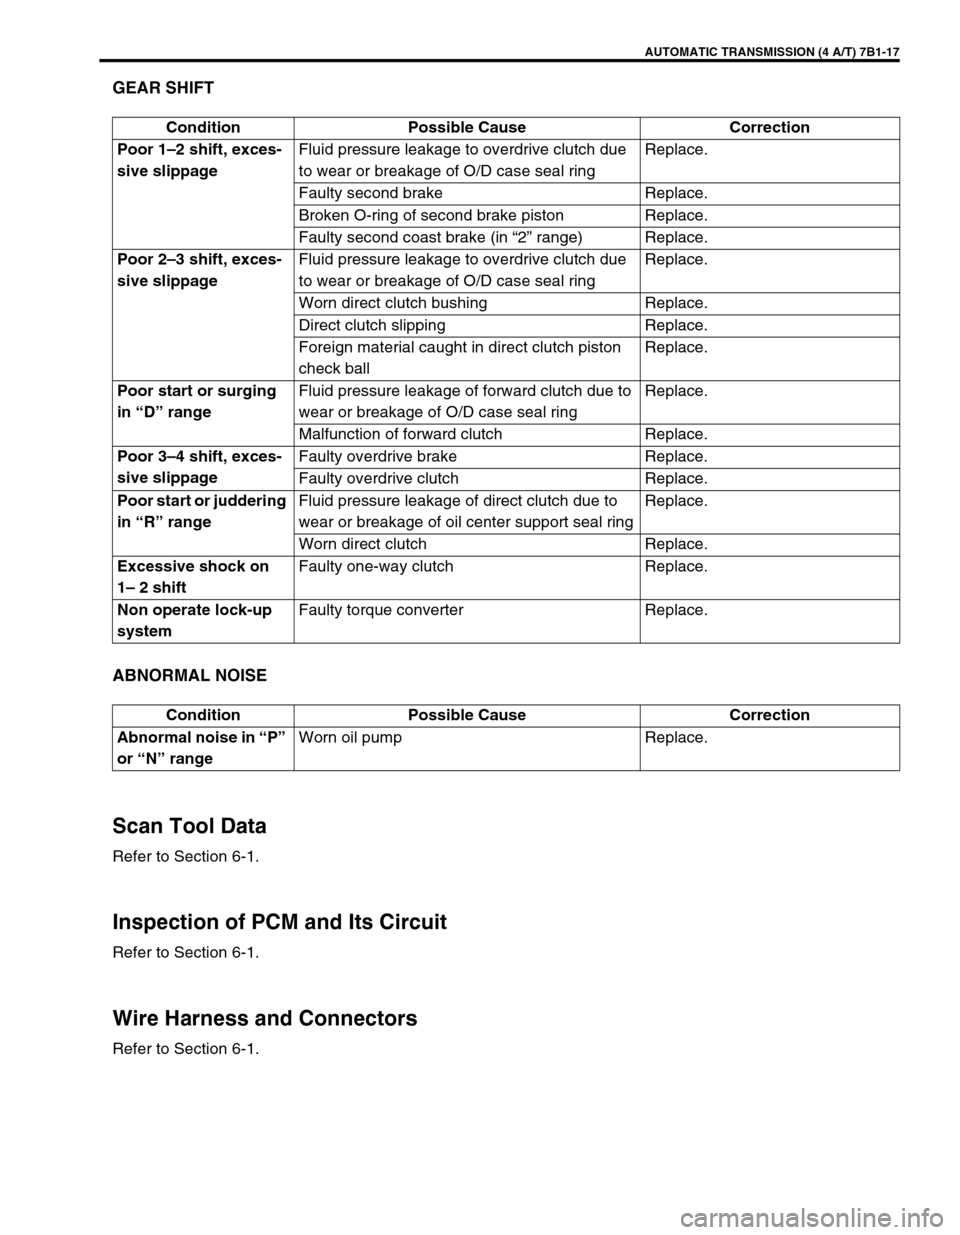
GEAR SHIFT
ABNORMAL NOISE
Scan Tool Data
Refer to Section 6-1.
Inspection of PCM and Its Circuit
Refer to Section 6-1.
Wire Harness and Connectors
Refer to Section 6-1.Condition Possible Cause Correction
Poor 1–2 shift, exces-
sive slippageFluid pressure leakage to overdrive clutch due
to wear or breakage of O/D case seal ringReplace.
Faulty second brake Replace.
Broken O-ring of second brake piston Replace.
Faulty second coast brake (in “2” range) Replace.
Poor 2–3 shift, exces-
sive slippageFluid pressure leakage to overdrive clutch due
to wear or breakage of O/D case seal ringReplace.
Worn direct clutch bushing Replace.
Direct clutch slipping Replace.
Foreign material caught in direct clutch piston
check ballReplace.
Poor start or surging
in “D” rangeFluid pressure leakage of forward clutch due to
wear or breakage of O/D case seal ringReplace.
Malfunction of forward clutch Replace.
Poor 3–4 shift, exces-
sive slippageFaulty overdrive brake Replace.
Faulty overdrive clutch Replace.
Poor start or juddering
in “R” rangeFluid pressure leakage of direct clutch due to
wear or breakage of oil center support seal ringReplace.
Worn direct clutch Replace.
Excessive shock on
1– 2 shiftFaulty one-way clutch Replace.
Non operate lock-up
systemFaulty torque converter Replace.
Condition Possible Cause Correction
Abnormal noise in “P”
or “N” rangeWorn oil pump Replace.
Page 447 of 656
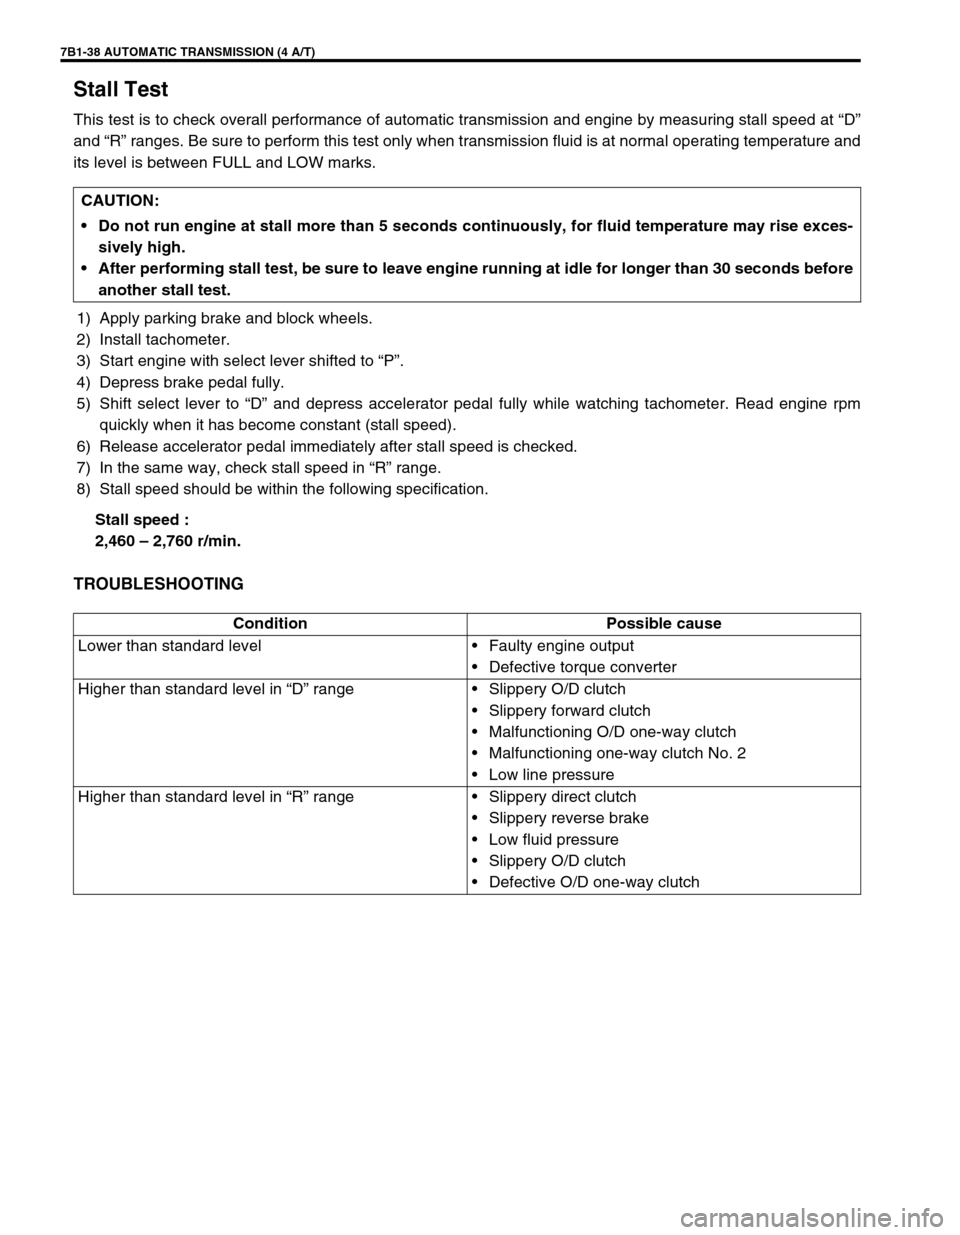
7B1-38 AUTOMATIC TRANSMISSION (4 A/T)
Stall Test
This test is to check overall performance of automatic transmission and engine by measuring stall speed at “D”
and “R” ranges. Be sure to perform this test only when transmission fluid is at normal operating temperature and
its level is between FULL and LOW marks.
1) Apply parking brake and block wheels.
2) Install tachometer.
3) Start engine with select lever shifted to “P”.
4) Depress brake pedal fully.
5) Shift select lever to “D” and depress accelerator pedal fully while watching tachometer. Read engine rpm
quickly when it has become constant (stall speed).
6) Release accelerator pedal immediately after stall speed is checked.
7) In the same way, check stall speed in “R” range.
8) Stall speed should be within the following specification.
Stall speed :
2,460 – 2,760 r/min.
TROUBLESHOOTING
CAUTION:
Do not run engine at stall more than 5 seconds continuously, for fluid temperature may rise exces-
sively high.
After performing stall test, be sure to leave engine running at idle for longer than 30 seconds before
another stall test.
Condition Possible cause
Lower than standard level•Faulty engine output
•Defective torque converter
Higher than standard level in “D” range•Slippery O/D clutch
•Slippery forward clutch
•Malfunctioning O/D one-way clutch
•Malfunctioning one-way clutch No. 2
•Low line pressure
Higher than standard level in “R” range•Slippery direct clutch
•Slippery reverse brake
•Low fluid pressure
•Slippery O/D clutch
•Defective O/D one-way clutch
Page 448 of 656
AUTOMATIC TRANSMISSION (4 A/T) 7B1-39
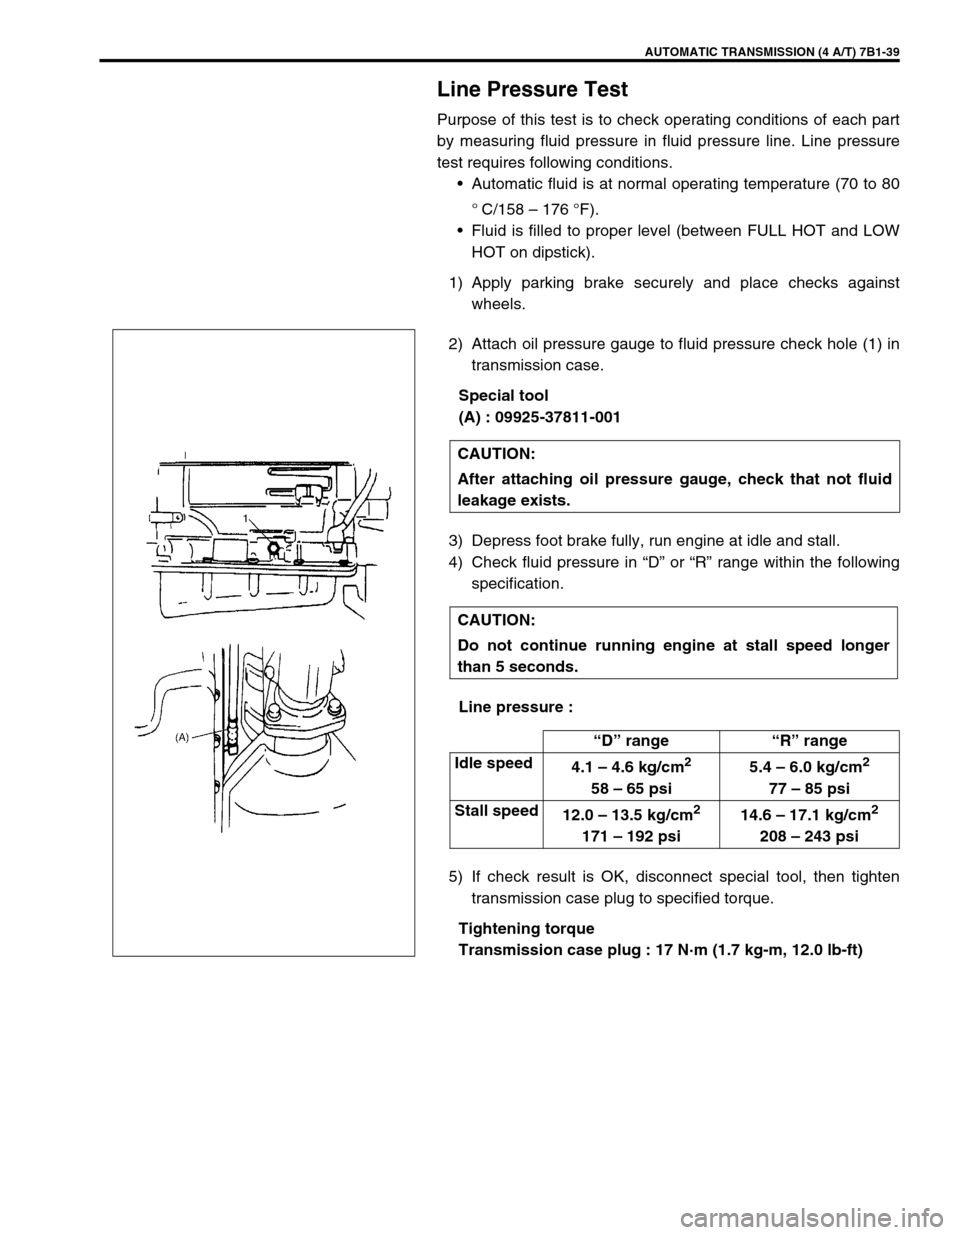
Line Pressure Test
Purpose of this test is to check operating conditions of each part
by measuring fluid pressure in fluid pressure line. Line pressure
test requires following conditions.
•Automatic fluid is at normal operating temperature (70 to 80
°
C/158 – 176 °F).
•Fluid is filled to proper level (between FULL HOT and LOW
HOT on dipstick).
1) Apply parking brake securely and place checks against
wheels.
2) Attach oil pressure gauge to fluid pressure check hole (1) in
transmission case.
Special tool
(A) : 09925-37811-001
3) Depress foot brake fully, run engine at idle and stall.
4) Check fluid pressure in “D” or “R” range within the following
specification.
Line pressure :
5) If check result is OK, disconnect special tool, then tighten
transmission case plug to specified torque.
Tightening torque
Transmission case plug : 17 N·m (1.7 kg-m, 12.0 lb-ft) CAUTION:
After attaching oil pressure gauge, check that not fluid
leakage exists.
CAUTION:
Do not continue running engine at stall speed longer
than 5 seconds.
“D” range“R” range
Idle speed
4.1 – 4.6 kg/cm
2
58 – 65 psi5.4 – 6.0 kg/cm
2
77 – 85 psi
Stall speed
12.0 – 13.5 kg/cm
2
171 – 192 psi14.6 – 17.1 kg/cm
2
208 – 243 psi
Page 449 of 656
7B1-40 AUTOMATIC TRANSMISSION (4 A/T)
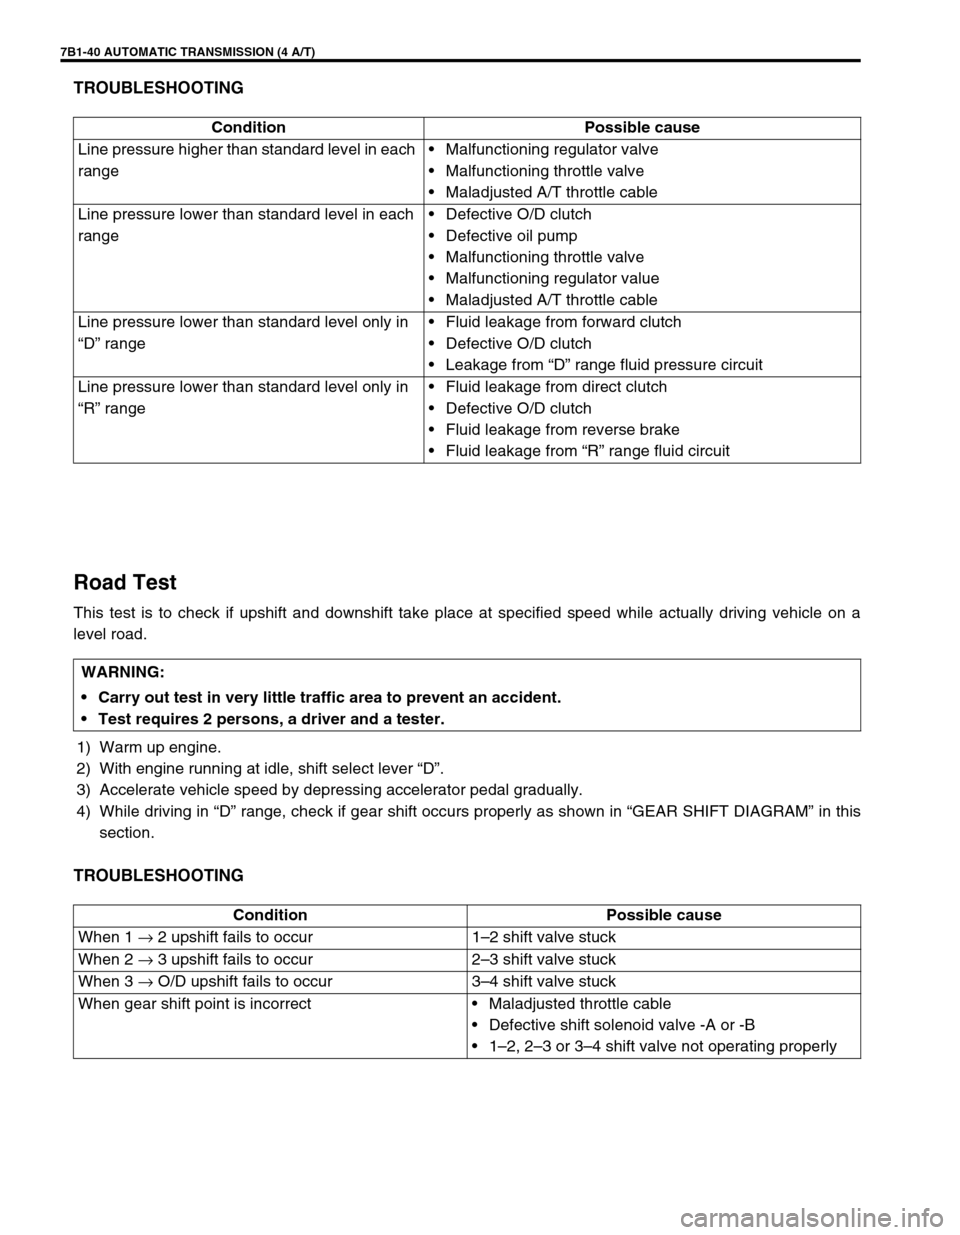
TROUBLESHOOTING
Road Test
This test is to check if upshift and downshift take place at specified speed while actually driving vehicle on a
level road.
1) Warm up engine.
2) With engine running at idle, shift select lever “D”.
3) Accelerate vehicle speed by depressing accelerator pedal gradually.
4) While driving in “D” range, check if gear shift occurs properly as shown in “GEAR SHIFT DIAGRAM” in this
section.
TROUBLESHOOTING
Condition Possible cause
Line pressure higher than standard level in each
range•Malfunctioning regulator valve
•Malfunctioning throttle valve
•Maladjusted A/T throttle cable
Line pressure lower than standard level in each
range•Defective O/D clutch
•Defective oil pump
•Malfunctioning throttle valve
•Malfunctioning regulator value
•Maladjusted A/T throttle cable
Line pressure lower than standard level only in
“D” range•Fluid leakage from forward clutch
•Defective O/D clutch
•Leakage from “D” range fluid pressure circuit
Line pressure lower than standard level only in
“R” range•Fluid leakage from direct clutch
•Defective O/D clutch
•Fluid leakage from reverse brake
•Fluid leakage from “R” range fluid circuit
WARNING:
Carry out test in very little traffic area to prevent an accident.
Test requires 2 persons, a driver and a tester.
Condition Possible cause
When 1 → 2 upshift fails to occur 1–2 shift valve stuck
When 2 → 3 upshift fails to occur 2–3 shift valve stuck
When 3 → O/D upshift fails to occur 3–4 shift valve stuck
When gear shift point is incorrect•Maladjusted throttle cable
•Defective shift solenoid valve -A or -B
•1–2, 2–3 or 3–4 shift valve not operating properly
Page 450 of 656
AUTOMATIC TRANSMISSION (4 A/T) 7B1-41
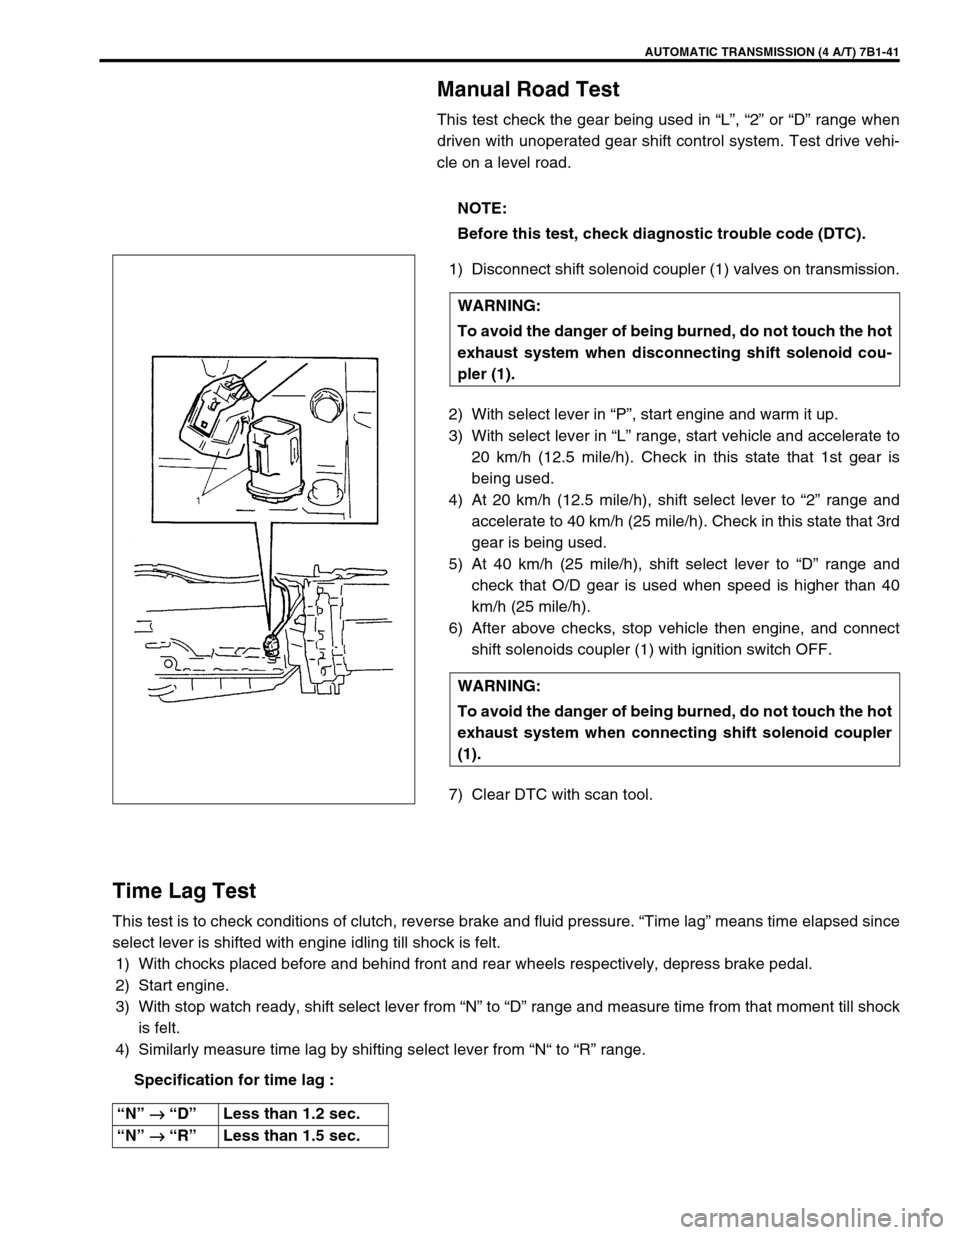
Manual Road Test
This test check the gear being used in “L”, “2” or “D” range when
driven with unoperated gear shift control system. Test drive vehi-
cle on a level road.
1) Disconnect shift solenoid coupler (1) valves on transmission.
2) With select lever in “P”, start engine and warm it up.
3) With select lever in “L” range, start vehicle and accelerate to
20 km/h (12.5 mile/h). Check in this state that 1st gear is
being used.
4) At 20 km/h (12.5 mile/h), shift select lever to “2” range and
accelerate to 40 km/h (25 mile/h). Check in this state that 3rd
gear is being used.
5) At 40 km/h (25 mile/h), shift select lever to “D” range and
check that O/D gear is used when speed is higher than 40
km/h (25 mile/h).
6) After above checks, stop vehicle then engine, and connect
shift solenoids coupler (1) with ignition switch OFF.
7) Clear DTC with scan tool.
Time Lag Test
This test is to check conditions of clutch, reverse brake and fluid pressure. “Time lag” means time elapsed since
select lever is shifted with engine idling till shock is felt.
1) With chocks placed before and behind front and rear wheels respectively, depress brake pedal.
2) Start engine.
3) With stop watch ready, shift select lever from “N” to “D” range and measure time from that moment till shock
is felt.
4) Similarly measure time lag by shifting select lever from “N“ to “R” range.
Specification for time lag :NOTE:
Before this test, check diagnostic trouble code (DTC).
WARNING:
To avoid the danger of being burned, do not touch the hot
exhaust system when disconnecting shift solenoid cou-
pler (1).
WARNING:
To avoid the danger of being burned, do not touch the hot
exhaust system when connecting shift solenoid coupler
(1).
“N” →
→→ → “D”Less than 1.2 sec.
“N” →
→→ → “R”Less than 1.5 sec.