Page 25 of 90

Downloaded from www.Manualslib.com manuals search engine WIRING
Air bags and seat belt pretensioners
88
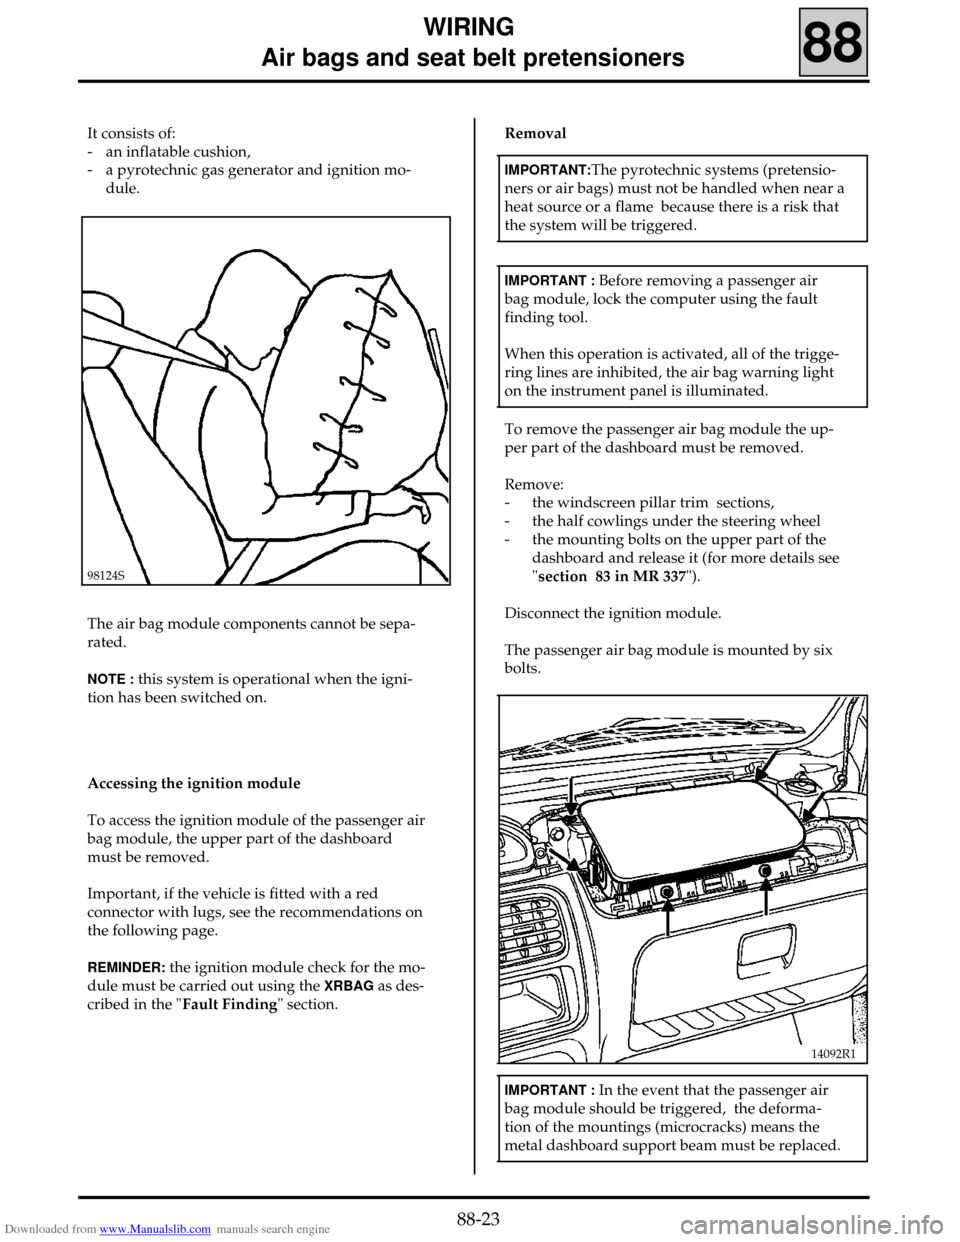
It consists of:
- an inflatable cushion,
- a pyrotechnic gas generator and ignition mo-
dule.
98124S
The air bag module components cannot be sepa-
rated.
NOTE : this system is operational when the igni-
tion has been switched on.
Accessing the ignition module
To access the ignition module of the passenger air
bag module, the upper part of the dashboard
must be removed.
Important, if the vehicle is fitted with a red
connector with lugs, see the recommendations on
the following page.
REMINDER: the ignition module check for the mo-
dule must be carried out using the
XRBAG as des-
cribed in the "Fault Finding" section.Removal
IMPORTANT:The pyrotechnic systems (pretensio-
ners or air bags) must not be handled when near a
heat source or a flame because there is a risk that
the system will be triggered.
IMPORTANT : Before removing a passenger air
bag module, lock the computer using the fault
finding tool.
When this operation is activated, all of the trigge-
ring lines are inhibited, the air bag warning light
on the instrument panel is illuminated.
To remove the passenger air bag module the up-
per part of the dashboard must be removed.
Remove:
- the windscreen pillar trim sections,
- the half cowlings under the steering wheel
- the mounting bolts on the upper part of the
dashboard and release it (for more details see
"section 83 in MR 337").
Disconnect the ignition module.
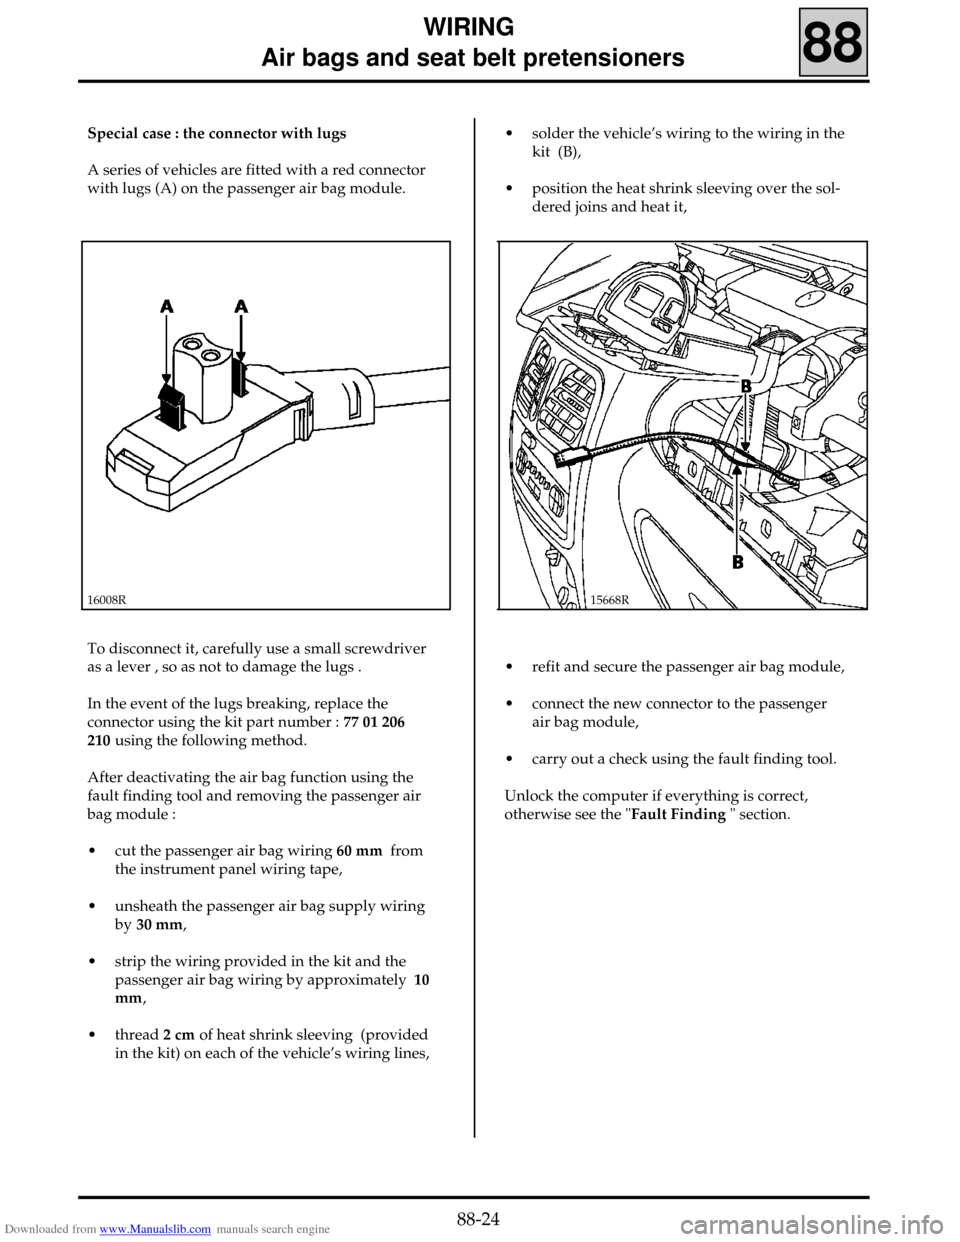
The passenger air bag module is mounted by six
bolts.
14092R1
IMPORTANT : In the event that the passenger air
bag module should be triggered, the deforma-
tion of the mountings (microcracks) means the
metal dashboard support beam must be replaced.
88-23
Page 26 of 90

Downloaded from www.Manualslib.com manuals search engine WIRING
Air bags and seat belt pretensioners
88
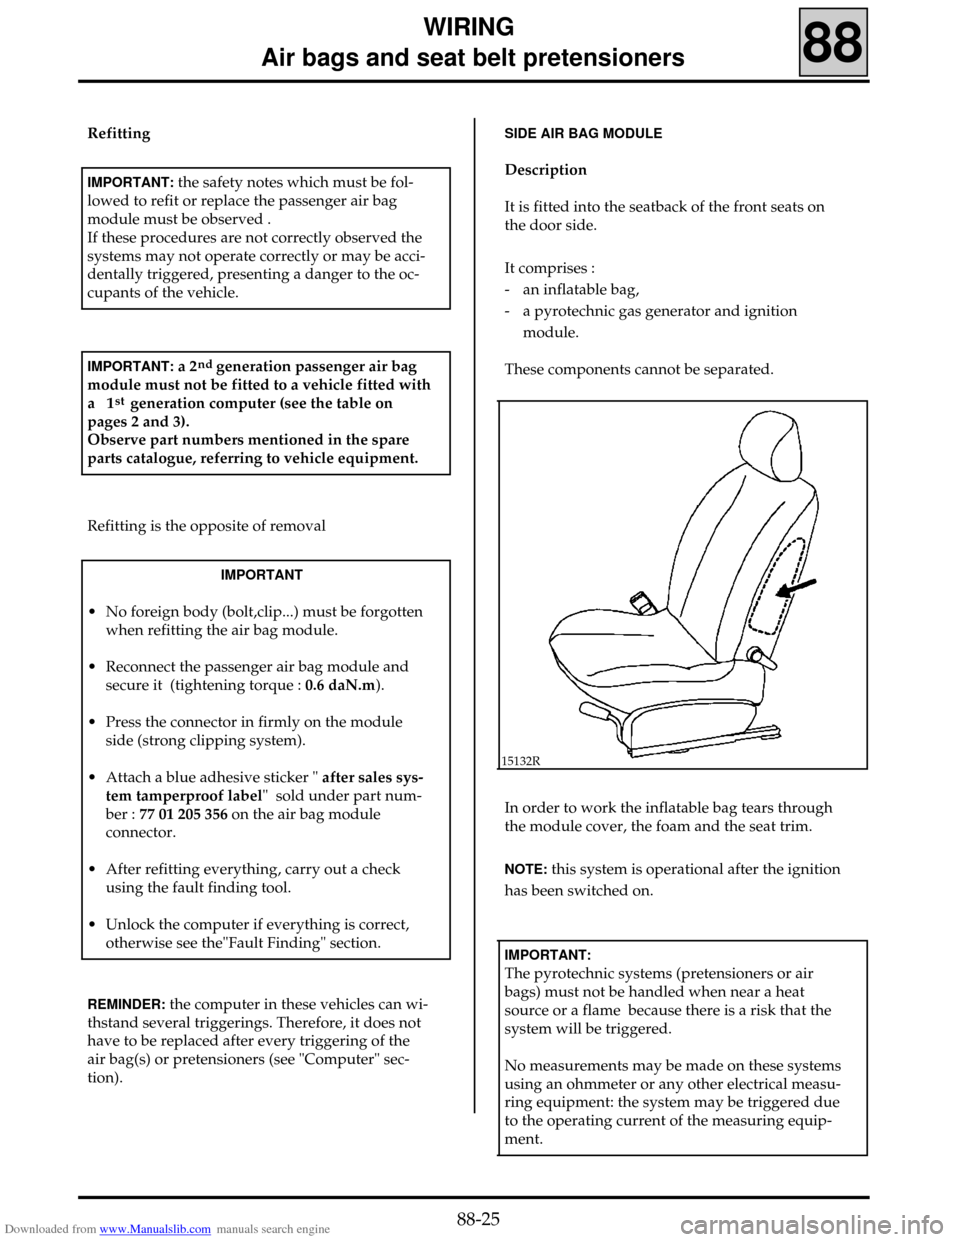
Special case : the connector with lugs
A series of vehicles are fitted with a red connector
with lugs (A) on the passenger air bag module.
16008R
To disconnect it, carefully use a small screwdriver
as a lever , so as not to damage the lugs .
In the event of the lugs breaking, replace the
connector using the kit part number : 77 01 206
210 using the following method.
After deactivating the air bag function using the
fault finding tool and removing the passenger air
bag module :
• cut the passenger air bag wiring 60 mm from
the instrument panel wiring tape,
• unsheath the passenger air bag supply wiring
by 30 mm,
• strip the wiring provided in the kit and the
passenger air bag wiring by approximately10
mm,
• thread 2 cm of heat shrink sleeving (provided
in the kit) on each of the vehicle’s wiring lines,
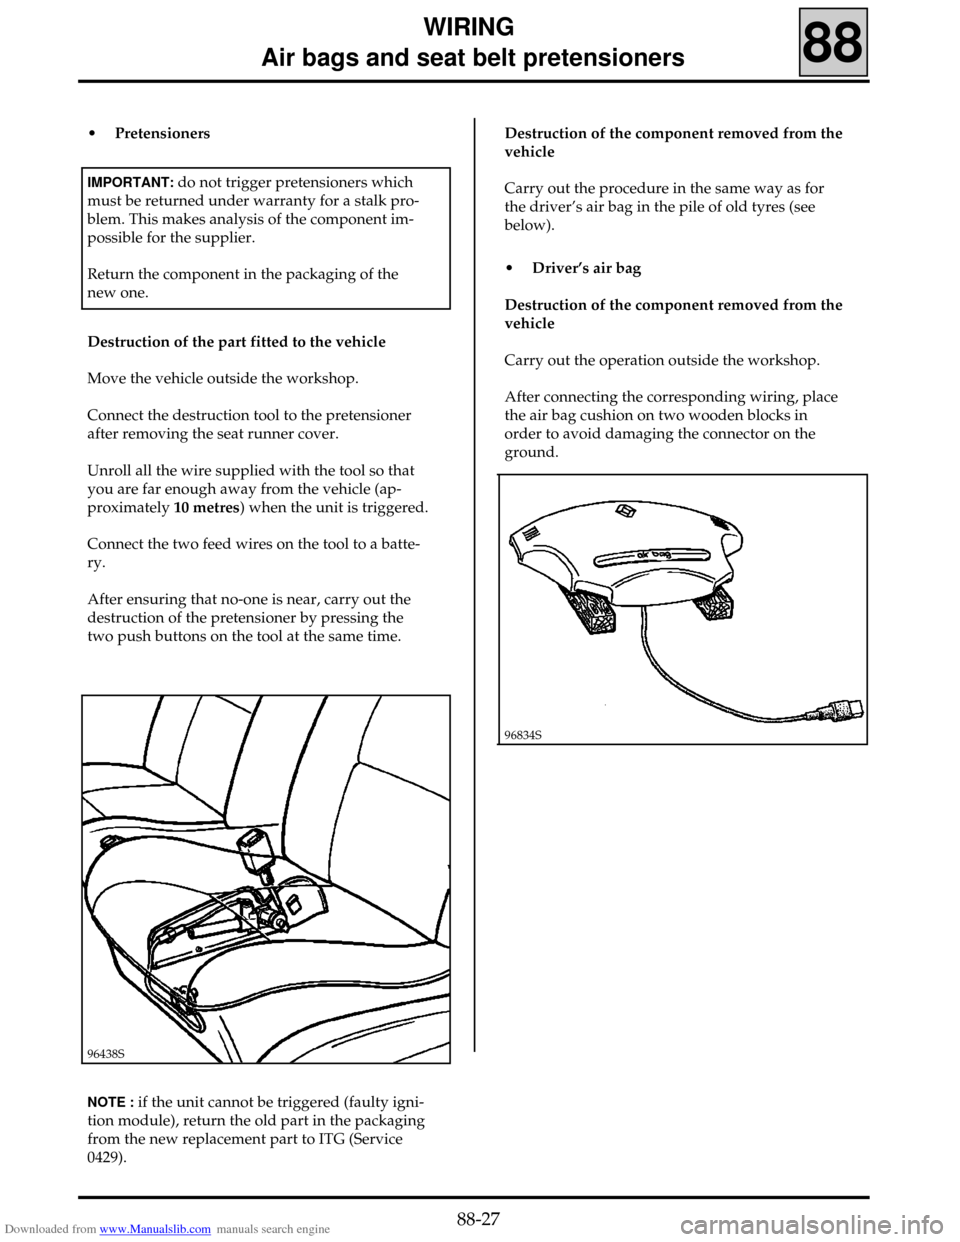
15668R
• refit and secure the passenger air bag module,
• connect the new connector to the passenger
air bag module,
• carry out a check using the fault finding tool.
Unlock the computer if everything is correct,
otherwise see the "Fault Finding " section. • solder the vehicle’s wiring to the wiring in the
kit (B),
• position the heat shrink sleeving over the sol-
dered joins and heat it,
88-24
Page 27 of 90

Downloaded from www.Manualslib.com manuals search engine WIRING
Air bags and seat belt pretensioners
88
Refitting
IMPORTANT: the safety notes which must be fol-
lowed to refit or replace the passenger air bag
module must be observed .
If these procedures are not correctly observed the
systems may not operate correctly or may be acci-
dentally triggered, presenting a danger to the oc-
cupants of the vehicle.
Refitting is the opposite of removal
IMPORTANT: a 2nd generation passenger air bag
module must not be fitted to a vehicle fitted with
a 1
stgeneration computer (see the table on
pages 2 and 3).
Observe part numbers mentioned in the spare
parts catalogue, referring to vehicle equipment.
REMINDER: the computer in these vehicles can wi-
thstand several triggerings. Therefore, it does not
have to be replaced after every triggering of the
air bag(s) or pretensioners (see "Computer" sec-
tion).
IMPORTANT
• No foreign body (bolt,clip...) must be forgotten
when refitting the air bag module.
• Reconnect the passenger air bag module and
secure it (tightening torque : 0.6 daN.m).
• Press the connector in firmly on the module
side (strong clipping system).
• Attach a blue adhesive sticker " after sales sys-
tem tamperproof label" sold under part num-
ber : 77 01 205 356 on the air bag module
connector.
• After refitting everything, carry out a check
using the fault finding tool.
• Unlock the computer if everything is correct,
otherwise see the"Fault Finding" section.
SIDE AIR BAG MODULE
Description
It is fitted into the seatback of the front seats on
the door side.
It comprises :
- an inflatable bag,
- a pyrotechnic gas generator and ignition
module.
These components cannot be separated.
15132R
In order to work the inflatable bag tears through
the module cover, the foam and the seat trim.
NOTE: this system is operational after the ignition
has been switched on.
IMPORTANT:
The pyrotechnic systems (pretensioners or air
bags) must not be handled when near a heat
source or a flame because there is a risk that the
system will be triggered.
No measurements may be made on these systems
using an ohmmeter or any other electrical measu-
ring equipment: the system may be triggered due
to the operating current of the measuring equip-
ment.
88-25
Page 28 of 90

Downloaded from www.Manualslib.com manuals search engine WIRING
Air bags and seat belt pretensioners
88
Removal - Refitting
Any operation involving removal and refitting of
the seat trim of a seat back fitted with a side air
bag, must not be carried out for the time being.
In case of a fault on the air bag cushion or follo-
wing its inflation, the whole seat must be repla-
ced following the specific Parts Department or-
der procedure .
REMINDER: the computer in these vehicles can wi-
thstand several triggerings. Therefore, it does not
have to be replaced after every triggering of the
air bag(s) or pretensioners (see "Computer" sec-
tion).
On the other hand, in the event of a triggering
being caused, the side impact sensor must be re-
placed (certain components lose their nominal
specifications after the triggering energy has pas-
sed through them).
IMPORTANT :
• Before removing a seat, lock the computer
using the fault finding tool.
When this operation is activated, all the trig-
gering lines are inhibited and the air bag war-
ning light on the instrument panel is illumina-
ted.
• When refitting, after replacing the seat and
reconnecting the connectors, carry out a check
using the fault finding tool. Unlock the
computer if everything is correct, otherwise
see the"Fault Finding" section.
IMPORTANT : before scrapping an untriggered air
bag module, it
MUST be destroyed in accordance
with the method described in the "Destruction
Procedure" section
96832R
DESTRUCTION PROCEDURE
To avoid the risk of an accident, the pyrotechnic
gas generators must be triggered before scrap-
ping a vehicle or a single part.
Tool Elé. 1287 must be used.
88-26
Page 29 of 90

Downloaded from www.Manualslib.com manuals search engine WIRING
Air bags and seat belt pretensioners
88
• Pretensioners
IMPORTANT: do not trigger pretensioners which
must be returned under warranty for a stalk pro-
blem. This makes analysis of the component im-
possible for the supplier.
Return the component in the packaging of the
new one.
Destruction of the part fitted to the vehicle
Move the vehicle outside the workshop.
Connect the destruction tool to the pretensioner
after removing the seat runner cover.
Unroll all the wire supplied with the tool so that
you are far enough away from the vehicle (ap-
proximately 10 metres) when the unit is triggered.
Connect the two feed wires on the tool to a batte-
ry.
After ensuring that no-one is near, carry out the
destruction of the pretensioner by pressing the
two push buttons on the tool at the same time.
96438S
Destruction of the component removed from the
vehicle
Carry out the procedure in the same way as for
the driver’s air bag in the pile of old tyres (see
below).
NOTE : if the unit cannot be triggered (faulty igni-
tion module), return the old part in the packaging
from the new replacement part to ITG (Service
0429).• Driver’s air bag
Destruction of the component removed from the
vehicle
Carry out the operation outside the workshop.
After connecting the corresponding wiring, place
the air bag cushion on two wooden blocks in
order to avoid damaging the connector on the
ground.
96834S
88-27
Page 30 of 90
Downloaded from www.Manualslib.com manuals search engine WIRING
Air bags and seat belt pretensioners
88
96835S
Unroll all the wire supplied with the tool so that
you are far enough away from the assembly
(approximately 10 metres) when the unit is
triggered and connect it to the air bag cushion
wiring.
Connect the two feed wires on the tool to a
battery.
After ensuring that no-one is near the unit, carry
out the destruction of the air bag by pressing the
two push buttons on the tool at the same time.
NOTE : if the unit cannot be triggered (faulty
ignition module), return the old part in the
packaging from the new replacement part to ITG
(Service 0429).
• Passenger air bag module
Destruction of the component removed from the
vehicle
Carry out the procedure in the same way as for
the driver’s air bag in the pile of old tyres (see
above). Cover the assembly with a stack of four old tyres.
88-28
Page 31 of 90

Downloaded from www.Manualslib.com manuals search engine 1AB8651.0
This fault finding section comprises two parts :
- For systems only with front air bags marked "Front".
- For systems with front and side air bags marked "Side".
CONDITIONS FOR APPLYING THE CHECKS DEFINED IN THIS FAULT FINDING
In this fault finding, each fault is interpreted for a type of special memory (fault present, fault memorised,
fault present or memorised).
The checks defined for the processing of each fault are therefore only applied to a vehicle if the fault is
interpreted for the type of fault declared by the fault finding tool.
If a fault is only interpreted in this fault finding if it is declared "present", applying the fault finding when
the fault is only "memorised" does not enable the origin of memorising this fault to be located. In this
case, only a check of the wiring and the connections for the part at fault needs to be carried out (it is
possible to test the wiring concerned in fault finding mode in order to try to see the change from
memorised fault to fault present).
If a fault is interpreted when it is declared"memorised", the conditions for confirming the actual presence
of the fault (and the need to apply fault finding) appear in the "Notes" section or at the beginning of the
fault interpretation.
Note : the ignition must be switched off before operating the fault finding tool.
TOOLING REQUIRED FOR OPERATIONS ON THE AIR BAG AND SEAT BELT PRETENSIONER SYSTEMS :
- fault finding tool (except XR25).
- XRBAG update N° 4 for front air bags (with the 30 track B40 adaptor with yellow computer base).
- XRBAG update N° 5 for side air bags ( with the new 50 track B50 adapter with orange computer base).
REMINDERS :
When carrying out an operation on the air bag / seat belt pretensioner systems, the computer must be
locked using the fault finding tool to prevent any risk of incorrect triggering (all trigger lines will be
inhibited).This "locked" mode is indicated by illumination of the warning light on the instrument panel.
If the operation follows an impact during which the pretensioners and/or air bags
were triggered, locking will only be possible following a computer unlocking command.
Following an impact during which the pretensioners and/or air bags were triggered, erasing the
memorised faults will only be possible following a computer unlocking command.
Never take measurements on the air bag and pretensioner triggering lines with an apparatus other than
the XRBAG.
Before using a dummy ignition module, ensure that its resistance is between 1.8 and 2.5 ohms.
During an operation ensure that the computer supply voltage does not fall below 10 volts (#01).
FAULT FINDING - INTRODUCTION
WIRING
Air bags and seat belt pretensioners
88
88-29
Page 32 of 90
Downloaded from www.Manualslib.com manuals search engine 1AB8651.0
FAULT FINDING - INTRODUCTION
FICHE XRBAG
Pretensioners, front air bags
WIRING
Air bags and seat belt pretensioners
88
FRONT
DI8826
The connector is identical for the pretensioners and side air bags on both seats
ACentral computer
BDriver’s seat
CPassenger’s seat
DPretensioner
EDriver’s air bag ignition module
GPassenger’s air bag ignition module
Correct insulation value : display> = 100 h or 9999 flashing.CTRotary switch
A1+ 12 Volts
A2Warning light
A3Earth
B1
B2Fault finding lines
FRONT AIR BAGS
Measuring point Correct value
C0, C2 and C42.1 to 7 ohms
C0 and C41.3 to 4.5 ohms
Driver
Passenger
PRETENSIONERS
Measuring point Correct value
C0, C1 and C31.3 to 4.5 ohms
88-30