1999 NISSAN SENTRA run flat
[x] Cancel search: run flatPage 110 of 223

1) Move the shift selector lever into the P
(Park) position.
2) Turn the ignition key slightly toward the
ON position.
3) Turn the key to the LOCK position.
4) Remove the key.
If the key is removed from the ignition switch,
the shift selector lever cannot be moved from
P (Park).The shift selector lever can be
moved if the ignition switch is in the ACC
position. This allows the vehicle to be
moved if the battery is discharged.
The shift selector lever can also be
moved if the ignition switch is in the ON
position and the foot brake pedal is de-
pressed.
There is an OFF position between the
LOCK and ACC positions. The OFF position
is indicated by a ``1'' on the key cylinder.
When the ignition is in OFF, the steering
wheel is not locked.
To lock the steering wheel, remove the
key. In order for the steering wheel to be
locked, it must be turned about 1/8 of a
turn clockwise from the straight up posi-
tion. To unlock the steering wheel, insert
the key and turn it gently while rotatingthe steering wheel slightly right and left.
WARNING
Never remove the key while driving. If
the key is removed, the steering wheel
will lock. This may cause the driver to
lose control of the vehicle and could
result in serious vehicle damage or
personal injury.
Key positions
LOCK: Normal parking position (0)
OFF: (Manual transmission model) (1)
The engine can be turned off without locking
the steering wheel.
ACC: (Accessories) (2)
This position activates electrical accesso-
ries such as the radio when the engine is
not running.
ON: Normal operating position (3)
This position turns on the ignition system
and the electrical accessories.
START: (4)
This position activates the starter motor,
which starts the engine.cMake sure the area around the vehicle is
clear.
cMaintenance items listed here should be
checked periodically, for example, each
time you check engine oil.
cCheck that all windows and lights are
clean.
cVisually inspect tires for their appearance
and condition. Also check tires for proper
inflation.
cLock all doors.
cPosition seat and adjust head restraints.
cAdjust inside and outside mirrors.
cFasten seat belts and ask all passengers
to do likewise.
c
Check the operation of warning lights
when key is turned to the ON (3) position.
See ``Warning/indicator lights and chimes''
in the ``Instrument and controls'' section.
BEFORE STARTING THE
ENGINE
Starting and driving5-5
ZX
Page 120 of 223

During the first 1,000 miles (1,600 km),
follow these recommendations for the future
reliability and economy of your new vehicle.
Failure to follow these recommendations
may result in vehicle damage or shortened
engine life.
cDo not drive over 55 MPH (90 km/h) and
do not run the engine over 4,000 rpm.
Avoid driving for long periods at constant
speed, either fast or slow.
cDo not accelerate at full throttle in any
gear.
cAvoid quick starts.
cAvoid hard braking as much as possible.
cDo not tow a trailer for the first 500 miles
(800 km).cAccelerate slowly and smoothly. Main-
tain cruising speeds with a constant ac-
celerator position.
cDrive at moderate speeds on the high-
way. Driving at high speed lowers fuel
economy.
cAvoid unnecessary stopping and brak-
ing. Maintain a safe distance behind
other vehicles.
cUse a proper gear range which suits road
conditions. On level roads, shift into high
gear as soon as possible.
cAvoid unnecessary engine idling.cKeep your engine tuned up.
cFollow the recommended periodic main-
tenance schedule.
cKeep the tires inflated to the correct
pressure. Low tire pressure increases
tire wear and wastes fuel.
cKeep the front wheels in correct align-
ment. Improper alignment increases tire
wear and lowers fuel economy.
cAir conditioner operation lowers fuel
economy. Use the air conditioner only
when necessary.
cWhen cruising at highway speeds, it is
more economical to use the air condi-
tioner and leave the windows closed to
reduce drag.
SD1001M
BREAK-IN SCHEDULE INCREASING FUEL
ECONOMY
Starting and driving5-15
ZX
Page 129 of 223

If you have a flat tire, follow the instructions
below.
Stopping the vehicle
1. Safely move the vehicle off the road and
away from traffic.
2. Turn on the hazard warning flashers.
3. Park on a level surface and apply the
parking brake. Shift the manual transmis-
sion into R (Reverse), or the automatic
transmission into P (Park).
4. Turn off the engine.
5. Raise the hood to warn other traffic, and
to signal professional road assistance
personnel that you need assistance.
6. Have all passengers get out of the ve-
hicle and stand in a safe place, away
from traffic and clear of the vehicle.
WARNING
cMake sure that the parking brake is
securely applied and the manual
transmission is shifted into R (Re-
verse), or the automatic transmis-
sion into P (Park).cNever change tires when the vehicle
is on a slope, ice or slippery areas.
This is hazardous.
cNever change tires if oncoming traf-
fic is close to your vehicle. Wait for
professional road assistance.
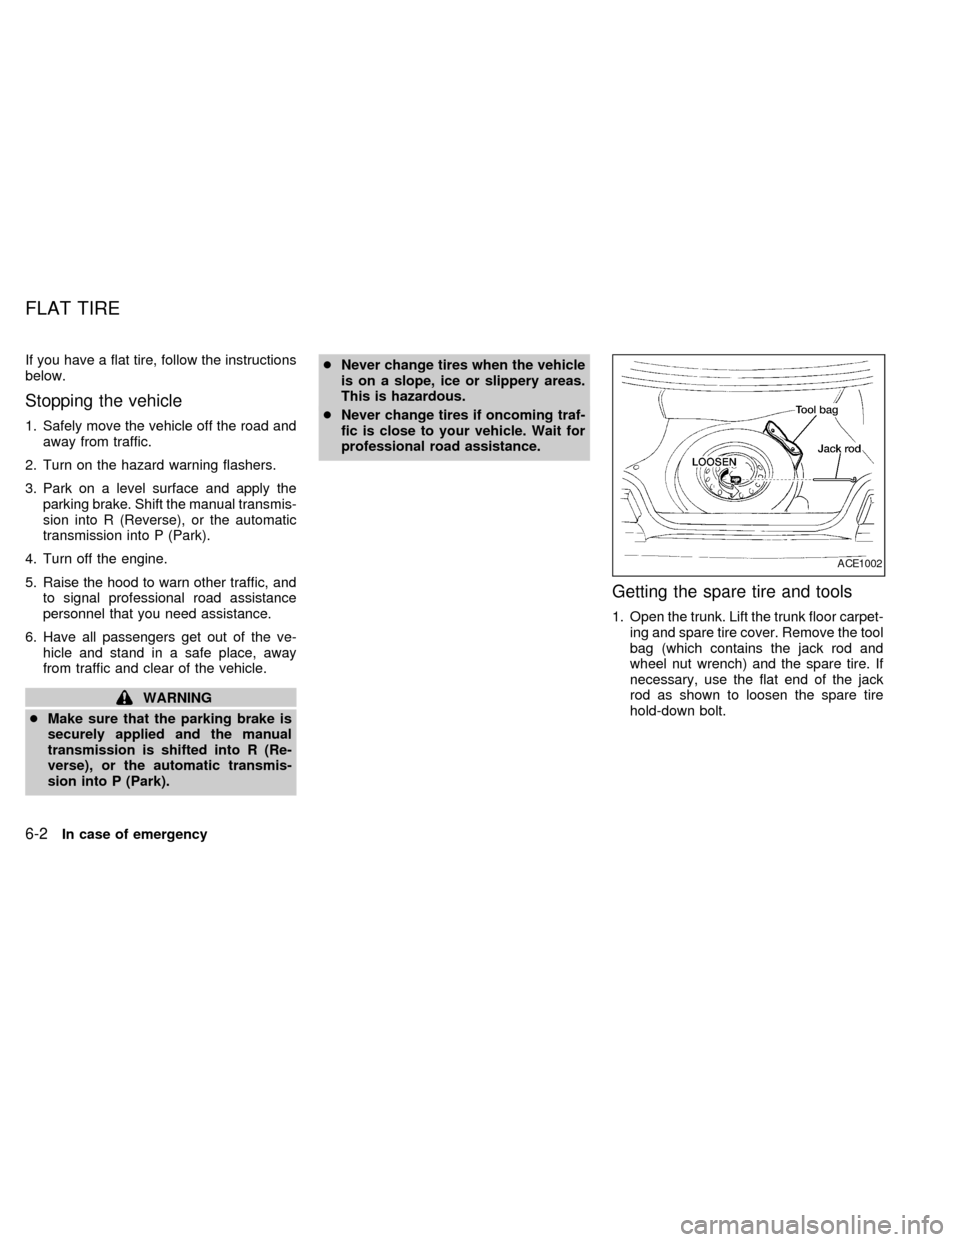
Getting the spare tire and tools
1. Open the trunk. Lift the trunk floor carpet-
ing and spare tire cover. Remove the tool
bag (which contains the jack rod and
wheel nut wrench) and the spare tire. If
necessary, use the flat end of the jack
rod as shown to loosen the spare tire
hold-down bolt.
ACE1002
FLAT TIRE
6-2In case of emergency
ZX
Page 133 of 223

cNever jack up the vehicle more than
necessary.
cNever use blocks on or under the
jack.
cDo not start or run engine while
vehicle is on the jack as it may cause
the vehicle to move.
cDo not allow passengers to stay in
the vehicle while it is on the jack.
cNever run the engine with a wheel off
the ground. It may cause the vehicle
to move. This is especially true for
models equipped with a limited slip
differential carrier.
Installing the spare tire
The T-type spare tire is designed for
emergency use. See specific instruc-
tions under the heading ``Wheels and
tires'' in the ``Do-it- yourself'' section of
this owner's manual.
1. Clean any mud or dirt from the surface
between the wheel and hub.
2. Carefully put the spare tire on and tighten
the wheel nuts finger tight.
3. With the wheel nut wrench, tighten wheel
nuts alternately and evenly until they are
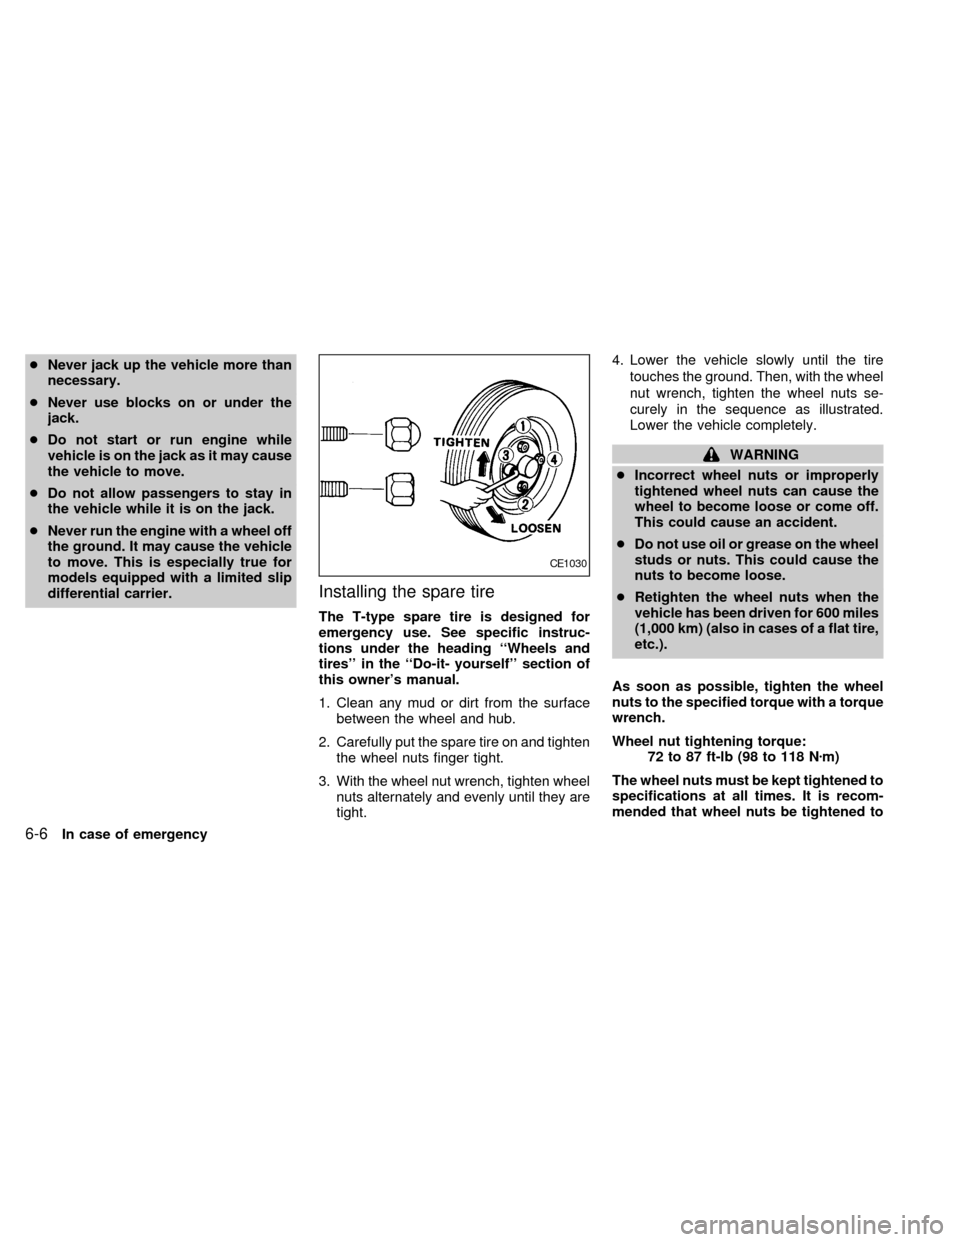
tight.4. Lower the vehicle slowly until the tire
touches the ground. Then, with the wheel
nut wrench, tighten the wheel nuts se-
curely in the sequence as illustrated.
Lower the vehicle completely.
WARNING
cIncorrect wheel nuts or improperly
tightened wheel nuts can cause the
wheel to become loose or come off.
This could cause an accident.
cDo not use oil or grease on the wheel
studs or nuts. This could cause the
nuts to become loose.
cRetighten the wheel nuts when the
vehicle has been driven for 600 miles
(1,000 km) (also in cases of a flat tire,
etc.).
As soon as possible, tighten the wheel
nuts to the specified torque with a torque
wrench.
Wheel nut tightening torque:
72 to 87 ft-lb (98 to 118 Nzm)
The wheel nuts must be kept tightened to
specifications at all times. It is recom-
mended that wheel nuts be tightened to
CE1030
6-6In case of emergency
ZX
Page 174 of 223

cAiming is not necessary after replac-
ing the bulb.
cDo not leave the bulb out of the
headlight reflector for a long period
of time as dust, moisture, and smoke
may enter the headlight body and
affect the performance of the head-
light.
Before adjusting the headlights, make sure
all of the tires are properly inflated, the
vehicle is on level ground and there is no
excess weight in the vehicle that would
affect the level of the vehicle.
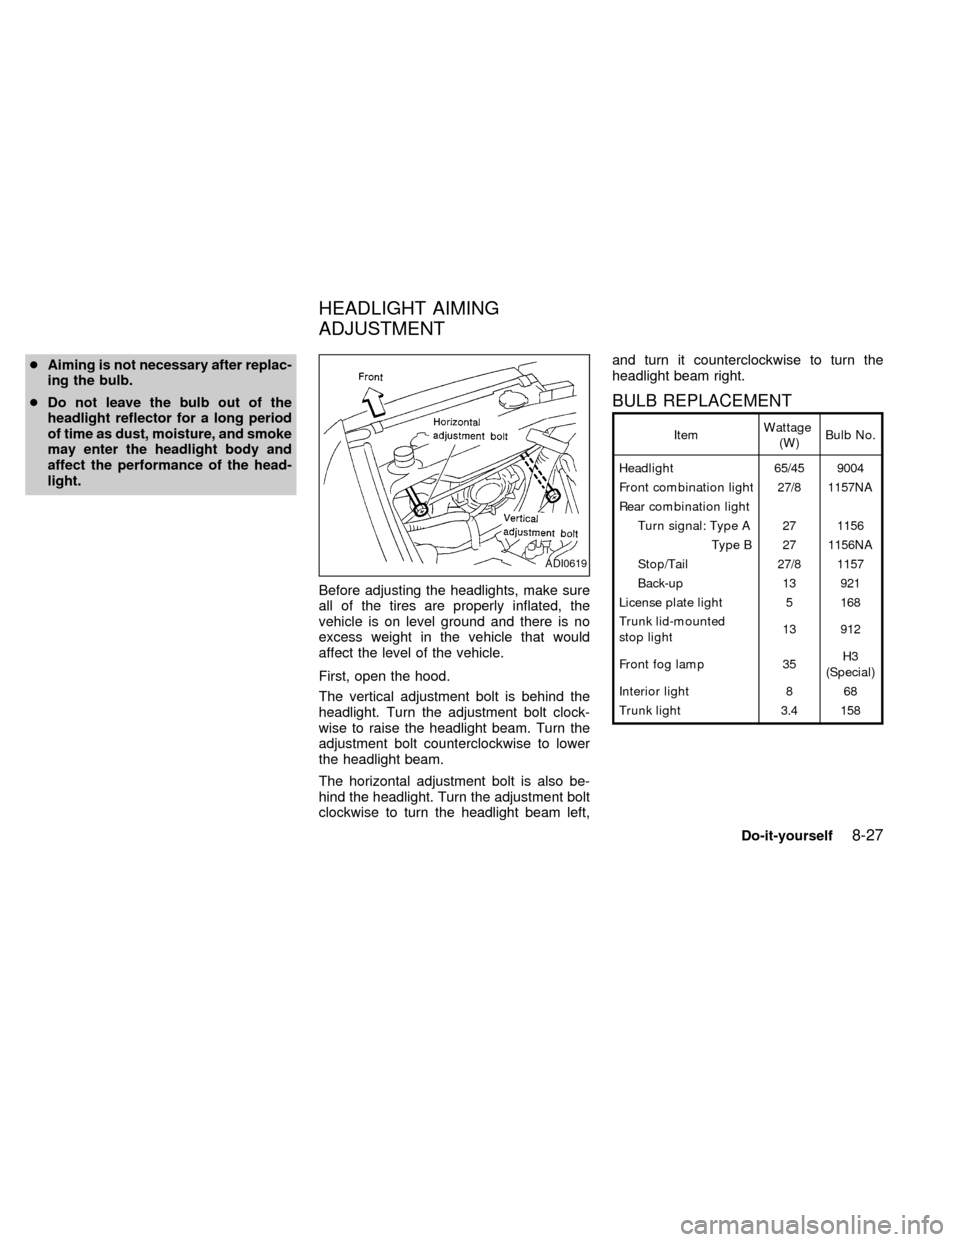
First, open the hood.
The vertical adjustment bolt is behind the
headlight. Turn the adjustment bolt clock-
wise to raise the headlight beam. Turn the
adjustment bolt counterclockwise to lower
the headlight beam.
The horizontal adjustment bolt is also be-
hind the headlight. Turn the adjustment bolt
clockwise to turn the headlight beam left,and turn it counterclockwise to turn the
headlight beam right.
BULB REPLACEMENT
ItemWattage
(W)Bulb No.
Headlight 65/45 9004
Front combination light 27/8 1157NA
Rear combination light
Turn signal: Type A 27 1156
Type B 27 1156NA
Stop/Tail 27/8 1157
Back-up 13 921
License plate light 5 168
Trunk lid-mounted
stop light13 912
Front fog lamp 35H3
(Special)
Interior light 8 68
Trunk light 3.4 158
ADI0619
HEADLIGHT AIMING
ADJUSTMENT
Do-it-yourself8-27
ZX
Page 219 of 223

Corrosion protection .................................... 7-5
Cruise control............................................. 5-13
Cup holder ................................................. 2-15
D
Daytime running light system
(Canada only) ............................................ 2-12
Defogger switch
Rear window defogger switch .............. 2-11
Dimensions and weights............................ 10-9
Door ajar warning light ................................ 2-6
Door locks .................................................... 3-2
Drive belts .................................................. 8-17
Driving
Cold weather driving............................. 5-19
Driving with automatic transmission ....... 5-6
Driving with manual transmission ........... 5-9
Precautions when starting and driving ... 5-2
E
Economy - fuel........................................... 5-15
Emission control information label........... 10-12
Emission control system warranty ........... 10-19
Engine
Before starting the engine ...................... 5-5
Capacities and recommended fuel/
lubricants .............................................. 10-2
Changing engine coolant........................ 8-6
Changing engine oil................................ 8-9Changing engine oil filter...................... 8-10
Checking engine coolant level ............... 8-5
Checking engine oil level ....................... 8-8
Engine compartment check locations ... 8-3,
8-4
Engine coolant temperature gauge ........ 2-3
Engine cooling system ........................... 8-5
Engine oil ................................................ 8-8
Engine oil and oil filter
recommendation ................................... 10-5
Engine oil pressure warning light ........... 2-5
Engine oil viscosity ............................... 10-5
Engine serial number ......................... 10-11
Engine specifications ............................ 10-8
Starting the engine ............................... 5-11
Exhaust gas (Carbon monoxide) ................. 5-2
F
Flashers (See hazard warning flasher
switch) ........................................................ 2-14
Flat tire ......................................................... 6-2
Floor mat positioning aid ............................. 7-4
Fluid
Automatic transmission fluid (ATF) ...... 8-11
Brake fluid............................................. 8-14
Capacities and recommended fuel/
lubricants .............................................. 10-2
Engine coolant ........................................ 8-5
Engine oil ................................................ 8-8
Power steering fluid .............................. 8-13
Window washer fluid ............................ 8-14F.M.V.S.S. certification label ................... 10-11
Front fog light switch ................................. 2-13
Front seats ................................................... 1-2
Fuel
Capacities and recommended fuel/
lubricants .............................................. 10-2
Fuel economy ....................................... 5-15
Fuel filler cap ........................................ 3-12
Fuel filler lid lock opener lever ............. 3-12
Fuel gauge.............................................. 2-4
Fuel octane rating................................. 10-3
Fuel recommendation ........................... 10-3
Fuses ......................................................... 8-24
Fusible links ............................................... 8-24
G
Gauge
Engine coolant temperature gauge ........ 2-3
Fuel gauge.............................................. 2-4
Speedometer .......................................... 2-3
Tachometer............................................. 2-3
Trip odometer ......................................... 2-3
General maintenance .................................. 9-2
Glove box................................................... 3-10
H
Hazard warning flasher switch .................. 2-14
Head restraints ............................................ 1-4
Headlight aiming adjustment ..................... 8-27
11-2
ZX
Page 222 of 223

Headlight and turn signal switch .......... 2-12
Ignition switch ......................................... 5-4
Overdrive switch.............................. 5-8, 5-9
Rear window defogger switch .............. 2-11
Windshield wiper and washer switch ... 2-11
T
Tachometer .................................................. 2-3
Theft warning ............................................... 2-9
Three way catalyst....................................... 5-2
Tilting steering wheel ................................. 3-14
Tire
Flat tire.................................................... 6-2
Spare tire....................................... 6-2, 8-36
Tire chains ............................................ 8-34
Tire placard......................................... 10-12
Tire pressure ........................................ 8-33
Tire rotation .......................................... 8-34
Types of tires ........................................ 8-33
Uniform tire quality grading ................ 10-18
Wheels and tires................................... 8-33
Wheel/tire size ...................................... 10-9
Towing
Tow truck towing .................................. 6-11
Towing load/specification chart .......... 10-16
Trailer towing ...................................... 10-15
Transmission
Automatic transmission fluid (ATF) ...... 8-11
Driving with automatic transmission ....... 5-6
Driving with manual transmission ........... 5-9
Selector lever lock release ..................... 5-5Travel (See registering your vehicle in
another country)....................................... 10-10
Trip odometer .............................................. 2-3
Trunk access through the rear seat ............ 1-5
Trunk lid lock opener lever ........................ 3-10
Trunk light .................................................. 2-19
Tuning ........................................................ 4-11
U
Uniform tire quality grading ..................... 10-18
V
Vanity mirror .............................................. 3-15
Vehicle dimensions and weights ............... 10-9
Vehicle identification number (VIN)
(chassis number) ..................................... 10-10
Vehicle identification number (VIN)
plate ......................................................... 10-10
Vehicle recovery ........................................ 6-12
Ventilators .................................................... 4-2
W
Warning
Air bag warning light ..................... 1-11, 2-6
Hazard warning flasher switch ............. 2-14
Theft warning .......................................... 2-9
Warning labels (for SRS) ..................... 1-11
Warning/indicator lights and chimes ...... 2-5Weights (See dimensions and weights) .... 10-9
Wheels and tires ........................................ 8-33
Wheel/tire size ........................................... 10-9
When traveling or registering your vehicle
in another country .................................... 10-10
Window washer fluid.................................. 8-14
Windows
Locking passengers' windows .............. 2-16
Manual windows ................................... 2-16
Power windows..................................... 2-16
Rear power windows ............................ 2-17
Windshield wiper and washer switch ........ 2-11
Wiper
Windshield wiper and washer switch ... 2-11
Wiper blades......................................... 8-21
11-5
ZX