1999 NISSAN SENTRA ESP
[x] Cancel search: ESPPage 22 of 223
CHILD SAFETY
Children need adults to help protect them.
They need to be properly restrained.
The proper restraint depends on the child's
size. Generally, infants up to about one year
and less than 20 pounds (9 kg) should be
placed in rear facing child restraints. Front
facing child restraints are available for chil-
dren who outgrow rear facing child restraints.
WARNING
Infants and children need special pro-
tection. The vehicle's seat belts may
not fit them properly. The shoulder belt
may come too close to the face or neck.
The lap belt may not fit over their small
hip bones. In an accident, an improp-
erly fitting seat belt could cause seri-
ous or fatal injury. Always use appro-
priate child restraints.
All U.S. States and Canadian provinces or
territories require the use of approved child
restraints for infants and small children. See
``Child Restraints'' later in this section.
In addition, there are many types of child
restraints available for larger children which
should be used for maximum protection.
NISSAN recommends that all preteens and
children be restrained in the rear seat if
possible. According to accident statistics,
children are safer when properly restrained
in the rear seat than in the front seat. This
is especially important because your ve-
hicle has a supplemental restraint system
(Air bag system) for the front passenger.
See ``Supplemental restraint system'' ear-
lier in this section.
Infants and small children
NISSAN recommends that infants and small
children be placed in child restraints that
comply with Federal Motor Vehicle Safety
Standards or Canadian Motor Vehicle
Safety Standards. You should choose a
child restraint that fits your vehicle and
always follow the manufacturer's instruc-
tions for installation and use.
Larger children
Children who are too large for child re-
straints should be seated and restrained by
the seat belts which are provided.
If the child's seating position has a shoulder
belt that fits close to the face or neck, the
use of a booster seat (commercially avail-
able) may help overcome this. The booster
seat should raise the child so that the shoul-der belt is properly positioned across the
top, middle portion of the shoulder and the
lap belt is low on the hips. The booster seat
should fit the vehicle seat and have a label
certifying that it complies with Federal Motor
Vehicle Safety Standards or Canadian Mo-
tor Vehicle Safety Standards. Once the
child has grown so the shoulder belt is no
longer on or near the face and neck, use the
shoulder belt without the booster seat.
WARNING
Never let a child stand or kneel on any
seat and do not allow a child in the
cargo areas while the vehicle is mov-
ing. The child could be seriously in-
jured or killed in an accident.
PREGNANT WOMEN
NISSAN recommends that pregnant women
use seat belts. Contact your doctor for spe-
cific recommendations. The lap belt should
be worn snug and positioned as low as
possible around the hips, not the waist.
INJURED PERSONS
NISSAN recommends that injured persons
use seat belts. Check with your doctor for
specific recommendations.
Seats, restraints and supplemental air bag systems
1-15
ZX
Page 58 of 223

The passenger side switch opens or closes
only the passenger side window. To open
the window, push the switch down. To close
the window, lift the switch up.Rear power windows
The rear power window switches open or
close only the corresponding window. To
open the window, push the switch down. To
close the window, lift the switch up.
Automatic power window switch
To fully open the driver's side window, press
the driver's side window switch down to the
second detent and release it; it need not be
held. The window automatically opens all
the way. To stop the window, pull up on the
switch while the window is opening.
AIC1051AIC1032AIC0615
Instruments and controls2-17
ZX
Page 64 of 223

To lock the door without the key, move the
inside lock knob to the lock position, then
close the door.
When locking the door this way, be certain
not to leave the key inside the vehicle.POWER DOOR LOCK
(if so equipped)
Move the door lock/unlock button, located
on the driver's door armrest, toward the rear
of the vehicle to lock all doors. Move the
door lock/unlock button toward the front of
the vehicle to unlock all doors.If your vehicle is equipped with the theft
warning system,the power door lock sys-
tem allows you to lock or unlock all doors
simultaneously.
Turning the front door key to the front of the
vehicle locks all doors.
Turning the front door key one time to the
rear of the vehicle unlocks the corresponding
door. From that position, returning the key to
Neutral (where the key can only be removed
and inserted) and turning it to the rear again
within 5 seconds unlocks all doors.
PD1160MAPD1014APD1043
Pre-driving checks and adjustments3-3
ZX
Page 69 of 223

CHILD SAFETY REAR DOOR
LOCK
Child safety locks help prevent doors from
being opened accidentally, especially when
small children are in the vehicle.
The child safety lock levers are located on
the edge of the rear doors.
When the lever is in the lock position, the
rear door can be opened only from the
outside.
PD1161M
3-8Pre-driving checks and adjustments
ZX
Page 117 of 223
press and hold the accelerator pedal
to help start the engine.
Ð In the summer, when restarting the
engine within 30 minutes after it has
been stopped, keep the accelerator
pedal fully depressed while starting.
CAUTION
Do not operate the starter for more than
15 seconds at a time. If the engine does
not start, turn the key off and wait 10
seconds before cranking again, other-
wise the starter could be damaged.
4.Warm-up
Allow the engine to idle for at least 30
seconds after starting. Drive at moderate
speed for a short distance first, especially
in cold weather.
WARNING
cBe sure the parking brake is fully
released before driving. Failure to do
so can cause brake failure and lead
to an accident.
cDo not release the parking brake
from outside the vehicle.
cDo not use the gearshift in place of
the parking brake. When parking, be
sure the parking brake is fully en-
gaged.
c
Do not leave children unattended in a
vehicle. They could release the park-
ing brake and cause an accident.
To engage:pull the lever up.
To release:
1. Firmly apply the foot brake.
2. Manual transmission models:
Place the shift lever in the N (Neutral)
position.
Automatic transmission models:
Move the shift selector lever to the P
(Park) position.
3. While pulling up on the lever slightly,
push the button and lower completely.
4. Before driving, be sure the brake warning
light goes out.
ASD0603
PARKING BRAKE
OPERATION
5-12Starting and driving
ZX
Page 122 of 223
cHEADED UPHILL OR DOWNHILL, NO
CURB:
s3
Turn the wheels toward the side of the
road so the vehicle will move away from
the center of the road if it moves.
4. Turn the ignition key to the LOCK posi-
tion and remove the key.The power assisted steering is designed to
use a hydraulic pump, driven by the engine,
to assist steering.
If the engine stops or the drive belt breaks,
you will still have control of the vehicle.
However, much greater steering effort is
needed, especially in sharp turns and at low
speeds.
WARNING
If the engine is not running or is turned
off while driving the power assist for
the steering will not work. Steering will
be much harder to operate.The brake system has two separate hy-
draulic circuits. If one circuit develops a
problem, you will still have braking at
two wheels.
Vacuum assisted brakes
The brake booster aids braking by using
engine vacuum. If the engine stops, you can
stop the vehicle by depressing the brake
pedal. However, greater foot pressure on
the brake pedal will be required to stop the
vehicle and stopping distance will be longer.
Wet brakes
When the vehicle is washed or driven
through water, the brakes may get wet. As a
result, your braking distance will be longer
and the vehicle may pull to one side during
braking.
To dry the brakes, drive the vehicle at a safe
speed while lightly pressing the brake pedal
to heat-up the brakes. Do this until the
brakes return to normal. Avoid driving the
vehicle at high speeds until the brakes
function correctly.
Using the brakes
Avoid resting your foot on the brake pedal
while driving. This overheats the brakes,
POWER STEERING SYSTEM BRAKE SYSTEM
Starting and driving5-17
ZX
Page 124 of 223
WARNING
c
The anti-lock brake system is a so-
phisticated device, but it cannot pre-
vent accidents resulting from care-
less or dangerous driving tech-
niques. It can help maintain vehicle
control during braking on slippery
surfaces, but the stopping distance
on slippery surfaces will be longer
than on normal surfaces, even with
the anti-lock system. Stopping dis-
tances may also be longer on rough,
gravel or snow covered roads, or if
you are using tire chains. Always
maintain a safe distance from the ve-
hicle in front of you. Ultimately, the
responsibility for safety of self and
others rests in the hands of the driver.
cTire type and condition may also
affect braking effectiveness.
cWhen replacing tires, install the
specified size of tires on all four
wheels.c
When installing a spare tire, make
sure it is the proper size and type as
specified on the tire placard. For tire
placard location information, refer to
``Tire placard'' in the Owner's Manual
index.
cRefer to ``Wheels and tires'' in the
``Do-it-yourself'' section of this
manual.
Freeing a frozen door lock
To prevent a door lock from freezing, apply
de-icer or glycerin through the key hole. If
the lock becomes frozen, heat the key be-
fore inserting it in the key hole.
Anti-freeze
In the winter when it is anticipated that the
temperature will drop below 32ÉF (0ÉC),
check the anti-freeze (ethylene glycol base)
to assure proper winter protection. For de-
tails, see ``Engine cooling system'' in the
``Do-it-yourself'' section of this manual.
Battery
If the battery is not fully charged during
extremely cold weather conditions, the bat-
tery fluid may freeze and damage the bat-
tery. To maintain maximum efficiency, the
battery should be checked regularly. For
details, see ``Battery'' in the ``Do-it-yourself''
section of this manual.
Draining of coolant
If the vehicle is to be left outside without
anti-freeze, drain the cooling system by
opening the drain valves located under the
radiator and on the engine block. Refill
COLD WEATHER DRIVING
Starting and driving5-19
ZX
Page 133 of 223
cNever jack up the vehicle more than
necessary.
cNever use blocks on or under the
jack.
cDo not start or run engine while
vehicle is on the jack as it may cause
the vehicle to move.
cDo not allow passengers to stay in
the vehicle while it is on the jack.
cNever run the engine with a wheel off
the ground. It may cause the vehicle
to move. This is especially true for
models equipped with a limited slip
differential carrier.
Installing the spare tire
The T-type spare tire is designed for
emergency use. See specific instruc-
tions under the heading ``Wheels and
tires'' in the ``Do-it- yourself'' section of
this owner's manual.
1. Clean any mud or dirt from the surface
between the wheel and hub.
2. Carefully put the spare tire on and tighten
the wheel nuts finger tight.
3. With the wheel nut wrench, tighten wheel
nuts alternately and evenly until they are
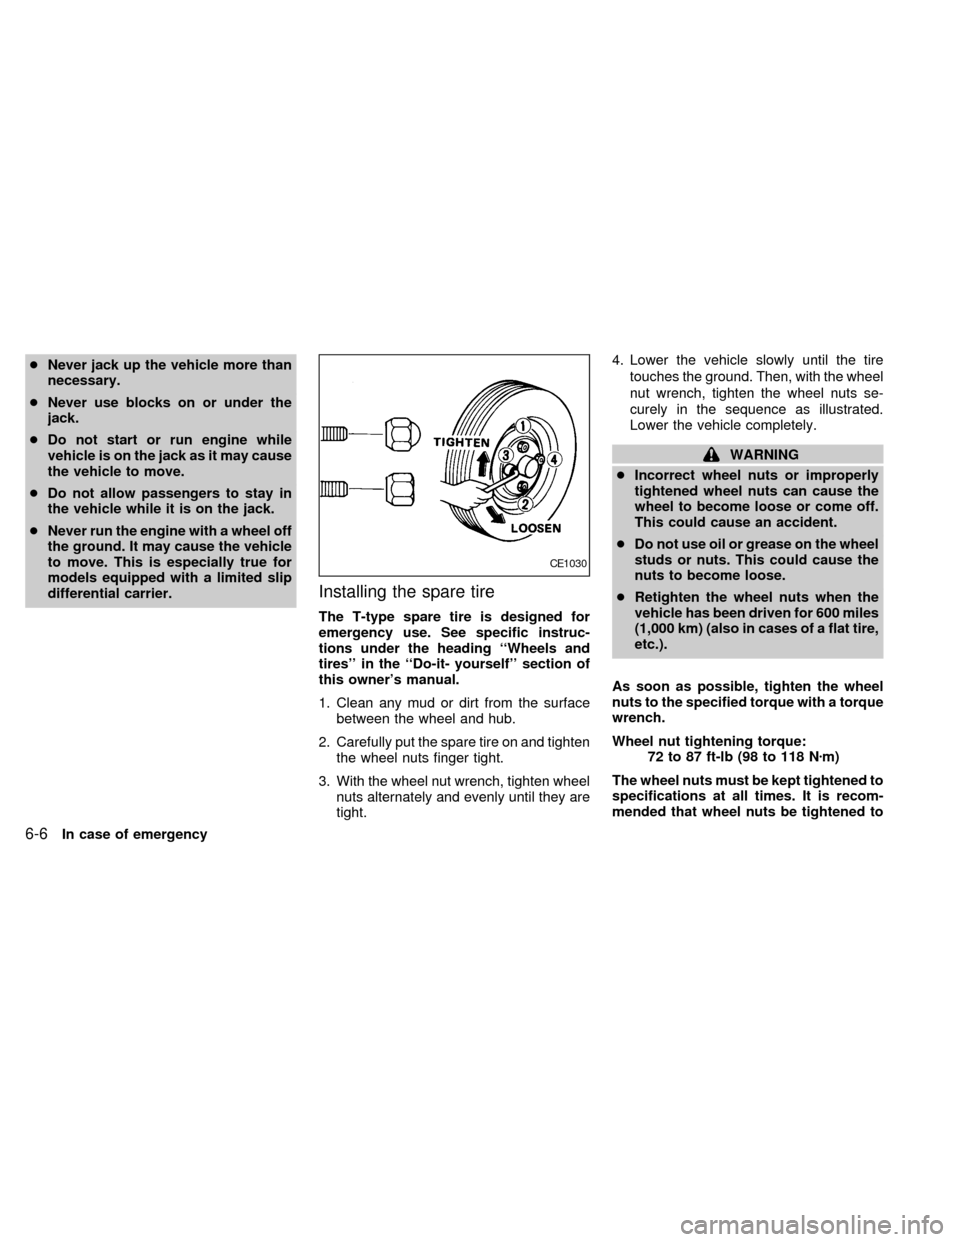
tight.4. Lower the vehicle slowly until the tire
touches the ground. Then, with the wheel
nut wrench, tighten the wheel nuts se-
curely in the sequence as illustrated.
Lower the vehicle completely.
WARNING
cIncorrect wheel nuts or improperly
tightened wheel nuts can cause the
wheel to become loose or come off.
This could cause an accident.
cDo not use oil or grease on the wheel
studs or nuts. This could cause the
nuts to become loose.
cRetighten the wheel nuts when the
vehicle has been driven for 600 miles
(1,000 km) (also in cases of a flat tire,
etc.).
As soon as possible, tighten the wheel
nuts to the specified torque with a torque
wrench.
Wheel nut tightening torque:
72 to 87 ft-lb (98 to 118 Nzm)
The wheel nuts must be kept tightened to
specifications at all times. It is recom-
mended that wheel nuts be tightened to
CE1030
6-6In case of emergency
ZX