1999 NISSAN SENTRA instrument panel
[x] Cancel search: instrument panelPage 13 of 223
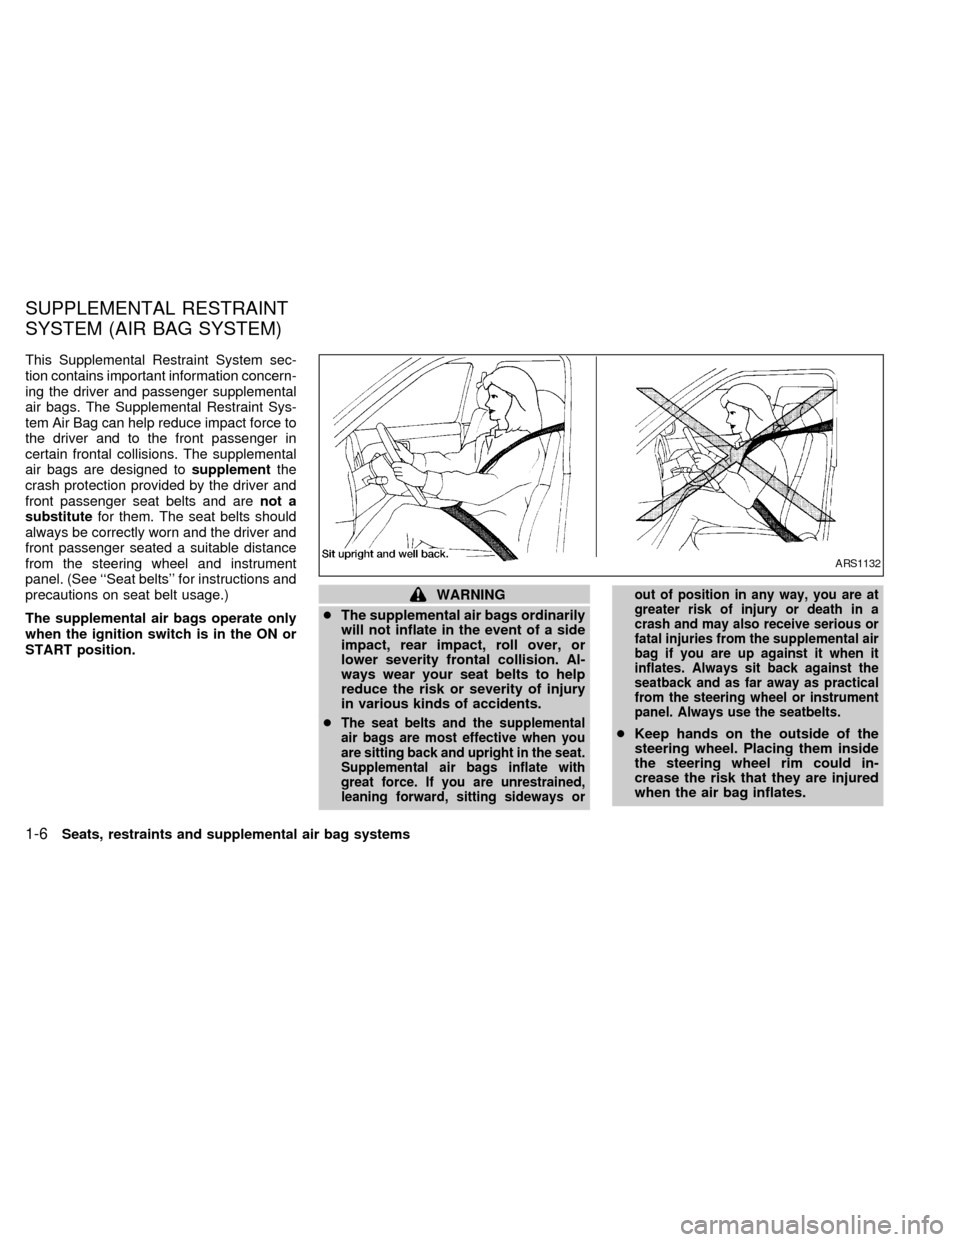
This Supplemental Restraint System sec-
tion contains important information concern-
ing the driver and passenger supplemental
air bags. The Supplemental Restraint Sys-
tem Air Bag can help reduce impact force to
the driver and to the front passenger in
certain frontal collisions. The supplemental
air bags are designed tosupplementthe
crash protection provided by the driver and
front passenger seat belts and arenot a
substitutefor them. The seat belts should
always be correctly worn and the driver and
front passenger seated a suitable distance
from the steering wheel and instrument
panel. (See ``Seat belts'' for instructions and
precautions on seat belt usage.)
The supplemental air bags operate only
when the ignition switch is in the ON or
START position.
WARNING
cThe supplemental air bags ordinarily
will not inflate in the event of a side
impact, rear impact, roll over, or
lower severity frontal collision. Al-
ways wear your seat belts to help
reduce the risk or severity of injury
in various kinds of accidents.
c
The seat belts and the supplemental
air bags are most effective when you
are sitting back and upright in the seat.
Supplemental air bags inflate with
great force. If you are unrestrained,
leaning forward, sitting sideways orout of position in any way, you are at
greater risk of injury or death in a
crash and may also receive serious or
fatal injuries from the supplemental air
bag if you are up against it when it
inflates. Always sit back against the
seatback and as far away as practical
from the steering wheel or instrument
panel. Always use the seatbelts.cKeep hands on the outside of the
steering wheel. Placing them inside
the steering wheel rim could in-
crease the risk that they are injured
when the air bag inflates.
ARS1132
SUPPLEMENTAL RESTRAINT
SYSTEM (AIR BAG SYSTEM)
1-6Seats, restraints and supplemental air bag systems
ZX
Page 16 of 223
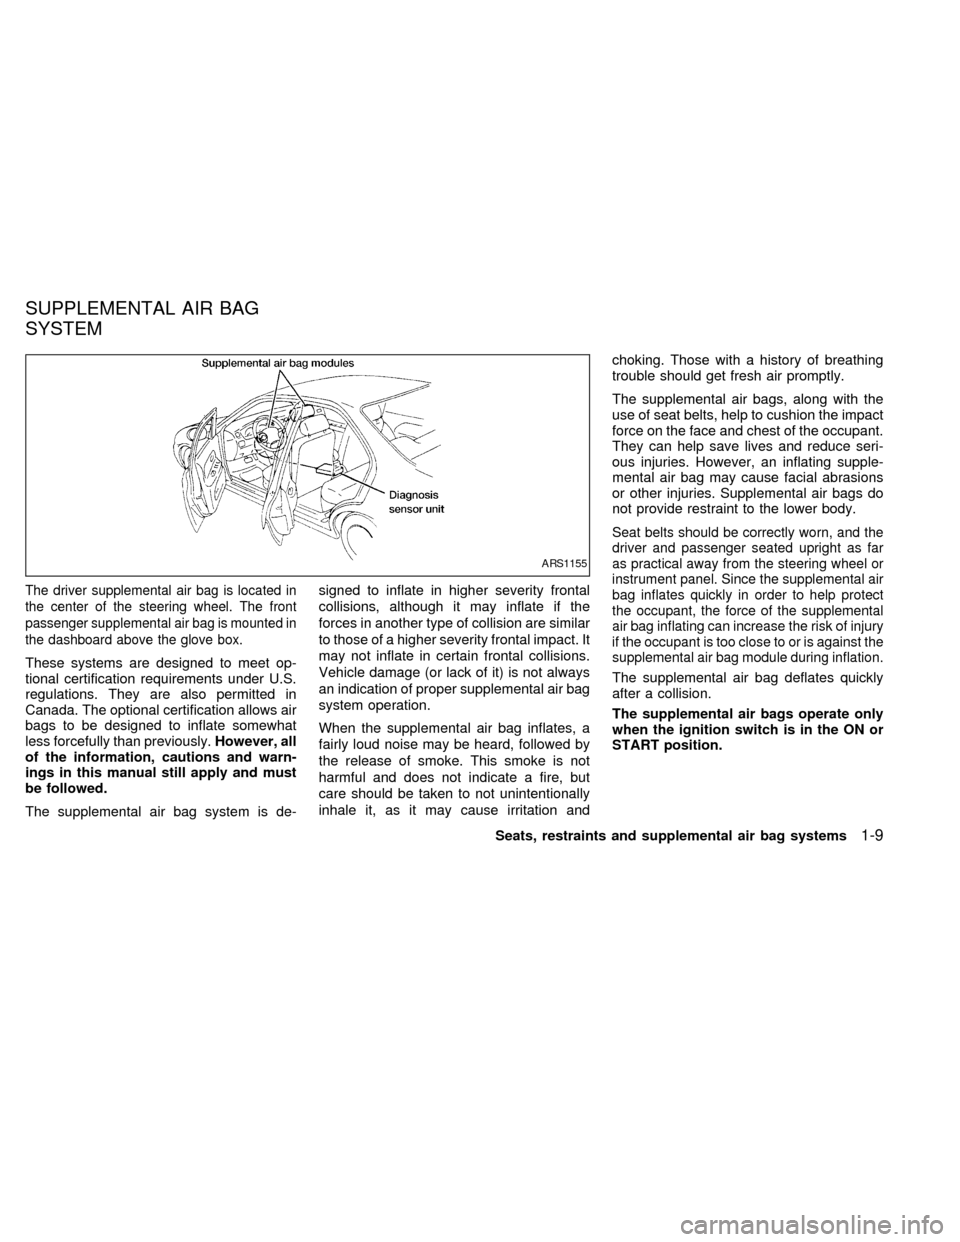
The driver supplemental air bag is located in
the center of the steering wheel. The front
passenger supplemental air bag is mounted in
the dashboard above the glove box.
These systems are designed to meet op-
tional certification requirements under U.S.
regulations. They are also permitted in
Canada. The optional certification allows air
bags to be designed to inflate somewhat
less forcefully than previously.However, all
of the information, cautions and warn-
ings in this manual still apply and must
be followed.
The supplemental air bag system is de-signed to inflate in higher severity frontal
collisions, although it may inflate if the
forces in another type of collision are similar
to those of a higher severity frontal impact. It
may not inflate in certain frontal collisions.
Vehicle damage (or lack of it) is not always
an indication of proper supplemental air bag
system operation.
When the supplemental air bag inflates, a
fairly loud noise may be heard, followed by
the release of smoke. This smoke is not
harmful and does not indicate a fire, but
care should be taken to not unintentionally
inhale it, as it may cause irritation andchoking. Those with a history of breathing
trouble should get fresh air promptly.
The supplemental air bags, along with the
use of seat belts, help to cushion the impact
force on the face and chest of the occupant.
They can help save lives and reduce seri-
ous injuries. However, an inflating supple-
mental air bag may cause facial abrasions
or other injuries. Supplemental air bags do
not provide restraint to the lower body.
Seat belts should be correctly worn, and the
driver and passenger seated upright as far
as practical away from the steering wheel or
instrument panel. Since the supplemental air
bag inflates quickly in order to help protect
the occupant, the force of the supplemental
air bag inflating can increase the risk of injury
if the occupant is too close to or is against the
supplemental air bag module during inflation.
The supplemental air bag deflates quickly
after a collision.
The supplemental air bags operate only
when the ignition switch is in the ON or
START position.
ARS1155
SUPPLEMENTAL AIR BAG
SYSTEM
Seats, restraints and supplemental air bag systems1-9
ZX
Page 17 of 223
WARNING
c
Do not place any objects on the steer-
ing wheel pad or on the instrument
panel. Also, do not place any objects
between any occupant and the steer-
ing wheel or instrument panel. Such
objects may become dangerous pro-
jectiles and may cause injury if the
supplemental air bag inflates.
cRight after inflation, several supple-
mental air bag system components
will be hot. Do not touch them; you
may severely burn yourself.
c
No unauthorized changes should be
made to any components or wiring of
the supplemental air bag system. This
is to prevent accidental inflation of
the supplemental air bag or damage
to the supplemental air bag system.
cDo not make unauthorized changes
to your vehicle's electrical system,
suspension system or front end
structure. This could affect proper
operation of the supplemental air
bag system.cTampering with the supplemental air
bag system may result in serious
personal injury. Tampering includes
changes to the steering wheel and
the instrument panel assembly by
placing material over the steering
wheel pad and above the instrument
panel, or by installing additional trim
material around the supplemental air
bag system.
cWork around and on the supplemen-
tal air bag system should be done by
an authorized NISSAN dealer. Instal-
lation of electrical equipment should
also be done by an authorized NIS-
SAN dealer. The yellow SRS wiring
should not be modified or discon-
nected. Unauthorized electrical test
equipment and probing devices
should not be used on the supple-
mental air bag system.
cThe SRS wiring harnesses are cov-
ered with yellow insulation either
just before the harness connectors
or on the complete harness for easy
identification.
When selling your vehicle, we request that
you inform the buyer about the supplemental
air bag system and guide the buyer to the
appropriate sections in this owner's manual.
1-10Seats, restraints and supplemental air bag systems
ZX
Page 18 of 223

Warning labels about the supplemental air
bag system are placed in the vehicle as
shown in the illustration.
The supplemental air bag warning light,
displaying
in the instrument panel,
monitors the circuits of the supplemental air
bag system. The circuits monitored by the
ARS1156
APD0610
WARNING LABELS SUPPLEMENTAL AIR BAG
WARNING LIGHT
Seats, restraints and supplemental air bag systems1-11
ZX
Page 19 of 223
supplemental air bag warning light are the
diagnosis sensor unit, supplemental air bag
modules and all related wiring.
When the ignition key is in the ON or START
position, the supplemental air bag warning
light illuminates for about 7 seconds and
then turns off. This means the system is
operational.
If any of the following conditions occur, the
supplemental air bag needs system servic-
ing:
1. The supplemental air bag warning light
does not come on and remain on for 7
seconds and then go off as described.
2. The supplemental air bag warning light
flashes intermittently or remains on.
3. The supplemental air bag warning light
does not come on at all.
Under these conditions, the supplemental
restraint system air bag may not operate
properly. It must be checked and repaired.
Take your vehicle to the nearest authorized
NISSAN dealer.WARNING
If the supplemental air bag warning light
is on, it could mean that the supplemen-
tal air bag system will not operate in an
accident.
Repair and replacement procedure
The supplemental air bag modules are de-
signed to inflate on a one-time-only basis.
As a reminder, unless it is damaged, the
supplemental air bag light remains illumi-
nated after inflation has occurred. Repair
and replacement of the supplemental air
bag system should be done only by an
authorized NISSAN dealer.
After a supplemental air bag inflates, the
instrument panel assembly should be re-
placed by an authorized NISSAN dealer if
damaged.
To ensure long-term functioning, the
supplemental air bag system must be
inspected 10 years after the date of manu-
facture as noted on the certification label
located on the driver side front pillar.
When maintenance work is required on the
vehicle, the supplemental air bag system
and related parts should be pointed out to
the person performing the maintenance.
The ignition key should always be in the
LOCK position when working under the
hood or inside the vehicle.
WARNING
cOnce the supplemental air bag in-
flates, the supplemental air bag
module will not function again and
must be replaced. The supplemental
air bag module cannot be repaired.
cThe supplemental air bag system
should be inspected by an autho-
rized NISSAN dealer if there is any
damage to the front end portion of
the vehicle, or replaced if the supple-
mental air bag has inflated.
cIf you need to dispose of a supple-
mental air bag or scrap the vehicle,
contact an authorized NISSAN
dealer. Correct supplemental air bag
disposal procedures are set forth in
the appropriate NISSAN Service
Manual. Incorrect disposal proce-
dures could cause personal injury.
1-12Seats, restraints and supplemental air bag systems
ZX
Page 53 of 223
Lighting
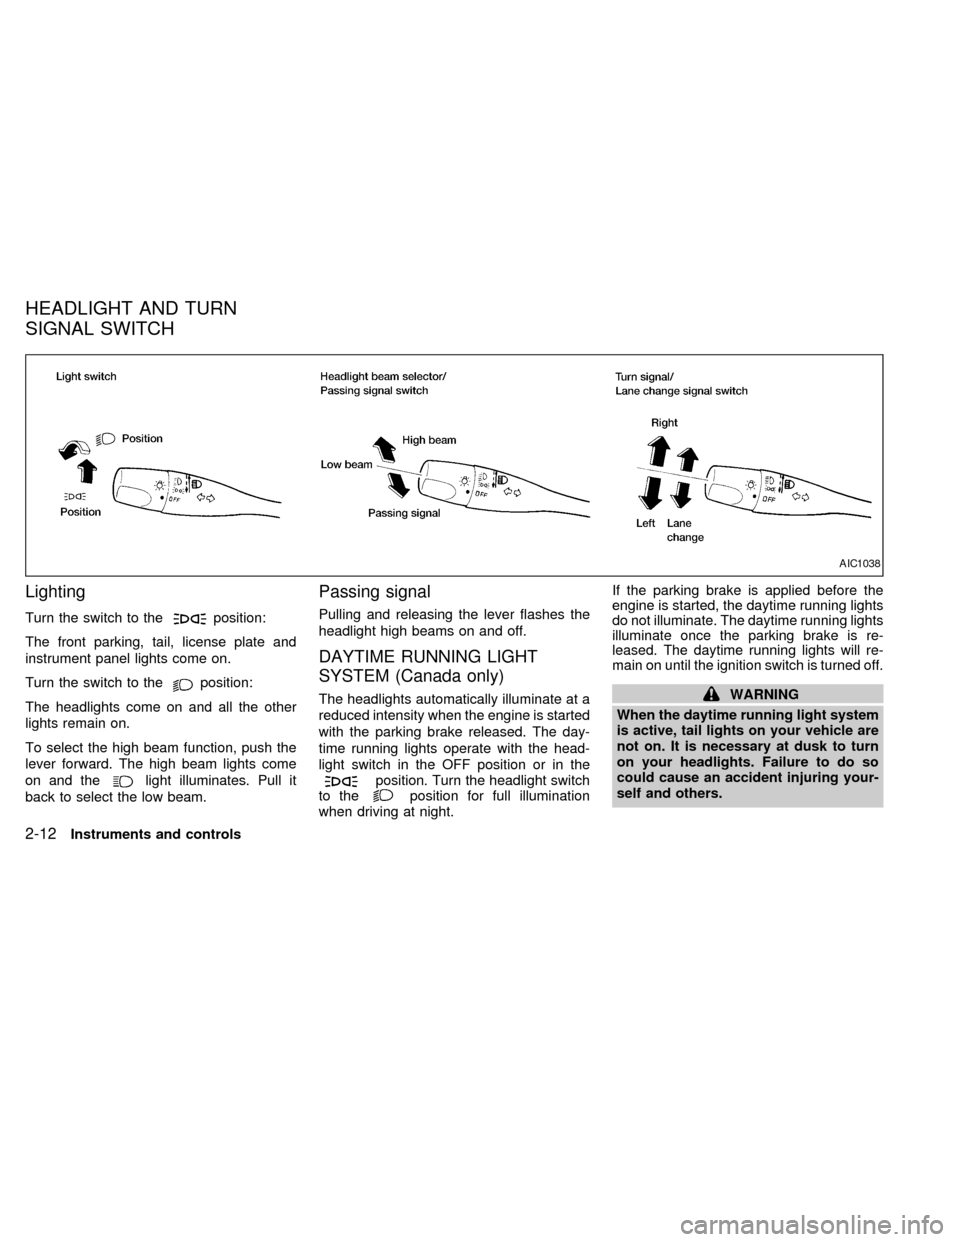
Turn the switch to theposition:
The front parking, tail, license plate and
instrument panel lights come on.
Turn the switch to the
position:
The headlights come on and all the other
lights remain on.
To select the high beam function, push the
lever forward. The high beam lights come
on and the
light illuminates. Pull it
back to select the low beam.
Passing signal
Pulling and releasing the lever flashes the
headlight high beams on and off.
DAYTIME RUNNING LIGHT
SYSTEM (Canada only)
The headlights automatically illuminate at a
reduced intensity when the engine is started
with the parking brake released. The day-
time running lights operate with the head-
light switch in the OFF position or in the
position. Turn the headlight switch
to theposition for full illumination
when driving at night.If the parking brake is applied before the
engine is started, the daytime running lights
do not illuminate. The daytime running lights
illuminate once the parking brake is re-
leased. The daytime running lights will re-
main on until the ignition switch is turned off.
WARNING
When the daytime running light system
is active, tail lights on your vehicle are
not on. It is necessary at dusk to turn
on your headlights. Failure to do so
could cause an accident injuring your-
self and others.
AIC1038
HEADLIGHT AND TURN
SIGNAL SWITCH
2-12Instruments and controls
ZX
Page 54 of 223

Turn signal
Move the lever up or down to signal the
turning direction. When the turn is com-
pleted, the turn signals cancel automati-
cally.
Lane change signal
To signal a lane change, move the lever up
or down to the point where the indicator light
begins to flash, but the lever does not latch.
The instrument brightness control operates
when the headlight switch is in the
orposition.
Turn the control to adjust the brightness of
instrument panel lights.To turn the front fog lights on, rotate the
switch to theposition.
To turn them off, rotate the switch to the
OFF position.
The headlight switch must be in the
position (low beam headlights on) for
the fog lights to operate. The fog lights
automatically turn off whenever the high-
beam headlight function is selected.
AIC0608AIC0618
INSTRUMENT BRIGHTNESS
CONTROLFRONT FOG LIGHT SWITCH
(if so equipped)
Instruments and controls2-13
ZX
Page 57 of 223
The side windows can be opened or closed
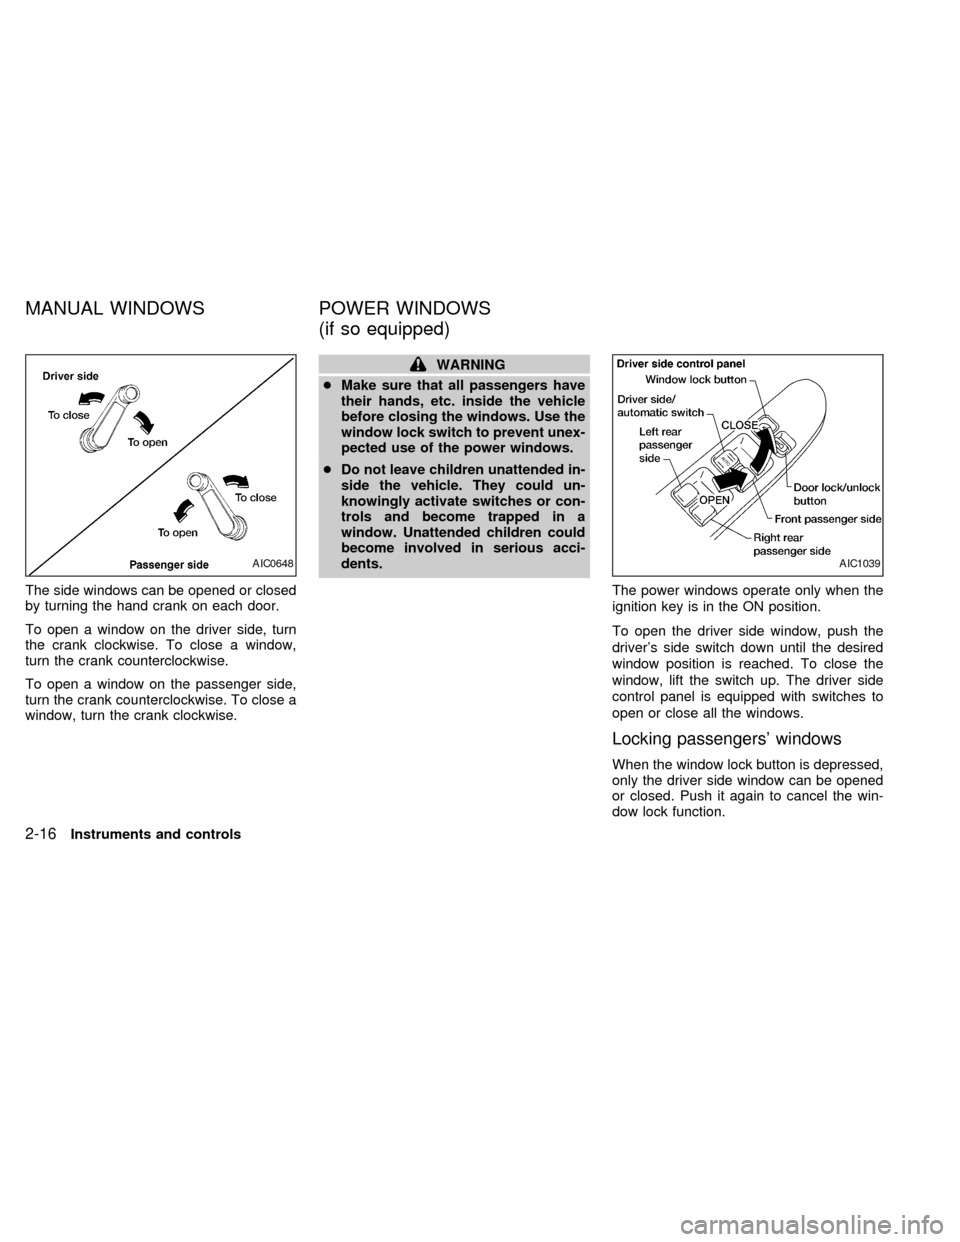
by turning the hand crank on each door.
To open a window on the driver side, turn
the crank clockwise. To close a window,
turn the crank counterclockwise.
To open a window on the passenger side,
turn the crank counterclockwise. To close a
window, turn the crank clockwise.
WARNING
cMake sure that all passengers have
their hands, etc. inside the vehicle
before closing the windows. Use the
window lock switch to prevent unex-
pected use of the power windows.
cDo not leave children unattended in-
side the vehicle. They could un-
knowingly activate switches or con-
trols and become trapped in a
window. Unattended children could
become involved in serious acci-
dents.
The power windows operate only when the
ignition key is in the ON position.
To open the driver side window, push the
driver's side switch down until the desired
window position is reached. To close the
window, lift the switch up. The driver side
control panel is equipped with switches to
open or close all the windows.
Locking passengers' windows
When the window lock button is depressed,
only the driver side window can be opened
or closed. Push it again to cancel the win-
dow lock function.
AIC0648AIC1039
MANUAL WINDOWS POWER WINDOWS
(if so equipped)
2-16Instruments and controls
ZX