1999 NISSAN SENTRA tow
[x] Cancel search: towPage 110 of 223
1) Move the shift selector lever into the P
(Park) position.
2) Turn the ignition key slightly toward the
ON position.
3) Turn the key to the LOCK position.
4) Remove the key.
If the key is removed from the ignition switch,
the shift selector lever cannot be moved from
P (Park).The shift selector lever can be
moved if the ignition switch is in the ACC
position. This allows the vehicle to be
moved if the battery is discharged.
The shift selector lever can also be
moved if the ignition switch is in the ON
position and the foot brake pedal is de-
pressed.
There is an OFF position between the
LOCK and ACC positions. The OFF position
is indicated by a ``1'' on the key cylinder.
When the ignition is in OFF, the steering
wheel is not locked.
To lock the steering wheel, remove the
key. In order for the steering wheel to be
locked, it must be turned about 1/8 of a
turn clockwise from the straight up posi-
tion. To unlock the steering wheel, insert
the key and turn it gently while rotatingthe steering wheel slightly right and left.
WARNING
Never remove the key while driving. If
the key is removed, the steering wheel
will lock. This may cause the driver to
lose control of the vehicle and could
result in serious vehicle damage or
personal injury.
Key positions
LOCK: Normal parking position (0)
OFF: (Manual transmission model) (1)
The engine can be turned off without locking
the steering wheel.
ACC: (Accessories) (2)
This position activates electrical accesso-
ries such as the radio when the engine is
not running.
ON: Normal operating position (3)
This position turns on the ignition system
and the electrical accessories.
START: (4)
This position activates the starter motor,
which starts the engine.cMake sure the area around the vehicle is
clear.
cMaintenance items listed here should be
checked periodically, for example, each
time you check engine oil.
cCheck that all windows and lights are
clean.
cVisually inspect tires for their appearance
and condition. Also check tires for proper
inflation.
cLock all doors.
cPosition seat and adjust head restraints.
cAdjust inside and outside mirrors.
cFasten seat belts and ask all passengers
to do likewise.
c
Check the operation of warning lights
when key is turned to the ON (3) position.
See ``Warning/indicator lights and chimes''
in the ``Instrument and controls'' section.
BEFORE STARTING THE
ENGINE
Starting and driving5-5
ZX
Page 120 of 223

During the first 1,000 miles (1,600 km),
follow these recommendations for the future
reliability and economy of your new vehicle.
Failure to follow these recommendations
may result in vehicle damage or shortened
engine life.
cDo not drive over 55 MPH (90 km/h) and
do not run the engine over 4,000 rpm.
Avoid driving for long periods at constant
speed, either fast or slow.
cDo not accelerate at full throttle in any
gear.
cAvoid quick starts.
cAvoid hard braking as much as possible.
cDo not tow a trailer for the first 500 miles
(800 km).cAccelerate slowly and smoothly. Main-
tain cruising speeds with a constant ac-
celerator position.
cDrive at moderate speeds on the high-
way. Driving at high speed lowers fuel
economy.
cAvoid unnecessary stopping and brak-
ing. Maintain a safe distance behind
other vehicles.
cUse a proper gear range which suits road
conditions. On level roads, shift into high
gear as soon as possible.
cAvoid unnecessary engine idling.cKeep your engine tuned up.
cFollow the recommended periodic main-
tenance schedule.
cKeep the tires inflated to the correct
pressure. Low tire pressure increases
tire wear and wastes fuel.
cKeep the front wheels in correct align-
ment. Improper alignment increases tire
wear and lowers fuel economy.
cAir conditioner operation lowers fuel
economy. Use the air conditioner only
when necessary.
cWhen cruising at highway speeds, it is
more economical to use the air condi-
tioner and leave the windows closed to
reduce drag.
SD1001M
BREAK-IN SCHEDULE INCREASING FUEL
ECONOMY
Starting and driving5-15
ZX
Page 122 of 223
cHEADED UPHILL OR DOWNHILL, NO
CURB:
s3
Turn the wheels toward the side of the
road so the vehicle will move away from
the center of the road if it moves.
4. Turn the ignition key to the LOCK posi-
tion and remove the key.The power assisted steering is designed to
use a hydraulic pump, driven by the engine,
to assist steering.
If the engine stops or the drive belt breaks,
you will still have control of the vehicle.
However, much greater steering effort is
needed, especially in sharp turns and at low
speeds.
WARNING
If the engine is not running or is turned
off while driving the power assist for
the steering will not work. Steering will
be much harder to operate.The brake system has two separate hy-
draulic circuits. If one circuit develops a
problem, you will still have braking at
two wheels.
Vacuum assisted brakes
The brake booster aids braking by using
engine vacuum. If the engine stops, you can
stop the vehicle by depressing the brake
pedal. However, greater foot pressure on
the brake pedal will be required to stop the
vehicle and stopping distance will be longer.
Wet brakes
When the vehicle is washed or driven
through water, the brakes may get wet. As a
result, your braking distance will be longer
and the vehicle may pull to one side during
braking.
To dry the brakes, drive the vehicle at a safe
speed while lightly pressing the brake pedal
to heat-up the brakes. Do this until the
brakes return to normal. Avoid driving the
vehicle at high speeds until the brakes
function correctly.
Using the brakes
Avoid resting your foot on the brake pedal
while driving. This overheats the brakes,
POWER STEERING SYSTEM BRAKE SYSTEM
Starting and driving5-17
ZX
Page 128 of 223

6 In case of emergency
Flat tire ...................................................................6-2
Jump starting ..........................................................6-8
Push starting ........................................................6-10If your vehicle overheats ......................................6-10
Tow truck towing ..................................................6-11
Vehicle recovery (freeing a stuck vehicle) ...........6-12
ZX
Page 137 of 223
CAUTION
cAutomatic transmission models can-
not be push started. This may cause
transmission damage.
cThree-way catalytic converter
equipped models should not be
started by pushing since the three
way catalyst may be damaged.
cNever try to start the vehicle by tow-
ing it; when the engine starts, the
forward surge could cause the ve-
hicle to collide with the tow vehicle.If your vehicle is overheating (indicated by
an extremely high temperature gauge read-
ing), or if you feel a lack of engine power,
detect abnormal noise, etc., take the follow-
ing steps.
WARNING
cDo not continue to drive if your ve-
hicle overheats. Doing so could
cause a vehicle fire.
cTo avoid the danger of being
scalded, never remove the radiator
cap while the engine is still hot.
When the radiator cap is removed,
pressurized hot water will spurt out,
possibly causing serious injury.
cDo not open the hood if steam is
coming out.
1. Move the vehicle safely off the road,
apply the parking brake and move the
shift lever to N (Neutral) (manual trans-
mission) or the shift selector lever to P
(Park) (automatic transmission).
Do not stop the engine.
2. Turn off the air conditioner. Open all the
windows, move the heater or air condi-
tioner temperature control to maximumhot and fan control to high speed.
3. If engine overheating is caused by climb-
ing a long hill on a hot day, run the engine
at a fast idle (approximately 1,500 rpm)
until the temperature gauge indication
returns to normal.
4. Get out of the vehicle. Look and listen for
steam or coolant escaping from the ra-
diator before opening the hood. Wait until
no steam or coolant can be seen before
proceeding.
5. Open the hood.
WARNING
If steam or water is coming from the
engine, stand clear to prevent getting
burned.
6. Visually check drive belts for damage or
looseness. Also check if the cooling fan
is running. The radiator hoses and radia-
tor should not leak water. If coolant is
leaking, the water pump belt is missing or
loose, or the cooling fan does not run,
stop the engine.
PUSH STARTING IF YOUR VEHICLE
OVERHEATS
6-10In case of emergency
ZX
Page 138 of 223
WARNING
Be careful not to allow your hands, hair,
jewelry or clothing to come into contact
with, or to get caught in, the running
fan, belts, or fan motor. The fan motor
can start at any time when the coolant
temperature is high.
7. After the engine cools down, check the
coolant level in the reservoir tank with the
engine running. Add coolant to the res-
ervoir tank if necessary. Have your ve-
hicle repaired at an authorized NISSAN
dealer.When towing your vehicle, U.S States, Cana-
dian Provinces and local regulations for tow-
ing must be followed. Incorrect towing equip-
ment could damage your vehicle. Towing
instructions are available from an authorized
NISSAN dealer. Local service operators are
generally familiar with the applicable laws
and procedures for towing. To assure proper
towing and to prevent accidental damage to
your vehicle, NISSAN recommends having a
service operator tow your vehicle. It is advis-
able to have the service operator carefully
read the following precautions.
WARNING
cNever ride in a vehicle that is being
towed.
cNever get under your vehicle after it
has been lifted by a tow truck.
CAUTION
cWhen towing, make sure that the
transmission, axles, steering system
and powertrain are in working con-
dition. If any unit is damaged, dollies
must be used.cWhen towing manual transmission
models with the front wheels on the
ground (if you do not use towing
dollies):
Turn the ignition key to the OFF
position and secure the steering
wheel in a straight ahead position
with a rope or similar device. Never
place the ignition key in the LOCK
position. This will result in damage
to the steering lock mechanism.
Move the gearshift lever to the N
(Neutral) position.
cWhen towing with the rear wheels on
the ground, release the parking
brake.
cAttach safety chains for all towing.
TOW TRUCK TOWING
In case of emergency6-11
ZX
Page 139 of 223
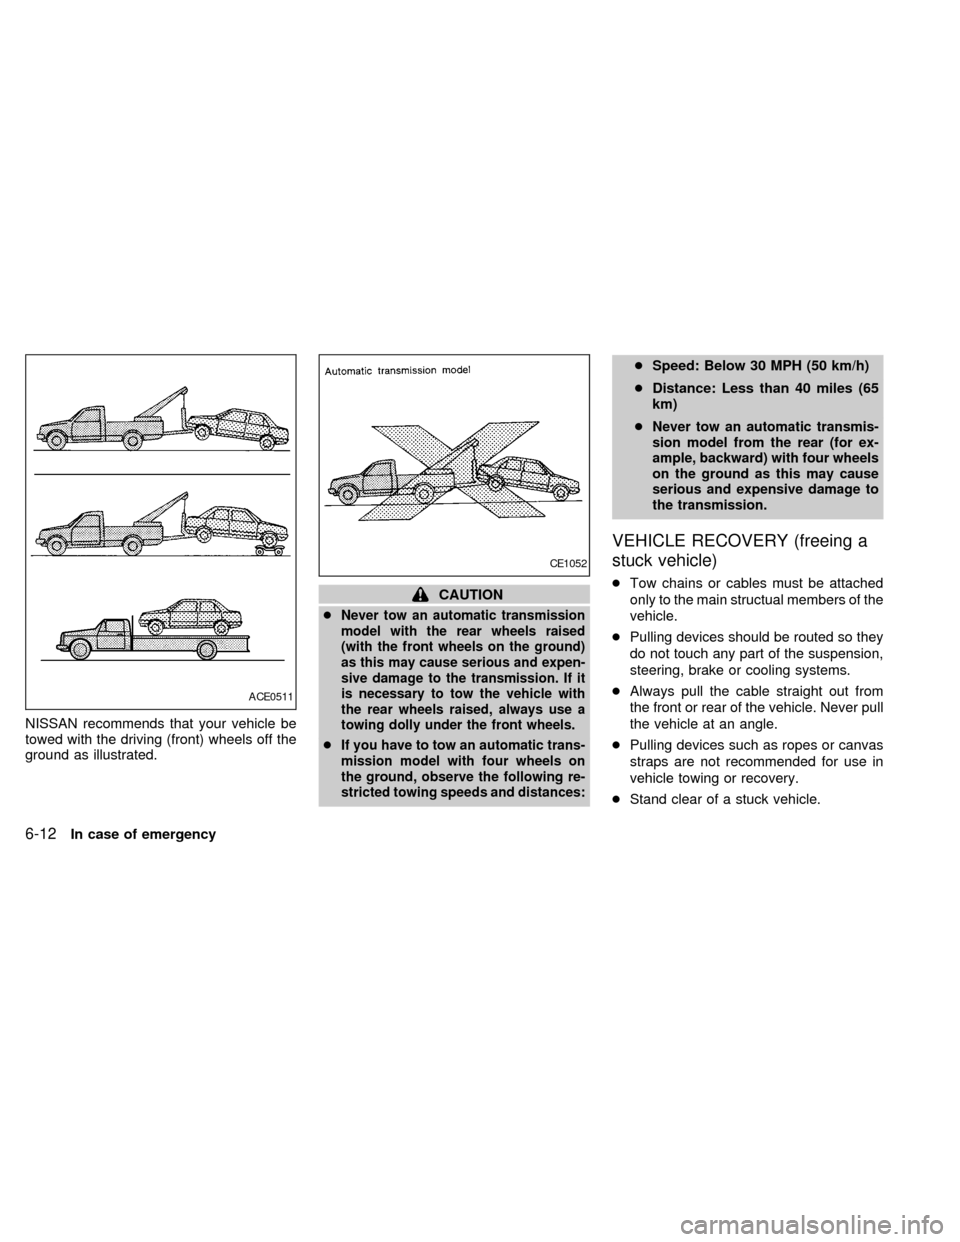
NISSAN recommends that your vehicle be
towed with the driving (front) wheels off the
ground as illustrated.
CAUTION
c
Never tow an automatic transmission
model with the rear wheels raised
(with the front wheels on the ground)
as this may cause serious and expen-
sive damage to the transmission. If it
is necessary to tow the vehicle with
the rear wheels raised, always use a
towing dolly under the front wheels.
cIf you have to tow an automatic trans-
mission model with four wheels on
the ground, observe the following re-
stricted towing speeds and distances:
cSpeed: Below 30 MPH (50 km/h)
cDistance: Less than 40 miles (65
km)
c
Never tow an automatic transmis-
sion model from the rear (for ex-
ample, backward) with four wheels
on the ground as this may cause
serious and expensive damage to
the transmission.
VEHICLE RECOVERY (freeing a
stuck vehicle)
cTow chains or cables must be attached
only to the main structual members of the
vehicle.
cPulling devices should be routed so they
do not touch any part of the suspension,
steering, brake or cooling systems.
cAlways pull the cable straight out from
the front or rear of the vehicle. Never pull
the vehicle at an angle.
cPulling devices such as ropes or canvas
straps are not recommended for use in
vehicle towing or recovery.
cStand clear of a stuck vehicle.
ACE0511
CE1052
6-12In case of emergency
ZX
Page 179 of 223

FRONT FOG LIGHT BULB
REPLACEMENT (if so equipped)
1. Use a Phillip's head screwdriver to re-
move the trim plate and the anchoring
bolts on the fog light assembly.
2. Move the fog light assembly towards the
center of the vehicle and pull out to
expose the rear of the assembly.
3. Remove the retaining ring from the fog
light assembly.
4. Remove the bulb cover.
5. Lift the spring retainer.
6. Remove the fog light bulb.
ADI0651
8-32Do-it-yourself
ZX