1999 NISSAN QUEST light
[x] Cancel search: lightPage 233 of 286
Proper brake inspection intervals should
be followed.For more information regard-
ing brake inspections, see the appropriate
maintenance schedule information in the
``Maintenance'' section of this manual.Check the brake booster function as fol-
lows:
1. With the engine off, press and release
the brake pedal several times. When
brake pedal movement (distance of
travel) remains the same from one pedal
application to the next, continue on to the
next step.
2. While depressing the brake pedal, start
the engine. The pedal height should drop
a little.
3. With the brake pedal depressed, turn the
engine off. Keep the pedal depressed for
about 30 seconds; the pedal height
should not change.
4. Run the engine for one minute without
depressing the brake pedal, then turn it
off. Depress the brake pedal several
times. The pedal travel distance will de-
crease gradually with each depression
as the vacuum is released from the
booster.
If the brakes do not operate properly, see an
authorized NISSAN dealer.
Engine compartment
(headlight fuses)
CAUTION
Never use a fuse of a higher amperage
rating than that specified on the fuse
box cover. This could damage the elec-
trical system or cause a fire.
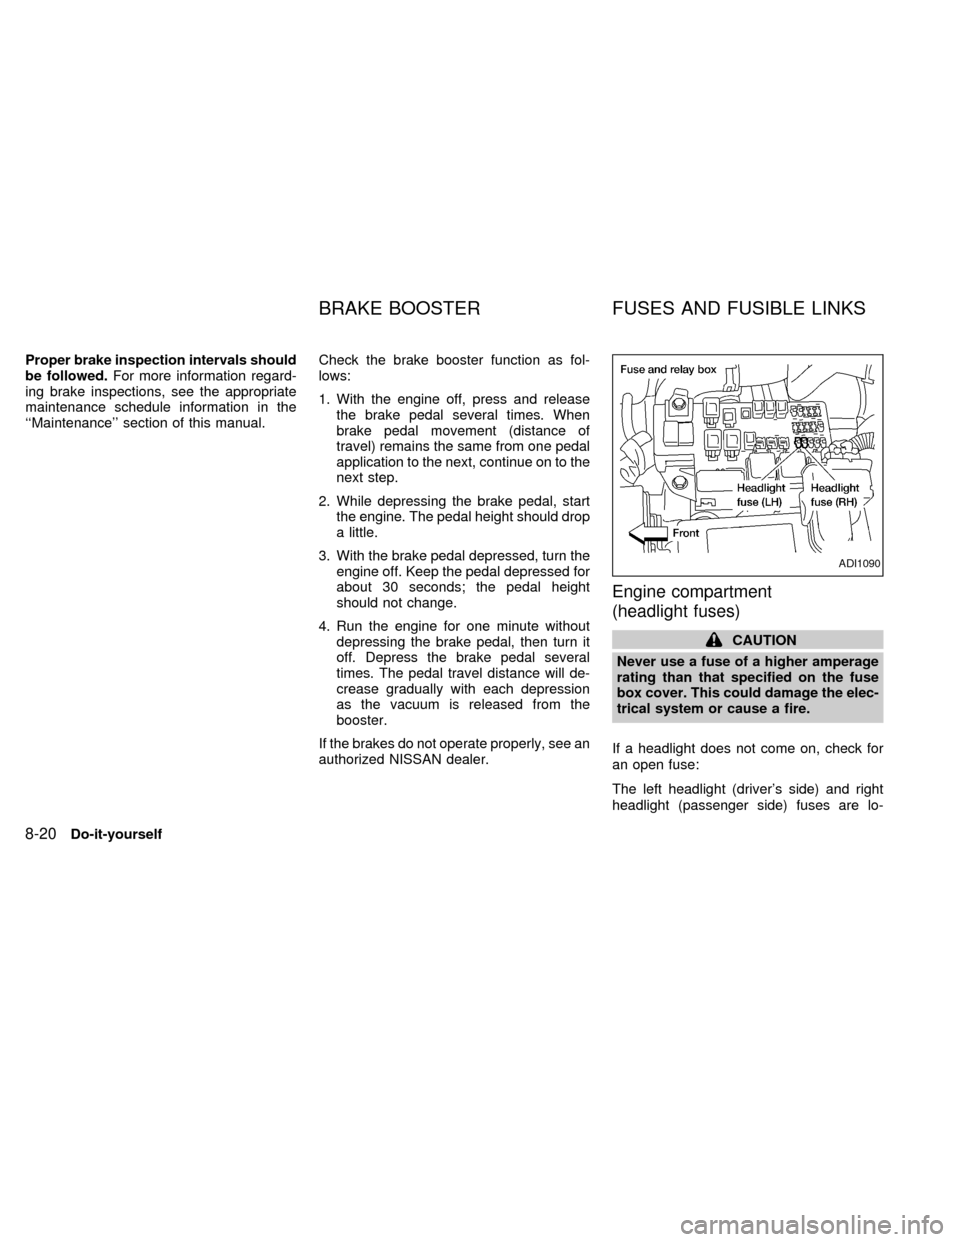
If a headlight does not come on, check for
an open fuse:
The left headlight (driver's side) and right
headlight (passenger side) fuses are lo-
ADI1090
BRAKE BOOSTER FUSES AND FUSIBLE LINKS
8-20Do-it-yourself
ZX
Page 234 of 286
cated in the left-hand fuse box, near the
radiator cap.
1. Turn the headlight switch to the OFF
position.
2. Open the engine hood.
3. Remove the fuse box cover.
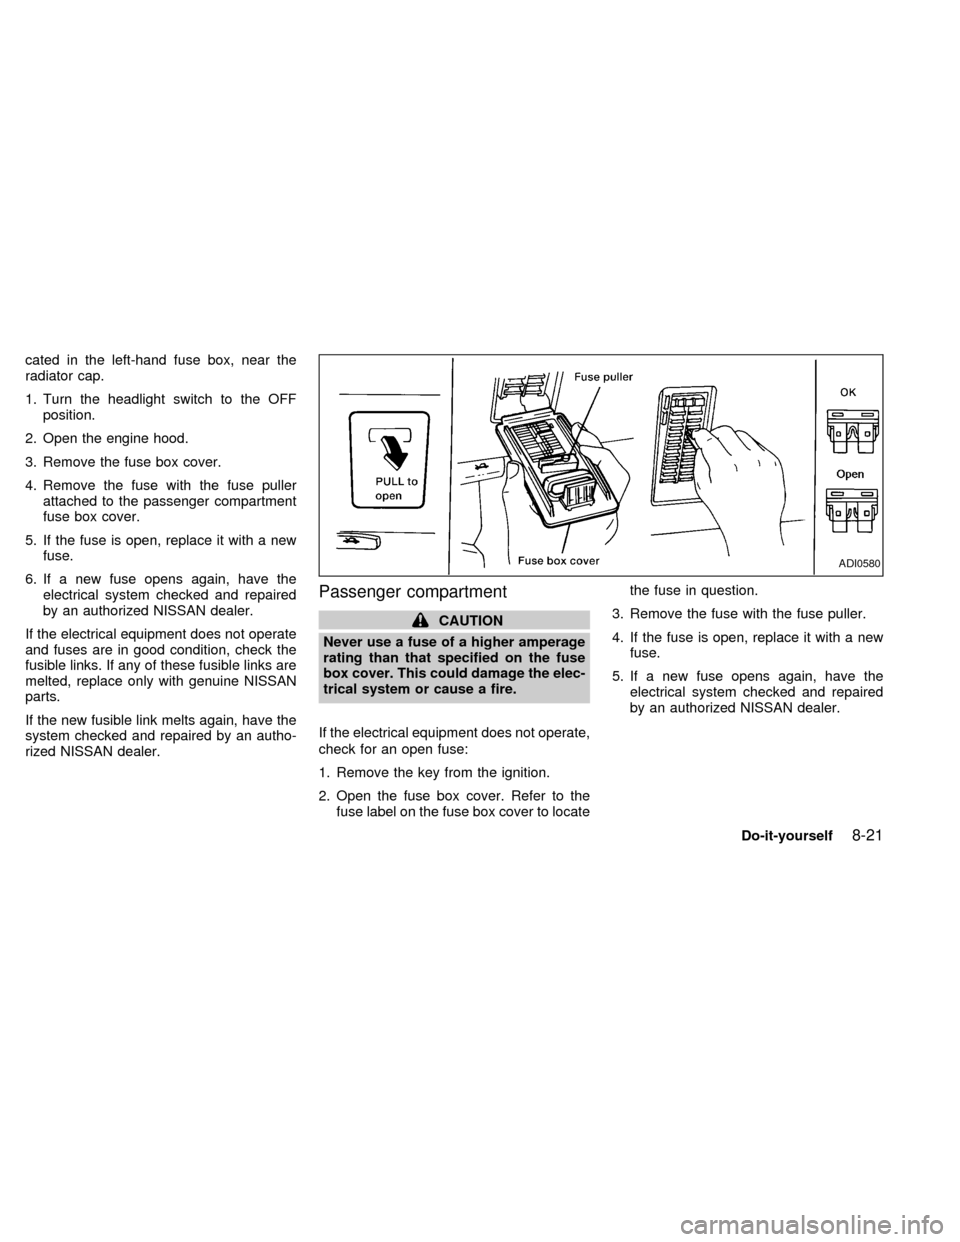
4. Remove the fuse with the fuse puller
attached to the passenger compartment
fuse box cover.
5. If the fuse is open, replace it with a new
fuse.
6. If a new fuse opens again, have the
electrical system checked and repaired
by an authorized NISSAN dealer.
If the electrical equipment does not operate
and fuses are in good condition, check the
fusible links. If any of these fusible links are
melted, replace only with genuine NISSAN
parts.
If the new fusible link melts again, have the
system checked and repaired by an autho-
rized NISSAN dealer.
Passenger compartment
CAUTION
Never use a fuse of a higher amperage
rating than that specified on the fuse
box cover. This could damage the elec-
trical system or cause a fire.
If the electrical equipment does not operate,
check for an open fuse:
1. Remove the key from the ignition.
2. Open the fuse box cover. Refer to the
fuse label on the fuse box cover to locatethe fuse in question.
3. Remove the fuse with the fuse puller.
4. If the fuse is open, replace it with a new
fuse.
5. If a new fuse opens again, have the
electrical system checked and repaired
by an authorized NISSAN dealer.
ADI0580
Do-it-yourself8-21
ZX
Page 235 of 286
HEADLIGHTS
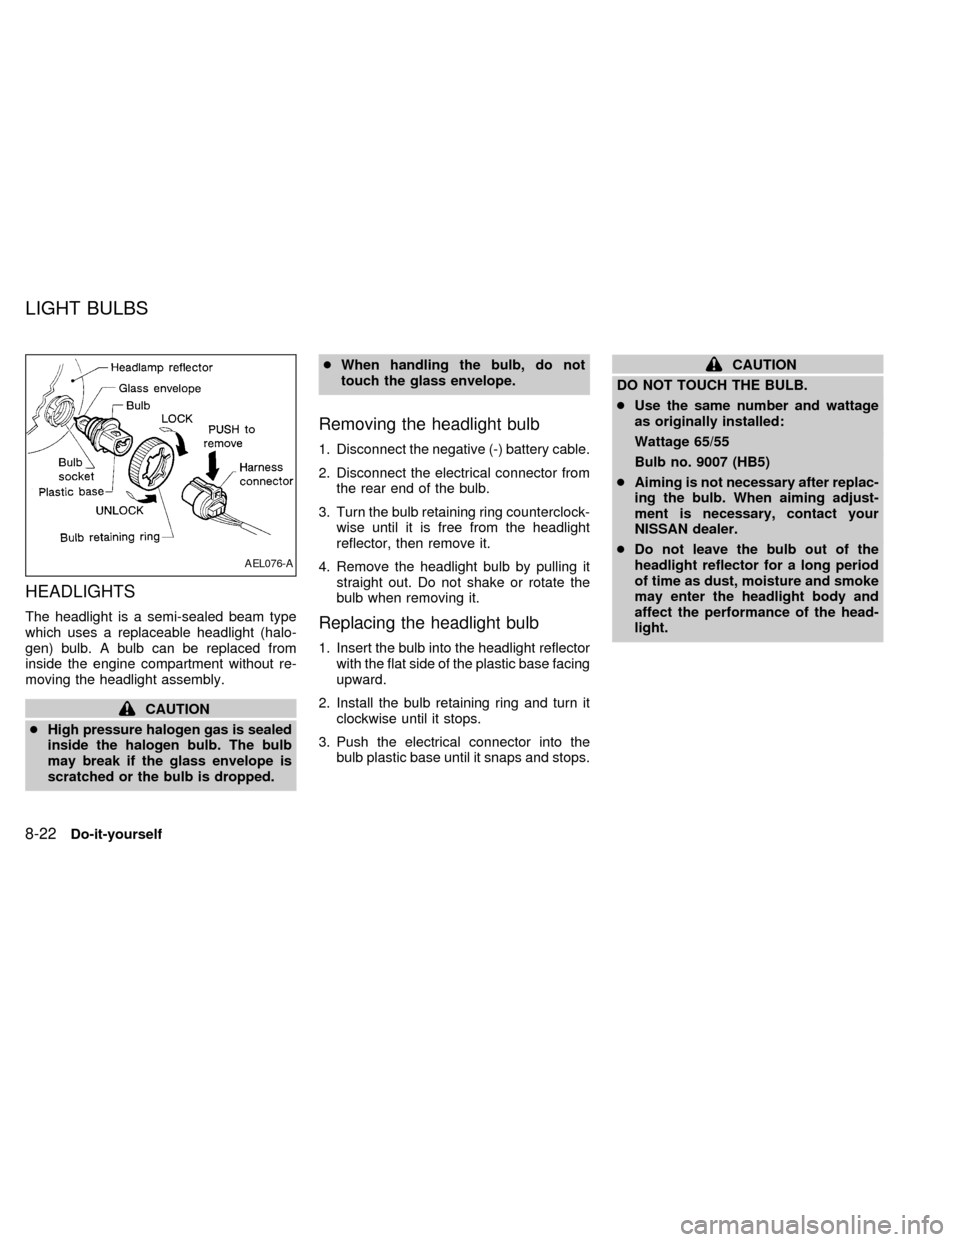
The headlight is a semi-sealed beam type
which uses a replaceable headlight (halo-
gen) bulb. A bulb can be replaced from
inside the engine compartment without re-
moving the headlight assembly.
CAUTION
cHigh pressure halogen gas is sealed
inside the halogen bulb. The bulb
may break if the glass envelope is
scratched or the bulb is dropped.cWhen handling the bulb, do not
touch the glass envelope.
Removing the headlight bulb
1. Disconnect the negative (-) battery cable.
2. Disconnect the electrical connector from
the rear end of the bulb.
3. Turn the bulb retaining ring counterclock-
wise until it is free from the headlight
reflector, then remove it.
4. Remove the headlight bulb by pulling it
straight out. Do not shake or rotate the
bulb when removing it.
Replacing the headlight bulb
1. Insert the bulb into the headlight reflector
with the flat side of the plastic base facing
upward.
2. Install the bulb retaining ring and turn it
clockwise until it stops.
3. Push the electrical connector into the
bulb plastic base until it snaps and stops.
CAUTION
DO NOT TOUCH THE BULB.
cUse the same number and wattage
as originally installed:
Wattage 65/55
Bulb no. 9007 (HB5)
cAiming is not necessary after replac-
ing the bulb. When aiming adjust-
ment is necessary, contact your
NISSAN dealer.
cDo not leave the bulb out of the
headlight reflector for a long period
of time as dust, moisture and smoke
may enter the headlight body and
affect the performance of the head-
light.
AEL076-A
LIGHT BULBS
8-22Do-it-yourself
ZX
Page 236 of 286
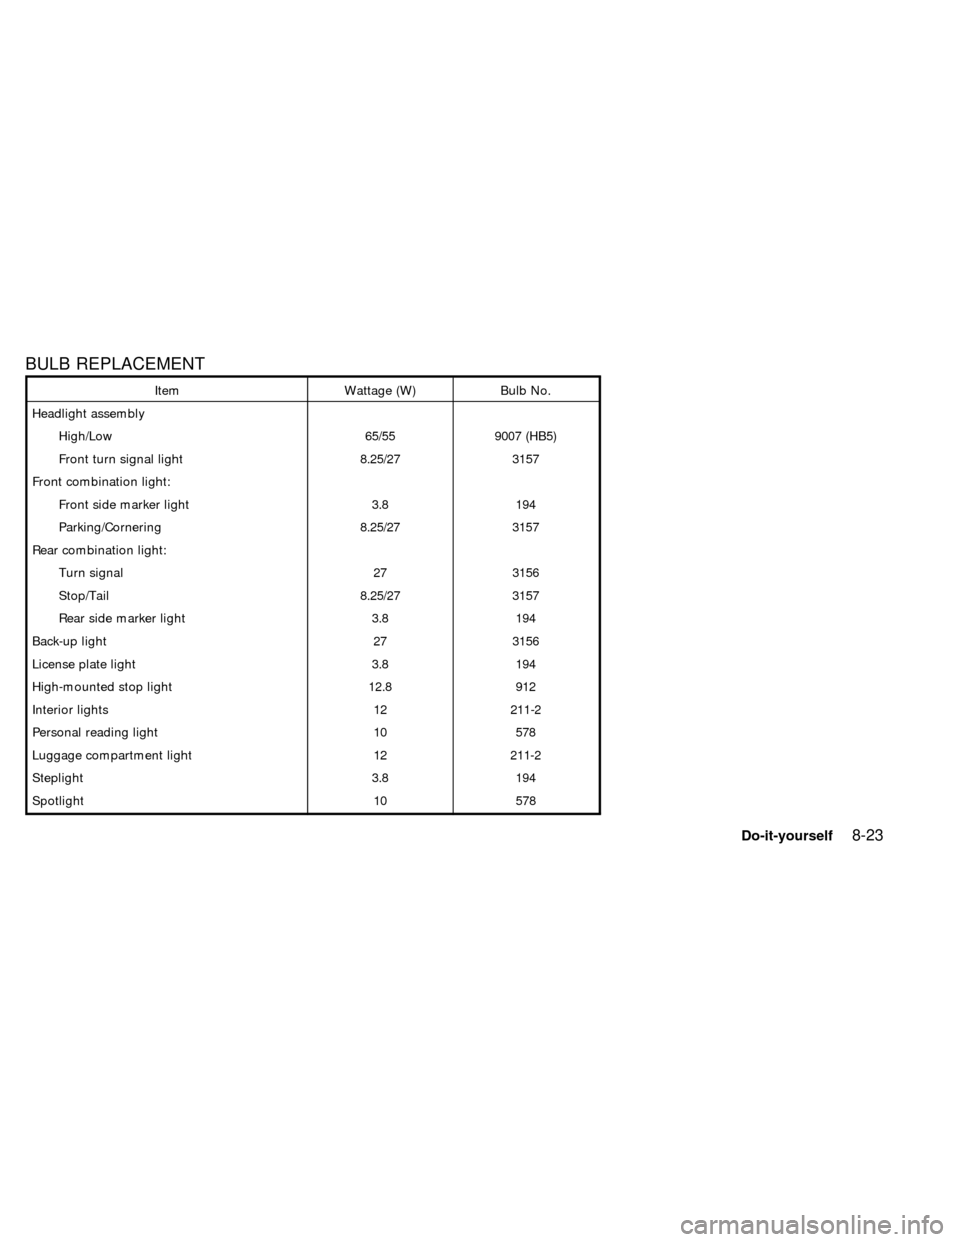
BULB REPLACEMENT
Item Wattage (W) Bulb No.
Headlight assembly
High/Low 65/55 9007 (HB5)
Front turn signal light 8.25/27 3157
Front combination light:
Front side marker light 3.8 194
Parking/Cornering 8.25/27 3157
Rear combination light:
Turn signal 27 3156
Stop/Tail 8.25/27 3157
Rear side marker light 3.8 194
Back-up light 27 3156
License plate light 3.8 194
High-mounted stop light 12.8 912
Interior lights 12 211-2
Personal reading light 10 578
Luggage compartment light 12 211-2
Steplight 3.8 194
Spotlight 10 578
Do-it-yourself8-23
ZX
Page 237 of 286

Replacement procedures
All lights (except for headlights) are either
type A, B, C or D. When replacing a bulb,
first remove the lens and/or cover.
ADI1094
ADI1093
8-24Do-it-yourself
ZX
Page 243 of 286
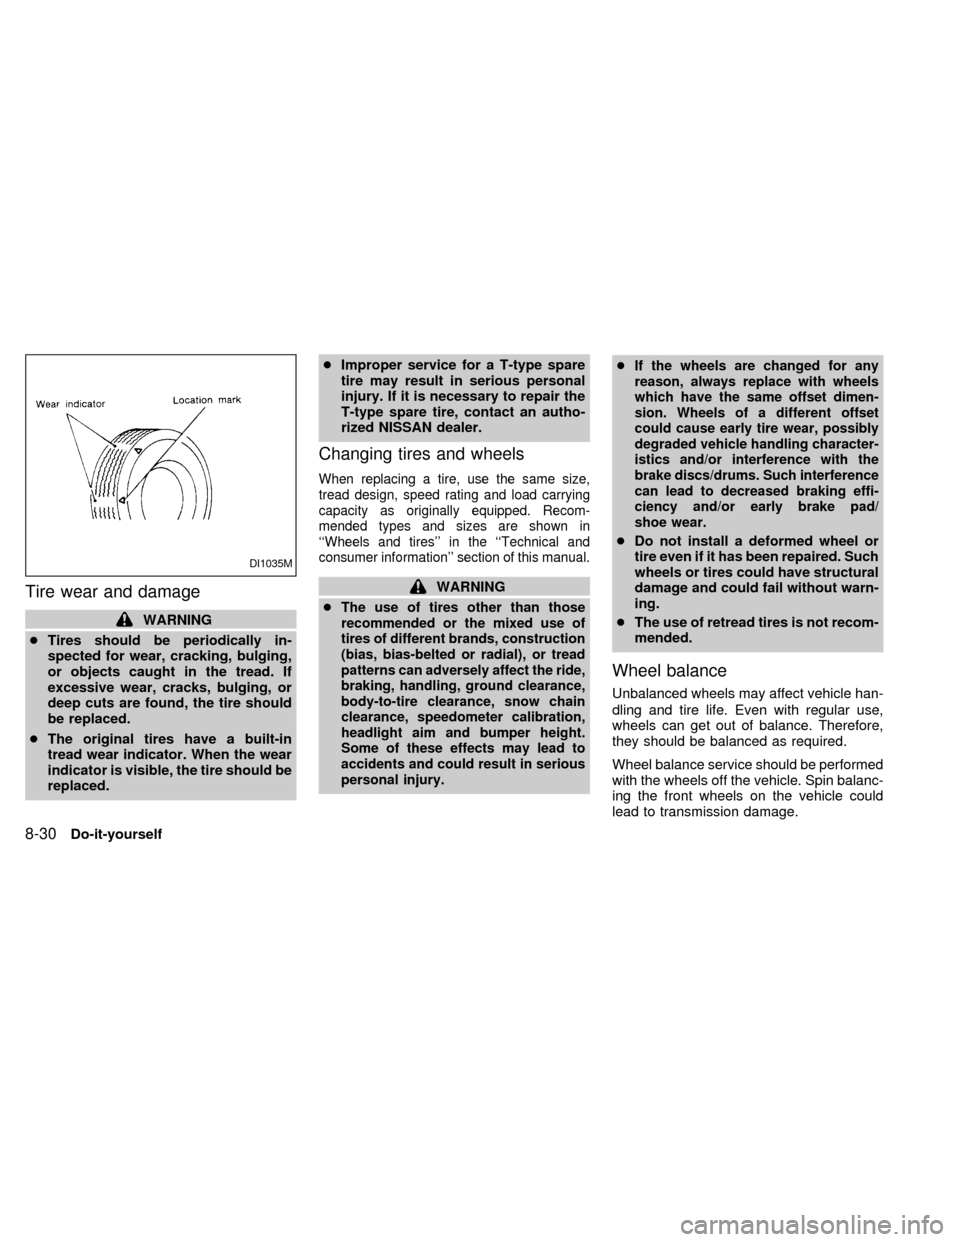
Tire wear and damage
WARNING
cTires should be periodically in-
spected for wear, cracking, bulging,
or objects caught in the tread. If
excessive wear, cracks, bulging, or
deep cuts are found, the tire should
be replaced.
cThe original tires have a built-in
tread wear indicator. When the wear
indicator is visible, the tire should be
replaced.cImproper service for a T-type spare
tire may result in serious personal
injury. If it is necessary to repair the
T-type spare tire, contact an autho-
rized NISSAN dealer.
Changing tires and wheels
When replacing a tire, use the same size,
tread design, speed rating and load carrying
capacity as originally equipped. Recom-
mended types and sizes are shown in
``Wheels and tires'' in the ``Technical and
consumer information'' section of this manual.
WARNING
c
The use of tires other than those
recommended or the mixed use of
tires of different brands, construction
(bias, bias-belted or radial), or tread
patterns can adversely affect the ride,
braking, handling, ground clearance,
body-to-tire clearance, snow chain
clearance, speedometer calibration,
headlight aim and bumper height.
Some of these effects may lead to
accidents and could result in serious
personal injury.cIf the wheels are changed for any
reason, always replace with wheels
which have the same offset dimen-
sion. Wheels of a different offset
could cause early tire wear, possibly
degraded vehicle handling character-
istics and/or interference with the
brake discs/drums. Such interference
can lead to decreased braking effi-
ciency and/or early brake pad/
shoe wear.
cDo not install a deformed wheel or
tire even if it has been repaired. Such
wheels or tires could have structural
damage and could fail without warn-
ing.
cThe use of retread tires is not recom-
mended.
Wheel balance
Unbalanced wheels may affect vehicle han-
dling and tire life. Even with regular use,
wheels can get out of balance. Therefore,
they should be balanced as required.
Wheel balance service should be performed
with the wheels off the vehicle. Spin balanc-
ing the front wheels on the vehicle could
lead to transmission damage.
DI1035M
8-30Do-it-yourself
ZX
Page 248 of 286

make sure no wheel nuts are missing, and
check for any loose wheel nuts. Tighten if
necessary.
Tire rotation*Ð Tires should be rotated
every 7,500 miles (12,000 km).
Wheel alignment and balanceÐIfthe
vehicle should pull to either side while driv-
ing on a straight and level road, or if you
detect uneven or abnormal tire wear, there
may be a need for a wheel alignment.
If the steering wheel or seat vibrates at
normal highway speeds, wheel balancing
may be needed.
Windshield wiper blades*Ð Check for
cracks or wear if they do not wipe properly.
Doors and hoodÐ Check that all doors
and the hood operate properly. Also ensure
that all latches lock securely. Lubricate
hinges, latches, rollers and links if neces-
sary. Make sure the secondary latch keeps
the hood from opening when the primary
latch is released.
When driving in areas using road salt or
other corrosive materials, check lubrication
frequently.INSIDE THE VEHICLE
The maintenance items listed here should
be checked on a regular basis, such as
when performing periodic maintenance,
cleaning the vehicle, etc.
Additional information on the following
items with an ``*'' is found in the ``Do-it-
yourself'' section of this manual.
Lights*Ð Make sure the headlights, stop
lights, tail lights, turn signal lights, and other
lights are all operating properly and installed
securely. Also check headlight aim.
Warning lights and buzzers/chimesÐ
Make sure all warning lights and
buzzers/chimes are operating properly.
Windshield wiper and washer*Ð Check
that the wipers and washer operate properly
and that the wipers do not streak.
Windshield defrosterÐ Check that the air
comes out of the defroster outlets properly
and in sufficient quantity when operating the
heater or air conditioner.
Steering wheelÐ Check for changes in
the steering conditions, such as excessive
freeplay, hard steering or strange noises.SeatsÐ Check seat position controls such
as seat adjusters, seatback recliner, etc. to
ensure they operate smoothly and all
latches lock securely in every position.
Check that the head restraints move up and
down smoothly and the locks hold securely
in all latched positions. Check that the seat
leg latches lock securely in every anchor
position for the folding down rear seat and
detachable rear seat (if so equipped).
Seat beltsÐ Check that all parts of the seat
belt system (e.g. buckles, anchors, adjust-
ers and retractors) operate properly and
smoothly, and are installed securely. Check
the belt webbing for cuts, fraying, wear or
damage.
Accelerator pedalÐ Check the pedal for
smooth operation and make sure the pedal
does not catch or require uneven effort.
Keep the floor mat away from the pedal.
BrakesÐ Check that the brakes do not pull
the vehicle to one side when applied.
Brake pedal and booster*Ð Check the
pedal for smooth operation and make sure it
has the proper distance under it when de-
pressed fully. Check the brake booster func-
Maintenance
9-3
ZX
Page 261 of 286

of the vehicle, for which NISSAN is not
responsible.
Incorrect ignition timing may result in spark
knock, after-run, and/or overheating, which
may cause excessive fuel consumption or
engine damage. If any of the above symp-
toms are encountered, have your vehicle
checked at an authorized NISSAN dealer or
other competent service facility.
However, now and then you may notice
light spark knock for a short time while
accelerating or driving up hills. This is
no cause for concern, because you get
the greatest fuel benefit when there is
light spark knock for a short time under
heavy engine load.
ENGINE OIL AND OIL FILTER
RECOMMENDATION
Selecting the correct oil
It is essential to choose engine oil with the
correct quality and viscosity to ensure sat-
isfactory engine life and performance. NIS-
SAN recommends the use of a low friction
oil (energy conserving oil) in order to im-
prove fuel economy and conserve energy.
Oils which do not have the specified quality
label should not be used as they could
cause engine damage.Only those engine oils with the American
Petroleum Institute (API) CERTIFICATION
MARK on the front of the container should
be used. This type of oil supersedes the
existing API SG, SH, or SJ and Energy
Conserving II categories.
If you cannot find engine oil with the API
CERTIFICATION MARK, use an API grade
SG/SH, Energy Conserving II or API grade
SJ, Energy Conserving oil. An oil with a
single designation SG or SH, or in combi-
nation with other categories (for example,
SG/CC or SG/CD) may also be used if one
ATI0507
10-4Technical and consumer information
ZX