1999 NISSAN QUEST door lock
[x] Cancel search: door lockPage 42 of 286

CAUTION
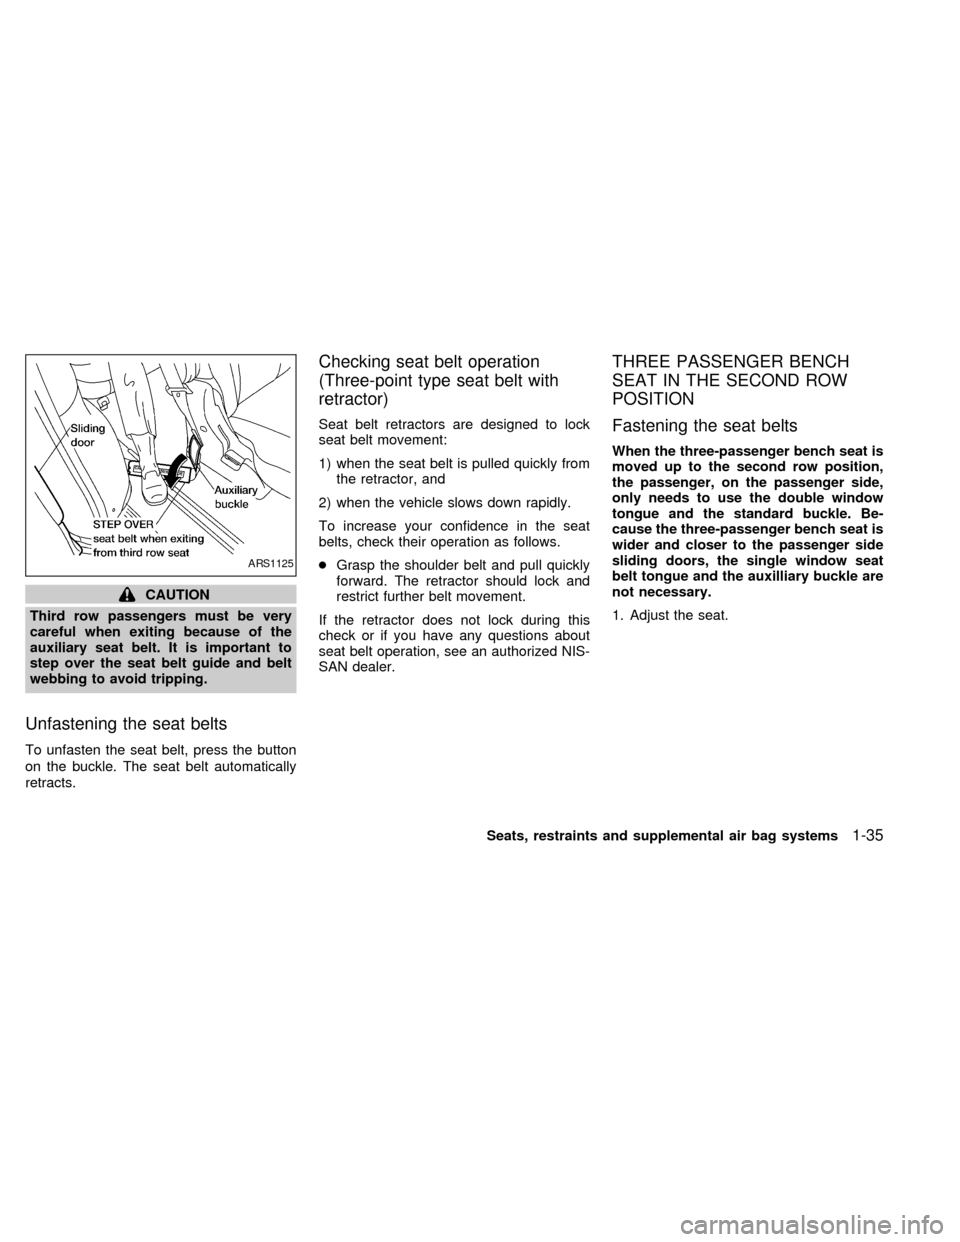
Third row passengers must be very
careful when exiting because of the
auxiliary seat belt. It is important to
step over the seat belt guide and belt
webbing to avoid tripping.
Unfastening the seat belts
To unfasten the seat belt, press the button
on the buckle. The seat belt automatically
retracts.
Checking seat belt operation
(Three-point type seat belt with
retractor)
Seat belt retractors are designed to lock
seat belt movement:
1) when the seat belt is pulled quickly from
the retractor, and
2) when the vehicle slows down rapidly.
To increase your confidence in the seat
belts, check their operation as follows.
cGrasp the shoulder belt and pull quickly
forward. The retractor should lock and
restrict further belt movement.
If the retractor does not lock during this
check or if you have any questions about
seat belt operation, see an authorized NIS-
SAN dealer.
THREE PASSENGER BENCH
SEAT IN THE SECOND ROW
POSITION
Fastening the seat belts
When the three-passenger bench seat is
moved up to the second row position,
the passenger, on the passenger side,
only needs to use the double window
tongue and the standard buckle. Be-
cause the three-passenger bench seat is
wider and closer to the passenger side
sliding doors, the single window seat
belt tongue and the auxilliary buckle are
not necessary.
1. Adjust the seat.
ARS1125
Seats, restraints and supplemental air bag systems1-35
ZX
Page 55 of 286

After the child restraint is removed and the
seat belt is fully retracted (for the passenger
side of the two-passenger bench seat, the
auxilliary buckle must also be released), the
automatic locking mode (child restraint
mode) is canceled.REAR FACING INSTALLATION
AT SECOND AND THIRD ROW
OUTBOARD POSITIONS
The following instructions apply to second
row bucket seats, the second row bench
seat and the outboard positions of the three-
passenger bench seat.
WARNING
When installing a child restraint in the
two-passenger bench seat, if it is
placed in the seating position next to
the passenger side sliding door, be
sure both the auxiliary buckle and main
buckle are properly fastened. Failure to
do so could increase the chance and/or
severity of injury in an accident.
WARNING
cThe three-point belt in your vehicle
is equipped with an automatic lock-
ing mode retractor which must be
used when installing a child re-
straint.cFailure to use the retractor's locking
mode will result in the child restraint
not being properly secured. The seat
could tip over or otherwise be unse-
cured and cause injury to the child in
a sudden stop or collision.
1-48Seats, restraints and supplemental air bag systems
ZX
Page 95 of 286

The theft warning system provides audio
and visual alarm signals if parts of the
vehicle are disturbed.
How to activate the theft warning
system
1. Close all windows.
2. Remove the key from the ignition switch.
3. Close all doors and the hood.
4. Push the
button on the multi-remote
controller. All doors lock. The hazard
lights flash twice and the horn beeps
once to indicate all doors are locked.cWhen the
button is pushed with all
doors locked, the hazard lights flash
twice and the horn beeps once as a
reminder that the doors are already
locked.
The horn may or may not beep once.
Refer to ``silencing the horn beep fea-
ture'' later in this section.
The system can be activated even if the
windows are open.
5. Confirm that the SECURITY indicator
light comes on. The SECURITY light
glows for about 30 seconds and then
begins to flash once every three seconds.
The system is now activated. If, during
this 30-second time period, the door is
unlocked by the key or the multi-remote
controller, or the ignition key is turned to
ACC or ON, the system will not activate.
If the key is turned slowly when locking
the door, the system may not activate.
Furthermore, if the key is turned exces-
sively to the unlock position, the system
may be deactivated when the key is re-
moved. If the indicator light fails to glow
for 30 seconds, unlock the door once
and lock it again.Even when the driver and/or passengers
are in the vehicle, the system will acti-
vate with all doors, hood and trunk lid
locked and ignition key off. Turn the
ignition key to ACC or ON to turn the
system off.
Theft warning system operation
The theft warning system emits the follow-
ing alarm:
cThe headlights and tail lights flash and
the horn sounds intermittently. In addi-
tion, the starter motor does not operate.
cThe alarm automatically turns off after
two to three minutes. However, the alarm
reactivates if the vehicle is tampered with
again. The alarm can be shut off by
unlocking a door with the key or by
pressing the
button on the multi-
remote controller.
The alarm is activated when:
ca door is unlocked or opened without
using the key or the multi-remote control-
ler. This includes unlocking the doors
with the inside door lock switch.
cthe hood is opened.
IC0005
THEFT WARNING
(if so equipped)
2-10Instruments and controls
ZX
Page 96 of 286

cthe ignition is placed into the ACC, ON,
or START position without the key in the
ignition.
How to stop the alarm
The alarm stops only by unlocking a door
with the key or by pressing the
button on
the multi-remote controller. The alarm does
not stop if the ignition key is turned to the
ACC or ON position.
Silencing the horn beep feature
If desired, the horn beep feature can be
deactivated using the multi-remote control-
ler. The instructions are on the back of the
multi-remote controller.
To deactivate:Press and hold the
andbuttonsfor at least two seconds.
The hazard lights will quickly flash three
times to confirm that the horn beep feature
has been deactivated.
To activate:Press and hold the
andbuttonsfor at least two seconds once
more.The hazard lights will quickly flash three
times to confirm that the horn beep feature
has been reactivated.
Deactivating the horn feature does not si-
lence the horn if the alarm is triggered.
If the system does not operate as de-
scribed above, have it checked by an
authorized NISSAN dealer.
AIC1037
Instruments and controls2-11
ZX
Page 106 of 286

WARNING
cMake sure that all passengers have
their hands, etc. inside the vehicle
before closing the windows. Use the
window lock switch to prevent unex-
pected use of the power windows.
c
Do not leave children unattended in-
side the vehicle. They could unknow-
ingly activate switches or controls
and become trapped in a window.
Unattended children could become
involved in serious accidents.
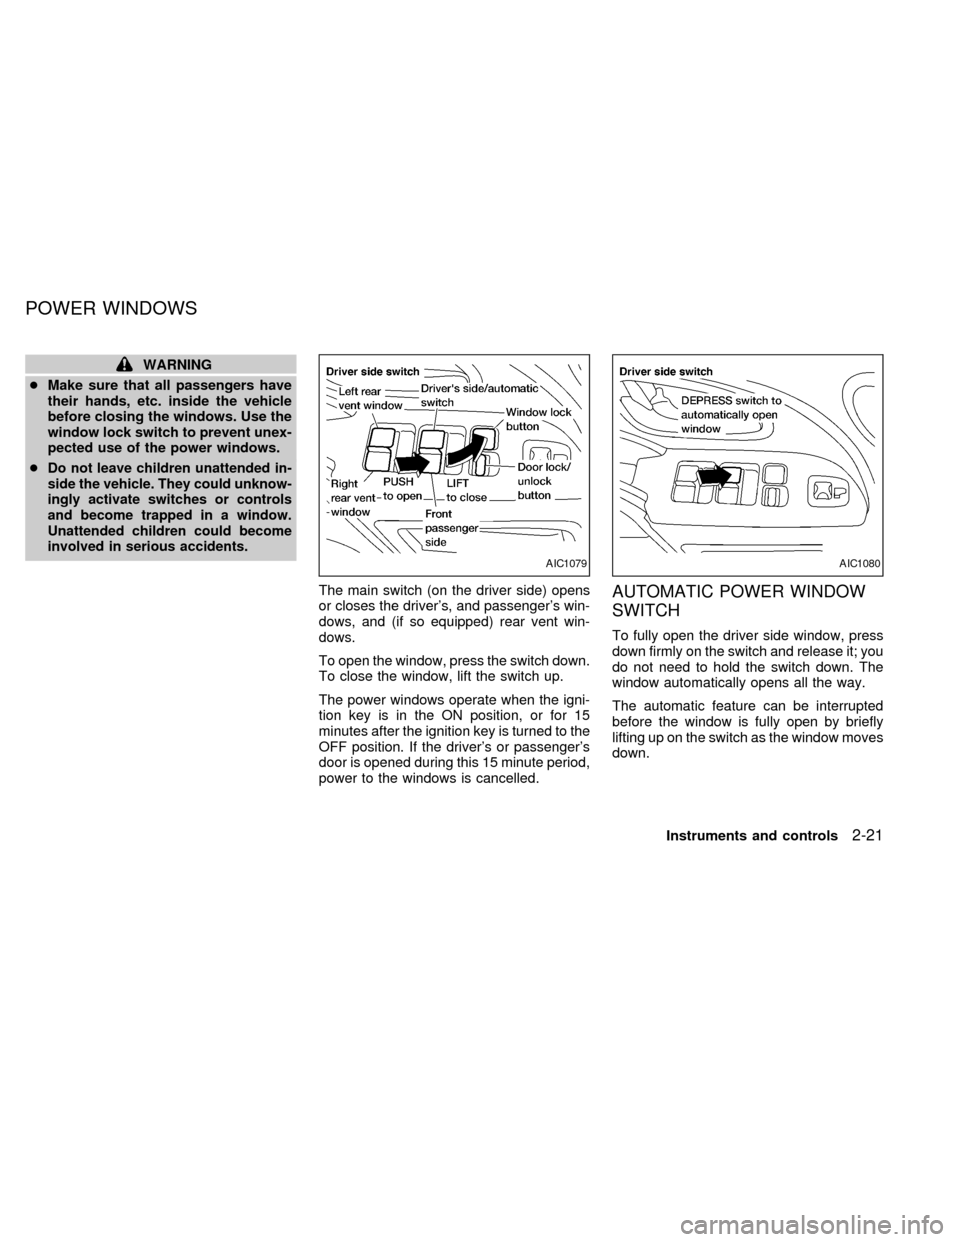
The main switch (on the driver side) opens
or closes the driver's, and passenger's win-
dows, and (if so equipped) rear vent win-
dows.
To open the window, press the switch down.
To close the window, lift the switch up.
The power windows operate when the igni-
tion key is in the ON position, or for 15
minutes after the ignition key is turned to the
OFF position. If the driver's or passenger's
door is opened during this 15 minute period,
power to the windows is cancelled.AUTOMATIC POWER WINDOW
SWITCH
To fully open the driver side window, press
down firmly on the switch and release it; you
do not need to hold the switch down. The
window automatically opens all the way.
The automatic feature can be interrupted
before the window is fully open by briefly
lifting up on the switch as the window moves
down.
AIC1079AIC1080
POWER WINDOWS
Instruments and controls2-21
ZX
Page 107 of 286

Locking passenger's window
When the power window lock-out button is
pushed in, the passenger's window cannot
be opened or closed. Push the power win-
dow lock-out button again to cancel this
feature.
The passenger side switch opens or closes
the passenger window only. To open the
window, press the switch down. To close
the window, lift the switch up.The sunroof operates when the ignition key
is in the ON position, or for 15 minutes after
the ignition key is turned to the OFF posi-
tion. If the driver's or passenger's door is
opened during this 15 minute period, power
to the sunroof is cancelled.
NOTE:
If the battery is discharged or is discon-
nected, the sunroof may not operate cor-
rectly, and must be reset.
To reset a fully or partially open sunroof:
1. Push and hold the UP/CLOSE side of the
sunroof switch until the sunroof closes,and tilts up to the fully open position, then
release the switch.
2. Push and hold the DOWN/OPEN side of
the switch until the sunroof lowers com-
pletely. The sunroof is now reset and
should operate correctly.
To reset a fully or partially tilted, or closed
sunroof:
1. Push and hold the UP/CLOSE side of the
sunroof switch until the sunroof stops
tilting up, then release the switch.
2. Push and hold the DOWN/OPEN side of
the switch until the sunroof lowers com-
pletely. The sunroof is now reset and
should operate correctly.
Sliding the sunroof
To open the roof, push and hold the OPEN
side of the switch.
To close the roof, push and hold the CLOSE
side.
Tilting the sunroof
To tilt up, first close the sunroof, then push the
UP side of the switch. To close the sunroof,
push the DOWN side of the switch.
AIC1081AIC1066
SUNROOF (if so equipped)
2-22Instruments and controls
ZX
Page 108 of 286

Sun shade
Open and close the sun shade by sliding it
forward or backward. The shade opens
when the sunroof opens, but it must be
closed manually.
WARNING
cIn an accident you could be thrown
from the vehicle through an open
sunroof. Always use seat belts and
child restraints.
c
Do not allow anyone to stand up or
extend any portion of their body out of
the opening while the vehicle is in
motion or while the sunroof is closing.
CAUTION
c
Remove water drops, snow, ice or
sand from the sunroof before opening.
cDo not place any heavy object on the
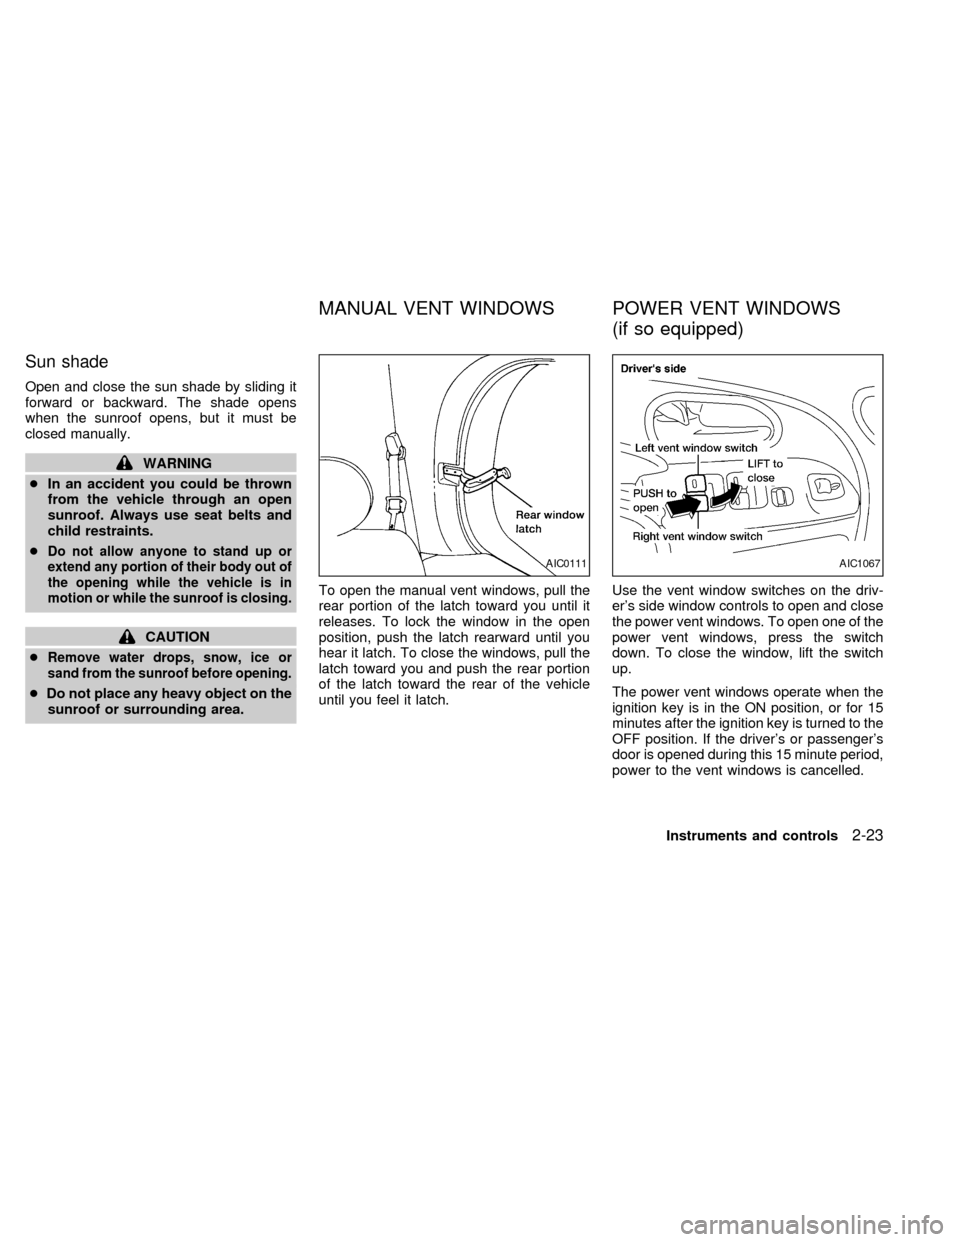
sunroof or surrounding area.To open the manual vent windows, pull the
rear portion of the latch toward you until it
releases. To lock the window in the open
position, push the latch rearward until you
hear it latch. To close the windows, pull the
latch toward you and push the rear portion
of the latch toward the rear of the vehicle
until you feel it latch.Use the vent window switches on the driv-
er's side window controls to open and close
the power vent windows. To open one of the
power vent windows, press the switch
down. To close the window, lift the switch
up.
The power vent windows operate when the
ignition key is in the ON position, or for 15
minutes after the ignition key is turned to the
OFF position. If the driver's or passenger's
door is opened during this 15 minute period,
power to the vent windows is cancelled.
AIC0111AIC1067
MANUAL VENT WINDOWS POWER VENT WINDOWS
(if so equipped)
Instruments and controls2-23
ZX
Page 116 of 286

3 Pre-driving checks and adjustments
Key .........................................................................3-2
Door locks ..............................................................3-2
Manual door lock ....................................................3-3
Child safety sliding door lock .................................3-6
Power door lock (if so equipped) ...........................3-7
Multi-remote control system (if so equipped).........3-9
Battery replacement .............................................3-11
Illuminated entry system ......................................3-12
Hood release ........................................................3-12
Glove box .............................................................3-13
Front seat convenience net .................................3-14
Rear door lock ......................................................3-15
Cargo net (if so equipped) ...................................3-16Parcel shelf (if so equipped) ................................3-17
Luggage rack (if so equipped) .............................3-19
Fuel filler lid and cap ............................................3-20
Tilting steering wheel ...........................................3-21
Memory driver seat and mirrors (if so
equipped) .............................................................3-21
Multi-remote controller system entry ....................3-21
Memory driver seat and mirror buttons................3-22
Outside mirror control...........................................3-23
Outside mirrors .....................................................3-24
Inside mirror .........................................................3-24
Vanity mirror .........................................................3-24
ZX