1999 NISSAN QUEST key
[x] Cancel search: keyPage 96 of 286

cthe ignition is placed into the ACC, ON,
or START position without the key in the
ignition.
How to stop the alarm
The alarm stops only by unlocking a door
with the key or by pressing the
button on
the multi-remote controller. The alarm does
not stop if the ignition key is turned to the
ACC or ON position.
Silencing the horn beep feature
If desired, the horn beep feature can be
deactivated using the multi-remote control-
ler. The instructions are on the back of the
multi-remote controller.
To deactivate:Press and hold the
andbuttonsfor at least two seconds.
The hazard lights will quickly flash three
times to confirm that the horn beep feature
has been deactivated.
To activate:Press and hold the
andbuttonsfor at least two seconds once
more.The hazard lights will quickly flash three
times to confirm that the horn beep feature
has been reactivated.
Deactivating the horn feature does not si-
lence the horn if the alarm is triggered.
If the system does not operate as de-
scribed above, have it checked by an
authorized NISSAN dealer.
AIC1037
Instruments and controls2-11
ZX
Page 99 of 286

Push the headlight switch again to turn the
interior lights off.
DAYTIME RUNNING LIGHT
SYSTEM (Canada only)
The headlights automatically illuminate at a
reduced intensity when the engine is started
with the parking brake released. The day-
time running lights operate with the head-
light switch in the OFF position or in the
position. Turn the headlight switch to
theposition for full illumination when
driving at night.
If the parking brake is applied before the
engine is started, the daytime running lights
do not illuminate. The daytime running lights
illuminate once the parking brake is released.
The daytime running lights will remain on until
the ignition switch is turned OFF.
WARNING
When the daytime running light system
is active, tail lights on your vehicle will
not be on. It is necessary at dusk to
turn on your headlights. Failure to do
so could cause an accident injuring
yourself and others.The autolamp system allows the headlights
to be set so they turn on and off automati-
cally. The autolamp system can turn on the
headlights automatically when it is dark,
turn off the headlights when it is light, and
keep the headlights on for up to three
minutes after you turn the key to OFF.
To set the autolamp system:
1. Make sure the headlight switch is in the
AUTO1 or AUTO2 position.
2. Turn the ignition key to ON.
3. The autolamp system automatically turns
the headlights on and off.
Shut-off delay
The length of time the headlights stay on
after the ignition is turned to OFF depends
on whether the switch is in the AUTO1 or
AUTO2 position. If the switch is in the
AUTO1 position, then the headlights stay on
for less than 1 minute after the ignition is
turned OFF. If the switch is in the AUTO2
position, the headlights stay on approxi-
mately 3 minutes after the ignition is turned
OFF.
To turn the autolamp system off, turn the
switch to the OFF,
,orposition.AIC1058
AUTOLAMP SWITCH
(if so equipped)
2-14Instruments and controls
ZX
Page 106 of 286

WARNING
cMake sure that all passengers have
their hands, etc. inside the vehicle
before closing the windows. Use the
window lock switch to prevent unex-
pected use of the power windows.
c
Do not leave children unattended in-
side the vehicle. They could unknow-
ingly activate switches or controls
and become trapped in a window.
Unattended children could become
involved in serious accidents.
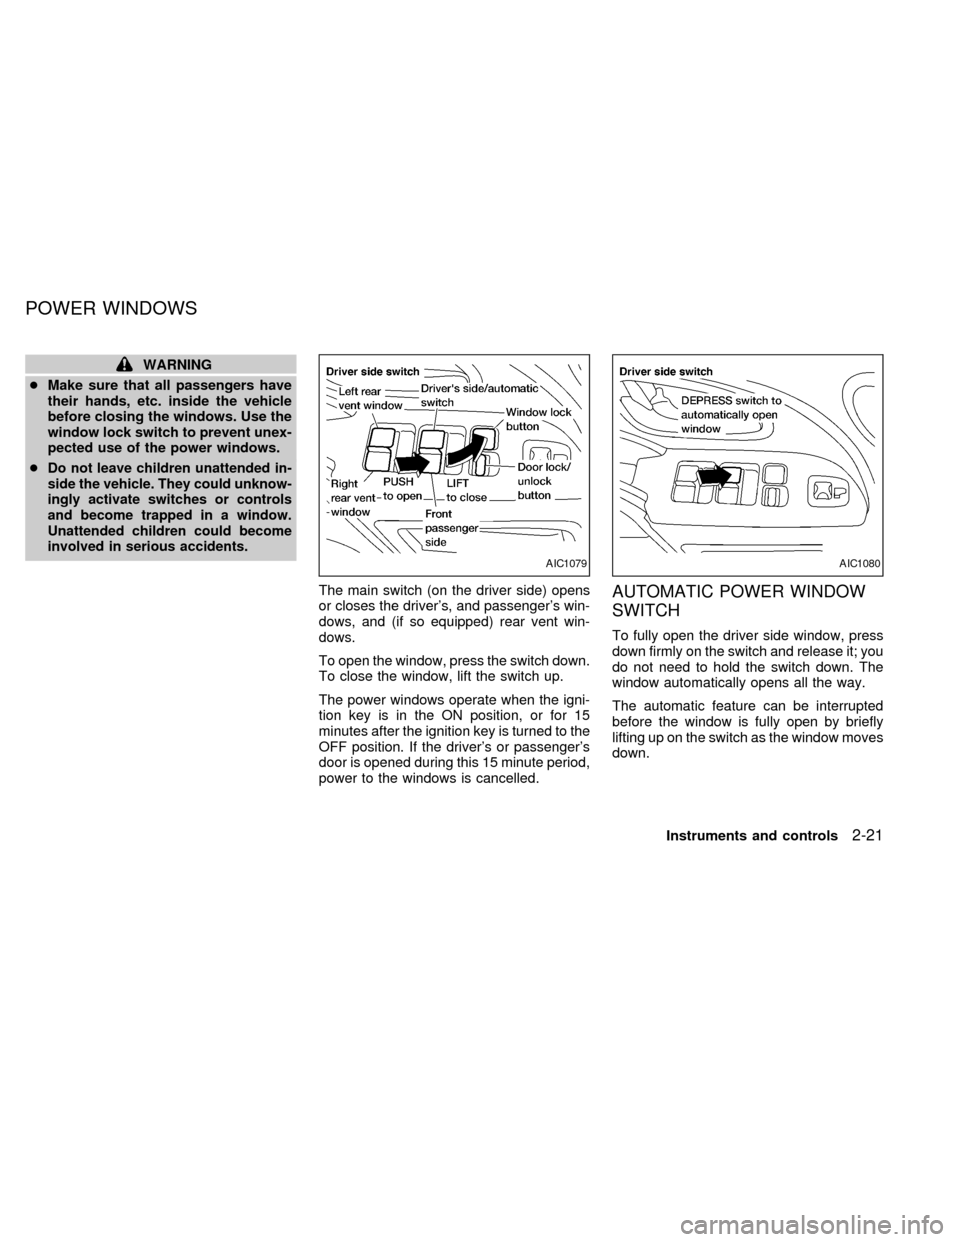
The main switch (on the driver side) opens
or closes the driver's, and passenger's win-
dows, and (if so equipped) rear vent win-
dows.
To open the window, press the switch down.
To close the window, lift the switch up.
The power windows operate when the igni-
tion key is in the ON position, or for 15
minutes after the ignition key is turned to the
OFF position. If the driver's or passenger's
door is opened during this 15 minute period,
power to the windows is cancelled.AUTOMATIC POWER WINDOW
SWITCH
To fully open the driver side window, press
down firmly on the switch and release it; you
do not need to hold the switch down. The
window automatically opens all the way.
The automatic feature can be interrupted
before the window is fully open by briefly
lifting up on the switch as the window moves
down.
AIC1079AIC1080
POWER WINDOWS
Instruments and controls2-21
ZX
Page 107 of 286

Locking passenger's window
When the power window lock-out button is
pushed in, the passenger's window cannot
be opened or closed. Push the power win-
dow lock-out button again to cancel this
feature.
The passenger side switch opens or closes
the passenger window only. To open the
window, press the switch down. To close
the window, lift the switch up.The sunroof operates when the ignition key
is in the ON position, or for 15 minutes after
the ignition key is turned to the OFF posi-
tion. If the driver's or passenger's door is
opened during this 15 minute period, power
to the sunroof is cancelled.
NOTE:
If the battery is discharged or is discon-
nected, the sunroof may not operate cor-
rectly, and must be reset.
To reset a fully or partially open sunroof:
1. Push and hold the UP/CLOSE side of the
sunroof switch until the sunroof closes,and tilts up to the fully open position, then
release the switch.
2. Push and hold the DOWN/OPEN side of
the switch until the sunroof lowers com-
pletely. The sunroof is now reset and
should operate correctly.
To reset a fully or partially tilted, or closed
sunroof:
1. Push and hold the UP/CLOSE side of the
sunroof switch until the sunroof stops
tilting up, then release the switch.
2. Push and hold the DOWN/OPEN side of
the switch until the sunroof lowers com-
pletely. The sunroof is now reset and
should operate correctly.
Sliding the sunroof
To open the roof, push and hold the OPEN
side of the switch.
To close the roof, push and hold the CLOSE
side.
Tilting the sunroof
To tilt up, first close the sunroof, then push the
UP side of the switch. To close the sunroof,
push the DOWN side of the switch.
AIC1081AIC1066
SUNROOF (if so equipped)
2-22Instruments and controls
ZX
Page 108 of 286

Sun shade
Open and close the sun shade by sliding it
forward or backward. The shade opens
when the sunroof opens, but it must be
closed manually.
WARNING
cIn an accident you could be thrown
from the vehicle through an open
sunroof. Always use seat belts and
child restraints.
c
Do not allow anyone to stand up or
extend any portion of their body out of
the opening while the vehicle is in
motion or while the sunroof is closing.
CAUTION
c
Remove water drops, snow, ice or
sand from the sunroof before opening.
cDo not place any heavy object on the
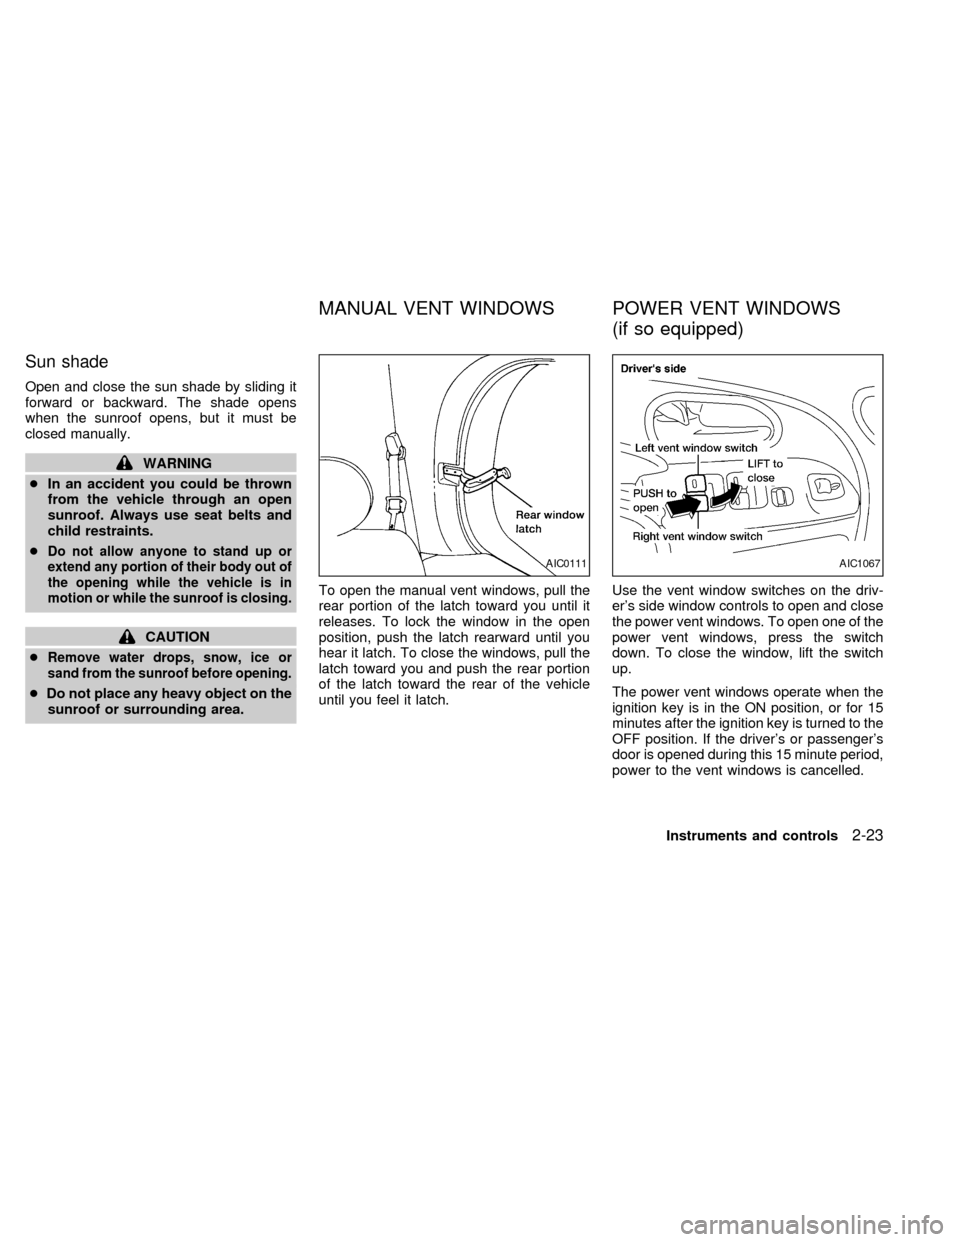
sunroof or surrounding area.To open the manual vent windows, pull the
rear portion of the latch toward you until it
releases. To lock the window in the open
position, push the latch rearward until you
hear it latch. To close the windows, pull the
latch toward you and push the rear portion
of the latch toward the rear of the vehicle
until you feel it latch.Use the vent window switches on the driv-
er's side window controls to open and close
the power vent windows. To open one of the
power vent windows, press the switch
down. To close the window, lift the switch
up.
The power vent windows operate when the
ignition key is in the ON position, or for 15
minutes after the ignition key is turned to the
OFF position. If the driver's or passenger's
door is opened during this 15 minute period,
power to the vent windows is cancelled.
AIC0111AIC1067
MANUAL VENT WINDOWS POWER VENT WINDOWS
(if so equipped)
Instruments and controls2-23
ZX
Page 109 of 286

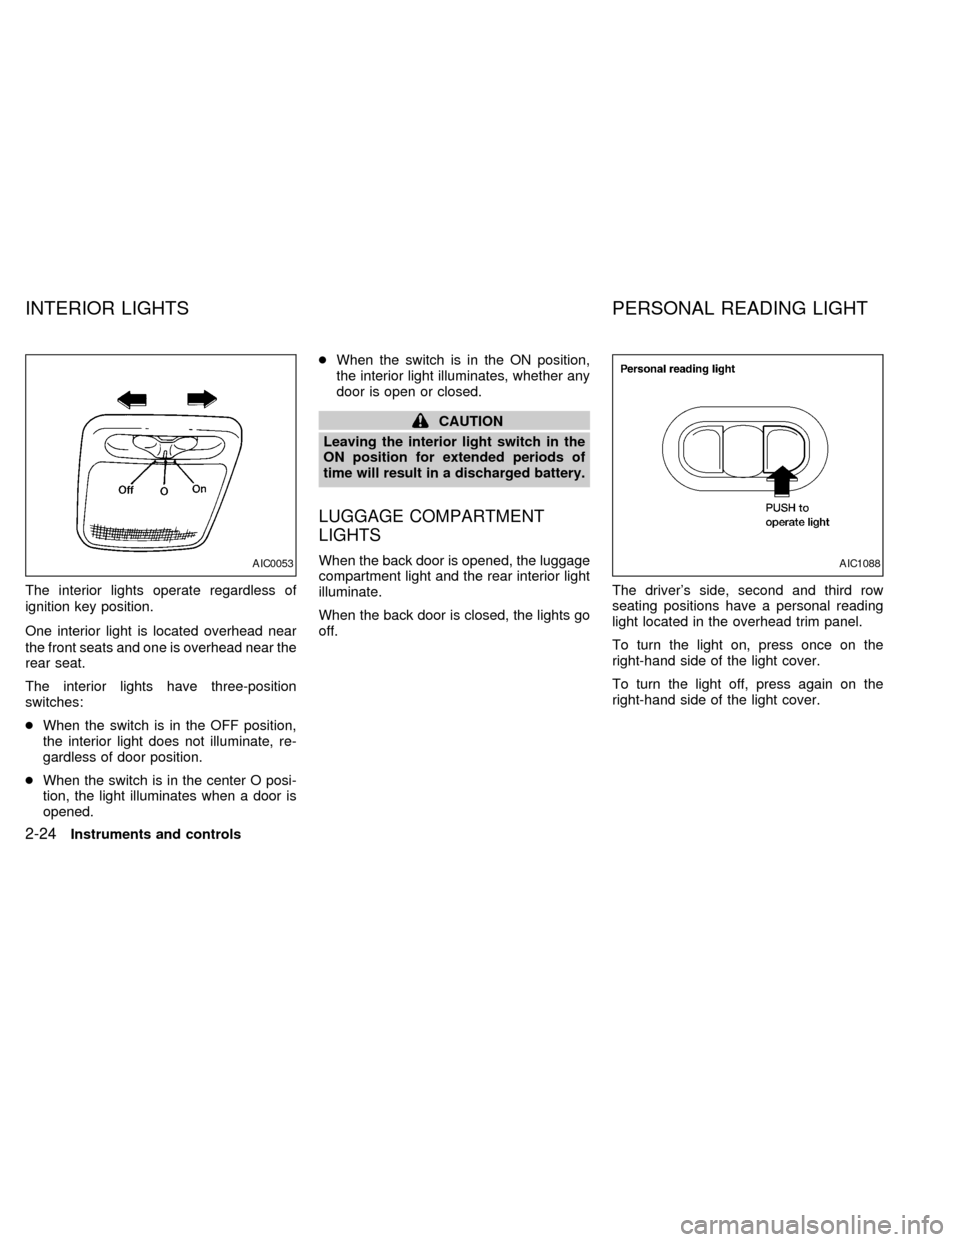
The interior lights operate regardless of
ignition key position.
One interior light is located overhead near
the front seats and one is overhead near the
rear seat.
The interior lights have three-position
switches:
cWhen the switch is in the OFF position,
the interior light does not illuminate, re-
gardless of door position.
cWhen the switch is in the center O posi-
tion, the light illuminates when a door is
opened.cWhen the switch is in the ON position,
the interior light illuminates, whether any
door is open or closed.
CAUTION
Leaving the interior light switch in the
ON position for extended periods of
time will result in a discharged battery.
LUGGAGE COMPARTMENT
LIGHTS
When the back door is opened, the luggage
compartment light and the rear interior light
illuminate.
When the back door is closed, the lights go
off.The driver's side, second and third row
seating positions have a personal reading
light located in the overhead trim panel.
To turn the light on, press once on the
right-hand side of the light cover.
To turn the light off, press again on the
right-hand side of the light cover.AIC0053AIC1088
INTERIOR LIGHTS PERSONAL READING LIGHT
2-24Instruments and controls
ZX
Page 110 of 286

To turn on the map lights, press the
switches. To turn them off, press the
switches again.
The interior lights, the cargo light, the glove
box light, the stepwell lights near the sliding
doors and on the front doors, and the foot-
well lights near the driver's and front pas-
senger's feet illuminate when the front or
sliding doors are opened. Once the doors
are closed, these lights gradually dim to off
within 30 seconds or turn off immediately
when the key is turned to the ON position.
Battery saver
If the vehicle doors are not fully closed and
the interior lights remain illuminated, they
eventually turn off automatically to prevent
the battery from becoming discharged. If the
interior lights are left in the ON position, with
all doors closed, they will automatically turn
off after approximately 30 minutes. Lights
that illuminate when the front or sliding
doors are opened turn off after approxi-
mately 30 minutes. Lights that illuminate
when the back door is opened turn off after
approximately 60 minutes. Vanity mirror
lights are not part of the battery saver
system.
If the personal reading lights are left on after
the key is removed from the ignition, they
will automatically turn off after approxi-
mately 30 minutes.Some vehicles are equipped with an addi-
tional storage compartment in the map light
unit. This storage compartment has been
specially designed to hold some garage
door transmitters. Some transmitters may
not fit. When properly installed, the garage
door transmitter can be activated while it is
within the storage compartment.
AIC1097AIC1089
MAP LIGHTS ILLUMINATED ENTRY
SYSTEMSTORAGE COMPARTMENT
FOR GARAGE DOOR
TRANSMITTER (if so equipped)
Instruments and controls2-25
ZX
Page 116 of 286

3 Pre-driving checks and adjustments
Key .........................................................................3-2
Door locks ..............................................................3-2
Manual door lock ....................................................3-3
Child safety sliding door lock .................................3-6
Power door lock (if so equipped) ...........................3-7
Multi-remote control system (if so equipped).........3-9
Battery replacement .............................................3-11
Illuminated entry system ......................................3-12
Hood release ........................................................3-12
Glove box .............................................................3-13
Front seat convenience net .................................3-14
Rear door lock ......................................................3-15
Cargo net (if so equipped) ...................................3-16Parcel shelf (if so equipped) ................................3-17
Luggage rack (if so equipped) .............................3-19
Fuel filler lid and cap ............................................3-20
Tilting steering wheel ...........................................3-21
Memory driver seat and mirrors (if so
equipped) .............................................................3-21
Multi-remote controller system entry ....................3-21
Memory driver seat and mirror buttons................3-22
Outside mirror control...........................................3-23
Outside mirrors .....................................................3-24
Inside mirror .........................................................3-24
Vanity mirror .........................................................3-24
ZX