1999 LAND ROVER DISCOVERY brake fluid
[x] Cancel search: brake fluidPage 837 of 1529

REAR SUSPENSION
64-28 REPAIRS
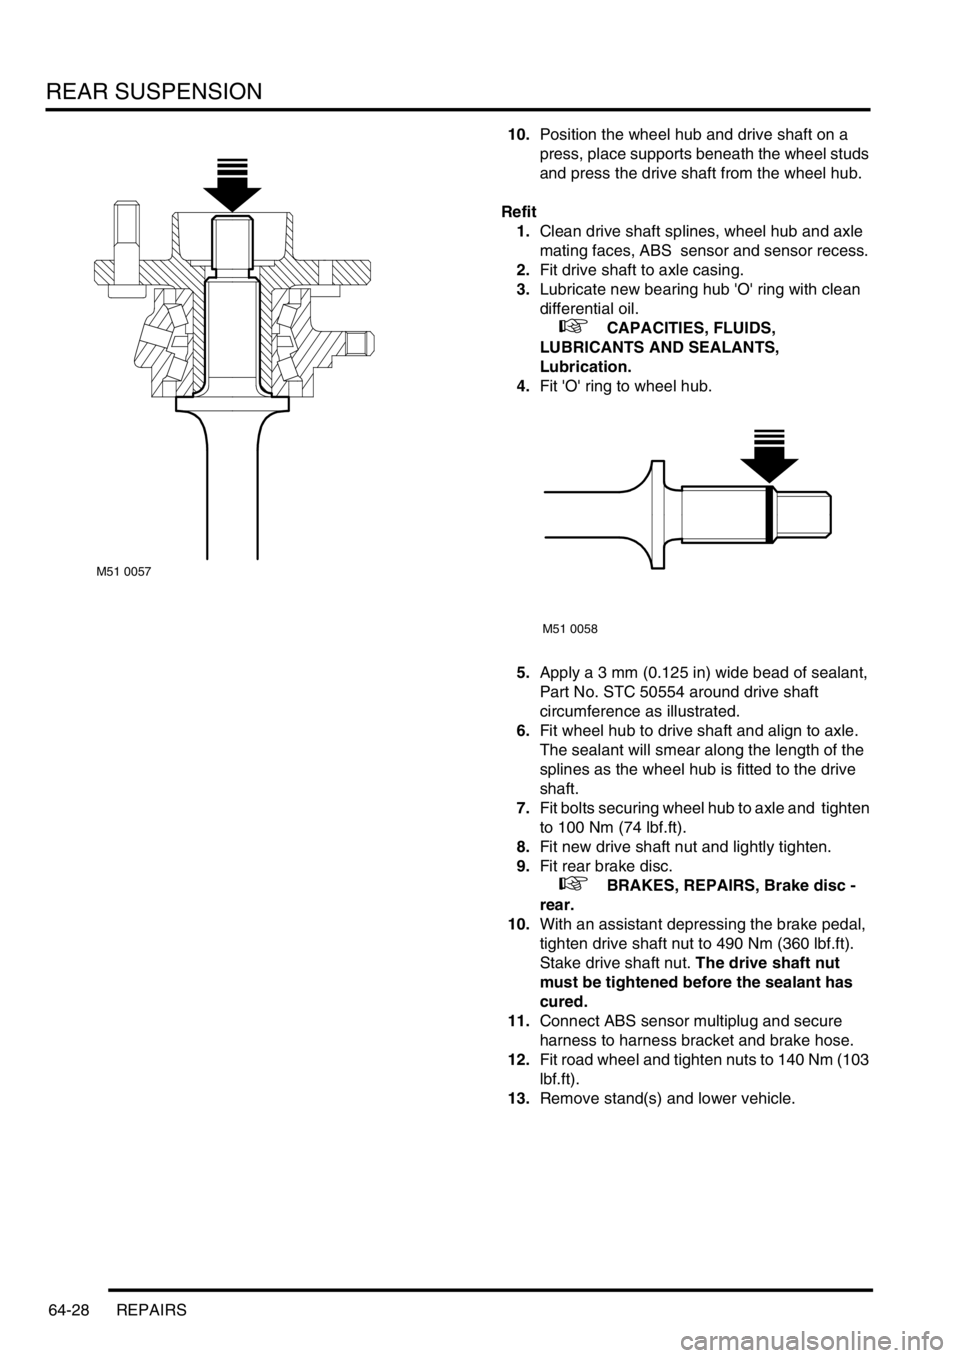
10.Position the wheel hub and drive shaft on a
press, place supports beneath the wheel studs
and press the drive shaft from the wheel hub.
Refit
1.Clean drive shaft splines, wheel hub and axle
mating faces, ABS sensor and sensor recess.
2.Fit drive shaft to axle casing.
3.Lubricate new bearing hub 'O' ring with clean
differential oil.
+ CAPACITIES, FLUIDS,
LUBRICANTS AND SEALANTS,
Lubrication.
4.Fit 'O' ring to wheel hub.
5.Apply a 3 mm (0.125 in) wide bead of sealant,
Part No. STC 50554 around drive shaft
circumference as illustrated.
6.Fit wheel hub to drive shaft and align to axle.
The sealant will smear along the length of the
splines as the wheel hub is fitted to the drive
shaft.
7.Fit bolts securing wheel hub to axle and tighten
to 100 Nm (74 lbf.ft).
8.Fit new drive shaft nut and lightly tighten.
9.Fit rear brake disc.
+ BRAKES, REPAIRS, Brake disc -
rear.
10.With an assistant depressing the brake pedal,
tighten drive shaft nut to 490 Nm (360 lbf.ft).
Stake drive shaft nut. The drive shaft nut
must be tightened before the sealant has
cured.
11.Connect ABS sensor multiplug and secure
harness to harness bracket and brake hose.
12.Fit road wheel and tighten nuts to 140 Nm (103
lbf.ft).
13.Remove stand(s) and lower vehicle.
M51 0057
M51 0058
Page 857 of 1529

BRAKES
70-4 DESCRIPTION AND OPERATION
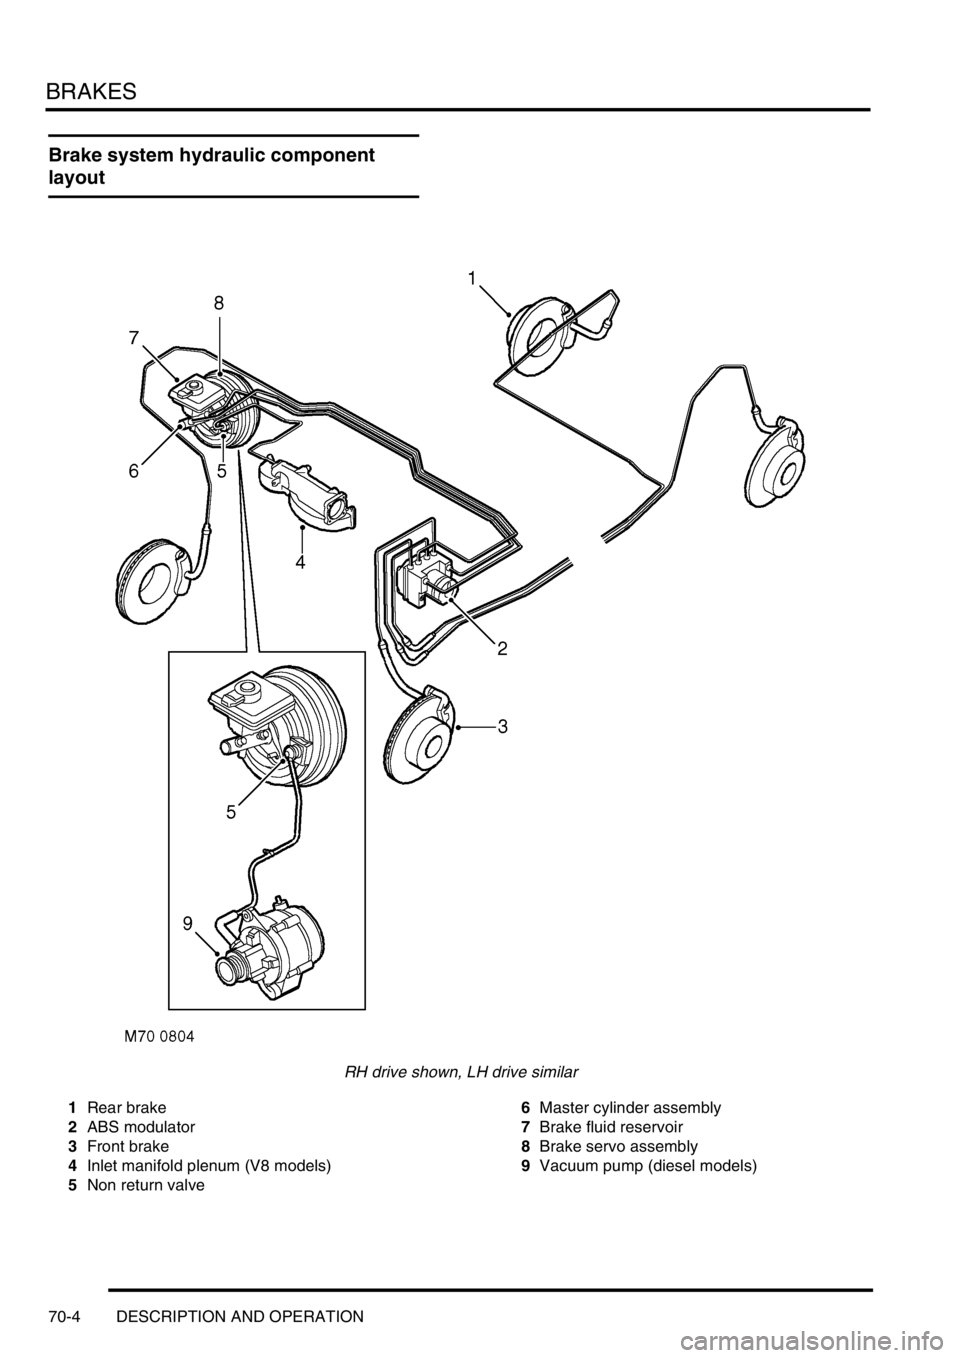
Brake system hydraulic component
layout
RH drive shown, LH drive similar
1Rear brake
2ABS modulator
3Front brake
4Inlet manifold plenum (V8 models)
5Non return valve6Master cylinder assembly
7Brake fluid reservoir
8Brake servo assembly
9Vacuum pump (diesel models)
Page 864 of 1529

BRAKES
DESCRIPTION AND OPERATION 70-11
Master cylinder assembly
Section through master cylinder assembly
1Reservoir filler cap
2Switch float
3Brake fluid reservoir
4Primary feed hole
5Valve pin
6Primary centre valve
7Primary piston
8Primary spring9Pressure chamber
10Cylinder
11Valve pin
12Secondary centre valve
13Secondary spring
14Pressure chamber
15Secondary piston
16Secondary feed hole
The master cylinder assembly produces hydraulic pressure to operate the brakes when the brake pedal is pressed.
The assembly is attached to the front of the brake servo assembly, and comprises a cylinder containing two pistons
in tandem. The rear piston produces pressure for the primary circuit and the front piston produces pressure for the
secondary circuit. A brake fluid reservoir is installed on top of the cylinder. The reservoir is internally divided to provide
an independent supply of fluid to each brake circuit, and so prevent a single fluid leak from disabling both primary and
secondary brake circuits. Should a failure occur in one circuit, the remaining circuit will still operate effectively,
although brake pedal travel and vehicle braking distances will increase. If the fluid level in the reservoir is too low, a
float operated switch in the reservoir filler cap connects an earth to the instrument pack, which illuminates the brake
warning lamp.
Page 865 of 1529

BRAKES
70-12 DESCRIPTION AND OPERATION
Brakes applied
When the brake pedal is pressed, the output rod in the brake servo assembly pushes the primary piston along the
cylinder bore. This produces pressure in the primary pressure chamber which, in conjunction with the primary spring,
overcomes the secondary spring and simultaneously moves the secondary piston along the cylinder bore. The initial
movement of the pistons, away from the piston stops, closes the primary and secondary centre valves. Further
movement of the pistons then pressurizes the fluid in the primary and secondary pressure chambers, and thus the
brake circuits. The fluid in the chambers behind the pistons is unaffected by movement of the pistons and can flow
unrestricted through the feed holes between the chambers and the reservoir.
Brakes released
When the brake pedal is released, the primary and secondary springs push the pistons back down the bore of the
cylinder. The rapid movement of the pistons cause partial vacuums to form in the pressure chambers, which opens
the centre valves and allows fluid to circulate unrestricted between the two hydraulic circuits and the reservoir. When
the pistons reach the brakes off position, the centre valves are held open by the piston stops.
Page 867 of 1529

BRAKES
70-14 DESCRIPTION AND OPERATION
The ABS modulator is a 4 channel unit that controls the supply of hydraulic pressure to the brakes in response to
inputs from the SLABS ECU. The modulator is attached by three mounting bushes to a bracket on the LH inner front
wing, and connected to the primary and secondary hydraulic circuits downstream of the master cylinder assembly.
Three electrical connectors link the ABS modulator to the vehicle wiring.
Passages within the ABS modulator, separated into primary and secondary circuits, connect to the various internal
components that control the supply of hydraulic pressure to the brakes:
lShuttle valves and non return valves control the flow through the internal circuits.
lShuttle valve switches, connected in series to the SLABS ECU, provide a brakes on/off signal.
lA damper chamber and restrictor are included in each circuit to refine system operation.
lInlet and outlet solenoid valves control the flow to the individual brakes.
lAn expansion chamber is connected to each circuit to absorb pressure.
lA return pump is connected to both circuits to provide a pressure source.
The ABS modulator has three operating modes: Normal braking, ABS braking and active braking.
Normal braking mode
When the brake pedal is pressed, pressurised fluid from the master cylinder assembly moves the shuttle valves to
open lines 'A' and close the shuttle valve switches. Pressurised fluid then flows through the open inlet solenoid valves
to operate the brakes. The closed shuttle valve switches supply a brakes on signal to the SLABS ECU. If the SLABS
ECU determines that EBD is necessary, it energises the inlet solenoid valves for the brakes of one axle. The inlet
solenoid valves close to isolate the brakes from any further increase in hydraulic pressure.
ABS braking mode
When in the normal braking mode, if the SLABS ECU determines that ABS braking is necessary, it energises the inlet
and outlet solenoid valves of the related brake and starts the return pump. The inlet solenoid valve closes to isolate
the brake from pressurised fluid; the outlet solenoid valve opens to release pressure from the brake into the expansion
chamber and the return pump circuit. The brake releases and the wheel begins to accelerate. The SLABS ECU then
operates the inlet and outlet solenoid valves to control the supply of hydraulic pressure to the brake and apply the
maximum braking effort (for the available traction) without locking the wheel.
Active braking mode
When ETC or HDC are enabled, and the SLABS ECU determines that active braking is necessary, it starts the return
pump. Hydraulic fluid, drawn from the reservoirs through the master cylinder, shuttle valves and lines 'B', is
pressurised by the return pump and supplied to lines 'A'. The SLABS ECU then operates the inlet and outlet solenoid
valves to control the supply of hydraulic pressure to the individual brakes and slow the wheel(s).
Page 872 of 1529

BRAKES
DESCRIPTION AND OPERATION 70-19
ABS sensors
The ABS sensors supply the SLABS ECU with a sinusoidal speed signal from each wheel. An inductive sensor,
installed in the hub bearing of each wheel, senses off a 60 tooth exciter ring integrated into the inner race of the hub
bearing. Each ABS sensor has a fly-lead connecting it to the vehicle wiring.
HDC switch
The HDC switch is a latching push switch installed on the fascia, in the switchpack inboard of the steering wheel.
When pushed in, the switch connects an ignition supply to the SLABS ECU to initiate HDC.
Warning indications
The SLABS ECU operates audible and visual warnings to convey brake system status.
Audible warning
A repetitive chime, at a frequency of 2 Hz, draws attention to warning lamp indications. The chime is produced on the
speaker in the instrument pack.
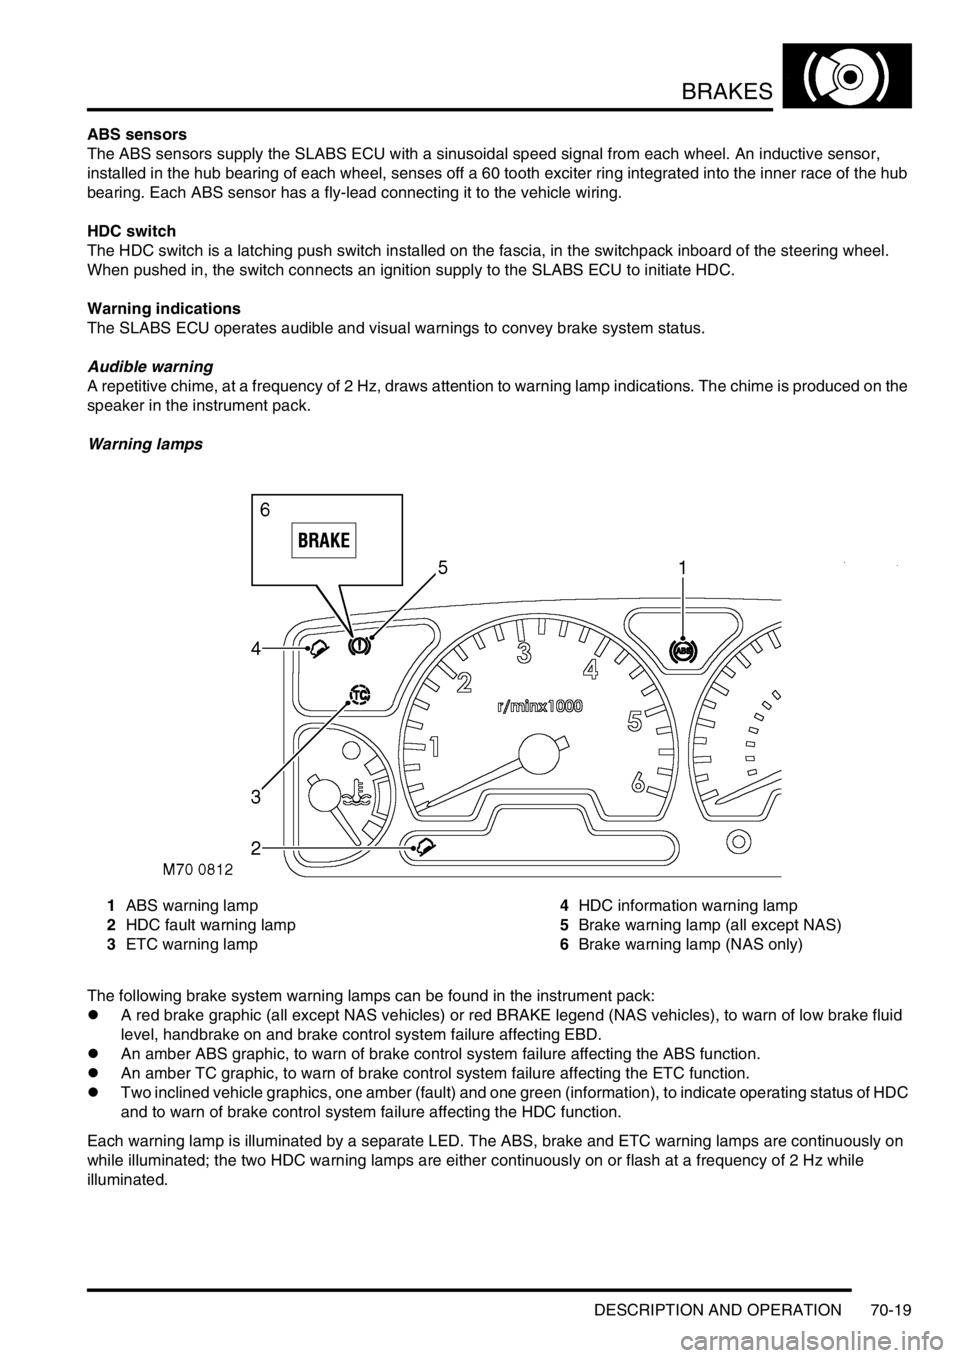
Warning lamps
1ABS warning lamp
2HDC fault warning lamp
3ETC warning lamp4HDC information warning lamp
5Brake warning lamp (all except NAS)
6Brake warning lamp (NAS only)
The following brake system warning lamps can be found in the instrument pack:
lA red brake graphic (all except NAS vehicles) or red BRAKE legend (NAS vehicles), to warn of low brake fluid
level, handbrake on and brake control system failure affecting EBD.
lAn amber ABS graphic, to warn of brake control system failure affecting the ABS function.
lAn amber TC graphic, to warn of brake control system failure affecting the ETC function.
lTwo inclined vehicle graphics, one amber (fault) and one green (information), to indicate operating status of HDC
and to warn of brake control system failure affecting the HDC function.
Each warning lamp is illuminated by a separate LED. The ABS, brake and ETC warning lamps are continuously on
while illuminated; the two HDC warning lamps are either continuously on or flash at a frequency of 2 Hz while
illuminated.
Page 883 of 1529

BRAKES
70-30 ADJUSTMENTS
Brake system bleeding
$% 70.25.02
Bleeding of the brake system can be carried out
using the procedures given on TestBook, or by
following the manual procedure given below.
WARNING: If any components upstream of brake
modulator, including the modulator itself are
replaced, the brake system must be bled using
the procedure on TestBook/T4, to ensure that all
air is expelled from the new component(s).
WARNING: Do not allow brake fluid to come into
contact with eyes or skin.
Bleed
NOTE: This procedure covers bleeding the
complete system, but where only the primary or
secondary circuit have been disturbed in
isolation, it should only be necessary to bleed
that circuit. Partial bleeding of the hydraulic
system is only permissible if a brake pipe or
hose has been disconnected with only minor
loss of fluid.
1.Do not allow fluid level in master cylinder to fall
below 'MIN' mark during bleeding.
2.Do not fill reservoir above 'MAX' level.
3.Raise front and rear of vehicle.
WARNING: Do not work on or under a
vehicle supported only by a jack. Always
support the vehicle on safety stands.
4.Check all pipe and hose connections are tight
and there are no signs of leakage.
5.Top-up fluid level in brake reservoir to 'MAX'
mark.
WARNING: Do not allow dirt or foreign
liquids to enter the reservoir. Use only new
DOT 4 brake fluid from airtight containers.
Do not mix brands of brake fluid as they
may not be compatible.6.Attach bleed tube to the bleed screw on front
brake caliper on the passenger side, submerge
free end in a clear container containing brake
fluid.
7.Apply pressure to brake pedal several times,
then apply steady pressure.
8.Loosen bleed screw to release brake fluid and
air. Allow pedal to return unassisted.
9.Depress brake pedal steadily through its full
stroke and allow to return unassisted. Repeat
procedure until a flow of clean air-free fluid is
purged into container then, whilst holding
pedal at end of downward stroke, tighten brake
caliper bleed screw to 10 Nm (7 lbf.ft).
CAUTION: Ensure the fluid in the reservoir
is maintained between the minimum and
maximum levels throughout the bleed
procedure using new brake fluid.
10.Top-up brake fluid level to 'MAX' mark.
Page 888 of 1529

BRAKES
REPAIRS 70-35
Master cylinder - brake
$% 70.30.08
Remove
1.Disconnect multiplug from fluid level switch.
2.Position cloth under master cylinder to absorb
spilled fluid.
CAUTION: Brake fluid will damage paint
finished surfaces. If spilled, immediately
remove fluid and clean area with water.
3.Disconnect secondary system pipe union from
master cylinder.
4.Disconnect primary system pipe union from
master cylinder.
5. Manual gearbox only: Release clip and
disconnect clutch fluid supply hose from
reservoir.
CAUTION: Always fit plugs to open
connections to prevent contamination.
6.Remove 2 nuts and washers securing master
cylinder to servo.
7.Remove master cylinder. Refit
1.Clean master cylinder and servo mating
surfaces.
2.Align push rod and position master cylinder to
servo.
3.Fit nuts and washers securing master cylinder
to servo and tighten to 25 Nm (18 lbf.ft).
4.Connect primary and secondary brake pipes,
and tighten unions to 25 Nm (18 lbf.ft).
5. Manual gearbox only: Connect clutch fluid
hose to reservoir, secure with clip.
6.Connect fluid level switch multiplug.
7.Bleed brake system using TestBook/T4.
+ BRAKES, ADJUSTMENTS, Brake
system bleeding.