1999 LAND ROVER DISCOVERY ABS
[x] Cancel search: ABSPage 1304 of 1529

BODY CONTROL UNIT
DESCRIPTION AND OPERATION 86-3-17
The existence of an intermediate state causes a fault code to be detected by the BCU. To reduce the chances of the
fault condition occurring while changing selector lever position, the inputs are debounced and only considered valid
when they have existed for at least 33 ms.
Transmission neutral selector
The transmission neutral sensor provides an earth signal to the BCU when the transfer box is in neutral. The earth
signal causes the BCU to operate an audible warning when the transfer box is in neutral with the ignition switched on.
+ TRANSFER BOX - LT230SE, DESCRIPTION AND OPERATION, Description.
Self levelling suspension and ABS
The BCU communicates with the SLABS ECU for several functions:
lAn output is provided from the SLABS ECU to the BCU to provide the logic conditions for issuing the SLS audible
warning.
lThe BCU receives an input from the SLABS ECU relating to the raise/ lower command from the remote handset.
+ REAR SUSPENSION, DESCRIPTION AND OPERATION, Description - SLS.
Hill descent control
The BCU provides an output signal to the SLABS ECU for automatic transmission in neutral for HDC control. The
BCU checks the status of the ignition and 'gearbox state' inputs and provides a 'Neutral selected' output. If the ignition
is on and 'gearbox state' is Neutral, the 'Neutral selected' output is on, otherwise 'Neutral selected' is off.
+ BRAKES, DESCRIPTION AND OPERATION, Description.
Heated screens
The Heated Front Screen (HFS) is fitted for some market destinations and is operated from a non-latching switch
located on the instrument pack cowl. The BCU will only allow the heated front screen to operate when the engine is
running and controls the time-out period for switching the circuit off.
The heated front screen operation can also be controlled from the Automatic Temperature Control (ATC) ECU on
vehicles fitted with air conditioning.
The heated rear window will only function when the engine is running, and is operated by a non-latching switch on the
instrument pack cowl. The heated rear window can also be operated by the ATC ECU on vehicles fitted with air
conditioning.
Interior courtesy lamps
The BCU controls the operation of the interior courtesy lamps. The courtesy lamps are situated in the front, mid and
rear areas of the headlining.
Fuel flap actuator
The BCU provides an earth path to the fuel flap release solenoid to allow the fuel filler flap to be opened. This is only
allowed if the alarm system is not set and all other conditions have been satisfied. The fuel flap release switch is
located in the fascia switch pack on vehicles up to 2003 model year or in the instrument pack binacle on vehicles from
2003 model year. The switch receives a voltage supply from the passenger compartment fuse box.
Page 1305 of 1529

BODY CONTROL UNIT
86-3-18 DESCRIPTION AND OPERATION
Audible warnings
The BCU can request the instrument pack to generate an audible warning in response to conditions it has detected
and which need to be drawn to the driver's attention. One of six different audible warnings can be requested by the
BCU.
Sound request number Sound functions Priority (1 = lowest, 6 = highest)
0Off 1
1 Seat belt warning 6
2Key-in warning 3
3 SLABS/ HDC warning 4
4 Transfer box in neutral warning 5
5 Lights on warning 2
Page 1321 of 1529

BODY CONTROL UNIT
86-3-34 DESCRIPTION AND OPERATION
Key-in warning
The BCU can be programmed to one of two options:
lOption 1 – no timeout.
lOption 2 – no key-in warning.
The BCU issues an audible warning No. 2 request, depending on the status of the following inputs:
lIgnition state.
lIgnition key inserted.
lDriver's door open.
If the key-in warning is programmed into the BCU for operation, audible warning No.2 will be requested if the ignition
switch is off, the ignition key inserted signal is on and the driver's door open signal is ON.
In the event of a communications link failure occurring, the audible warning request is not sent to the instrument pack.
SLABS HDC warning
The BCU issues an audible warning No. 3 request, depending on the status of the following inputs:
lIgnition state.
lSLABS HDC warning.
The SLABS warning transmitted by the SLABS ECU is a 2 Hz signal, audible warning No. 3 is requested on every
falling edge of this signal. If the signal from the SLABS ECU stays low for more than 650 ms, audible warning No. 3
is requested every 2 seconds, for 30 seconds, while the signal stays low.
In the event of a communications link failure occurring, the audible warning request is not sent to the instrument pack.
Transfer box in neutral warning
If the transfer box is in the neutral position and the ignition switch is on, the BCU issues an audible warning No. 4
request. The BCU checks for the following inputs:
lTransfer box neutral selected.
lIgnition on.
The transfer box in neutral warning is activated by communicating with the instrument pack via the serial datalink. If
a communications link failure occurs while the transfer box in neutral warning is active, the audible warning will not
operate.
Lights on warning
If the ignition switch is off while the side lamps or headlamps on and the driver's door is opened, the BCU issues an
audible warning No. 5 request.
The BCU checks for the following inputs:
lDriver's door open.
lIgnition on.
lSide lamps.
lDipped beam state.
lMain beam state.
The lights on warning is activated by communicating with the instrument pack via the serial datalink. If a
communications link failure occurs while the lights on warning is active, the audible warning will not operate.
SLABS raise/lower
Before enabling a SLS vehicle raise/ lower request, the BCU checks the logical condition of the following inputs:
lIgnition state.
lSLABS raise request.
lSLABS lower request.
If the ignition switch is in position 0 or I, the vehicle raise/ lower request is off.
With the ignition switch in position II, and the 'SLABS raise' request and 'SLABS lower' request both off, the vehicle
raise/ lower request output is driven at 25 Hz with a 50% duty cycle and the vehicle height remains unchanged.
If the 'SLABS lower' request input is on, the vehicle raise/lower request output is driven at 25 Hz with a 25% duty cycle,
lowering the vehicle.
If the 'SLABS raise' request input is on, the vehicle raise/lower request output is driven at a 25 Hz with a 75% duty
cycle.
Page 1370 of 1529

IN CAR ENTERTAINMENT
DESCRIPTION AND OPERATION 86-6-3
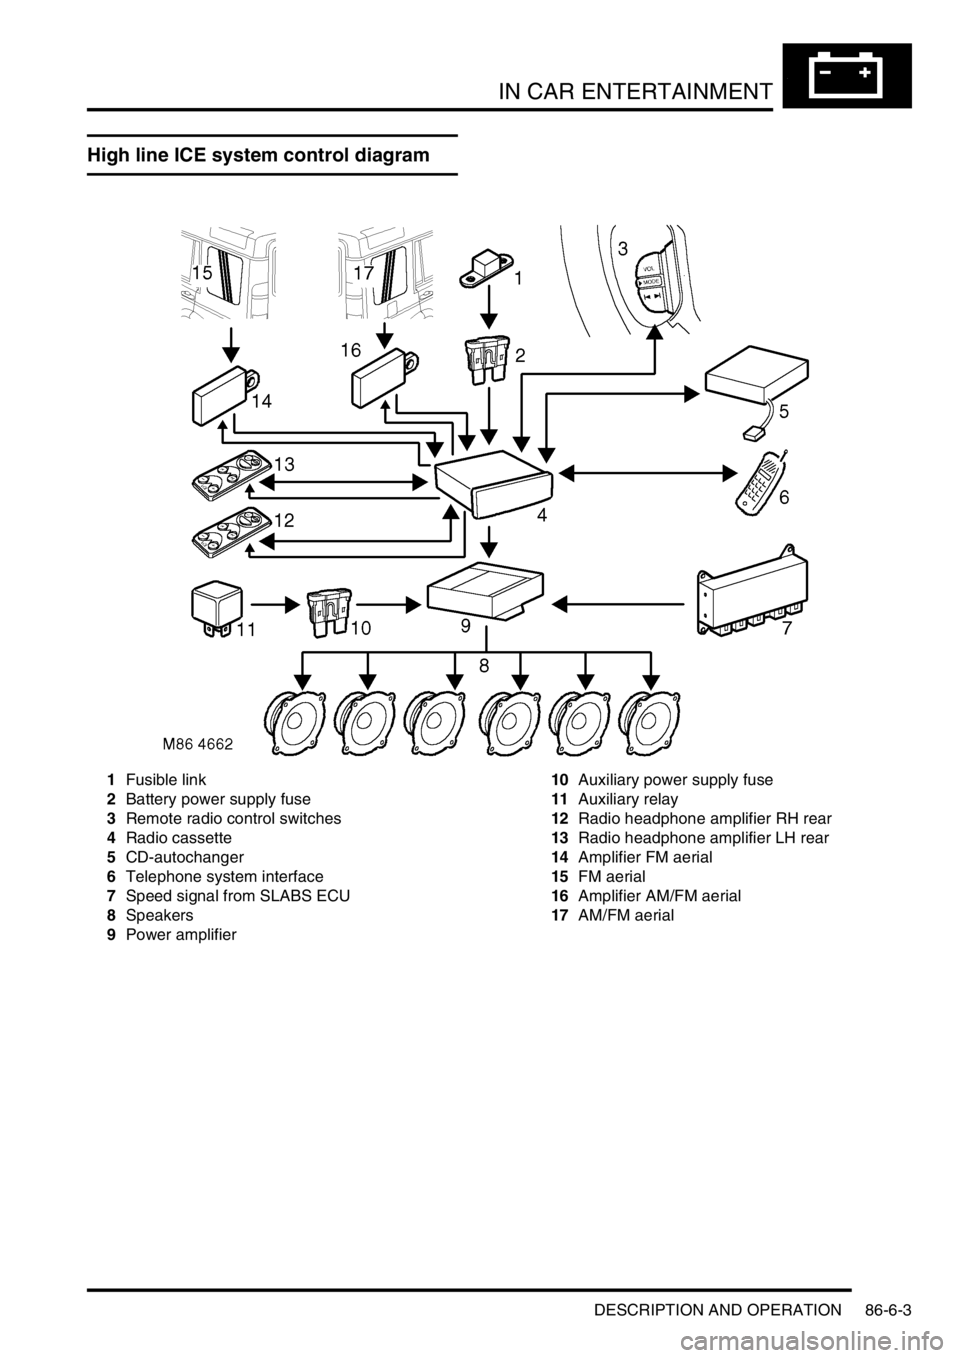
High line ICE system control diagram
1Fusible link
2Battery power supply fuse
3Remote radio control switches
4Radio cassette
5CD-autochanger
6Telephone system interface
7Speed signal from SLABS ECU
8Speakers
9Power amplifier10Auxiliary power supply fuse
11Auxiliary relay
12Radio headphone amplifier RH rear
13Radio headphone amplifier LH rear
14Amplifier FM aerial
15FM aerial
16Amplifier AM/FM aerial
17AM/FM aerial
Page 1378 of 1529

IN CAR ENTERTAINMENT
DESCRIPTION AND OPERATION 86-6-11
Automatic volume control (High line system only)
An automatic base and treble volume control feature compensates for increases in interior road/transmission noise.
A road speed signal is monitored by the power amplifier, the signal is supplied by the SLABS ECU.
+ BRAKES, DESCRIPTION AND OPERATION, Description.The power amplifier boosts the levels of base
and treble as road speed increases. This system ensures that the apparent volume of sound remains constant and is
not affected by increases in the background noise in the vehicle.
Speakers
Some vehicles will not have all the speakers, the type and location of speakers fitted depends on the trim level and
ICE options specified for the vehicle.
A-post speakers LH/RH (if fitted)
The A-post speakers are located in the A-post trim on each side of the windscreen, and are each protected by a metal
grille. The speakers are held from the rear by a bayonet clip that clamps the speaker on to the A-post trim. The A-post
speakers are a high range type and have a power rating of:
lMid line system A-post speakers have a power rating of 15 watts and an impedance of 4 Ω.
lHigh line system A-post speakers have a power rating of 30 watts and an impedance of 4 Ω.
Upper front and rear door speakers LH/RH (high line system only)
The upper door speakers are located in the upper door trim, the speaker is protected by an integral metal grille. The
speaker is held in by a threaded ring that clamps the speaker from the rear onto the door trim. The upper door speaker
is a mid-range type and has a power rating of 30 watts and an impedance of 4 Ω.
Lower front door speakers LH/RH
The lower front door speaker is located in the front end of the lower (pocket) trim and is secured by three self tapping
screws. The speaker is protected by a clip on circular metal grille. The type of lower front door speakers fitted depends
on trim level and market:
lThe base and mid line systems are fitted with full-range door speakers with a power rating of 15 watts and an
impedance of 4 Ω
lThe high line system is fitted with a low-range door speaker with a power rating of 30 watts and an impedance
of 4 Ω.
Lower rear door speaker LH/RH
The lower rear door speaker is located in the lower door trim and is secured by three self tapping screws. The speaker
is protected by a clip on metal grille. The type of lower rear door speaker fitted depends on trim level and market:
lThe base and mid line systems are fitted with full-range door speakers with a power rating of 15 watts and an
impedance of 4 Ω
lThe high line system is fitted with a low-range door speaker with a power rating of 30 watts and an impedance
of 4 Ω.
Low range tail door speakers (high line system only)
The low range tail door speaker are located in a plastic casing in the lower door trim. Each of the two speakers is
secured to the casing with four self tapping screws. The casing is secured to the lower door structure with eight bolts.
The tail door trim surrounds the casing, the front of the casing is covered by a metal grill that is secured with six
screws. The low range tail door speakers have a power rating of 30 watts and has an impedance of 4 Ω.
DESCRIPTION AND OPERAT ION
Page 1424 of 1529

HARNESSES
REPAIRS 86-7-19
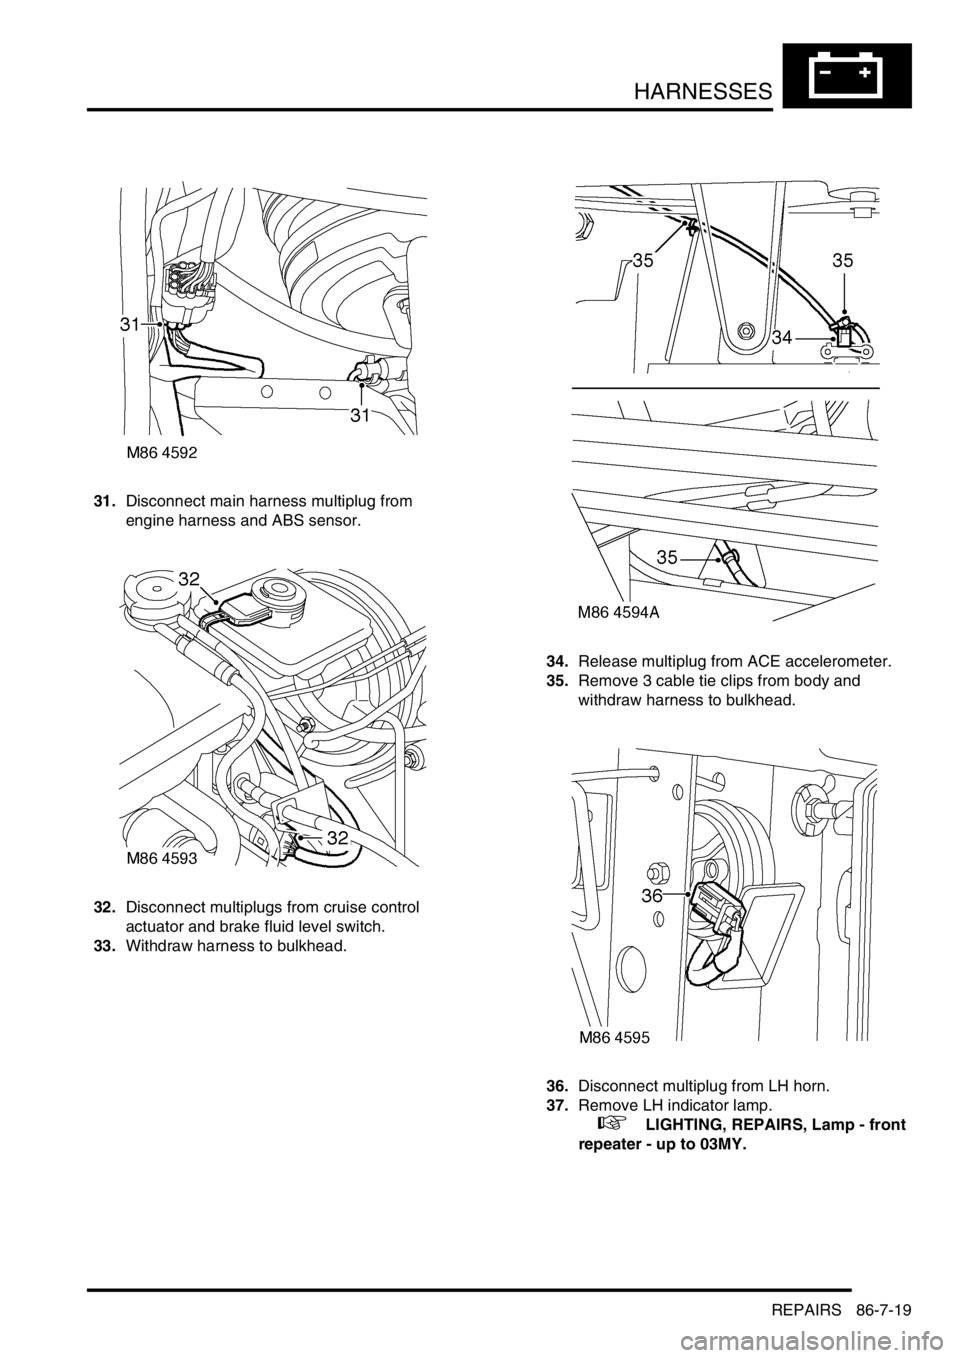
31.Disconnect main harness multiplug from
engine harness and ABS sensor.
32.Disconnect multiplugs from cruise control
actuator and brake fluid level switch.
33.Withdraw harness to bulkhead.34.Release multiplug from ACE accelerometer.
35.Remove 3 cable tie clips from body and
withdraw harness to bulkhead.
36.Disconnect multiplug from LH horn.
37.Remove LH indicator lamp.
+ LIGHTING, REPAIRS, Lamp - front
repeater - up to 03MY.
Page 1426 of 1529

HARNESSES
REPAIRS 86-7-21
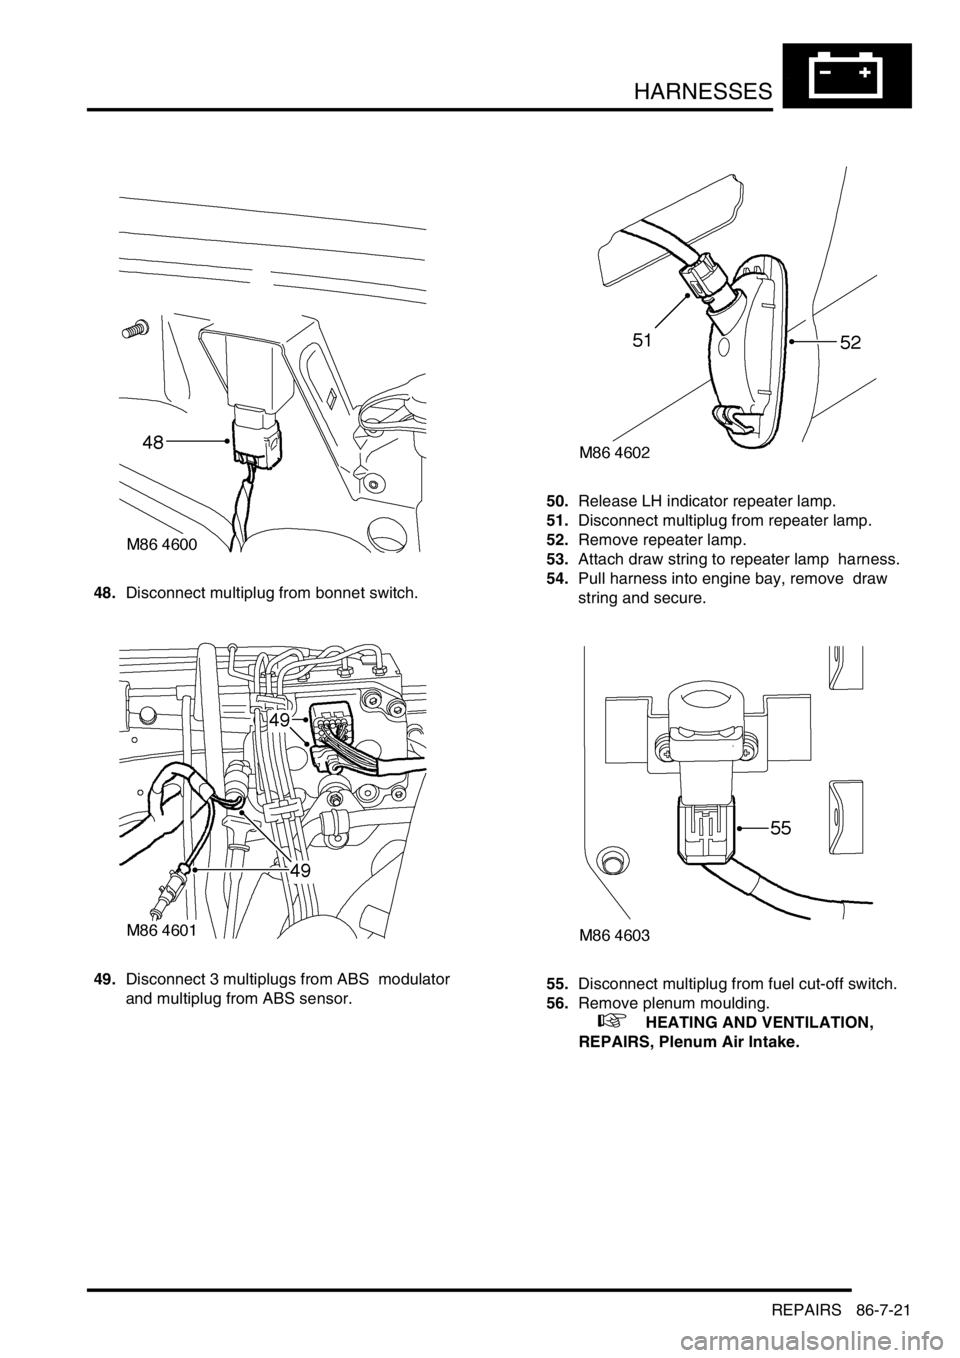
48.Disconnect multiplug from bonnet switch.
49.Disconnect 3 multiplugs from ABS modulator
and multiplug from ABS sensor. 50.Release LH indicator repeater lamp.
51.Disconnect multiplug from repeater lamp.
52.Remove repeater lamp.
53.Attach draw string to repeater lamp harness.
54.Pull harness into engine bay, remove draw
string and secure.
55.Disconnect multiplug from fuel cut-off switch.
56.Remove plenum moulding.
+ HEATING AND VENTILATION,
REPAIRS, Plenum Air Intake.
Page 1432 of 1529

HARNESSES
REPAIRS 86-7-27
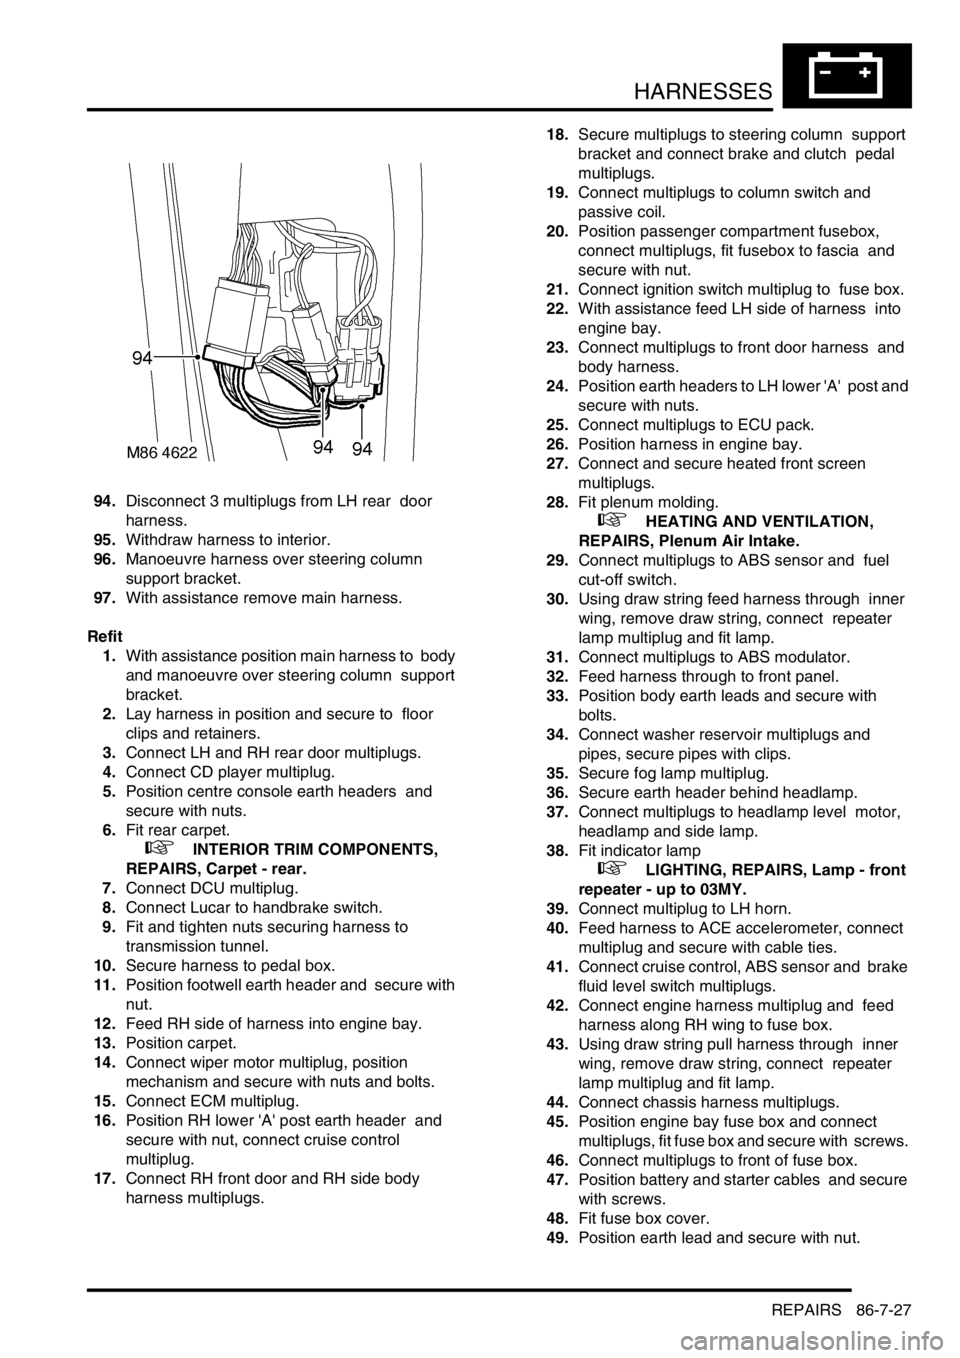
94.Disconnect 3 multiplugs from LH rear door
harness.
95.Withdraw harness to interior.
96.Manoeuvre harness over steering column
support bracket.
97.With assistance remove main harness.
Refit
1.With assistance position main harness to body
and manoeuvre over steering column support
bracket.
2.Lay harness in position and secure to floor
clips and retainers.
3.Connect LH and RH rear door multiplugs.
4.Connect CD player multiplug.
5.Position centre console earth headers and
secure with nuts.
6.Fit rear carpet.
+ INTERIOR TRIM COMPONENTS,
REPAIRS, Carpet - rear.
7.Connect DCU multiplug.
8.Connect Lucar to handbrake switch.
9.Fit and tighten nuts securing harness to
transmission tunnel.
10.Secure harness to pedal box.
11.Position footwell earth header and secure with
nut.
12.Feed RH side of harness into engine bay.
13.Position carpet.
14.Connect wiper motor multiplug, position
mechanism and secure with nuts and bolts.
15.Connect ECM multiplug.
16.Position RH lower 'A' post earth header and
secure with nut, connect cruise control
multiplug.
17.Connect RH front door and RH side body
harness multiplugs. 18.Secure multiplugs to steering column support
bracket and connect brake and clutch pedal
multiplugs.
19.Connect multiplugs to column switch and
passive coil.
20.Position passenger compartment fusebox,
connect multiplugs, fit fusebox to fascia and
secure with nut.
21.Connect ignition switch multiplug to fuse box.
22.With assistance feed LH side of harness into
engine bay.
23.Connect multiplugs to front door harness and
body harness.
24.Position earth headers to LH lower 'A' post and
secure with nuts.
25.Connect multiplugs to ECU pack.
26.Position harness in engine bay.
27.Connect and secure heated front screen
multiplugs.
28.Fit plenum molding.
+ HEATING AND VENTILATION,
REPAIRS, Plenum Air Intake.
29.Connect multiplugs to ABS sensor and fuel
cut-off switch.
30.Using draw string feed harness through inner
wing, remove draw string, connect repeater
lamp multiplug and fit lamp.
31.Connect multiplugs to ABS modulator.
32.Feed harness through to front panel.
33.Position body earth leads and secure with
bolts.
34.Connect washer reservoir multiplugs and
pipes, secure pipes with clips.
35.Secure fog lamp multiplug.
36.Secure earth header behind headlamp.
37.Connect multiplugs to headlamp level motor,
headlamp and side lamp.
38.Fit indicator lamp
+ LIGHTING, REPAIRS, Lamp - front
repeater - up to 03MY.
39.Connect multiplug to LH horn.
40.Feed harness to ACE accelerometer, connect
multiplug and secure with cable ties.
41.Connect cruise control, ABS sensor and brake
fluid level switch multiplugs.
42.Connect engine harness multiplug and feed
harness along RH wing to fuse box.
43.Using draw string pull harness through inner
wing, remove draw string, connect repeater
lamp multiplug and fit lamp.
44.Connect chassis harness multiplugs.
45.Position engine bay fuse box and connect
multiplugs, fit fuse box and secure with screws.
46.Connect multiplugs to front of fuse box.
47.Position battery and starter cables and secure
with screws.
48.Fit fuse box cover.
49.Position earth lead and secure with nut.