Page 168 of 269
Owner Maintenance Checks
You should check the following items at the specified intervals. If
you are unsure of how to perform any check, turn to the page given. Engine oil level — Check every
time you fill the fuel tank. See
page 111. Engine coolant level — Check the
radiator reserve tank every time
you fill the fuel tank. See page 127. Windshield washer fluid — Check
the level in the reservoir monthly.If weather conditions cause you to
use the washers frequently, check
the reservoir each time you stop
for fuel. See page 180. Automatic transmission — Check
the fluid level monthly. See page
180.
Brakes — Check the fluid level
monthly. See page 183.Tires — Check the tire pressure
monthly. Examine the tread for
wear and foreign objects. See page 196. Lights — Check the operation of
the headlights, parking lights,
taillights, high-mount brake light,
turn signals, brake lights, and
license plate lights monthly. See
page 202.
MaintenanceMain Menu Table of Contents s t
Page 169 of 269
Fluid Locations
Maintenance
COOLANT
RESERVOIR
AUTOMATIC
TRANSMISSION
FLUID DIPSTICK(Yellow loop)
(Including CVT)
BRAKE FLUID
(Gray cap)
CLUTCH FLUID (5-speed Manual
Transmission only) (Gray cap)
ENGINE OIL DIPSTICK
(Orange loop) ENGINE OIL
FILL CAP
WASHER FLUID (Blue cap)
POWER STEERING FLUID (Red cap)Main Menu Table of Contents s t
Page 181 of 269

Transmission Fluid, Brake and Clutch Fluid
5-speed Manual Transmission
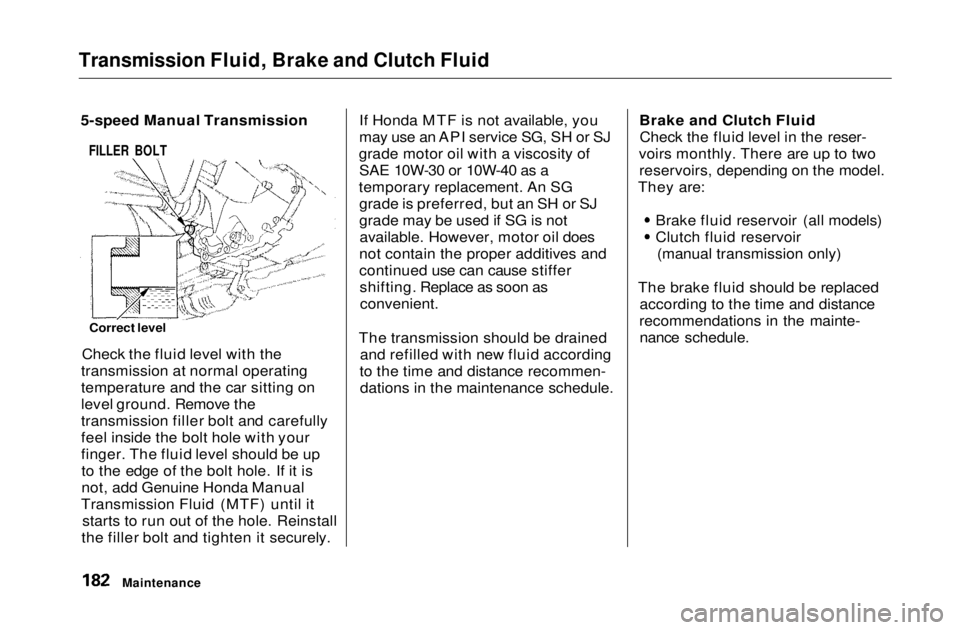
FILLER BOLT
Correct level
Check the fluid level with the
transmission at normal operating
temperature and the car sitting on
level ground. Remove the
transmission filler bolt and carefully
feel inside the bolt hole with your
finger. The fluid level should be up to the edge of the bolt hole. If it is
not, add Genuine Honda Manual
Transmission Fluid (MTF) until it starts to run out of the hole. Reinstall
the filler bolt and tighten it securely. If Honda MTF is not available, you
may use an API service SG, SH or SJ
grade motor oil with a viscosity of SAE 10W-30 or 10W-40 as a
temporary replacement. An SG grade is preferred, but an SH or SJ
grade may be used if SG is notavailable. However, motor oil does
not contain the proper additives and
continued use can cause stiffer shifting. Replace as soon asconvenient.
The transmission should be drained and refilled with new fluid according
to the time and distance recommen- dations in the maintenance schedule. Brake and Clutch Fluid
Check the fluid level in the reser-
voirs monthly. There are up to two reservoirs, depending on the model.
They are:
Brake fluid reservoir (all models) Clutch fluid reservoir
(manual transmission only)
The brake fluid should be replaced according to the time and distance
recommendations in the mainte- nance schedule.
MaintenanceMain Menu Table of Contents s t
Page 182 of 269

Brake and Clutch Fluid
Always use Genuine Honda DOT 3 brake fluid. If it is not available, you should use only DOT 3 or DOT 4
fluid, from a sealed container, as a temporary replacement. However,
the use of any non-Honda brake fluidcan cause corrosion and decrease
the life of the system. Have the
brake system flushed and refilled
with Honda DOT 3 brake fluid as soon as possible.
Brake fluid marked DOT 5 is not
compatible with your car's braking system and can cause extensive
damage.
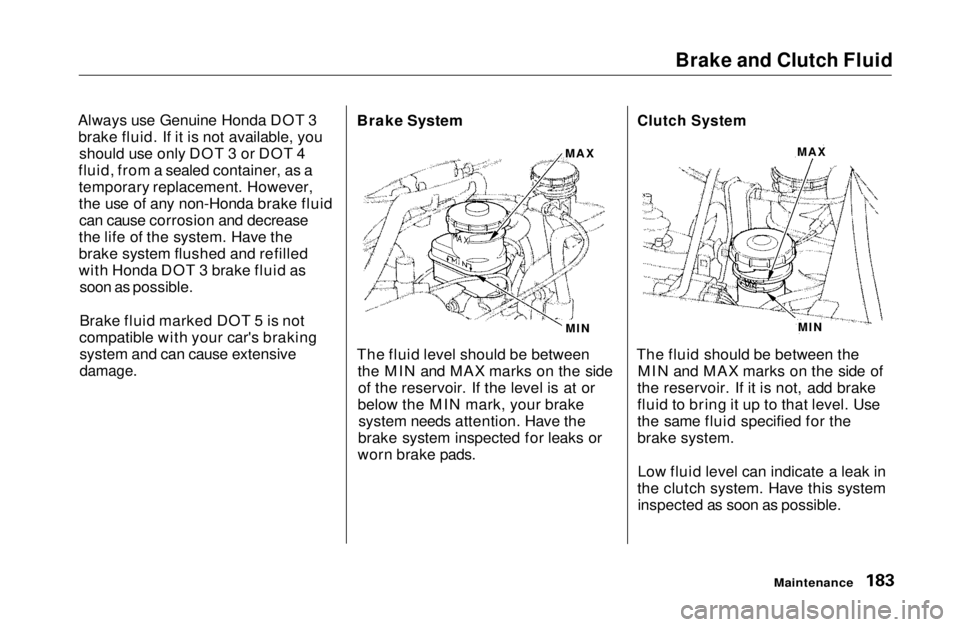
Brake System
MIN
The fluid level should be between the MIN and MAX marks on the sideof the reservoir. If the level is at or
below the MIN mark, your brake system needs attention. Have the
brake system inspected for leaks or
worn brake pads.
Clutch System
The fluid should be between the MIN and MAX marks on the side of
the reservoir. If it is not, add brake
fluid to bring it up to that level. Use
the same fluid specified for the
brake system.
Low fluid level can indicate a leak in
the clutch system. Have this system inspected as soon as possible.
Maintenance
MAX
MAX
MINMain Menu Table of Contents s t
Page 200 of 269
Tires
Tire Chains
Mount snow chains on your vehicle
when warranted by driving condi-
tions or required by local laws. Make sure the chains are the correct size
for your tires. Install them only on
the front tires. If metal chains are
used, they must be SAE class "S." Cable type traction devices can also
be used.
When installing chains, follow the manufacturer's instructions and
mount them as tightly as you can.
Drive slowly with chains installed. If
you hear the chains contacting the
body or chassis, stop and investigate. Make sure the chains are installed
tightly, and that they are not
contacting the brake lines or suspension. Remove the chains as
soon as you begin driving on cleared
roads.
Chains of the wrong size or that are
improperly installed can damage your
car's brake lines, suspension, body, and wheels. Stop driving if you hear the
chains hitting any part of the car.
Maintenance
NOTICEMain Menu Table of Contents s t
Page 202 of 269
Lights
Check the following: Headlights (low and high beam)
Parking lights
Taillights Brake lights
High-mount brake light
Turn signals Back-up lights
Hazard light function
License plate light
Side marker lights
Daytime running lights (Canadian models)
If you find any bulbs are burned out,
replace them as soon as possible. Refer to the chart on page 248 to
determine what type of replacement
bulb is needed.
Maintenance
STOP/TAILLIGHTS/
REAR SIDE MARKER LIGHTS
STOP/TAILLIGHTS
LICENSE PLATE
LIGHT
BACK-UP LIGHT
TURN SIGNAL LIGHTSMain Menu Table of Contents s t
Page 208 of 269
Lights
Replacing a High-mount Brake
Light Bulb 1. Open the trunk and remove the socket from the light assembly by
turning it one-quarter turn counter-
clockwise.
2. Pull the bulb straight out of itssocket.
Push the new bulb straight into
the socket until it bottoms.
3. Reinstall the socket. Turn it clockwise until it locks. Make sure
the new bulb is working. Replacing a Rear License Bulb
1. Remove the two screws and remove the license light assembly.
2. Remove the socket from the light assembly by turning it one-quarter
turn counterclockwise.
3. Pull the bulb straight out of its socket. Push the new bulb in until
it bottoms in the socket.
CONTINUED
MaintenanceMain Menu Table of Contents s t
Page 211 of 269

Storing Your Car
If you need to park your car for an
extended period (more than one
month), there are several things you
should do to prepare it for storage.
Proper preparation helps prevent
deterioration and makes it easier to
get your car back on the road. If possible, store your car indoors.
Fill the fuel tank.
Change the engine oil and filter
(see page 173).
Wash and dry the exterior
completely.
Clean the interior. Make sure the
carpeting, floor mats, etc. are
completely dry.
Leave the parking brake off. Put
the transmission in Reverse (5-
speed manual) or Park
(automatic). Block the rear wheels.
If the car is to be stored for a
longer period, it should be supported on jackstands so the
tires are off the ground.
Leave one window open slightly (if
the car is being stored indoors).
Disconnect the battery.
Support the front wiper blade
arms with a folded towel or rag so
they do not touch the windshield.
To minimize sticking, apply a silicone spray lubricant to all door
and trunk seals. Also, apply a
vehicle body wax to the painted surfaces that mate with the door
and trunk seals. Cover the car with a "breathable"
cover, one made from a porous
material such as cotton.
Nonporous materials, such as
plastic sheeting, trap moisture,
which can damage the paint.
If possible, run the engine for a
while periodically (preferably once a month).
If you store your car for 12 months
or longer, have your Acura dealer
perform the inspections called for in the 24 months/30,000 miles (48,000
km) maintenance schedule as soos as you take it out of storage (see
page 162). The replacements called
for in the maintenance schedule are not needed unless the car has
actually reached that time or mileage.
MaintenanceMain Menu Table of Contents s t