1999 HONDA CIVIC COUPE change time
[x] Cancel search: change timePage 62 of 269

Controls Near the Steering Wheel
Headlights
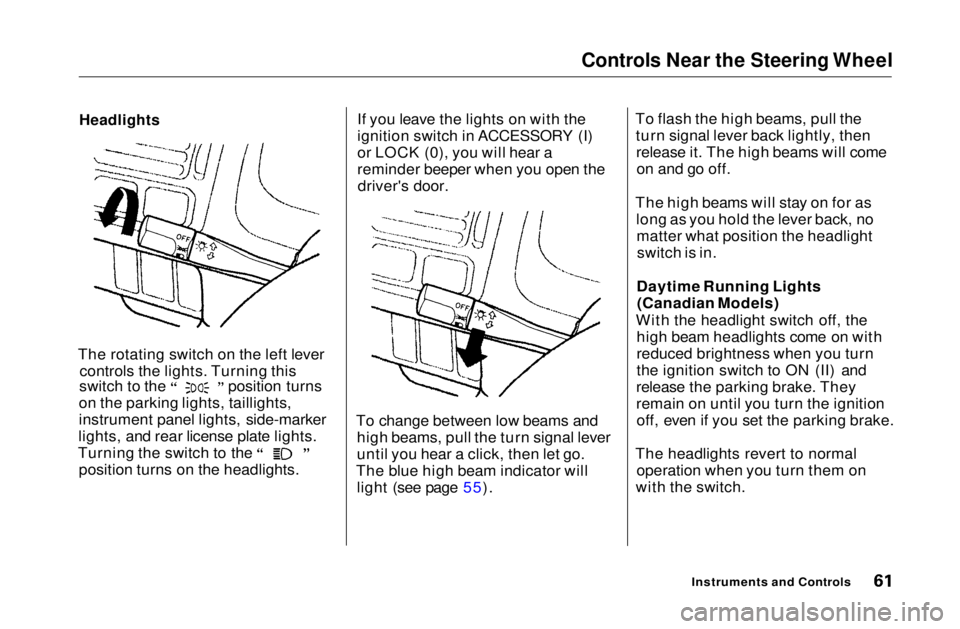
The rotating switch on the left lever controls the lights. Turning this switch to the position turns
on the parking lights, taillights,
instrument panel lights, side-marker
lights, and rear license plate lights. Turning the switch to the
position turns on the headlights. If you leave the lights on with the
ignition switch in ACCESSORY (I)
or LOCK (0), you will hear a
reminder beeper when you open the
driver's door.
To change between low beams and high beams, pull the turn signal lever
until you hear a click, then let go.
The blue high beam indicator will light (see page 55). To flash the high beams, pull the
turn signal lever back lightly, thenrelease it. The high beams will comeon and go off.
The high beams will stay on for as long as you hold the lever back, nomatter what position the headlightswitch is in.
Daytime Running Lights (Canadian Models)
With the headlight switch off, the high beam headlights come on with
reduced brightness when you turn
the ignition switch to ON (II) and
release the parking brake. They
remain on until you turn the ignition off, even if you set the parking brake.
The headlights revert to normal operation when you turn them on
with the switch.
Instruments and ControlsMain Menu Table of Contents s t
Page 74 of 269

Keys and Locks
Replacing the Battery
When the remote transmitter's battery begins to get weak, it may
take several pushes on the button to
lock or unlock the doors, and the LED will get dim. Replace the
battery as soon as possible.
Battery type: CR2025 To replace the battery, remove the
round cover on the back of the trans-
mitter by turning it counterclockwise
with a coin.
Remove the old battery and note the
polarity. Make sure the polarity of
the new battery is the same (+ side
facing up), then insert it in the transmitter. Reinstall the 0-ring. Align the
mark on the cover with the
mark on the transmitter,
then set the cover in place and turn it
clockwise.
After the battery is changed, the transmitter must be synchronized
with the main unit. With the doorsand trunk lid closed, press either the
LOCK or UNLOCK button six times.
Test the transmitter by locking and unlocking the doors several times.
CONTINUED
Instruments and Controls
Open
Close
ROUND
COVER
CUSHION
RING
BATTERYMain Menu Table of Contents s t
Page 99 of 269

Audio System
Adjusting the Sound
Bass, Treble, Balance, and Fader are
each adjustable. You select which of
these you want to adjust by pressing
the MODE button. The mode changes from BAS to TRE to FAD to
BAL, and then back to VOL each
time you press the button. Each
mode is shown in the display as it
changes.
Balance/Fader — These two
modes adjust the strength of the sound coming from each speaker.
BAL adjusts the side-to-side strength,
while FAD adjusts the front-to-back
strength.
Select BAL or FAD by pressing the
MODE button. Adjust the Balance or
Fader to your liking by turning the
PWR/VOL knob. The indicator bars
on the display show you the range. MODE BUTTON
PWR/VOL KNOB
Treble/Bass — Use these modes to adjust the tone to your liking. Select
TRE or BAS by pressing the MODE button. Adjust the desired mode by
turning the PWR/VOL knob. Theindicator bars on the display show
you the range. As you adjust a mode, you will hear a
beep whenever the indicator barreaches the center, far left, and far
right of its range. The system will automatically return the display to
normal mode about seven seconds
after you stop adjusting a mode with
the PWR/VOL knob.
Radio Frequencies and Reception
For information, See page 120.
Comfort and Convenience FeaturesMain Menu Table of Contents s t
Page 100 of 269

Audio System
Digital Clock
The audio system also displays the time. The ignition switch must be in
ACCESSORY (I) or ON (II).
To set the time, press the CLOCKbutton. The hour numbers will begin
blinking. Press the Preset 5 button toget the numbers to count down, or
the Preset 6 button to get the hours
to count up.
Press the CLOCK button again, and
the minutes numbers will begin
blinking. Use the Preset 5 or Preset 6 button to change the minutes to
the correct value.
After you have set the clock, press the CLOCK button again to return to
the normal display. If you do not, thesystem will automatically return to
the normal display about seven seconds after you stop pressing the
Preset buttons.
Comfort and Convenience FeaturesTIME DISPLAYED
PRESET 5 BUTTON PRESET 6 BUTTON
CLOCK BUTTONMain Menu Table of Contents s t
Page 109 of 269

Audio System
Audio System Lighting
You can use the instrument panelbrightness control dial to adjust the il-
lumination of the audio system (see
page 62). The audio system
illuminates when the parking lightsare on, even if the radio is turned off.
Digital Clock
The display of your audio system usually shows the time when the
ignition switch is in ACCESSORY (I)or ON (II). It shows operation mode
of radio, CD player, or optional CD
changer/cassette player when you
operate them, and goes back to the
time display after five seconds.
The display also goes back to the time display two seconds after you
turn the volume knob to adjust the
volume.
If an error occurs while operating
the CD player or optional CD changer, the display will show the
error code and will not switch to the time display until the error is
corrected (see page 133 and 134).
To set the time, press the CLOCK (AM/FM) button for more than two
seconds until you hear a beep. The
time display will begin blinking. To set the hour, press and hold the H (Preset 4) button until the hour
advances to the desired time.
To set the minutes, press and hold the M (Preset 5) button until the
numbers advance to the desired time.
When you are finished, presss the
CLOCK button again. The time
display will stop blinking and the
time is now set.
To exit the clock set function, push
the AM/FM button.
Comfort and Convenience Features
AM/FM BUTTONMain Menu Table of Contents s t
Page 111 of 269

Audio System
If you turn the system off while a CD
is playing, either with the PWR/VOL
knob or by turning off the ignition,
the disc will stay in the drive. When
you turn the system back on, the CD will begin playing where it left off.
Press the eject button to remove thedisc from the drive.
If you eject the disc, but do not
remove it from the slot, the system
will automatically reload the disc after 15 seconds and put the CD
player in pause mode. To begin
playing the disc, press the CD button. You can use the TUNE and SEEK/
SKIP bars while a disc is playing toselect passages and changers tracks.
To move rapidly within a track, press and hold the TUNE bar. Press the side to move forward. You will
see CUE in the display. Press the side to move backward. You
will see REW displayed. Release the bar when the system reaches the
point you want. Each time you press the side of
the SEEK/SKIP bar, the system skips forward to the beginning of the next track. Press the side to
skip backward to the beginning of
the current track. Press it again to skip to the beginning of the previous
track.
REPEAT — To activate the Repeat
feature, press and release the RPT
button. You will see RPT in the display. The system continuously replays the current track. Press the
RPT button again to turn it off.
RANDOM PLAY — This feature,
when activated, plays the tracks on the CD in random order, rather than
in the order they are recorded on theCD. To activate Random Play, press
and release the A. SEL/RDM button.
You will see RDM in the display. The system will then select and play
tracks randomly. This continues
until you deactivate Random Play by
pressing A. SEL/RDM again.
If the system is in Repeat mode, you
must turn it off by pressing RPT
button before selecting Random Play.
Comfort and Convenience FeaturesMain Menu Table of Contents s t
Page 125 of 269

Service Station Procedures
Filling the Fuel Tank
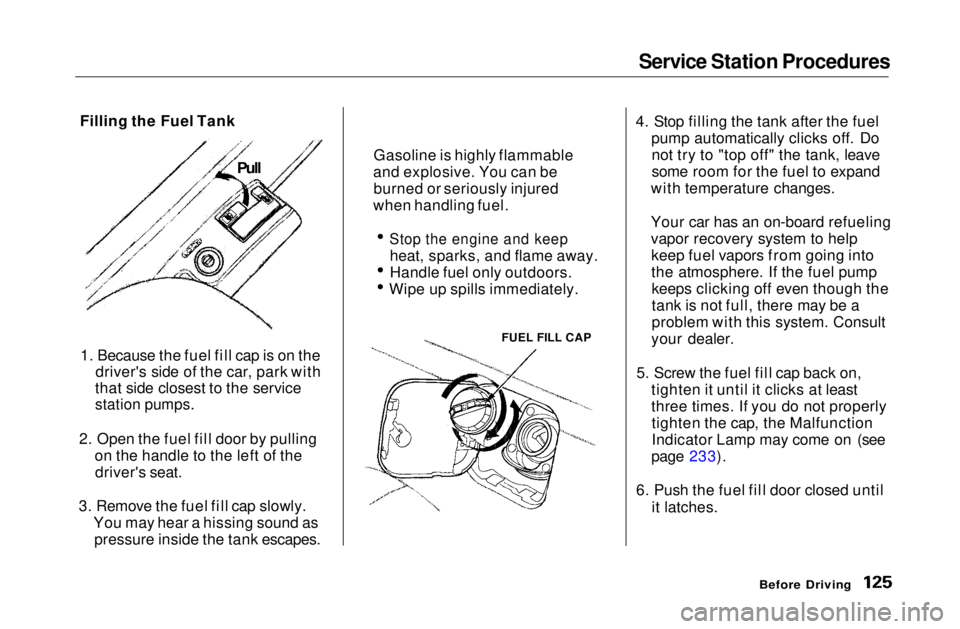
1. Because the fuel fill cap is on the driver's side of the car, park with
that side closest to the service
station pumps.
2. Open the fuel fill door by pulling on the handle to the left of thedriver's seat.
3. Remove the fuel fill cap slowly. You may hear a hissing sound aspressure inside the tank escapes. 4. Stop filling the tank after the fuel
pump automatically clicks off. Donot try to "top off" the tank, leave
some room for the fuel to expand
with temperature changes.
Your car has an on-board refueling
vapor recovery system to help keep fuel vapors from going into
the atmosphere. If the fuel pumpkeeps clicking off even though the
tank is not full, there may be a
problem with this system. Consult
your dealer.
5. Screw the fuel fill cap back on, tighten it until it clicks at least
three times. If you do not properlytighten the cap, the Malfunction
Indicator Lamp may come on (see
page 233).
6. Push the fuel fill door closed until it latches.
Before Driving
FUEL FILL CAP
Gasoline is highly flammable
and explosive. You can be burned or seriously injured
when handling fuel.
Stop the engine and keep
heat, sparks, and flame away.
Handle fuel only outdoors. Wipe up spills immediately.
PullMain Menu Table of Contents s t
Page 152 of 269

The Braking System
You will feel a pulsation in the brakepedal when the ABS activates, and
you may hear some noise. This is normal, it is the ABS rapidly
pumping the brakes.
Activation varies with the amount of traction your tires have. On dry
pavement, you will need to press on
the brake pedal very hard before youactivate the ABS. However, you may
feel the ABS activate immediately if
you are trying to stop on snow or ice.
Important Safety Reminders
ABS does not reduce the time or distance it takes to stop the car, it
only helps with steering controlduring braking. You should always
maintain a safe following distance
from other vehicles.
ABS will not prevent a skid that results from changing direction
abruptly, such as trying to take a
corner too fast or making a sudden
lane change. Always drive at a safe, prudent speed for the road and
weather conditions.
ABS cannot prevent a loss of stability. Always steer moderately
when you are braking hard. Severe or sharp steering wheel movement
can still cause your car to veer intooncoming traffic or off the road. A vehicle with ABS may require a
longer distance to stop on loose or
uneven surfaces, such as gravel orsnow, than a vehicle without anti-
lock. Slow down and allow a greater distance between vehicles under
those conditions.
DrivingMain Menu Table of Contents s t