1999 HONDA CIVIC COUPE service
[x] Cancel search: servicePage 6 of 269
Driver and Passenger Safety
This section gives you important
information about how to protect
yourself and your passengers. It
shows you how to use seat belts
properly. It explains your Supple-
mental Restraint System. And it tells
you how to properly restrain infants
mid children in your car.
Important Safety Precautions.......... 6
Your Car's Safety Features.............. 7
Seat Belts........................................ 8
Airbags............................................ 9
Seats & Seat-Backs...................... 10Head Restraints........................... 10
Door Locks................................... 11
Pre-Drive Safety Checklist......... 11
Protecting Adults............................. 12
1. Close and Lock the Doors...... 12
2. Adjust the Front Seats............ 12 3. Adjust the Seat-Backs............. 13
4. Adjust the Head Restraints.... 145. Fasten and Position the Seat
Belts...................................... 15
6. Adjust the Steering Wheel..... 18
7. Maintain a Proper Sitting
Position................................. 18
Advice for Pregnant Women...... 19
Additional Safety Precautions.... 19
Protecting Children......................... 21
All Children Must Be
Restrained................................ 21
Children Should Sit in the Back
Seat............................................ 22
The Passenger's Airbag Poses Serious Risks to Children....... 22
If You Must Drive with Several Children.................................... 24 If a Child Requires Close
Attention................................... 24
Additional Safety Precaution...... 24 General Guidelines for Using
Child Seats................................ 25
Protecting Infants........................ 29 Protecting Small Children.......... 33
Protecting Larger Children........ 37
Using Child Seats with Tethers...................................... 40
Additional Information About Your
Seat Belts.................................. 42
Seat Belt System Components... 42
Lap/Shoulder Belt....................... 42
Lap Belt......................................... 43
Seat Belt Maintenance................ 44
Additional Information About Your
SRS............................................ 45
SRS Components......................... 45
How Your Airbags Work............ 45
How the SRS Indicator Light
Works........................................ 47
SRS Service................................... 47
Additional Safety Precautions.... 48
Carbon Monoxide Hazard.............. 49
Safety Labels.................................... 50
Driver and Passenger SafetyMain Menu s t
Page 48 of 269

Additional Information About Your SRS
How the SRS Indicator Light
Works
The purpose of the SRSlight is to alert you to a
potential problem with your Supplemental Restraint System.
When you turn the ignition ON (II), this indicator will light up briefly
then go out. This tells you that the system is working properly.
However, if the light comes on at any
other time, you should have the system checked by your dealer. For
example:
If the SRS indicator light does not
come on after you turn the ignition
ON (II). If the light stays on after the
engine starts. If the light comes on or flashes on
and off while you drive.
If you see any of these indications,
your airbags may not deploy when
you need them. See your Honda dealer as soon as possible. SRS Service
Your Supplemental Restraint System is virtually maintenance-free, and
there are no parts you can safely service. However, you must have
your car serviced if:
Your airbags ever inflate. The
airbags and the control unit must
be replaced. Do not try to remove or replace the airbags yourself.
This must be done by a Honda dealer or a knowledgeable body
shop.
The SRS indicator light alerts you
to a problem. Take your car to an
authorized Acura dealer as soon as
possible. If you ignore this
indication, the airbags might not
inflate when you need them.
Driver and Passenger Safety
SRS
Ignoring the SRS indicator light
can result in serious injury or
death if the airbags do not inflate when needed.
Have your vehicle checked by a
dealer as soon as possible if
the SRS light alerts you to a potential problem.Main Menu Table of Contents s t
Page 123 of 269

Before Driving
Before you begin driving your Honda,
you should know what gasoline to use, and how to check the levels of
important fluids. You also need to
know how to properly store luggage or packages. The information in this
section will help you. If you plan to
add any accessories to your car,
please read the information in this section first. Break-in Period.............................. 124
Gasoline.......................................... 124
Service Station Procedures .......... 125 Filling the Fuel Tank................. 125Opening the Hood..................... 126 Oil Check................................127
Engine Coolant Check.......... 128
Fuel Economy................................ 129
Vehicle Condition...................... 129Driving Habits............................ 129
Accessories and Modifications.... 130 Carrying Cargo.............................. 132
Before DrivingMain Menu s t
Page 124 of 269
Break-in Period, Gasoline
Break-in Period
Help assure your car's future
reliability and performance by paying extra attention to how you drive
during the first 600 miles (1,000 km).
During this period: Avoid full-throttle starts and rapid
acceleration.
Avoid hard braking. New brakes
need to be broken-in by moderate
use for the first 200 miles (300
km).
You should follow these same re- commendations with an overhauledor exchanged engine, or when the
brakes are relined.
Gasoline
Your Honda is designed to operate on unleaded gasoline.
We recommend gasolines containing detergent additives that help prevent
fuel system and engine deposits.
Using gasoline containing lead will
damage your car's emissions
controls. This contributes to air
pollution.
In Canada, some gasolines contain
an octane-enhancing additive called
MMT. If you use such gasolines,
your emission control system performance may deteriorate and
the Malfunction Indicator Lamp on
your instrument panel may turn on. If this happens, contact your
authorized Honda dealer for service.
(U.S. DX, HX, EX models, and Canadian
DX and Si models)
Use an unleaded gasoline with a
pump octane number of 86 or higher. Use of a lower octane gasoline can
cause a persistent, heavy metallic
rapping noise in the engine that can
lead to mechanical damage.
(U.S. Si model and Canadian SiR model)
Use a premium unleaded gasoline
with a pump octane number of 91 or higher.
If you are unable to find premium
unleaded gasoline, you may substi-
tute an unleaded regular gasoline.
The engine will compensate for the lower octane, but you may notice aslight decrease in power as a result.
Before DrivingMain Menu Table of Contents s t
Page 125 of 269
Service Station Procedures
Filling the Fuel Tank
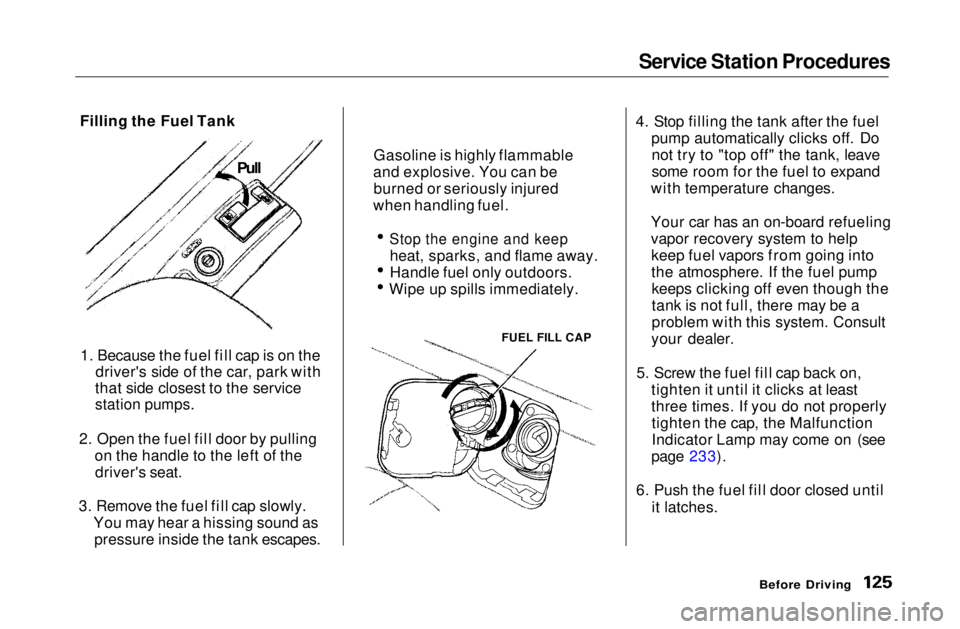
1. Because the fuel fill cap is on the driver's side of the car, park with
that side closest to the service
station pumps.
2. Open the fuel fill door by pulling on the handle to the left of thedriver's seat.
3. Remove the fuel fill cap slowly. You may hear a hissing sound aspressure inside the tank escapes. 4. Stop filling the tank after the fuel
pump automatically clicks off. Donot try to "top off" the tank, leave
some room for the fuel to expand
with temperature changes.
Your car has an on-board refueling
vapor recovery system to help keep fuel vapors from going into
the atmosphere. If the fuel pumpkeeps clicking off even though the
tank is not full, there may be a
problem with this system. Consult
your dealer.
5. Screw the fuel fill cap back on, tighten it until it clicks at least
three times. If you do not properlytighten the cap, the Malfunction
Indicator Lamp may come on (see
page 233).
6. Push the fuel fill door closed until it latches.
Before Driving
FUEL FILL CAP
Gasoline is highly flammable
and explosive. You can be burned or seriously injured
when handling fuel.
Stop the engine and keep
heat, sparks, and flame away.
Handle fuel only outdoors. Wipe up spills immediately.
PullMain Menu Table of Contents s t
Page 126 of 269
Service Station Procedures
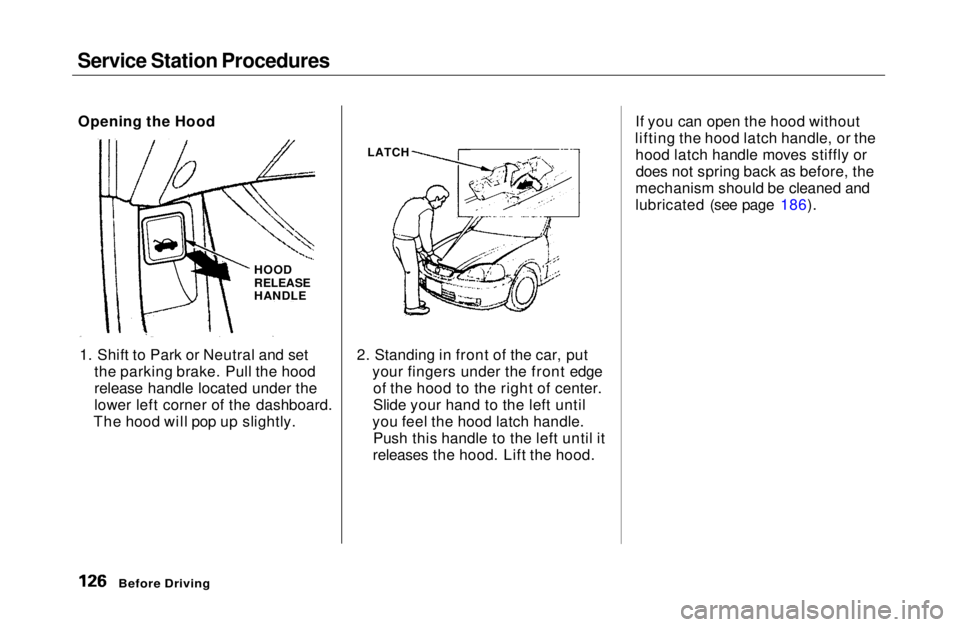
1. Shift to Park or Neutral and set the parking brake. Pull the hood
release handle located under the
lower left corner of the dashboard.
The hood will pop up slightly. 2. Standing in front of the car, put
your fingers under the front edgeof the hood to the right of center.
Slide your hand to the left until
you feel the hood latch handle. Push this handle to the left until it
releases the hood. Lift the hood. If you can open the hood without
lifting the hood latch handle, or the hood latch handle moves stiffly ordoes not spring back as before, the
mechanism should be cleaned and
lubricated (see page 186).
Before Driving
Opening the Hood
HOOD
RELEASE
HANDLE
LATCHMain Menu Table of Contents s t
Page 127 of 269
Service Station Procedures
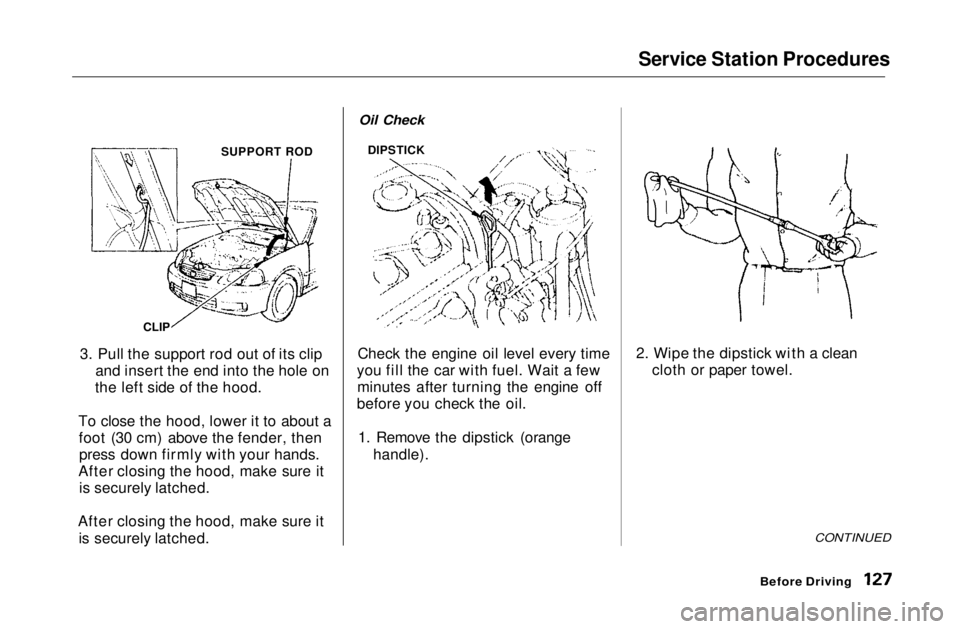
3. Pull the support rod out of its clip and insert the end into the hole on
the left side of the hood.
To close the hood, lower it to about a foot (30 cm) above the fender, thenpress down firmly with your hands.
After closing the hood, make sure it is securely latched.
After closing the hood, make sure it is securely latched. Check the engine oil level every time
you fill the car with fuel. Wait a few minutes after turning the engine off
before you check the oil.
1. Remove the dipstick (orange handle). 2. Wipe the dipstick with a clean
cloth or paper towel.
CONTINUED
Before Driving
SUPPORT ROD
CLIP
Oil Check
DIPSTICKMain Menu Table of Contents s t
Page 128 of 269
Service Station Procedures
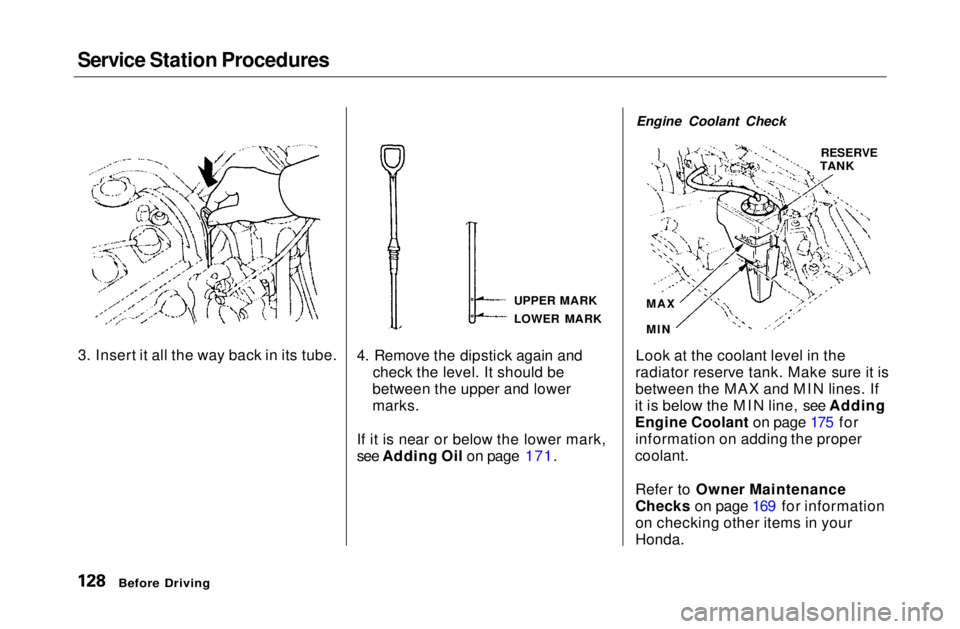
4. Remove the dipstick again andcheck the level. It should be
between the upper and lower
marks.
If it is near or below the lower mark,
see Adding Oil on page 171. Engine Coolant Check
Look at the coolant level in the
radiator reserve tank. Make sure it is
between the MAX and MIN lines. If
it is below the MIN line, see Adding
Engine Coolant on page 175 for information on adding the proper
coolant.
Refer to Owner Maintenance
Checks on page 169 for information
on checking other items in your
Honda.
Before Driving
3. Insert it all the way back in its tube.
UPPER MARK
LOWER MARKRESERVE
TANK
MAX
MINMain Menu Table of Contents s t