1999 HONDA CIVIC COUPE automatic transmission
[x] Cancel search: automatic transmissionPage 169 of 269

Fluid Locations
Maintenance
COOLANT
RESERVOIR
AUTOMATIC
TRANSMISSION
FLUID DIPSTICK(Yellow loop)
(Including CVT)
BRAKE FLUID
(Gray cap)
CLUTCH FLUID (5-speed Manual
Transmission only) (Gray cap)
ENGINE OIL DIPSTICK
(Orange loop) ENGINE OIL
FILL CAP
WASHER FLUID (Blue cap)
POWER STEERING FLUID (Red cap)Main Menu Table of Contents s t
Page 177 of 269
Cooling System
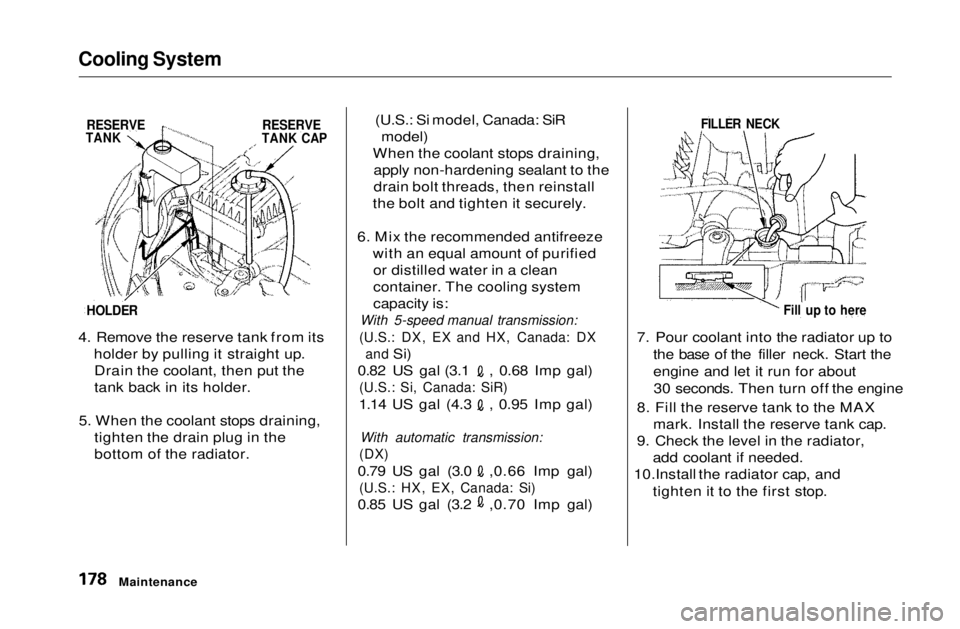
4. Remove the reserve tank from its
holder by pulling it straight up.Drain the coolant, then put the
tank back in its holder.
5. When the coolant stops draining, tighten the drain plug in the
bottom of the radiator. (U.S.: Si model, Canada: SiR
model)
When the coolant stops draining, apply non-hardening sealant to the
drain bolt threads, then reinstall
the bolt and tighten it securely.
6. Mix the recommended antifreeze with an equal amount of purifiedor distilled water in a clean
container. The cooling system
capacity is:
With 5-speed manual transmission:
(U.S.: DX, EX and HX, Canada: DX and
Si) 0.82 US gal (3.1 , 0.68 Imp gal)
(U.S.: Si, Canada: SiR)
1.14 US gal (4.3 , 0.95 Imp gal)
With automatic transmission:
(DX)
0.79 US gal (3.0 ,0.66 Imp gal)
(U.S.: HX, EX, Canada: Si)
0.85 US gal (3.2 ,0.70 Imp gal)7. Pour coolant into the radiator up to
the base of the filler neck. Start the
engine and let it run for about30 seconds. Then turn off the engine
8. Fill the reserve tank to the MAX mark. Install the reserve tank cap.
9. Check the level in the radiator, add coolant if needed.
10.Install the radiator cap, and
tighten it to the first stop.
Maintenance
RESERVE
TANK
RESERVE
TANK CAP
HOLDER
FILLER NECK
Fill up to hereMain Menu Table of Contents s t
Page 179 of 269
Windshield Washers, Transmission Fluid
Check the level in the windshield
washer reservoir at least monthly during normal usage. In bad weather,
when you use the washers often, check the level every time you stop
for fuel.
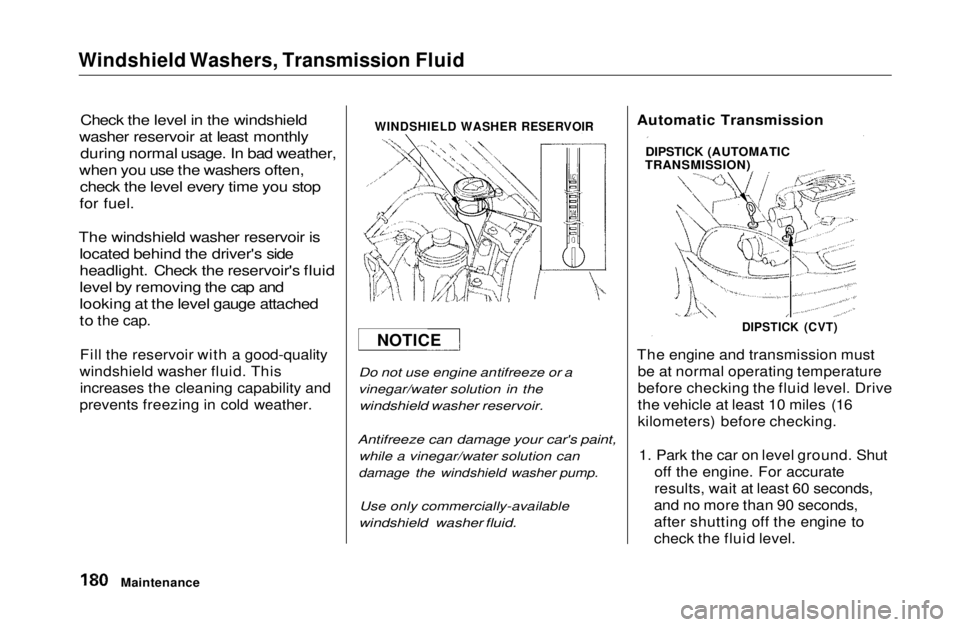
The windshield washer reservoir is located behind the driver's side
headlight. Check the reservoir's fluid
level by removing the cap and
looking at the level gauge attached
to
the cap.
Fill the reservoir with a good-quality
windshield washer fluid. This increases the cleaning capability and
prevents freezing in cold weather.
WINDSHIELD WASHER RESERVOIR
Do not use engine antifreeze or a
vinegar/water solution in the
windshield washer reservoir.
Antifreeze can damage your car's paint,
while a vinegar/water solution can
damage the windshield washer pump.
Use only commercially-available
windshield washer fluid.
The engine and transmission must
be at normal operating temperature
before checking the fluid level. Drive
the vehicle at least 10 miles (16
kilometers) before checking.
1. Park the car on level ground. Shut off the engine. For accurate
results, wait at least 60 seconds,
and no more than 90 seconds,
after shutting off the engine to
check the fluid level.
Maintenance
NOTICE
Automatic Transmission
DIPSTICK (AUTOMATIC
TRANSMISSION)
DIPSTICK (CVT)Main Menu Table of Contents s t
Page 180 of 269
Transmission Fluid
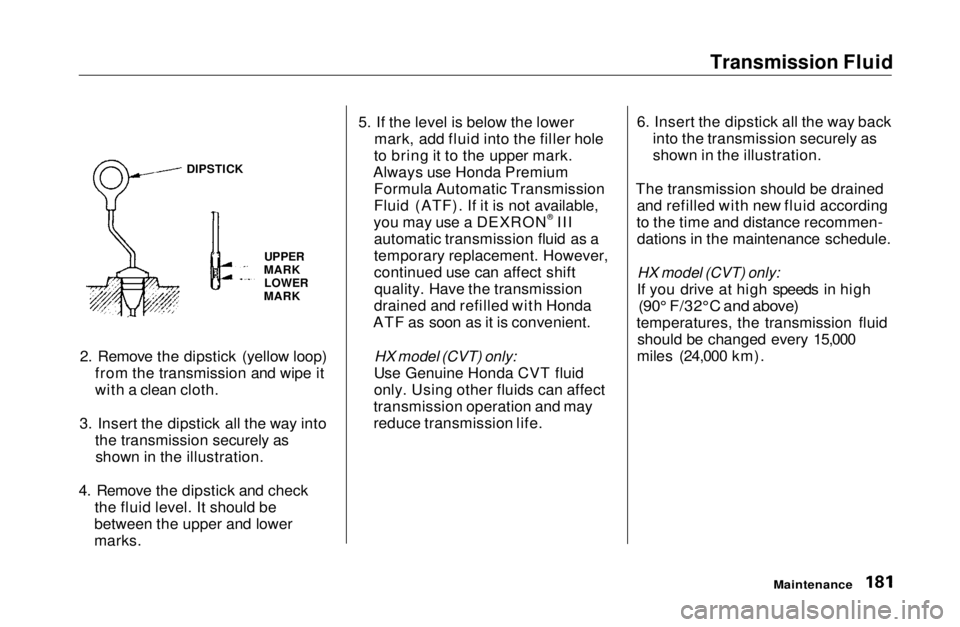
2. Remove the dipstick (yellow loop) from the transmission and wipe it
with a clean cloth.
3. Insert the dipstick all the way into the transmission securely asshown in the illustration.
4. Remove the dipstick and check the fluid level. It should be
between the upper and lower
marks. 5. If the level is below the lower
mark, add fluid into the filler hole
to bring it to the upper mark.
Always use Honda Premium Formula Automatic Transmission
Fluid (ATF). If it is not available,
you may use a DEXRON® III automatic transmission fluid as a
temporary replacement. However,
continued use can affect shiftquality. Have the transmission
drained and refilled with Honda
ATF as soon as it is convenient.
HX model (CVT) only:
Use Genuine Honda CVT fluid
only. Using other fluids can affect
transmission operation and may
reduce transmission life. 6. Insert the dipstick all the way back
into the transmission securely as
shown in the illustration.
The transmission should be drained and refilled with new fluid according
to the time and distance recommen- dations in the maintenance schedule.
HX model (CVT) only:
If you drive at high speeds in high
(90° F/32°C and above)
temperatures, the transmission fluid should be changed every 15,000
miles (24,000 km).
Maintenance
DIPSTICK
UPPER
MARK LOWER
MARKMain Menu Table of Contents s t
Page 211 of 269
Storing Your Car
If you need to park your car for an
extended period (more than one
month), there are several things you
should do to prepare it for storage.
Proper preparation helps prevent
deterioration and makes it easier to
get your car back on the road. If possible, store your car indoors.
Fill the fuel tank.
Change the engine oil and filter
(see page 173).
Wash and dry the exterior
completely.
Clean the interior. Make sure the
carpeting, floor mats, etc. are
completely dry.
Leave the parking brake off. Put
the transmission in Reverse (5-
speed manual) or Park
(automatic). Block the rear wheels.
If the car is to be stored for a
longer period, it should be supported on jackstands so the
tires are off the ground.
Leave one window open slightly (if
the car is being stored indoors).
Disconnect the battery.
Support the front wiper blade
arms with a folded towel or rag so
they do not touch the windshield.
To minimize sticking, apply a silicone spray lubricant to all door
and trunk seals. Also, apply a
vehicle body wax to the painted surfaces that mate with the door
and trunk seals. Cover the car with a "breathable"
cover, one made from a porous
material such as cotton.
Nonporous materials, such as
plastic sheeting, trap moisture,
which can damage the paint.
If possible, run the engine for a
while periodically (preferably once a month).
If you store your car for 12 months
or longer, have your Acura dealer
perform the inspections called for in the 24 months/30,000 miles (48,000
km) maintenance schedule as soos as you take it out of storage (see
page 162). The replacements called
for in the maintenance schedule are not needed unless the car has
actually reached that time or mileage.
MaintenanceMain Menu Table of Contents s t
Page 225 of 269
If Your Engine Won't Start
Diagnosing why your engine won't
start falls into two areas, depending
on what you hear when you turn the
key to START (III):
You hear nothing, or almostnothing. The engine's starter
motor does not operate at all, oroperates very slowly.
You can hear the starter motor operating normally, or the starter
motor sounds like it is spinning
faster than normal, but the engine does not start up and run. Nothing Happens or the Starter
Motor Operates Very Slowly
When you turn the ignition switch to START (III), you do not hear the
normal noise of the engine trying to start. You may hear a clicking sound
or series of clicks, or nothing at all. Check these things:
Check the transmission interlock.
If you have a manual transmission,
the clutch pedal must be pushed all the way to the floor or thestarter will not operate. With an
automatic transmission, it must be
in Park or Neutral.
Turn the ignition switch to ON (II).
Turn on the headlights and check their brightness. If the headlightsare very dim or don't light at all,
the battery is discharged. See
Jump Starting on page 227.
Turn the ignition switch to START
(III). If the headlights do not dim,
check the condition of the fuses. If
the fuses are OK, there is proba-
bly something wrong with the electrical circuit for the ignitionswitch or starter motor. You will
need a qualified technician to
determine the problem. (See
Emergency Towing on page 241.)
If the headlights dim noticeably or
go out when you try to start the engine, either the battery is dis-
charged or the connections are
corroded. Check the condition of
the battery and terminal connec-
tions (see page 189). You can
then try jump starting the vehicle
from a booster battery (see page 227).
Taking Care of the UnexpectedMain Menu Table of Contents s t
Page 226 of 269
If Your Engine Won't Start, Jump Starting
The Starter Operates Normally In this case, the starter motor's
speed sounds normal, or even faster
than normal, when you turn the ignition switch to START (III), but
the engine does not run.
Are you using the proper startingprocedure? Refer to Starting the
Engine on page 137.Do you have fuel? Turn the
ignition switch to ON (II) for a
minute and watch the fuel gauge.
The low fuel level warning light may not be working, so you were
not reminded to fill the tank.
There may be an electrical problem, such as no power to the
fuel pump. Check all the fuses (see page 237).
If you find nothing wrong, you will
need a qualified technician to find
the problem. See Emergency
Towing on page 241. Jump Starting
If your car's battery has run down,
you may be able to start the engine by using a booster battery. Although
this seems like a simple procedure,
you should take several precautions.
You cannot start a Honda with an automatic transmission by pushingor pulling it. To jump start your car, follow these
directions closely:
1. Open the hood and check the physical condition of the battery(see page 189). In very cold
weather, check the condition of the electrolyte. If it seems slushyor like ice, do not try jump starting
until it thaws.
If a battery sits in extreme cold, the
electrolyte inside can freeze.
Attempting to jump start with a frozen
battery can cause it to rupture.
2. Turn off all the electrical acces-
sories: heater, A/C, stereo system,
lights, etc.
Put the transmission in Neutral or
Park and set the parking brake.
CONTINUED
Taking Care of the Unexpected
A battery can explode if you do
not follow the correct procedure,
seriously injuring anyone nearby.
Keep all sparks, open flames,
and smoking materials away
from the battery.
NOTICEMain Menu Table of Contents s t
Page 240 of 269
Emergency Towing
If your vehicle needs to be towed,
call a professional towing service or, if you belong to one, an
organization that provides roadside
assistance. Never tow your vehicle
behind another vehicle with just a rope or chain. It is very dangerous.
There are three popular types of
professional towing equipment.
Flat-bed Equipment — The operator loads your vehicle on the back of a
truck. This is the best way to
transport your Honda.
Wheel-Lift Equipment — The tow
truck uses two pivoting arms that
go under the tires (front or rear) and
lift them off the ground. The other
two tires remain on the ground. This is an acceptable way to tow
your Honda.
Sling-type Equipment — The tow truck uses metal cables with hooks on the ends. These hooks go around
parts of the frame or suspension and
the cables lift that end of the vehicle
off the ground. Your vehicle's suspension and body can beseriously damaged. This method of
towing is unacceptable.
If your Honda cannot be transported
by flat-bed, it should be towed by
wheel-lift equipment with the front
wheels off the ground. If due to
damage, your vehicle must be towed with the front wheels on the ground,
do the following.
5-speed Manual Transmission Release the parking brake.
Shift the transmission to Neutral.
Automatic Transmission Release the parking brake.
Start the engine.
Shift to D4, then to N.
Turn off the engine. Improper towing preparation will
damage the transmission. Followthe above procedure exactly. If youcannot shift the transmission or
start the engine (automatictransmission), your vehicle must be
transported with the front wheels
off the ground.
With the front wheels on the ground, it is best to tow the vehicleno farther than 50 miles (80 km),
and keep the speed below 35 mph
(55 km/h).
If you decide to tow your vehicle
with all four wheels on the ground,
make sure you use a properly-
designed and attached tow bar. Prepare the vehicle for towing as
described above, and leave theignition switch in Accessory (I) so
the steering wheel does not lock.
Make sure the radio and any items
Taking Care of the Unexpected
NOTICEMain Menu Table of Contents s t