1999 HONDA CIVIC COUPE spare wheel
[x] Cancel search: spare wheelPage 219 of 269

Compact Spare Tire
Your car has a compact spare tire that takes up less space. Use thisspare tire as a temporary replace-
ment only. Get your regular tire
repaired or replaced and put back on
your car as soon as you can.
Check the inflation pressure of the
compact spare tire every time you
check the other tires. It should be
inflated to: 60 psi (420 kPa , 4.2 kgf/cm2)
Follow these precautions whenever
you are using the compact spare tire:
Do not exceed 50 mph (80 km/h)
under any circumstances.
This tire gives a harsher ride and
less traction on some road sur-
faces than the regular tire. Use
greater caution while driving on
this tire.
Do not mount snow chains on the
compact spare.
The wheel of the folding spare tire is designed especially to fit your
car. Do not use your spare tire on
another car unless it is the same
make and model.
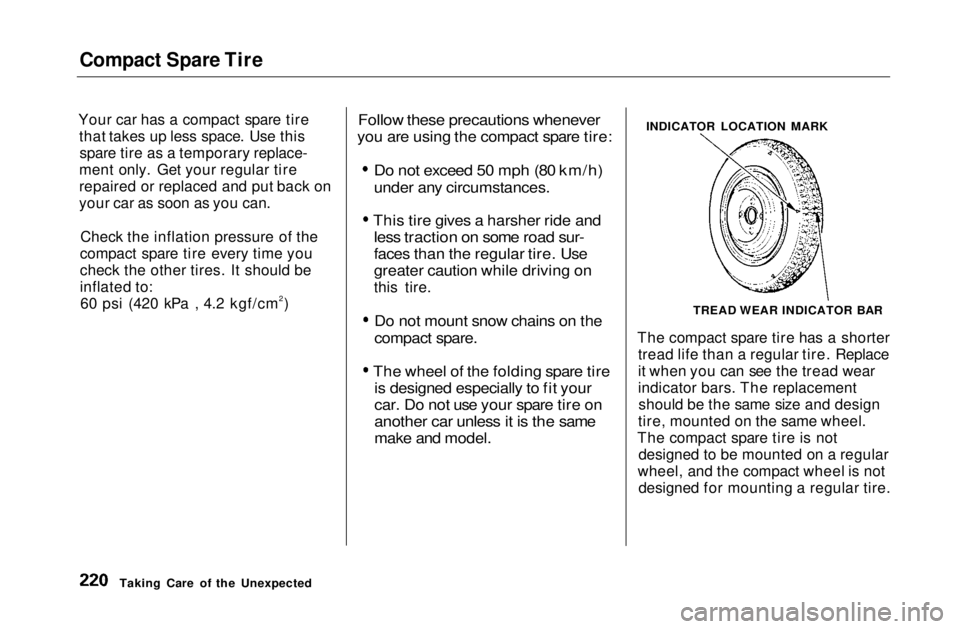
The compact spare tire has a shorter
tread life than a regular tire. Replace
it when you can see the tread wear
indicator bars. The replacementshould be the same size and design
tire, mounted on the same wheel.
The compact spare tire is not designed to be mounted on a regular
wheel, and the compact wheel is not designed for mounting a regular tire.
Taking Care of the Unexpected INDICATOR LOCATION MARK
TREAD WEAR INDICATOR BARMain Menu Table of Contents s t
Page 222 of 269

Changing a Flat Tire
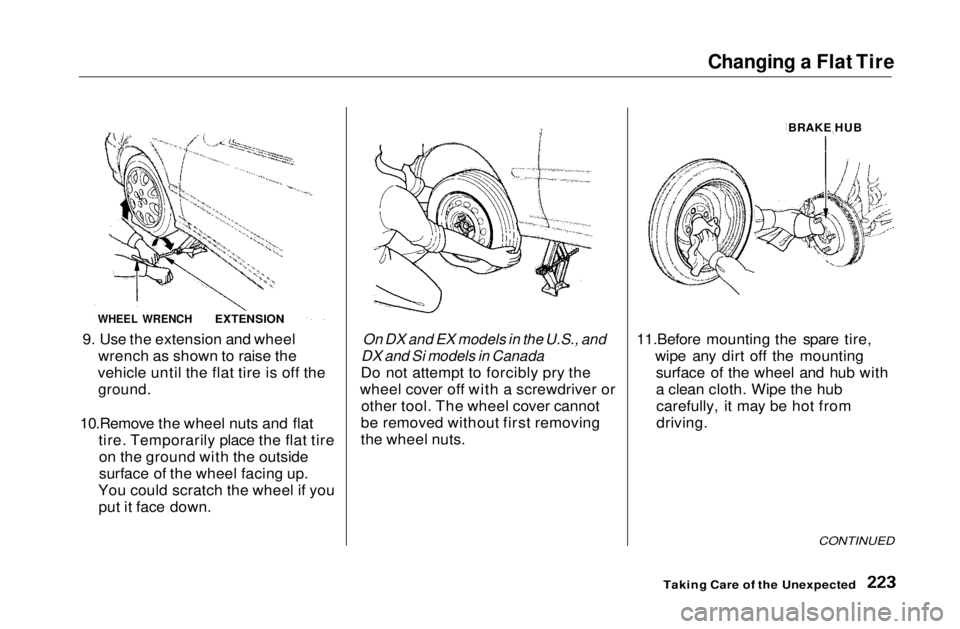
9. Use the extension and wheel wrench as shown to raise the
vehicle until the flat tire is off the
ground.
10.Remove the wheel nuts and flat tire. Temporarily place the flat tireon the ground with the outside
surface of the wheel facing up.
You could scratch the wheel if you put it face down.
On DX and EX models in the U.S., and
DX and Si models in Canada
Do not attempt to forcibly pry the
wheel cover off with a screwdriver or other tool. The wheel cover cannot
be removed without first removing
the wheel nuts. 11.Before mounting the spare tire,
wipe any dirt off the mountingsurface of the wheel and hub with
a clean cloth. Wipe the hubcarefully, it may be hot from
driving.
CONTINUED
Taking Care of the Unexpected
WHEEL WRENCH EXTENSION
BRAKE HU BMain Menu Table of Contents s t
Page 223 of 269

Changing a Flat Tire
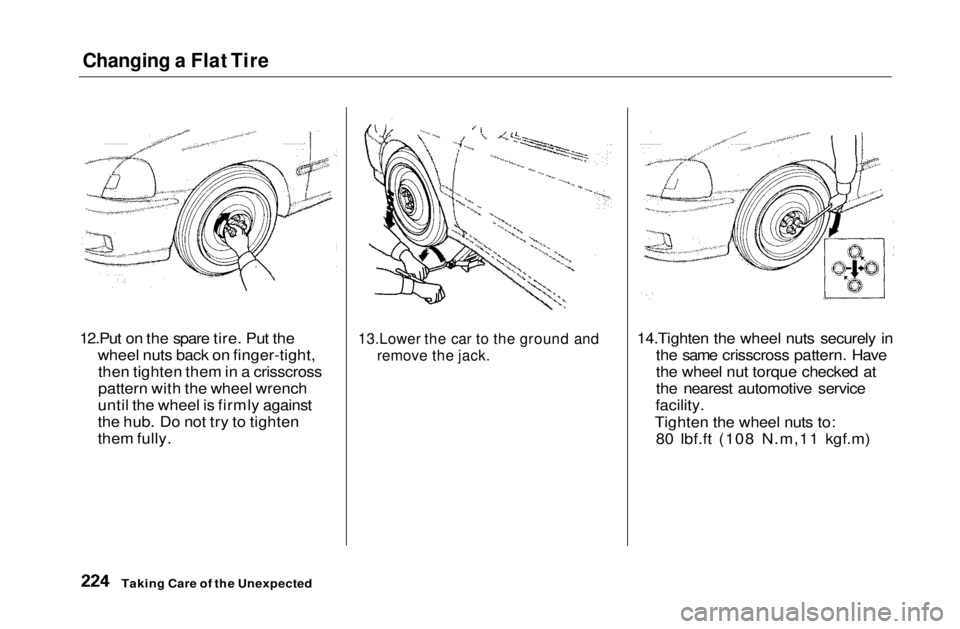
12.Put on the spare tire. Put the wheel nuts back on finger-tight,then tighten them in a crisscross
pattern with the wheel wrench
until the wheel is firmly against
the hub. Do not try to tighten
them fully.
13.Lower the car to the ground and
remove the jack.
14.Tighten the wheel nuts securely in
the same crisscross pattern. Have
the wheel nut torque checked at
the nearest automotive service
facility.
Tighten the wheel nuts to: 80 lbf.ft (108 N.m,11 kgf.m)
Taking Care of the UnexpectedMain Menu Table of Contents s t
Page 267 of 269

Index
SRS, Additional Information........... 45
Additional Safety Precautions.... 48
How Your Airbags Work............ 45
How Your SRS Indicator
Works........................................ 47
SRS Components......................... 45
SRS Service................................... 47
SRS Indicator.............................. 47, 54
START (Ignition Key Position)..... 70 Starting the Engine........................ 137 In Cold Weather at HighAltitude................................... 137
With a Dead Battery................. 227
Steam Coming from Engine......... 229
Steering Wheel
Adjustment................................... 65
Anti-theft Column Lock.............. 70
Stereo Sound System ...................... 96
Storing Your Car............................ 211
Supplemental Restraint System..... 45 Servicing....................................... 47
SRS Indicator.......................... 47, 54
System Components.................... 45
Synthetic Oil................................... 172 Tachometer...................................... 57
Taillights, Changing Bulbs in....... 206
Taking Care of the Unexpected .. 219
Tape Player..................................... 115
Technical Descriptions Driving In Foreign Countries... 253
Emissions Control Systems...... 254
Oxygenated Fuels...................... 252
Three Way Catalytic Converter................................ 256
Tire Information........................ 249
Temperature Gauge........................ 58
Tether Attachment Points.............. 40
Three Way Catalytic Converter... 256
Time, Setting the............................. 99
Timing Belt..................................... 194
Tire Chains..................................... 201
Tire, How to Change a Flat.......... 221 Tires................................................ 195 Air Pressure............................... 195Checking Wear.......................... 197
Compact Spare........................... 220
DOT Tire Quality Grading....... 250
Inflation....................................... 195 Inspection................................... 197
Maintenance............................... 197
Replacing.................................... 199
Rotating....................................... 198
Snow............................................ 200 Specifications............................. 248
Technical Information.............. 249
Technical Information................... 243 Tools,Tire Changing.................... 221
Towing A Trailer...................................... 155Emergency Wrecker................. 241
Transmission Checking Fluid Level,Automatic............................... 180
Checking Fluid Level,
Manual....................................182
Fluid Selection............................ 180
Identification Number............... 245
Shifting the Automatic..............140
Shifting the Manual................... 138
Treadwear...................................... 250
Trip Meter........................................ 57
Trunk................................................. 75
Opening......................................... 75
Open Monitor Light.................... 56Main Menu s t
Page 268 of 269

Index
Turn Signals..................................... 62
Underside, Cleaning...................... 214
Unexpected, Taking Care
of the........................................... 219
Uniform Tire Quality Grading..... 250
Unleaded Gasoline......................... 124
Upholstery Cleaning...................... 216
Used Oil, How to Dispose of........ 174
Vehicle Capacity Load .................. 132 Vehicle Dimensions....................... 246
Vehicle Identification Number..... 244
Vehicle Storage.............................. 211 Ventilation......................................... 90
VIN.................................................. 244
Vinyl Cleaning................................ 216
Viscosity, Oil................................... 172 Warning Beepers
Headlights on............................... 61
Key in Ignition.............................. 70
Seat Belts...................................... 54
WARNING, Explanation of.............. ii
Warning Labels, Location of.......... 50
Warranty Coverages*................... 261
Washer, Windshield Checking the Fluid Level......... 180Operation...................................... 63
Washing.......................................... 214 Waxing and Polishing................... 214
Wheels
Adjusting the Steering................ 65
Alignment and Balance............. 197Compact Spare........................... 220
Wrench....................................... 222
Windows
Cleaning...................................... 217Operating the Power................... 79
Rear, Defogger............................ 64
Windshield Cleaning........................................ 63
Defroster...................................... 93 Wipers, Windshield
Changing Blades........................ 191Operation...................................... 63
Worn Tires..................................... 195
Wrecker, Emergency Towing...... 241
* : U.S. and Canada onlyMain Menu s t