Page 191 of 269
Wiper Blades
3. Remove the blade from its holder by grasping the tabbed end of the
blade. Pull firmly until the tabs
come out of the holder. Examine the new wiper blades. If
they have no plastic or metal rein- forcement along the back edge,
remove the metal reinforcement
strips from the old wiper blade and install them in the slots along the
edge of the new blade. 5. Slide the new wiper blade into the
holder until the tabs lock.
6. Slide the wiper blade assembly onto the wiper arm. Make sure it
locks in place.
7. Lower the wiper arm down against the windshield.
Maintenance
BLADE
BLADE
REINFORCEMENTMain Menu Table of Contents s t
Page 198 of 269

Tires
Replacing Tires and Wheels
The tires that came with your car were selected to match the perform- ance capabilities of the car while
providing the best combination of
handling, ride comfort, and long life.
You should replace them with radial tires of the same size, load range, speed rating, and maximum cold tire
pressure rating (as shown on the
tire's sidewall). Mixing radial and
bias-ply tires on your car can reduce its braking ability, traction, andsteering accuracy. It is best to replace all four tires at
the same time. If that is not possible
or necessary, then replace the two
front tires or the two rear tires as a
pair. Replacing just one tire can seriously affect your car's handling. The ABS works by comparing the
speed of the wheels. When replacing
tires, use the same size originally supplied with the car. Tire size and
construction can affect wheel speed and may cause the system to work in-
consistently.
If you ever need to replace a wheel,
make sure the wheel's specifications
match those of the original wheel
that came on your car. Replacement
wheels are available at your Honda dealer.
Maintenance
Installing improper tires on your
car can affect handling and
stability. This can cause a crash in which you can be seriouslyhurt or killed.
Always use the size and type of
tires recommended in this owner's manual.Main Menu Table of Contents s t
Page 204 of 269

Lights
4. Unclip the end of the hold-down wire from its slot. Pivot it out ofthe way and remove the bulb.
5. Insert the new bulb into the hole, making sure the tabs are in theirslots. Pivot the hold-down wire
back in place and clip the end into
the slot.
6. Install the rubber seal over the back of the headlight assembly.Make sure it is right side up; it is
marked "TOP."
7. Push the electrical connector onto the tabs of the new bulb. Makesure it locks in place.
Turn on the headlights to test the new bulb.
8. (Driver's side) Reinstall the power steering
reservoir.
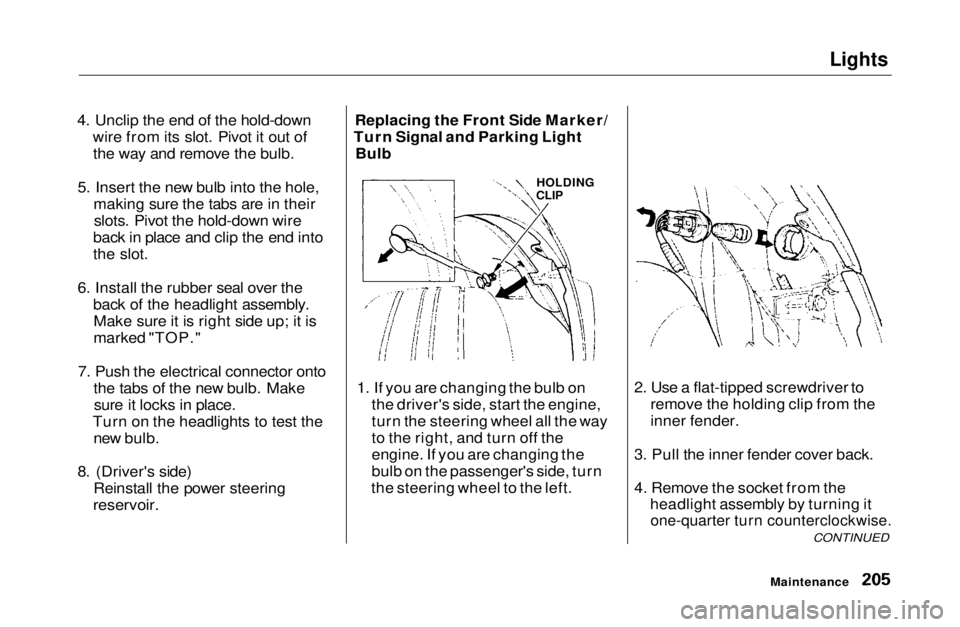
Replacing the Front Side Marker/
Turn Signal and Parking Light Bulb
1. If you are changing the bulb on the driver's side, start the engine,
turn the steering wheel all the way
to the right, and turn off the
engine. If you are changing the
bulb on the passenger's side, turn
the steering wheel to the left. 2. Use a flat-tipped screwdriver to
remove the holding clip from the
inner fender.
3. Pull the inner fender cover back.
4. Remove the socket from the headlight assembly by turning it
one-quarter turn counterclockwise.
CONTINUED
Maintenance
HOLDING
CLIPMain Menu Table of Contents s t
Page 209 of 269
Lights
4. Turn on the parking lights and check that the new bulb is
working.
5. Reinstall the socket. Turn it clock- wise until it locks.
6. Put the license light assembly in place. Reinstall the two screws and
tighten them securely. Replacing an Interior Light Bulb
(U.S.: EX, Si, Canada: Si, SiR)
1. Remove the lens by carefully prying on the edge of the lens inthe middle with a fingernail file or
a small flat-tip screwdriver. Do not
pry on the edge of the housingaround the lens. (U.S.: DX, HX, Canada: DX)
2. Remove the bulb by pulling it straight out of its metal tabs.
3. Push the new bulb into the metal tabs. Snap the lens back in place.
Maintenance INTERIOR LIGHT
INTERIOR LIGHTMain Menu Table of Contents s t
Page 210 of 269
Lights
(U.S.: EX and Si, Canada: SiR)
Replacing the Trunk Light Bulb
(U.S.: HX, EX and Si, Canada: DX,
EX, SiR models)
1. Remove the lens by carefully prying on the edge of the lens in
the middle with a fingernail file ora small flat-tip screwdriver. Do not
pry on the edge of the housing around the lens. 2. Remove the bulb by pulling it
straight out of its metal tabs.
3. Push the new bulb into the metal tabs. Snap the lens back in place.
Maintenance
SPOTLIGHT
TRUNK LIGHTMain Menu Table of Contents s t
Page 217 of 269

Corrosion Protection, Body Repairs
Inspect and clean out the drain
holes in the bottom of the doors and body.
Check the floor coverings for
dampness. Carpeting and floor
mats may remain damp for a long
time, especially in winter. This dampness can eventually cause
the floor panels to corrode.
Use a high-pressure spray to clean
the underside of your car. This is especially important in areas that
use road salt in winter. It is also a
good idea in humid climates and
areas subject to salt air. Cars
equipped with ABS have a sensor and wiring at each wheel. Be
careful not to damage them.
Have the corrosion-preventive
coatings on the underside of your
car inspected and repaired
periodically. Body Repairs
Body repairs can affect your car's
resistance to corrosion. If your car
needs repairs after a collision, pay
close attention to the parts used in
the repair and the quality of the
work.
Make sure the repair facility usesGenuine Honda replacement body
parts. Some companies make sheet metal pieces that seem to duplicate
the original Honda body parts, but
are actually inferior in fit, finish, and
corrosion resistance. Once installed,
they do not give the same high-quality appearance.
When reporting your collision to the
insurance company, tell them you
want Genuine Honda parts used in the repair. Although most insurers
recognize the quality of originalparts, some may try to specify that
the repairs be done with other available parts. You should investi-
gate this before any repairs are
begun.
Take your car to your authorized Honda dealer for inspection after the
repairs are completed. Your dealer
can make sure that quality materials
were used, and that corrosion- preventive coatings were applied to
all repaired and replaced parts.
Appearance CareMain Menu Table of Contents s t
Page 236 of 269
Fuses
Vehicles equipped with ABS have a third fuse box for the ABS. It is in
the engine compartment on the
passenger's side.
Checking and Replacing Fuses
If something electrical in your car stops working, the first thing you
should check for is a blown fuse.
Determine from the chart on pages 198 and 199, or the diagram on the
fuse box lid, which fuse or fuses control that component. Check those
fuses first, but check all the fuses
before deciding that a blown fuse is not the cause. Replace any blown
fuses and check the component's
operation.
1. Turn the ignition switch to LOCK (0). Make sure the headlights and
all other accessories are off.
2. Remove the cover from the fuse box. FUSE
3. Check each of the large fuses in the under-hood fuse box by
looking through the top at the wire
inside. Removing these fusesrequires a Phillips-head screw-
driver.
CONTINUED
Taking Care of the Unexpected
ABS FUSE BOX
BLOWNMain Menu Table of Contents s t
Page 239 of 269
Fuses
UNDER-HOOD FUSE BOX
ABS FUSE BOX
Taking Care of the UnexpectedMain Menu Table of Contents s t