1999 FORD F150 suspension
[x] Cancel search: suspensionPage 11 of 232

Check air suspension (if equipped)
Illuminates momentarily when the
ignition is turned to the ON position
and the engine is OFF. The light also
illuminates when the air suspension
system requires servicing.
For information, refer toAir suspension systemin theDrivingchapter.
Door ajar
Illuminates when the ignition is in
the ON or START position and any
door is open.
Fuel reset
Illuminates when the ignition is
turned to the ON position and the
fuel pump shut-off switch has been
triggered. For more information,
refer toFuel pump shut-off switch
in theRoadside emergencieschapter.
Safety belt warning chime
Chimes to remind you to fasten your safety belts.
For information on the safety belt warning chime, refer to theSeating
and safety restraintschapter.
Supplemental restraint system (SRS) warning chime
For information on the SRS warning chime, refer to theSeating and
safety restraintschapter.
Key-in-ignition warning chime
Sounds when the key is left in the ignition in the OFF/LOCK or ACC
position and the driver's door is opened.
Headlamps on warning chime
Sounds when the headlamps or parking lamps are on, the ignition is off
(and the key is not in the ignition) and the driver's door is opened.
CK
SUSP
DOOR
AJAR
FUEL
RESET
Instrumentation
11
Page 119 of 232
If the steering wanders or pulls, the condition could be caused by any of
the following:
²underinflated tire(s) on any wheel(s)
²high crown in center of road
²high crosswinds
²wheels out of alignment
²loose or worn components in steering linkage
AIR SUSPENSION SYSTEM (IF EQUIPPED)
The air suspension system is designed to improve ride, handling and
general vehicle performance for static, on and off-road driving conditions.
²The load leveling feature of the air suspension automatically keeps the
vehicle at a constant level if a load is added or removed from the
vehicle.
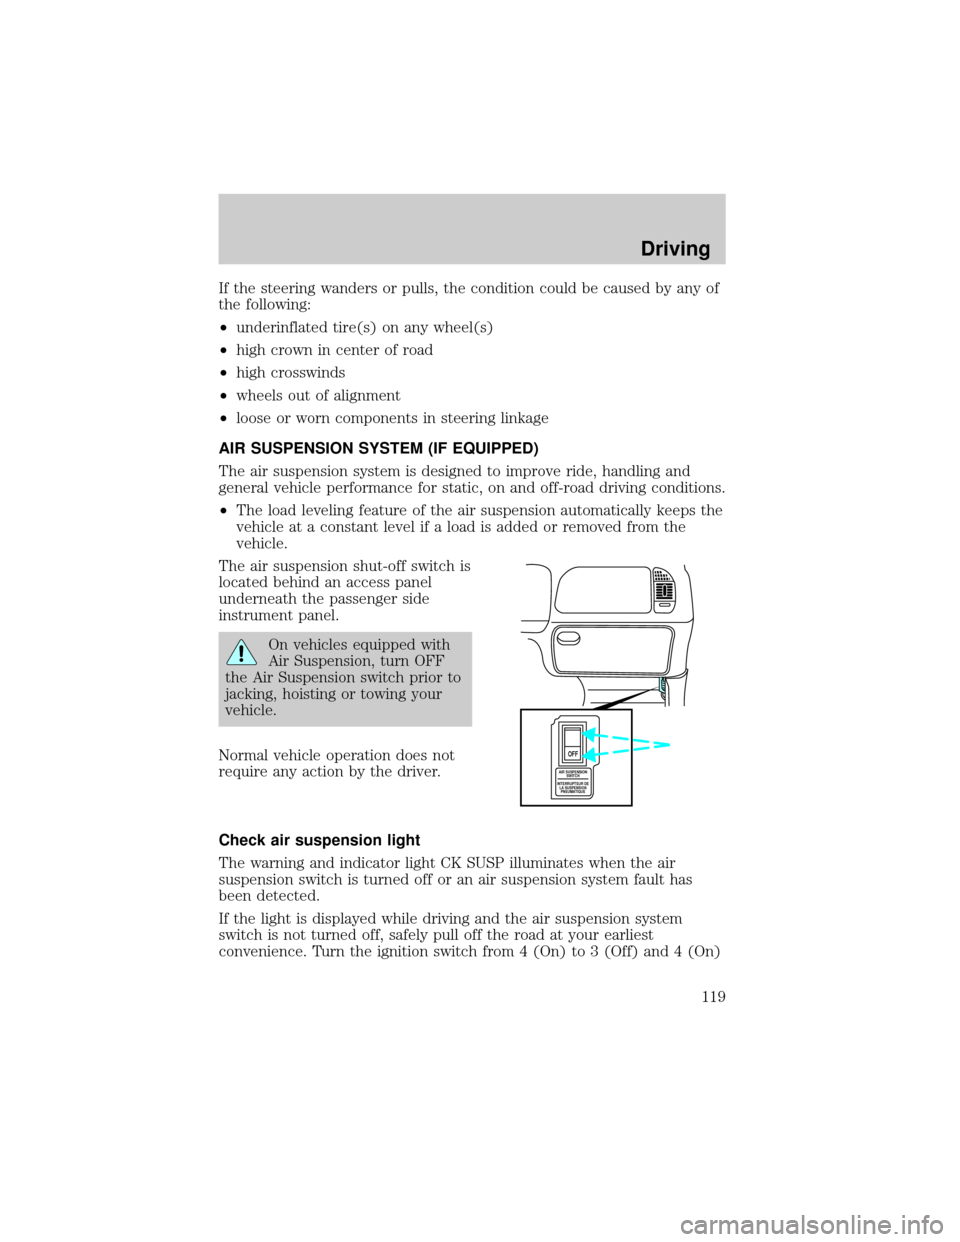
The air suspension shut-off switch is
located behind an access panel
underneath the passenger side
instrument panel.
On vehicles equipped with
Air Suspension, turn OFF
the Air Suspension switch prior to
jacking, hoisting or towing your
vehicle.
Normal vehicle operation does not
require any action by the driver.
Check air suspension light
The warning and indicator light CK SUSP illuminates when the air
suspension switch is turned off or an air suspension system fault has
been detected.
If the light is displayed while driving and the air suspension system
switch is not turned off, safely pull off the road at your earliest
convenience. Turn the ignition switch from 4 (On) to 3 (Off) and 4 (On)
AIR SUSPENSION
SWITCH
INTERRUPTEUR DE
LA SUSPENSION
PNEUMATIQUE
OFF
Driving
119
Page 120 of 232

again. If the warning light reappears, turn the air suspension switch off
and have the vehicle serviced by a dealer or qualified service technician.
If the vehicle is loaded beyond the recommended maximum payload, the
CK SUSP light may illuminate. To correct this condition, remove or
redistribute the payload according to the recommended requirements
and follow the procedure outlined above.
AUTOMATIC TRANSMISSION OPERATION (IF EQUIPPED)
Brake-shift interlock
This vehicle is equipped with a brake-shift interlock feature that prevents
the gearshift from being moved from P (Park) unless the brake pedal is
depressed.
If you cannot move the gearshift out of P (Park) with the brake pedal
depressed:
1. Apply the parking brake, turn ignition key to LOCK, then remove the
key.
2. Insert the key and turn it to OFF. Apply the brake pedal and shift to N
(Neutral).
3. Start the vehicle.
If it is necessary to use the above procedure to move the gearshift, it is
possible that a fuse has blown or the vehicle's brakelamps are not
operating properly. Refer toFuses and relaysin theRoadside
emergencieschapter.
Do not drive your vehicle until you verify that the brakelamps
are working.
If your vehicle gets stuck in mud or snow it may be rocked out by
shifting from forward and reverse gears, stopping between shifts, in a
steady pattern. Press lightly on the accelerator in each gear.
Do not rock the vehicle for more than a few minutes. The
transmission and tires may be damaged or the engine may
overheat.
Always set the parking brake fully and make sure the gearshift is
latched in P (Park). Turn off the ignition whenever you leave
your vehicle.
Driving
120
Page 136 of 232
DRIVING THROUGH WATER
Do not drive quickly through standing water, especially if the depth is
unknown. Traction or brake capability may be limited and if the ignition
system gets wet, your engine may stall. Water may also enter your
engine's air intake and severely damage your engine.
If driving through deep or standing water is unavoidable, proceed very
slowly. Never drive through water that is higher than the bottom of the
hubs.
Once through the water, always try the brakes. Wet brakes do not stop
the vehicle as effectively as dry brakes. Drying can be improved by
moving your vehicle slowly while applying light pressure on the brake
pedal.
Driving through deep water where the transmission is submerged
may allow water into the transmission and cause internal
transmission damage.
TOWING A TRAILER
Your vehicle may tow a class I, II or
III trailer provided the maximum
trailer weight is less than or equal to
the maximum trailer weight listed
for your engine and rear axle ratio
on the following charts.
Your vehicle's load capacity is designated by weight, not by volume, so
you cannot necessarily use all available space when loading a vehicle.
Towing a trailer places an additional load on your vehicle's engine,
transmission, axle, brakes, tires and suspension. Inspect these
components carefully after any towing operation.
Driving
136
Page 141 of 232
Trailer frontal area considerations:
²Not to exceed towing vehicle front area without Class III trailer towing
package
²Not to exceed 5.52 square meters (60 square feet) with Class III
trailer towing package
Preparing to tow
Use the proper equipment for towing a trailer, and make sure it is
properly attached to your vehicle. See your dealer or a reliable trailer
dealer if you require assistance.
Hitches
Do not use hitches that clamp onto the vehicle's bumper or attach to the
axle. You must distribute the load in your trailer so that 10% of the total
weight of the trailer is on the tongue.
Load equalizing hitch
When hooking up a trailer using a load equalizing hitch, always use the
following procedure:
1. Park the unloaded vehicle on a level surface. With the ignition on and
all doors closed, allow the vehicle to stand for several minutes so that it
can level.
2. Turn the air suspension (if equipped) control to OFF.
3. Measure the height of a reference point on the front and rear bumpers
at the center of the vehicle.
4. Attach the trailer to the vehicle and adjust the hitch equalizers so that
the front bumper height is within 0±13 mm (0.5 in) of the reference
point. After proper adjustment, the rear bumper should be no higher
than in Step 3.
5. Turn the air suspension (if equipped) control to ON.
Adjusting an equalizing hitch so the rear bumper of the vehicle
is lower or higher than it was unloaded will defeat the function
of the load equalizing hitch and may cause unpredictable handling.
Driving
141
Page 145 of 232

4WD ± Electronic shift transfer case
1. Place transmission in N (Neutral).
2. Shift the transfer case to 2H (2WD high).
3. Lockout the center disconnect by capping off one of the front axle
vacuum motor lines. See your dealer for assistance.
4. Maximum speed is 56 km/h (35 mph).
5. Maximum distance is 80 km (50 miles).
If a distance of 80 km (50 miles) or a speed of 56 km/h (35 mph) must
be exceeded, you must disconnect the rear driveshaft. With the rear
driveshaft disconnected, the maximum speed is 88 km/h (55 mph) and
there are no mileage restrictions.
See your dealer for help with disconnecting the driveshaft.
SNOWPLOWING
Ford recommends the following specifications for low speed, personal
use snow removal:
²F-150/F±250 4WD Regular Cab long wheelbase
²4.6L or 5.4L engine
²Heavy duty service package
²Super engine cooling
²Heavy duty front suspension package
²Automatic transmission with auxiliary automatic transmission fluid
cooling
²All-terrain tires
Do not install a snowplow and plow with your vehicle until it has been
driven at least 800 km (500 miles).
Installing snowplow
Read the following instructions before installing a snowplow:
²Front GAWR must not exceed 63% of the GVW. Add ballast weight to
the back of the vehicle, if necessary. Refer to the Safety Compliance
Certification Label to find Front GAWR.
Driving
145
Page 152 of 232
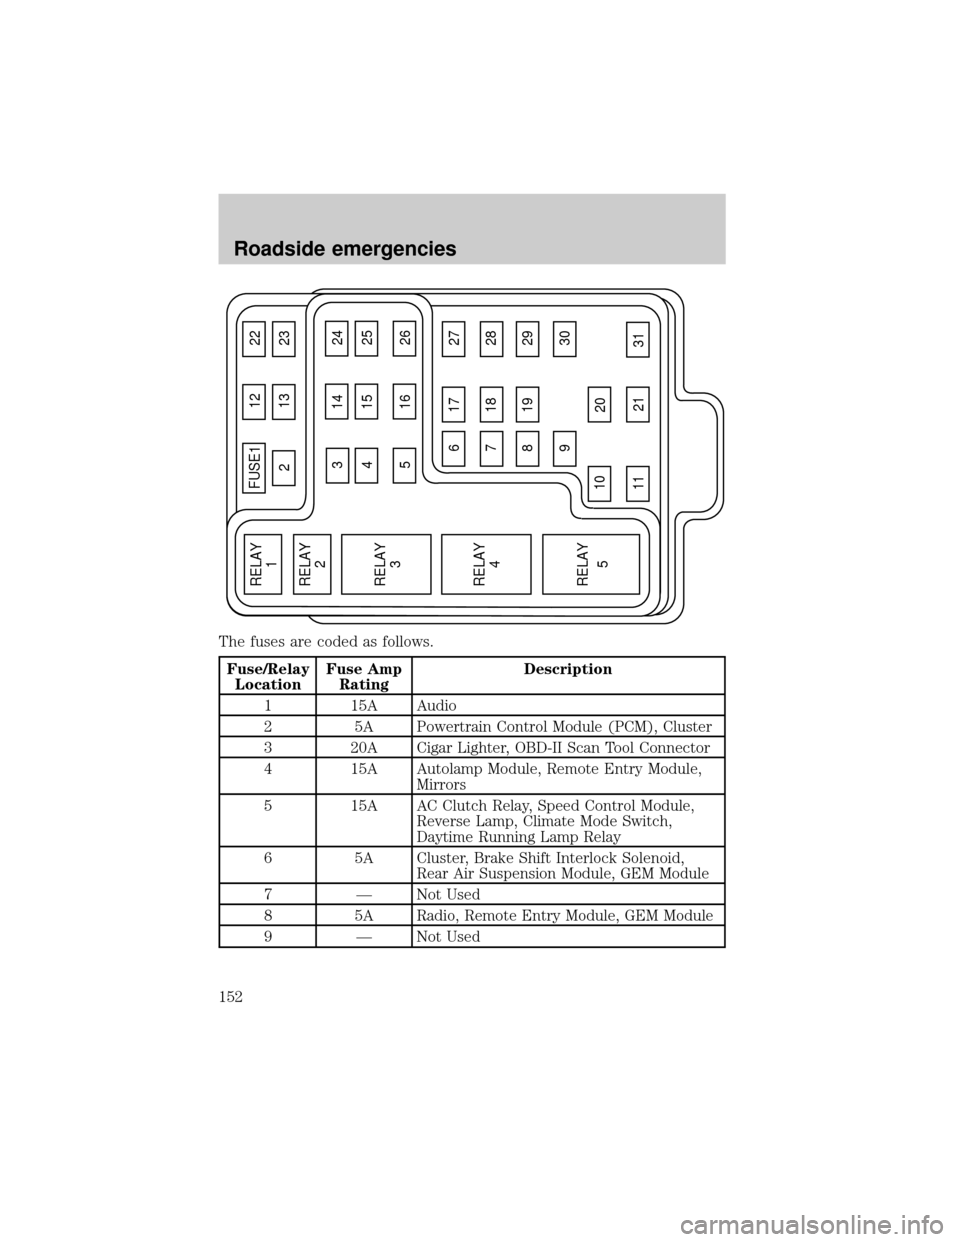
The fuses are coded as follows.
Fuse/Relay
LocationFuse Amp
RatingDescription
1 15A Audio
2 5A Powertrain Control Module (PCM), Cluster
3 20A Cigar Lighter, OBD-II Scan Tool Connector
4 15A Autolamp Module, Remote Entry Module,
Mirrors
5 15A AC Clutch Relay, Speed Control Module,
Reverse Lamp, Climate Mode Switch,
Daytime Running Lamp Relay
6 5A Cluster, Brake Shift Interlock Solenoid,
Rear Air Suspension Module, GEM Module
7 Ð Not Used
8 5A Radio, Remote Entry Module, GEM Module
9 Ð Not Used
FUSE1 12 22
21323
617 27
718 28
819 29
930
20
31 21 11 10
RELAY
5 RELAY
4 RELAY
3 RELAY
2 RELAY
1
31424
41525
51626
Roadside emergencies
152
Page 155 of 232
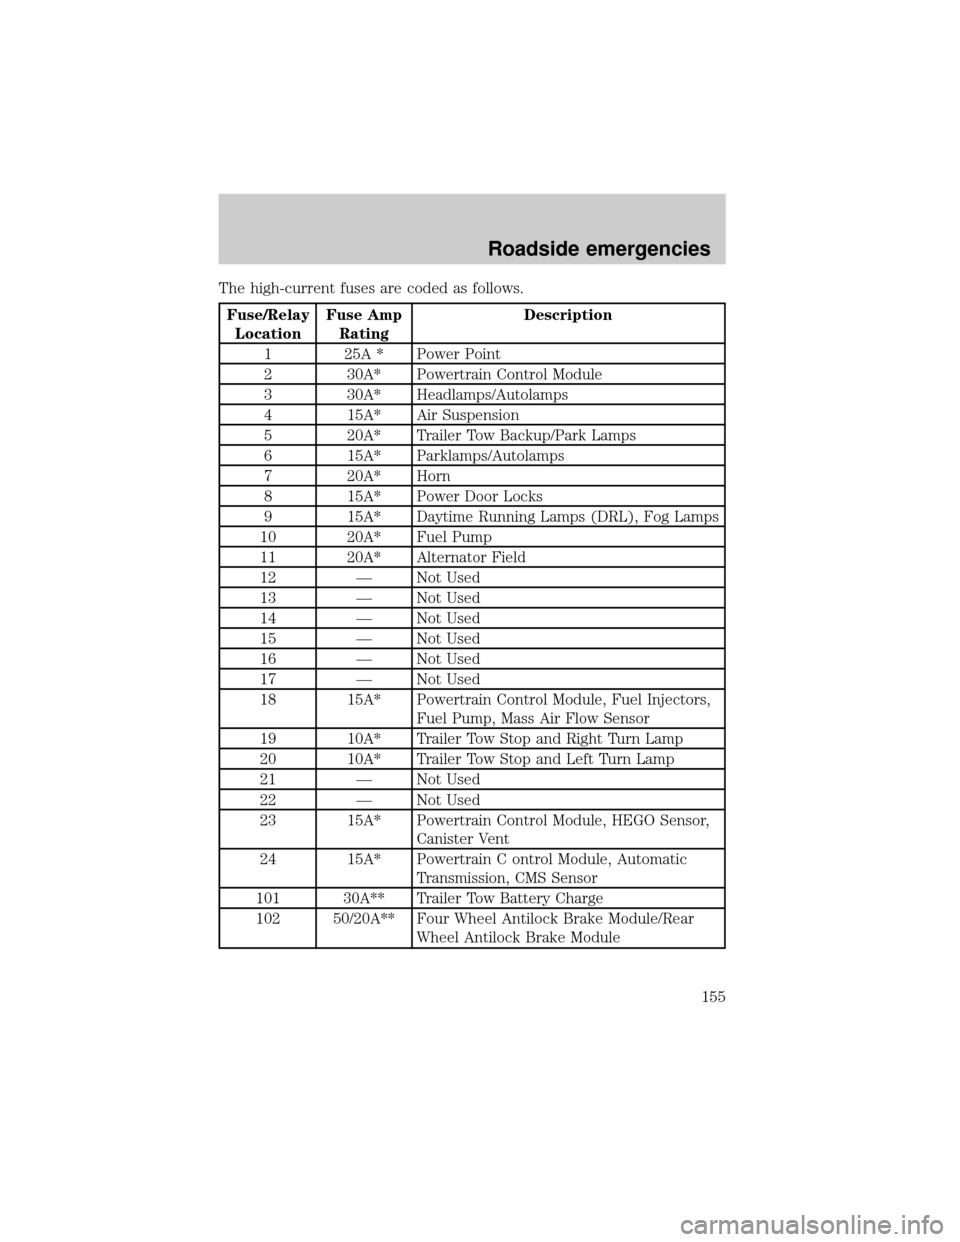
The high-current fuses are coded as follows.
Fuse/Relay
LocationFuse Amp
RatingDescription
1 25A * Power Point
2 30A* Powertrain Control Module
3 30A* Headlamps/Autolamps
4 15A* Air Suspension
5 20A* Trailer Tow Backup/Park Lamps
6 15A* Parklamps/Autolamps
7 20A* Horn
8 15A* Power Door Locks
9 15A* Daytime Running Lamps (DRL), Fog Lamps
10 20A* Fuel Pump
11 20A* Alternator Field
12 Ð Not Used
13 Ð Not Used
14 Ð Not Used
15 Ð Not Used
16 Ð Not Used
17 Ð Not Used
18 15A* Powertrain Control Module, Fuel Injectors,
Fuel Pump, Mass Air Flow Sensor
19 10A* Trailer Tow Stop and Right Turn Lamp
20 10A* Trailer Tow Stop and Left Turn Lamp
21 Ð Not Used
22 Ð Not Used
23 15A* Powertrain Control Module, HEGO Sensor,
Canister Vent
24 15A* Powertrain C ontrol Module, Automatic
Transmission, CMS Sensor
101 30A** Trailer Tow Battery Charge
102 50/20A** Four Wheel Antilock Brake Module/Rear
Wheel Antilock Brake Module
Roadside emergencies
155