Page 29 of 264
Rear console climate controls (if equipped)
Depending on the equipment
package of your vehicle, the rear
console may be equipped with rear
console audio/climate controls.
The instrument panel climate controls must be on in order for the rear
console climate controls to work.
Turn the air distribution control to the desired airflow position.
Turn the fan speed control to the
desired position.
Select
for air to flow through
these vents:
- VOLUME +
MODE
SEEK MEMORY
- VOLUME +
MODE
SEEK MEMORY
SEEK– VOLUME + BAND
MEMORY
Controls and features
29
Page 30 of 264
Selectfor air to flow through
these vents:
REAR WINDOW DEFROSTER
The rear defroster control is located
on the instrument panel.
Press the rear defroster control to
clear the rear window of thin ice
and fog.
²The small LED will illuminate when the rear defroster is activated.
The ignition must be in the ON position to operate the rear window
defroster.
The defroster turns off automatically after 10 minutes or when the
ignition is turned to the OFF position. To manually turn off the defroster
before ten minutes have passed, push the control again.
SEEK– VOLUME + BAND
MEMORY
Controls and features
30
Page 157 of 264

FOUR-WHEEL DRIVE (4WD) OPERATION (IF EQUIPPED)
If equipped with the Electronic Shift 4WD System, and the
instrument panel control is moved to 4WD Low while the vehicle
is moving, the system will not engage and no damage will occur to
the 4WD system.
All utility-type vehicles and 4WD vehicles have special design and
equipment features to make them capable of performing in a wide
variety of off-road applications. Specific design characteristics give them
higher centers of gravity than ordinary passenger cars.
Utility and four-wheel drive vehicles arenotdesigned for
cornering at speeds as high as passenger cars any more than
low-slung sports cars are designed to perform satisfactorily under
off-road conditions. Avoid sharp turns or abrupt maneuvers in these
vehicles.
4WD High and 4WD Low operation is not recommended on dry
pavement. Doing so could result in difficult disengagement of the
transfer case, increased tire wear and decreased fuel economy.
Control-Trac automatic four-wheel drive system (if equipped)
The 4WD system uses all four wheels to power the vehicle. This
increases traction, enabling you to drive your 4x4 over terrain and road
conditions not normally traveled by two-wheel drive vehicles.
Power is supplied to all four wheels through a transfer case that allows
you to select a four-wheel drive mode best suited for your current
driving conditions.
Positions of the Control-Trac system
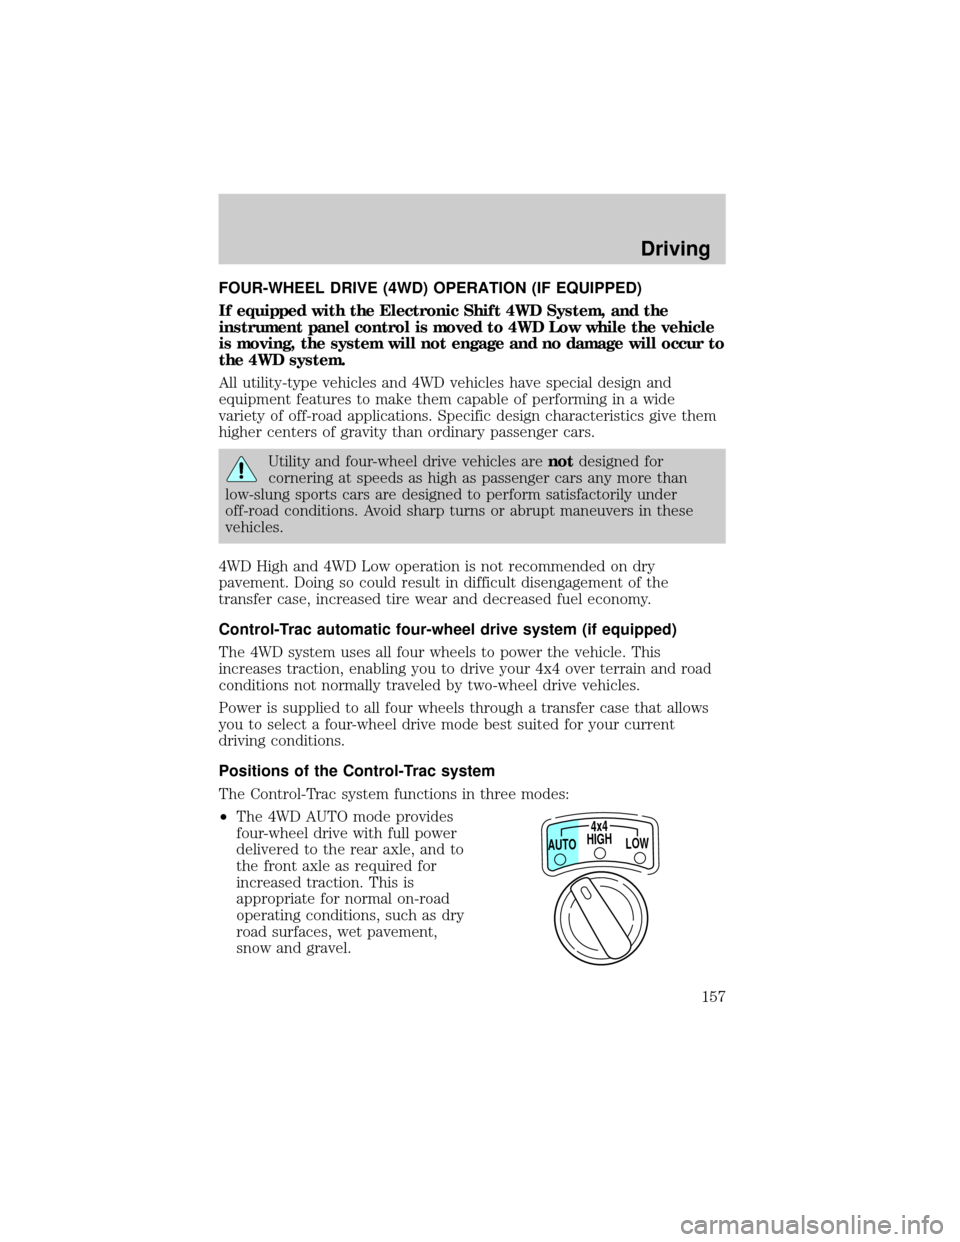
The Control-Trac system functions in three modes:
²The 4WD AUTO mode provides
four-wheel drive with full power
delivered to the rear axle, and to
the front axle as required for
increased traction. This is
appropriate for normal on-road
operating conditions, such as dry
road surfaces, wet pavement,
snow and gravel.
HIGH4x4
LOW AUTO
Driving
157
Page 181 of 264
Passenger compartment fuse panel
The fuse panel is located on the left
hand side of the instrument panel
facing the driver's side door. Pull the
panel cover outward to access the
fuses.
To remove a fuse use the fuse puller tool provided on the fuse panel
cover.
1 234
5 678
9 101112
13 14 15 16
17 18 19 20
21 22 23 24
25 26
29 30
35 36
313233
34
27 28
Roadside emergencies
181
Page 183 of 264
Fuse/Relay
LocationFuse Amp
RatingDescription
20 7.5A RAP Module, Generic Electronic Module
(GEM), Radio
21 15A Flasher (Hazard)
22 20A Auxiliary Power Socket
23 Ð Not Used
24 7.5A Clutch Pedal Position (CPP) Switch, Starter
Interrupt Relay, Anti-Theft
25 7.5A Generic Electronic Module (GEM),
Instrument Cluster, Securi-Lock
26 10A Battery Saver Relay, Electronic Shift Relay,
Interior Lamp Relay, Electronic Shift Control
Module
27 15A DRL, Backup Lamps Switch, DTR Sensor,
Electric Shift
28 7.5A Generic Electronic Module (GEM), Radio,
Memory Seat
29 10A Radio
30 15A Park Lamp/Trailer Tow Relay
31 Ð Not Used
32 10A Heated Mirror
33 15A Headlamps, Daytime Running Lamps (DRL)
Module, Instrument Cluster
34 7.5A Rear Integrated Control Panel, CD
35 7.5A Rear Blower Motor (w/EATC)
36 7.5A EATC Memory, CD, Rear Integrated Control
Panel, Memory Seat, Message Center
Roadside emergencies
183
Page 201 of 264
²Manual transmission:
1. Set the parking brake.
2. Depress the clutch and place the gearshift in 1 (First).
3. Turn off the engine and remove the key.
4. Block the wheels to prevent the vehicle from moving unexpectedly.
Working with the engine on
²Automatic transmission:
1. Set the parking brake and ensure the gearshift is securely latched in P
(Park).
2. Block the wheels to prevent the vehicle from moving unexpectedly.
Do not start your engine with the air cleaner removed and do
not remove it while the engine is running.
²Manual transmission:
1. Set the parking brake, depress the clutch and place the gearshift in N
(Neutral).
2. Block the wheels to prevent the vehicle from moving unexpectedly.
Do not start your engine with the air cleaner removed and do
not remove it while the engine is running.
OPENING THE HOOD
1. Inside the vehicle, pull the hood
release handle located under the
steering column on the instrument
panel.
Maintenance and care
201
Page 240 of 264
License plate lamp bulbs
To change the license plate bulbs:
1. Remove two screws and the
license plate lamp assembly from
the liftgate.
2. Pull the bulb out from lamp
assembly and push in the new bulb.
3. Install the lamp assembly on
liftgate with two screws.
High-mount brakelamp bulbs
For bulb replacement, see a dealer or qualified technician.
Using the right bulbs
Function Number of bulbs Trade number
Park/turn lamps (front) 2 3157 NAK
Headlamps 2 9007
Rear stop/tail lamps 2 3157K
Rear turn lamps 2 3156K
Rear license plate lamps 2 3156K/168
Backup lamp 2 3156K
Rear/turn/sidemarker 2 916NA
Fog lamp 2 899
Cargo lamp 1 211-2
Interior overhead lamp 1 912 (906)
Front door courtesy lamp 1 168
Map lamps 2 168 (T10)
Ashtray lamp 1 161
To replace all instrument panel lights - see your dealer.
Maintenance and care
240
Page 245 of 264

Cleaning the wiper blades and windshield
If the wiper blades do not wipe properly, clean the wiper blade rubber
element with undiluted windshield washer solution or a mild detergent.
To avoid damaging the blades, do not use fuel, kerosene, paint thinner or
other solvents.
If the wiper still does not wipe properly, this could be caused by
substances on the windshield such as tree sap and some hot wax
treatments used by commercial car washes. Clean the outside of the
windshield with a non-abrasive cleanser such as the non-abrasive
Bon-Amitpowder. Rinse thoroughly with clean water.Do notuse
abrasive cleansers on glass as they may cause scratches. The windshield
is clean if beads do not form when you rinse it with water. The
windshield and wiper blades should be cleaned on a regular basis, and
blades or rubber elements replaced when worn.
Cleaning seats equipped with side air bags
Remove dust and loose dirt with a whisk broom or a vacuum cleaner.
Remove fresh spots immediately. Follow the directions that come with
the cleaner. Do not saturate the seat cover with upholstery cleaner.
Do not use chemical solvents or strong detergents when cleaning
the seat mounted side air bag. Such products could contaminate
the side air bag system and affect performance of the side air bag in a
collision.
Cleaning the instrument panel
Clean with a damp cloth, then dry with a dry cloth.
Avoid cleaner or polish that increases the gloss of the upper portion of
the instrument panel. The dull finish in this area helps protect the driver
from undesirable windshield reflection.
Cleaning the overhead console
Clean with a damp cloth, then wipe dry with a dry cloth.
Avoid cleaner or polish that increases the gloss of the console. The dull
finish in this area helps protect the driver from undesirable windshield
reflection.
Maintenance and care
245