1999 DODGE RAM battery
[x] Cancel search: batteryPage 964 of 1691
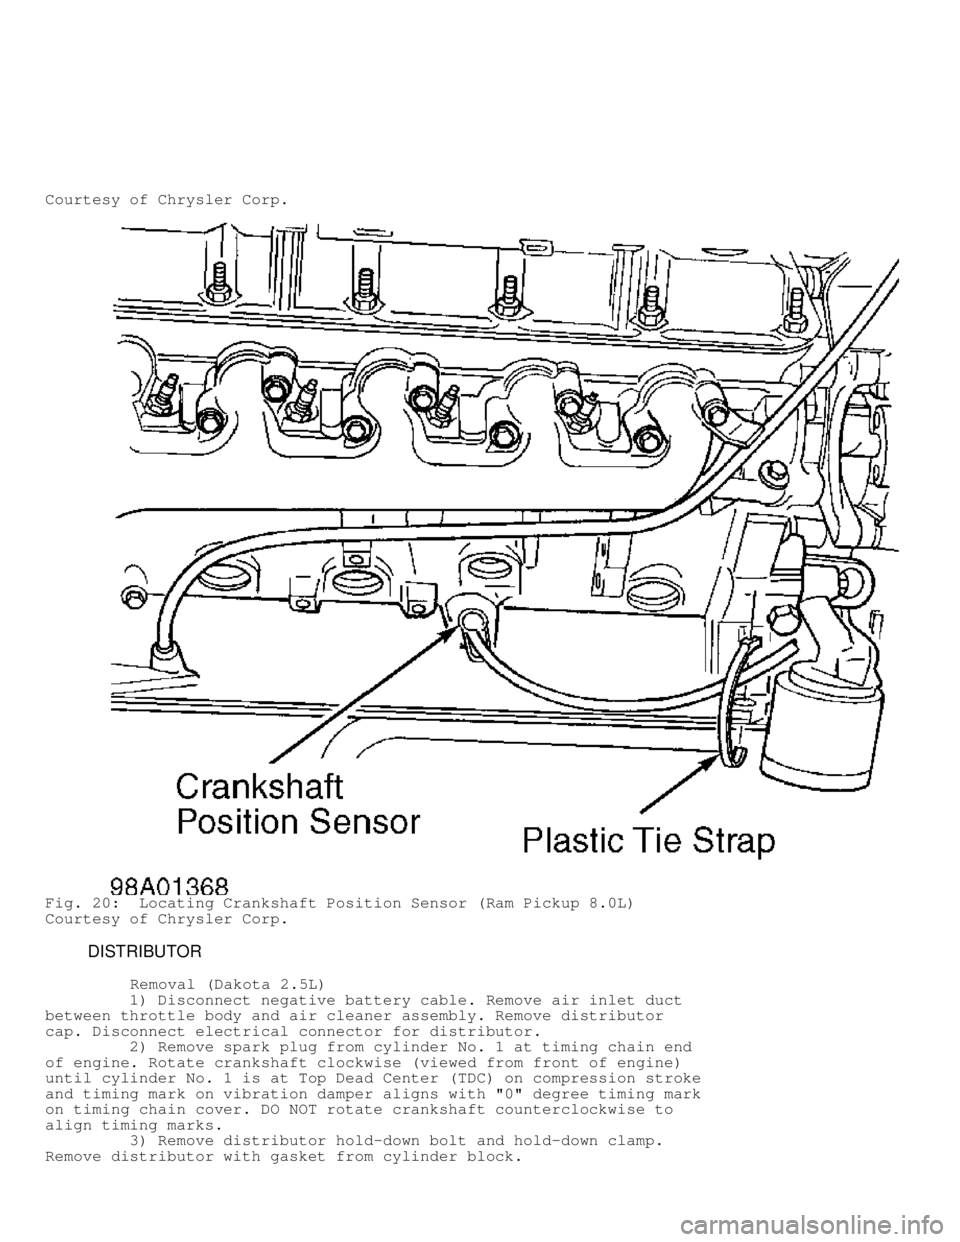
Courtesy of Chrysler Corp.
Fig. 20: Locating Crankshaft Position Sensor (Ram Pickup 8.0L)
Courtesy of Chrysler Corp.
DISTRIBUTOR
Removal (Dakota 2.5L)
1) Disconnect negative battery cable. Remove air inlet duct
between throttle body and air cleaner assembly. Remove distributor
cap. Disconnect electrical connector for distributor.
2) Remove spark plug from cylinder No. 1 at timing chain end
of engine. Rotate crankshaft clockwise (viewed from front of engine)
until cylinder No. 1 is at Top Dead Center (TDC) on compression stroke\
and timing mark on vibration damper aligns with "0" degree timing mark
on timing chain cover. DO NOT rotate crankshaft counterclockwise to
align timing marks.
3) Remove distributor hold-down bolt and hold-down clamp.
Remove distributor with gasket from cylinder block.
Page 967 of 1691
block. Install distributor so distributor shaft engages with slot in
oil pump drive gear. It may be necessary to slightly rotate
distributor during installation.
6) When distributor is fully seated, the distributor rotor
should be at 3 o'clock position and center of hold-down bolt area on
distributor housing should align with distributor hold-down bolt area
on cylinder block.
7) Install hold-down clamp and distributor hold-down bolt.
Tighten distributor hold-down bolt to specification. See TORQUE
SPECIFICATIONS.
8) If installing a factory replacement distributor, remove
plastic alignment pin from distributor housing. If installing original
or used distributor, remove drift from distributor housing and
reinstall camshaft position sensor. On all applications, install
distributor cap and remaining components. Base ignition timing is
nonadjustable, as ignition timing and timing advance are controlled by
the Powertrain Control Module (PCM).
Removal (Dakota 3.9L, 5.2L & 5.9L, Durango, Ram Pickup 3.9L,
5.2L & 5.9L, Ram Van & Ram Wagon)
1) Disconnect negative battery cable. On Ram Van and Ram
Wagon, remove engine cover. On all models, remove air cleaner
assembly. Remove distributor cap. Disconnect electrical connector for
distributor.
2) Rotate crankshaft clockwise (viewed from front of engine)\
until cylinder No. 1 is at Top Dead Center (TDC) on compression stroke\
and timing mark on vibration damper aligns with TDC timing mark on
timing chain cover. Cylinder No. 1 is the front cylinder on driver's
side of engine.
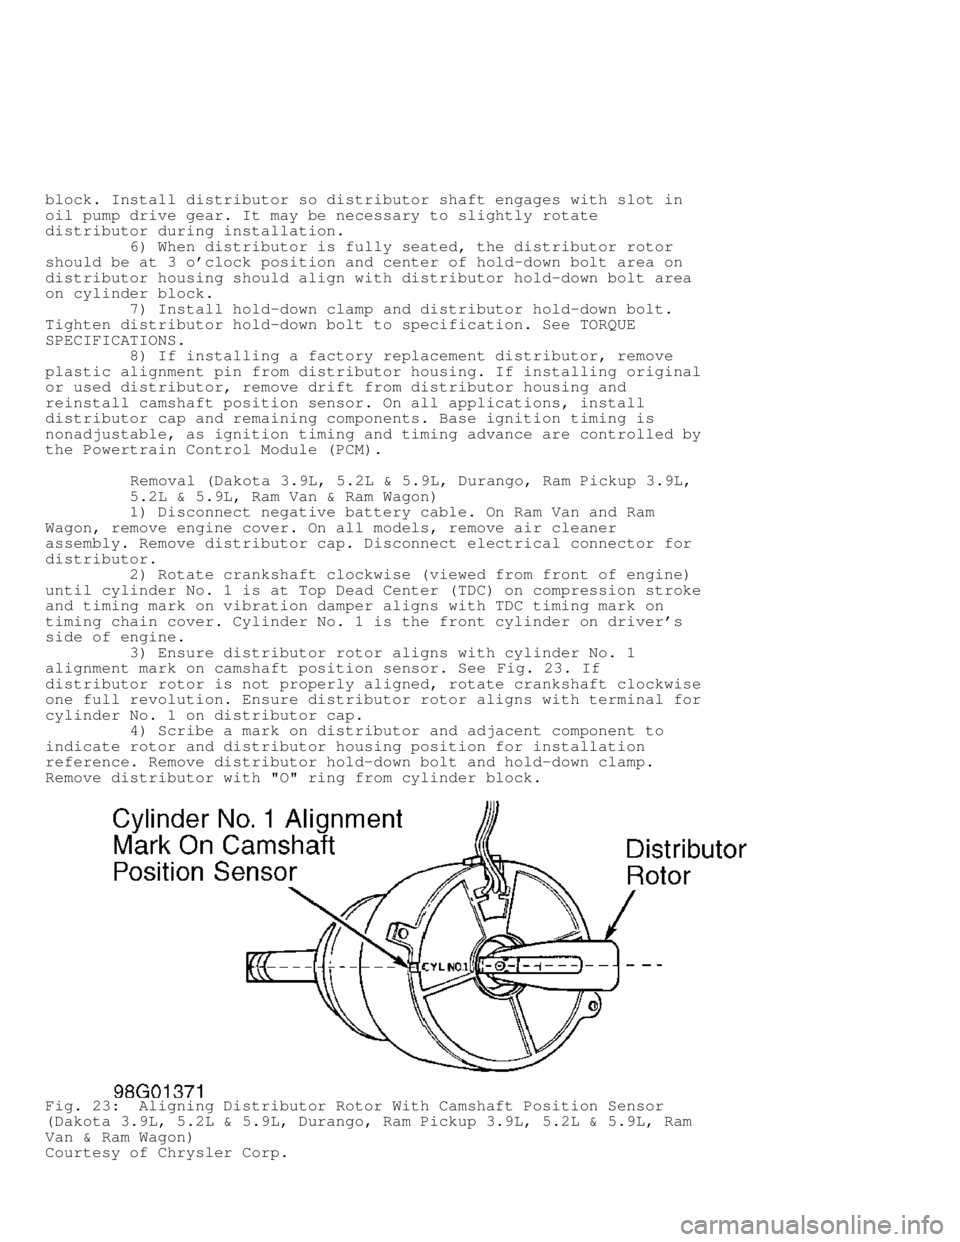
3) Ensure distributor rotor aligns with cylinder No. 1
alignment mark on camshaft position sensor. See Fig. 23. If
distributor rotor is not properly aligned, rotate crankshaft clockwise
one full revolution. Ensure distributor rotor aligns with terminal for
cylinder No. 1 on distributor cap.
4) Scribe a mark on distributor and adjacent component to
indicate rotor and distributor housing position for installation
reference. Remove distributor hold-down bolt and hold-down clamp.
Remove distributor with "O" ring from cylinder block.
Fig. 23: Aligning Distributor Rotor With Camshaft Position Sensor
(Dakota 3.9L, 5.2L & 5.9L, Durango, Ram Pickup 3.9L, 5.2L & 5.9L, Ram
Van & Ram Wagon)
Courtesy of Chrysler Corp.
Page 969 of 1691
pulley for the accessory drive belt, as these bolts are under
tension. If necessary to remove these bolts, accessory drive
belt must be removed first.
2) Remove ignition coil retaining bolts or nuts with ignition
coil from the ignition coil mounting bracket. On 3.9L, 5.2L and 5.9L
with light-duty emissions, DO NOT remove ignition coil-to-cylinder
head mounting bracket bolts, as these bolts are under tension. On all
applications, to install, reverse removal procedure. Tighten ignition
coil retaining bolts or nuts to specification. See TORQUE
SPECIFICATIONS.
Removal & Installation (Ram Pickup 8.0L)
1) Two separate ignition coils are located above passenger's
side valve cover. Each ignition coil can be serviced separately. On
all ignition coil applications, disconnect spark plug wires and
electrical connector from ignition coil.
2) Remove ignition coil retaining bolts and ignition coil
from ignition coil mounting bracket. To install, reverse removal
procedure. Ensure ignition coil is mounted on ignition coil mounting
bracket with electrical connector facing downward. Tighten ignition
coil retaining bolts to specification. See TORQUE SPECIFICATIONS.
FUEL SYSTEM
FUEL SYSTEM PRESSURE RELEASE
WARNING: Always release fuel pressure before disconnecting any fuel
injection-related component. DO NOT allow fuel to contact
engine or electrical components.
1) Remove fuel cap from fuel tank. Note location of spring
loaded flapper valve inside fuel tank filler tube assembly. Flapper
valve is located just below the fuel cap area on fuel tank filler tube
assembly. Flapper valve is used as a secondary way of sealing the fuel
tank if fuel cap was not properly tightened.
WARNING: When opening flapper valve inside fuel tank filler tube
assembly, ensure a non-metallic object is used to prevent any
sparks.
2) Using a non-metallic object, push flapper valve inside
filler tube assembly downward to release any pressure from the fuel
tank. Ensure all pressure is released from fuel tank.
3) Remove fuel pump relay from Power Distribution Center
(PDC). Fuel pump relay may be identified by label on inside of PDC
cover. See POWER DISTRIBUTION CENTER (PDC) LOCATION table.
4) On all models, start engine and allow engine to idle until
engine stalls. Attempt to restart engine until engine will no longer
run. Turn ignition off.
CAUTION: Ensure steps 1) through 4) are performed before proceeding.
Steps 3) and 4) must be performed to ensure most of the fuel
pressure is released from fuel rails to prevent an excessive
amount of fuel being delivered into the cylinders.
5) Remaining fuel pressure is released by energizing a fuel
injector. Disconnect electrical connector at any fuel injector.
6) Connect jumper wire between one electrical terminal on
fuel injector and positive battery terminal. Connect another jumper
wire on remaining electrical terminal on fuel injector.
Page 970 of 1691
CAUTION: DO NOT apply battery voltage to fuel injector for extended
periods, or fuel injector may be damaged.
7) Momentarily touch remaining end of jumper wire to negative
battery terminal in short intervals to energize fuel injector and
release remaining fuel pressure.
8) Remove jumper wires. Reinstall electrical connector and
fuel pump relay. Fuel system components may now be serviced. Cover
fuel lines with shop towel before disconnecting, as some residual fuel
pressure may exist.
9) Diagnostic Trouble Code (DTCs) may have been stored in
Powertrain Control Module (PCM) due to the removal of fuel pump relay.\
Using scan tool, clear DTCs from PCM. See appropriate SELF-DIAGNOSTICS
article for clearing of DTCs.
FUEL LINE DISCONNECT FITTINGS
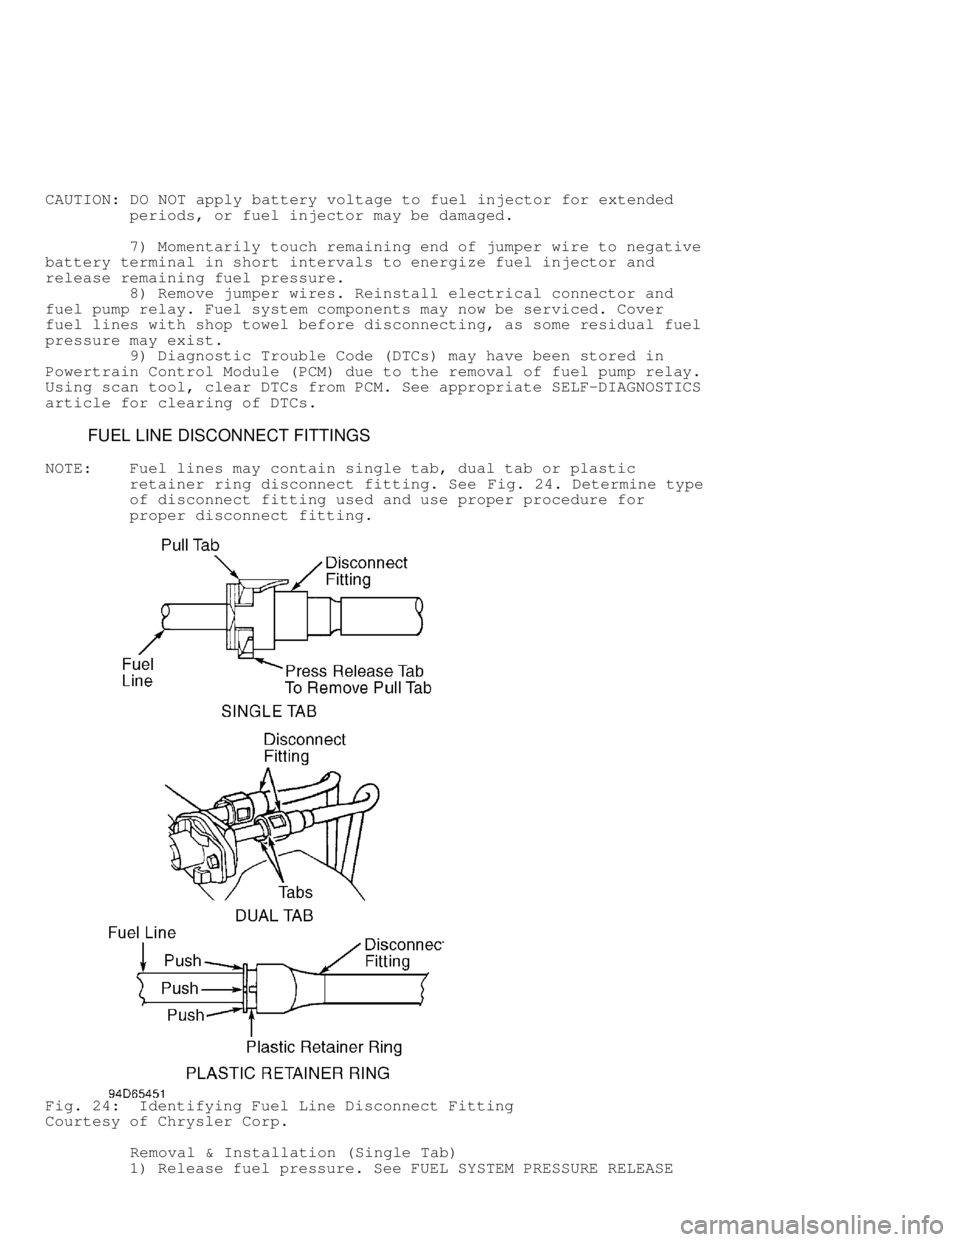
NOTE: Fuel lines may contain single tab, dual tab or plastic
retainer ring disconnect fitting. See Fig. 24. Determine type
of disconnect fitting used and use proper procedure for
proper disconnect fitting.
Fig. 24: Identifying Fuel Line Disconnect Fitting
Courtesy of Chrysler Corp.
Removal & Installation (Single Tab)
1) Release fuel pressure. See FUEL SYSTEM PRESSURE RELEASE
Page 971 of 1691
N - R EM OVE /IN STA LL/O VER HAU L
under FUEL SYSTEM. Disconnect negative battery cable. Ensure disconnect fitting and fuel lines are clean. Note location of releasetab and pull tab on disconnect fitting. See Fig. 24.
CAUTION: Release tab must be pressed downward before removing pull
tab, or pull tab will be damaged. 2) Press release tab downward. Use screwdriver to pry pull tab upward until pull tab separates from disconnect fitting. Removedisconnect fitting from fuel line. Inspect components for damage. Ifdisconnect fitting is damaged, entire assembly must be replaced, asonly pull tab may be replaced. 3) To install, ensure fuel line and disconnect fitting areclean. Lubricate fuel line and disconnect fitting with engine oil.Install disconnect fitting on fuel line until disconnect fittingbottoms on fuel line. 4) Install NEW pull tab until pull tab locks in disconnectfitting. DO NOT reuse old pull tab. Pull on fuel line and disconnectfitting to ensure components are properly locked together. Reconnectnegative battery cable. Start engine and check for leaks. Removal & Installation (Dual Tab)
1) Release fuel pressure. See FUEL SYSTEM PRESSURE RELEASE under FUEL SYSTEM. Disconnect negative battery cable. Ensuredisconnect fitting and fuel lines are clean. Note location of tabs ondisconnect fitting. See Fig. 24.
2) Squeeze both tabs against disconnect fitting. Pulldisconnect fitting from fuel line. The plastic retainer will remain onthe fuel system component being serviced. The "O" rings and spacerwill remain in the disconnect fitting. 3) Inspect components for damage. If disconnect fitting isdamaged, entire assembly must be replaced. The only component that maybe replaced is the plastic retainer. If plastic retainer must beremoved from fuel system component, carefully release the plasticretainer from the fuel system component using 2 screwdrivers. Inspectplastic retainer for cracks or damage. Replace plastic retainer ifdefective. 4) To install, ensure fuel line and disconnect fitting areclean. Lubricate fuel line and disconnect fitting with engine oil.Install disconnect fitting on fuel line until click sound is heard. 5) Pull on fuel line and disconnect fitting to ensurecomponents are properly locked together. Reconnect negative batterycable. Start engine and check for leaks. Removal & Installation (Plastic Retainer Ring)
1) Release fuel pressure. See FUEL SYSTEM PRESSURE RELEASE under FUEL SYSTEM. Disconnect negative battery cable. Ensuredisconnect fitting and fuel lines are clean. Note location of plasticretainer ring on disconnect fitting. See Fig. 24.
NOTE: Plastic retainer ring must be pressed evenly into disconnect fitting. If plastic retainer is not even, it will be difficult to remove disconnect fitting from fuel line. 2) Firmly push disconnect fitting toward the fuel line while pushing plastic retainer ring evenly into disconnect fitting. Withplastic retainer ring fully depressed, pull disconnect fitting fromfuel line. 3) Inspect components for damage. If disconnect fitting isdamaged, entire assembly must be replaced. 4) To install, ensure fuel line and disconnect fitting areclean. Lubricate fuel line and disconnect fitting with engine oil.Install disconnect fitting on fuel line until click sound is heard.
Page 972 of 1691
5) Pull on fuel line and disconnect fitting to ensure
components are properly locked together. Reconnect negative battery
cable. Start engine and check for leaks.
FUEL LINE AT FUEL RAIL
Removal & Installation (Dakota, Durango & Ram Pickup)
1) Release fuel pressure. See FUEL SYSTEM PRESSURE RELEASE
under FUEL SYSTEM. Disconnect negative battery cable.
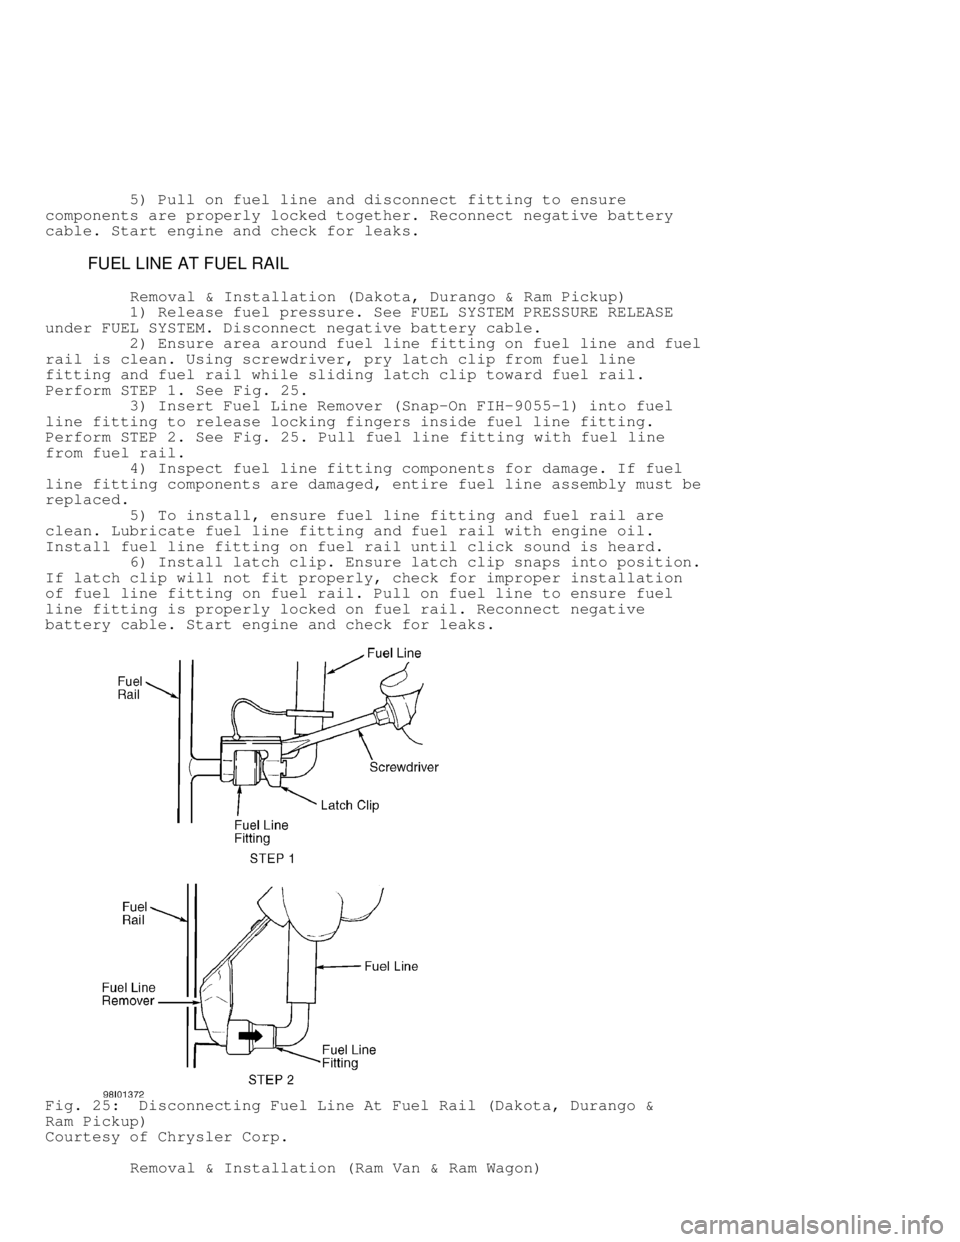
2) Ensure area around fuel line fitting on fuel line and fuel
rail is clean. Using screwdriver, pry latch clip from fuel line
fitting and fuel rail while sliding latch clip toward fuel rail.
Perform STEP 1. See Fig. 25.
3) Insert Fuel Line Remover (Snap-On FIH-9055-1) into fuel
line fitting to release locking fingers inside fuel line fitting.
Perform STEP 2. See Fig. 25. Pull fuel line fitting with fuel line
from fuel rail.
4) Inspect fuel line fitting components for damage. If fuel
line fitting components are damaged, entire fuel line assembly must be
replaced.
5) To install, ensure fuel line fitting and fuel rail are
clean. Lubricate fuel line fitting and fuel rail with engine oil.
Install fuel line fitting on fuel rail until click sound is heard.
6) Install latch clip. Ensure latch clip snaps into position.
If latch clip will not fit properly, check for improper installation
of fuel line fitting on fuel rail. Pull on fuel line to ensure fuel
line fitting is properly locked on fuel rail. Reconnect negative
battery cable. Start engine and check for leaks.
Fig. 25: Disconnecting Fuel Line At Fuel Rail (Dakota, Durango &
Ram Pickup)
Courtesy of Chrysler Corp.
Removal & Installation (Ram Van & Ram Wagon)
Page 973 of 1691
1) Release fuel pressure. See FUEL SYSTEM PRESSURE RELEASE
under FUEL SYSTEM. Disconnect negative battery cable.
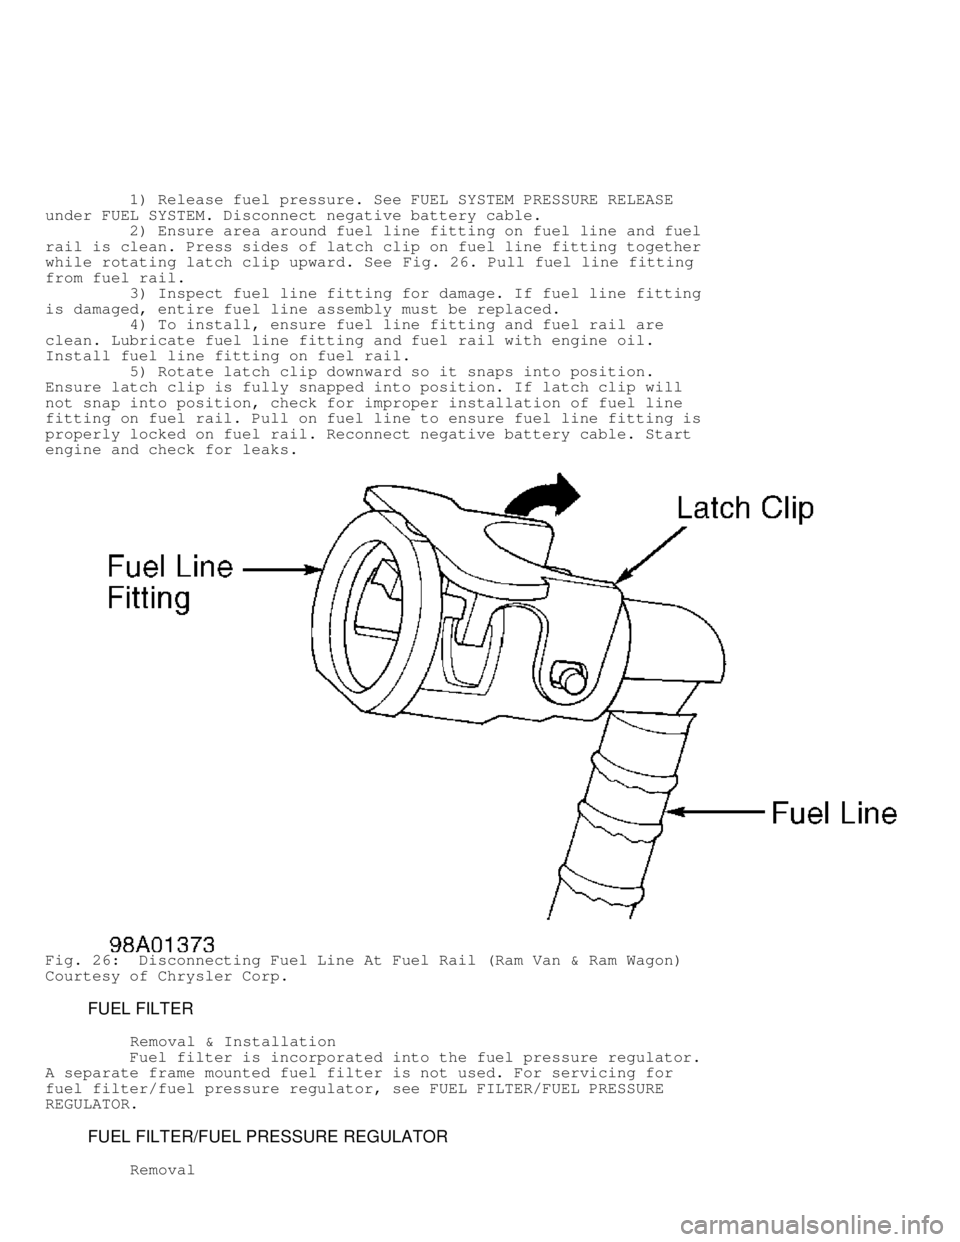
2) Ensure area around fuel line fitting on fuel line and fuel
rail is clean. Press sides of latch clip on fuel line fitting together
while rotating latch clip upward. See Fig. 26. Pull fuel line fitting
from fuel rail.
3) Inspect fuel line fitting for damage. If fuel line fitting
is damaged, entire fuel line assembly must be replaced.
4) To install, ensure fuel line fitting and fuel rail are
clean. Lubricate fuel line fitting and fuel rail with engine oil.
Install fuel line fitting on fuel rail.
5) Rotate latch clip downward so it snaps into position.
Ensure latch clip is fully snapped into position. If latch clip will
not snap into position, check for improper installation of fuel line
fitting on fuel rail. Pull on fuel line to ensure fuel line fitting is
properly locked on fuel rail. Reconnect negative battery cable. Start
engine and check for leaks.
Fig. 26: Disconnecting Fuel Line At Fuel Rail (Ram Van & Ram Wagon)
Courtesy of Chrysler Corp.
FUEL FILTER
Removal & Installation
Fuel filter is incorporated into the fuel pressure regulator.
A separate frame mounted fuel filter is not used. For servicing for
fuel filter/fuel pressure regulator, see FUEL FILTER/FUEL PRESSURE
REGULATOR.
FUEL FILTER/FUEL PRESSURE REGULATOR
Removal
Page 983 of 1691
line on fuel rail using proper procedure. Go to step 5).
4) Release fuel pressure from fuel system. See FUEL SYSTEM
PRESSURE RELEASE. Ensure negative battery cable is disconnected.
Remove fuel tank cap to release any residual fuel tank pressure.
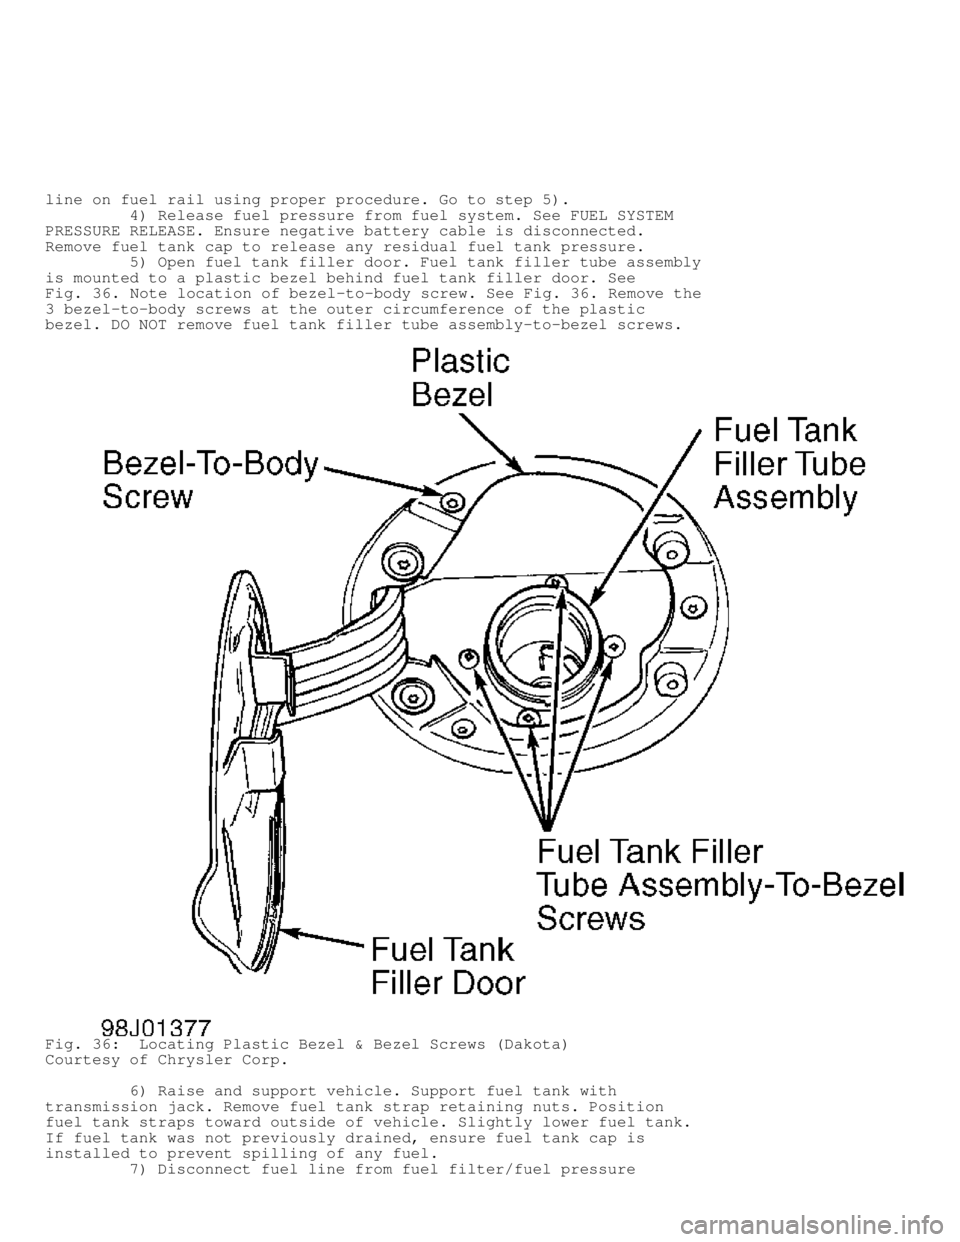
5) Open fuel tank filler door. Fuel tank filler tube assembly
is mounted to a plastic bezel behind fuel tank filler door. See
Fig. 36. Note location of bezel-to-body screw. See Fig. 36. Remove the
3 bezel-to-body screws at the outer circumference of the plastic
bezel. DO NOT remove fuel tank filler tube assembly-to-bezel screws.
Fig. 36: Locating Plastic Bezel & Bezel Screws (Dakota)
Courtesy of Chrysler Corp.
6) Raise and support vehicle. Support fuel tank with
transmission jack. Remove fuel tank strap retaining nuts. Position
fuel tank straps toward outside of vehicle. Slightly lower fuel tank.
If fuel tank was not previously drained, ensure fuel tank cap is
installed to prevent spilling of any fuel.
7) Disconnect fuel line from fuel filter/fuel pressure