Page 193 of 328

6-
yellowblue
6-1
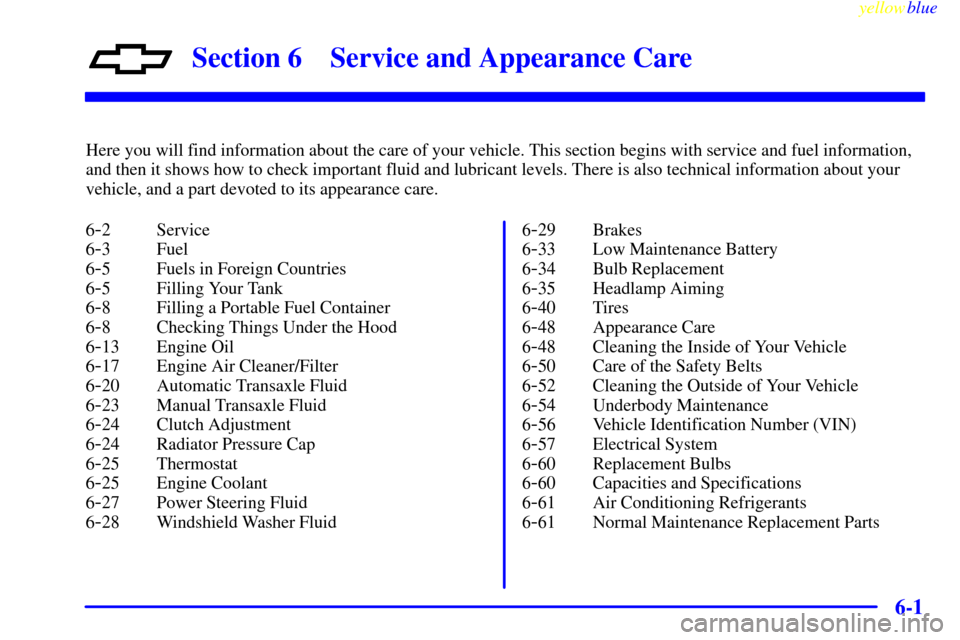
Section 6 Service and Appearance Care
Here you will find information about the care of your vehicle. This section begins with service and fuel information,
and then it shows how to check important fluid and lubricant levels. There is also technical information about your
vehicle, and a part devoted to its appearance care.
6
-2 Service
6
-3 Fuel
6
-5 Fuels in Foreign Countries
6
-5 Filling Your Tank
6
-8 Filling a Portable Fuel Container
6
-8 Checking Things Under the Hood
6
-13 Engine Oil
6
-17 Engine Air Cleaner/Filter
6
-20 Automatic Transaxle Fluid
6
-23 Manual Transaxle Fluid
6
-24 Clutch Adjustment
6
-24 Radiator Pressure Cap
6
-25 Thermostat
6
-25 Engine Coolant
6
-27 Power Steering Fluid
6
-28 Windshield Washer Fluid6
-29 Brakes
6
-33 Low Maintenance Battery
6
-34 Bulb Replacement
6
-35 Headlamp Aiming
6
-40 Tires
6
-48 Appearance Care
6
-48 Cleaning the Inside of Your Vehicle
6
-50 Care of the Safety Belts
6
-52 Cleaning the Outside of Your Vehicle
6
-54 Underbody Maintenance
6
-56 Vehicle Identification Number (VIN)
6
-57 Electrical System
6
-60 Replacement Bulbs
6
-60 Capacities and Specifications
6
-61 Air Conditioning Refrigerants
6
-61 Normal Maintenance Replacement Parts
Page 203 of 328
yellowblue
6-11 1.0L L3 Engine
When you lift the hood, you'll see these items:
A. Hood Prop
B. Engine Oil Dipstick
C. Engine Air Cleaner/Filter
D. Engine Oil Fill CapE. Radiator Pressure Cap
F. Brake Fluid Reservoir
G. Engine Coolant ReservoirH. Battery
I. Main Fuse Box
J. Windshield Washer Reservoir
Page 204 of 328
yellowblue
6-12 1.3L L4 Engine
When you lift the hood, you'll see these items:
A. Hood Prop
B. Power Steering Reservoir
C. Engine Air Cleaner/Filter
D. Engine Oil DipstickE. Engine Oil Fill Cap
F. Electric Engine Cooling Fan
G. Radiator Pressure Cap
H. Brake Fluid ReservoirI. Engine Coolant Reservoir
J. Battery
K. Main Fuse Box
L. Windshield Washer Reservoir
Page 209 of 328
yellowblue
6-17 What to Do with Used Oil
Did you know that used engine oil contains certain
elements that may be unhealthy for your skin and could
even cause cancer? Don't let used oil stay on your skin
for very long. Clean your skin and nails with soap and
water, or a good hand cleaner. Wash or properly throw
away clothing or rags containing used engine oil. (See
the manufacturer's warnings about the use and disposal
of oil products.)
Used oil can be a real threat to the environment. If you
change your own oil, be sure to drain all free
-flowing oil
from the filter before disposal. Don't ever dispose of oil
by putting it in the trash, pouring it on the ground, into
sewers, or into streams or bodies of water. Instead,
recycle it by taking it to a place that collects used oil. If
you have a problem properly disposing of your used oil,
ask your dealer, a service station or a local recycling
center for help.
Engine Air Cleaner/Filter
1.0L L3 Engine
Page 210 of 328
yellowblue
6-18
1.3L L4 Engine
Refer to the Maintenance Schedule to determine when to
replace the air filter.
See ªScheduled Maintenance Servicesº in the Index.
CAUTION:
Operating the engine with the air cleaner/filter
off can cause you or others to be burned. The air
cleaner not only cleans the air, it stops flame if
the engine backfires. If it isn't there, and the
engine backfires, you could be burned. Don't
drive with it off, and be careful working on the
engine with the air cleaner/filter off.
NOTICE:
If the air cleaner/filter is off, a backfire can cause
a damaging engine fire. And, dirt can easily get
into your engine, which will damage it. Always
have the air cleaner/filter in place when
you're driving.
Page 211 of 328
yellowblue
6-19 Engine Air Cleaner/Filter Replacement
1.0L L3 Engine
To check or replace the filter on vehicles with a
1.0L L3 engine:
1. Remove the center wing nut.
2. Lift and release the four clips.
3. Lift up the cover.
4. Pull out the filter and replace the filter.
5. Be sure to align the tab on the filter.
6. Reverse the above steps to replace the cover.
1.3L L4 Engine
To check or replace the filter on vehicles with a
1.3L L4 engine:
1. Remove the screws at the front and back of the
air cleaner.
2. Open the two retaining clips.
3. Lift and separate the two parts of the air cleaner housing.
4. Remove and replace the air filter.
5. Make sure that the hinge in the bottom of the air
cleaner housing is engaged.
6. Reverse the above steps to replace the air
cleaner housing.
Page 252 of 328

yellowblue
6-60
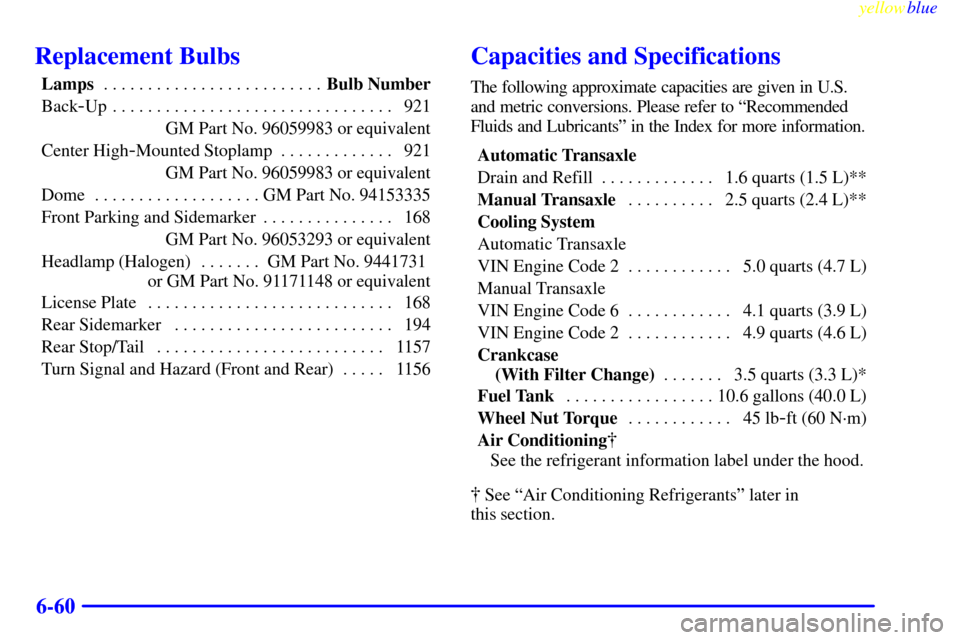
Replacement Bulbs
Lamps Bulb Number. . . . . . . . . . . . . . . . . . . . . . . . .
Back
-Up 921. . . . . . . . . . . . . . . . . . . . . . . . . . . . . . . .
GM Part No. 96059983 or equivalent
Center High
-Mounted Stoplamp 921. . . . . . . . . . . . .
GM Part No. 96059983 or equivalent
Dome GM Part No. 94153335. . . . . . . . . . . . . . . . . . .
Front Parking and Sidemarker 168. . . . . . . . . . . . . . .
GM Part No. 96053293 or equivalent
Headlamp (Halogen) GM Part No. 9441731 . . . . . . .
or GM Part No. 91171148 or equivalent
License Plate 168. . . . . . . . . . . . . . . . . . . . . . . . . . . .
Rear Sidemarker 194. . . . . . . . . . . . . . . . . . . . . . . . .
Rear Stop/Tail 1157. . . . . . . . . . . . . . . . . . . . . . . . . .
Turn Signal and Hazard (Front and Rear) 1156. . . . .
Capacities and Specifications
The following approximate capacities are given in U.S.
and metric conversions. Please refer to ªRecommended
Fluids and Lubricantsº in the Index for more information.
Automatic Transaxle
Drain and Refill 1.6 quarts (1.5 L)**. . . . . . . . . . . . .
Manual Transaxle2.5 quarts (2.4 L)** . . . . . . . . . .
Cooling System
Automatic Transaxle
VIN Engine Code 2 5.0 quarts (4.7 L). . . . . . . . . . . .
Manual Transaxle
VIN Engine Code 6 4.1 quarts (3.9 L). . . . . . . . . . . .
VIN Engine Code 2 4.9 quarts (4.6 L). . . . . . . . . . . .
Crankcase
(With Filter Change)3.5 quarts (3.3 L)* . . . . . . .
Fuel Tank10.6 gallons (40.0 L) . . . . . . . . . . . . . . . . .
Wheel Nut Torque45 lb
-ft (60 N´m) . . . . . . . . . . . .
Air Conditioning�
See the refrigerant information label under the hood.
� See ªAir Conditioning Refrigerantsº later in
this section.
Page 253 of 328

yellowblue
6-61
*When changing the oil filter, additional oil may be
needed. Recheck the oil level after filling. See ªEngine
Oilº in the Index.
**Recheck the fluid level after filling. See ªAutomatic
Transaxle Fluidº or ªManual Transaxle Fluidº in
the Index.
Engine Specifications
Type
VIN Engine Code 6 L3. . . . . . . . . . . . . . . . . . . . . . .
VIN Engine Code 2 L4. . . . . . . . . . . . . . . . . . . . . . .
Firing Order
VIN Engine Code 6 1
-3-2 . . . . . . . . . . . . . . . . . . . . .
VIN Engine Code 2 1
-3-4-2 . . . . . . . . . . . . . . . . . . .
Horsepower
VIN Engine Code 6 55 hp @ 5700 rpm. . . . . . . . . .
VIN Engine Code 2 79 hp @ 6000 rpm. . . . . . . . . .
Fuel DeliveryFuel Injection . . . . . . . . . . . . . . . . . . .
Piston Displacement
VIN Engine Code 6 61 CID (1.0L). . . . . . . . . . . . . .
VIN Engine Code 2 79 CID (1.3L). . . . . . . . . . . . . .
Valve ArrangementIn
-Head . . . . . . . . . . . . . . . . . . .
Air Conditioning Refrigerants
Not all air conditioning refrigerants are the same.
If the air conditioning system in your vehicle needs
refrigerant, be sure the proper refrigerant is used.
If you're not sure, ask your dealer.
See the refrigerant charge label under the hood for
information regarding refrigerant capacity.
Normal Maintenance
Replacement Parts
Air Cleaner Filter AC Type A1203C. . . . . . . . . . . . . .
Battery 26R
-50S . . . . . . . . . . . . . . . . . . . . . . . . . . . . .
Engine Oil Filter AC Type PF53. . . . . . . . . . . . . . . .
Fuel Filter GM Part No. 96068664 or equivalent. . . . .
PCV Valve GM Part No. 96051849. . . . . . . . . . . . . . .
Radiator Pressure Cap 13 psi (90 kPa). . . . . . . . . . . .
Spark Plugs
1.0L L3 Engine AC Type R42XLS. . . . . . . . . . . . . . .
0.039 to 0.045 inch gap (1.0 to 1.1 mm)
1.3L L4 Engine NGK Type BKR6E11. . . . . . . . . . . .
0.039 to 0.045 inch gap (1.0 to 1.1 mm)
1.3L L4 Engine Denso Type K20PR
-U11 . . . . . . . . .
0.039 to 0.045 inch gap (1.0 to 1.1 mm)