Page 151 of 336

yellowblue
4-7
Avoid needless heavy braking. Some people drive in
spurts
-- heavy acceleration followed by heavy
braking
-- rather than keeping pace with traffic.
This is a mistake. Your brakes may not have time to cool
between hard stops. Your brakes will wear out much
faster if you do a lot of heavy braking. If you keep pace
with the traffic and allow realistic following distances,
you will eliminate a lot of unnecessary braking. That
means better braking and longer brake life.
If your engine ever stops while you're driving, brake
normally but don't pump your brakes. If you do, the
pedal may get harder to push down. If your engine
stops, you will still have some power brake assist. But
you will use it when you brake. Once the power assist is
used up, it may take longer to stop and the brake pedal
will be harder to push.
Anti-Lock Brakes (Option)
Your vehicle may have anti-lock brakes (ABS). ABS is
an advanced electronic braking system that will help
prevent a braking skid.
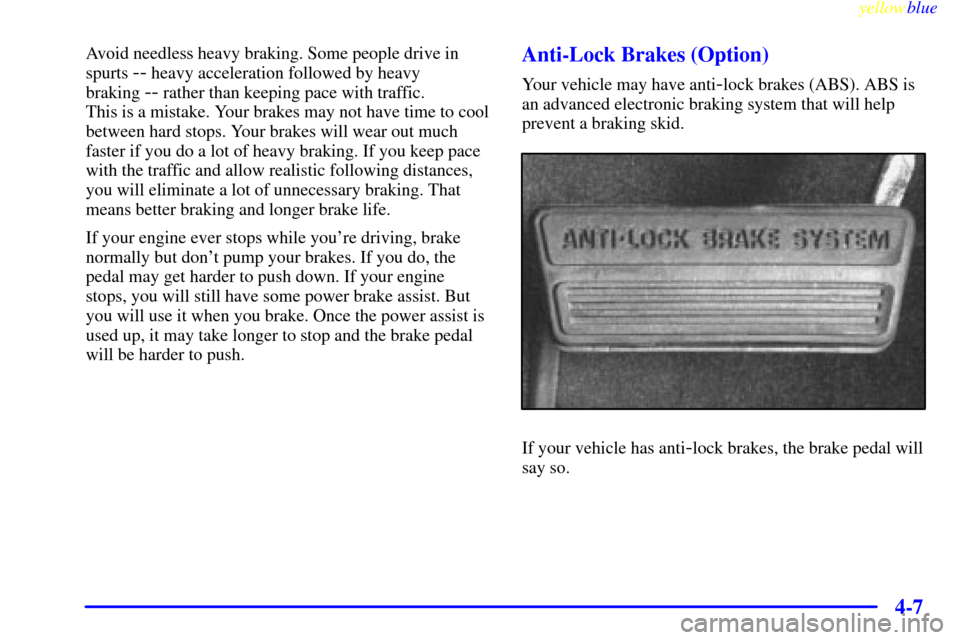
If your vehicle has anti-lock brakes, the brake pedal will
say so.
Page 152 of 336
yellowblue
4-8
And this warning light on
the instrument panel will
come on briefly when you
start your vehicle.
When you start your engine, or when you begin to drive
away, your anti
-lock brake system will check itself. You
may hear a momentary motor or clicking noise while
this test is going on, and you may even notice that your
brake pedal moves or pulses a little. This is normal.
If there's a problem with the anti
-lock brake system, the
anti
-lock brake system warning light will stay on. See
ªAnti
-Lock Brake System Warning Lightº in the Index.
Here's how anti-lock works. Let's say the road is wet.
You're driving safely. Suddenly an animal jumps out in
front of you.
You slam on the brakes. Here's what happens with ABS.
A computer senses that wheels are slowing down. If one
of the wheels is about to stop rolling, the computer will
separately work the brakes at each front wheel and at
both rear wheels.
Page 183 of 336

yellowblue
4-39 Turn Signals When Towing a Trailer
When you tow a trailer, your vehicle may need a
different turn signal flasher and/or extra wiring. Check
with your dealer. The arrows on your instrument panel
will flash whenever you signal a turn or lane change.
Properly hooked up, the trailer lamps will also flash,
telling other drivers you're about to turn, change lanes
or stop.
When towing a trailer, the arrows on your instrument panel
will flash for turns even if the bulbs on the trailer are burned
out. Thus, you may think drivers behind you are seeing your
signal when they are not. It's important to check occasionally
to be sure the trailer bulbs are still working.
Driving On Grades
Reduce speed and shift to a lower gear before you start
down a long or steep downgrade. If you don't shift
down, you might have to use your brakes so much that
they would get hot and no longer work well.
On a long uphill grade, shift down and reduce your
speed to around 45 mph (70 km/h) to reduce the
possibility of engine and transaxle overheating.
If you are towing a trailer, you may prefer to drive in
DRIVE (D) instead of AUTOMATIC OVERDRIVE (�)
(or, as you need to, a lower gear).
Parking on Hills
CAUTION:
You really should not park your vehicle, with a
trailer attached, on a hill. If something goes
wrong, your rig could start to move. People can
be injured, and both your vehicle and the trailer
can be damaged.
But if you ever have to park your rig on a hill, here's
how to do it:
1. Apply your regular brakes, but don't shift into
PARK (P) yet.
2. Have someone place chocks under the trailer wheels.
3. When the wheel chocks are in place, release the
regular brakes until the chocks absorb the load.
4. Reapply the regular brakes. Then apply your parking
brake, and then shift to PARK (P).
5. Release the regular brakes.
Page 255 of 336
yellowblue
6-35
3. Position the radiator air side baffle aside and remove
the two fasteners. Remove the snap screw from
the fascia.4. Slide the headlamp assembly inboard to release the
mounting tabs and gently pull the inside of the
assembly away from the vehicle.
5. Push the tab on the bulb socket and turn
it counterclockwise. Pull the socket out of
the assembly.
6. Remove the bulb from the socket by pulling it out.
Do not twist the bulb.
7. Push in the new bulb.
8. Reverse Steps 1 through 4 to replace the assembly.
Page 274 of 336

yellowblue
6-54
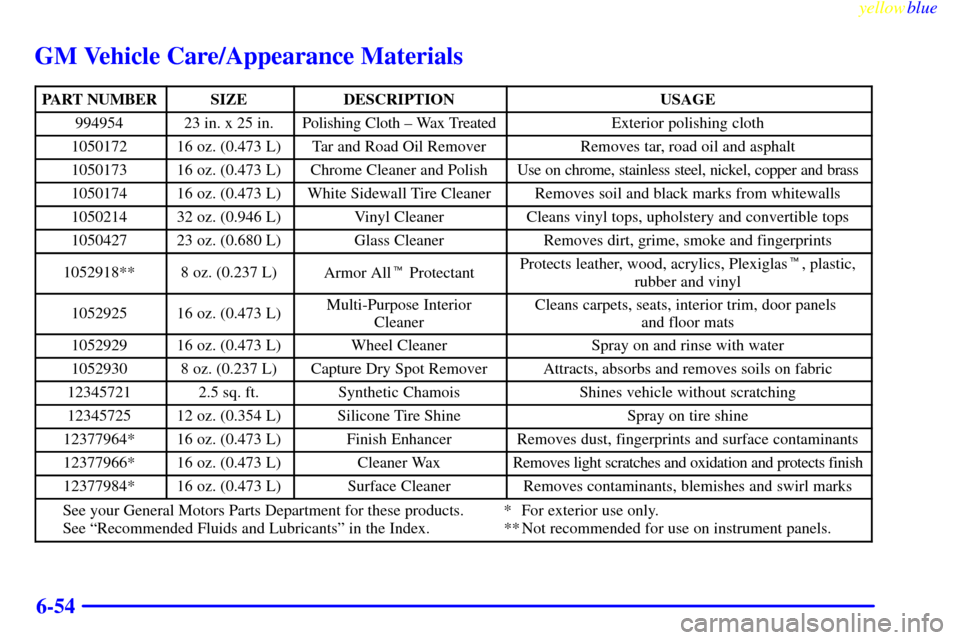
GM Vehicle Care/Appearance Materials
PART NUMBERSIZEDESCRIPTIONUSAGE
99495423 in. x 25 in.Polishing Cloth ± Wax TreatedExterior polishing cloth
105017216 oz. (0.473 L)Tar and Road Oil RemoverRemoves tar, road oil and asphalt
105017316 oz. (0.473 L)Chrome Cleaner and PolishUse on chrome, stainless steel, nickel, copper and brass
105017416 oz. (0.473 L)White Sidewall Tire CleanerRemoves soil and black marks from whitewalls
105021432 oz. (0.946 L)Vinyl CleanerCleans vinyl tops, upholstery and convertible tops
105042723 oz. (0.680 L)Glass CleanerRemoves dirt, grime, smoke and fingerprints
1052918**8 oz. (0.237 L)Armor All� ProtectantProtects leather, wood, acrylics, Plexiglas�, plastic,
rubber and vinyl
105292516 oz. (0.473 L)Multi-Purpose Interior
CleanerCleans carpets, seats, interior trim, door panels
and floor mats
105292916 oz. (0.473 L)Wheel CleanerSpray on and rinse with water
10529308 oz. (0.237 L)Capture Dry Spot RemoverAttracts, absorbs and removes soils on fabric
123457212.5 sq. ft.Synthetic ChamoisShines vehicle without scratching
1234572512 oz. (0.354 L)Silicone Tire ShineSpray on tire shine
12377964*16 oz. (0.473 L)Finish EnhancerRemoves dust, fingerprints and surface contaminants
12377966*16 oz. (0.473 L)Cleaner WaxRemoves light scratches and oxidation and protects finish
12377984*16 oz. (0.473 L)Surface CleanerRemoves contaminants, blemishes and swirl marks
See your General Motors Parts Department for these products. * For exterior use only.
See ªRecommended Fluids and Lubricantsº in the Index. ** Not recommended for use on instrument panels.
Page 278 of 336

yellowblue
6-58
Fuse Description
12 Anti
-Theft/PCM -- Theft-Deterrent
Module, Powertrain Control Module,
(PCM) IGN System Relay
13 ABS
-- Electronic Brake Control
Module (EBCM), ABS Relay
14 HVAC Blower Motor
-- Blower
Motor Relay
15 L.H. Spot Lamp (S.E.O.)
16 Steering Wheel Control #1
-- Steering
Wheel Radio Control Lighting
17 Not Used
18 Not Used
19 Power Accessory #1
-- Door Lock
Switches, Trunk Courtesy Lamp, O/S
Mirror Switch, (S.E.O.) Emergency
Vehicle
-Rear Compartment Lid Lamp or
Window Panel Lamps
20 Steering Wheel Control #2
-- Steering
Wheel Radio ControlsFuse Description
21 Air Bag
-- Air Bag System
22 Cruise Control
--Cruise Control Cut-Out
Switch, Cruise Control Module, Turn
Signal Cruise Control Switches
23 Stoplamps
-- Stoplamp Switch (Brake)
24 Not Used
25 English/Metric (S.E.O.)
26 Not Used
27 Not Used
28 CTSY Lamps
-- Vanity Mirrors, I/P
Compartment Lamp, I/S Lighted
Rearview Mirror, Dome Lamp
29 Wiper
-- Wiper Switch
30 Turn Signal
-- Turn Signal Flasher
31 Not Used
32 Power Locks
-- Door Lock Relay,
Remote Keyless Entry Receiver
Page 282 of 336

yellowblue
6-62
Fuse Description
FAN #3 FAN #3 Relay
PARK LPS Headlamp Switch
HORN Horn Relay
ABS Anti
-Lock Brake System
11 Circuit Breaker C, Starter Relay,
STR WHL Control # 2,
Power Accessory #2, and
Theft
-Deterrent RelayFuse Description
12 HD LPS
-- Circuit Breaker to
Headlamp Switch
13 ABS
-- ABS Relay
Relay Description
14 ABS
-- Anti-Lock Brake System
15 FAN #3
-- Secondary Cooling Fan
(Passenger's Side)
16 HORN
Replacement Bulbs
Exterior Lamps Bulb Number
Back
-Up 3156 or 3057. . . . . . . . . . . . . . . . . . . . . . . . .
Center High
-Mounted Stoplamp 891T2. . . . . . . . . . .
Front Parking/Turn Signal 3357NA. . . . . . . . . . . . . . .
Headlamp, High
-Beam 9005. . . . . . . . . . . . . . . . . . .
Headlamp, Low
-Beam 9006. . . . . . . . . . . . . . . . . . . .
Stop/Tail/Turn Signal 3057. . . . . . . . . . . . . . . . . . . . .
Interior Lamps Bulb Number
Dome 10230955. . . . . . . . . . . . . . . . . . . . . . . . . . . . .
*For service information on these bulbs, contact your
Chevrolet dealer service department.