Page 17 of 26
42-14
Guide bushings, removing and installing
Lowering rear axle
- On vehicles with headlight range control remove linkage from axle
beam.
- Remove bolts from guide bushing mount and lower axle.
- Position VW552 guide piece to prevent brake lines from becoming
stressed.
Removing guide bushing
Pa
ge 17 of 26 Rear axle, servicin
g (front-wheel-drive vehicles
)
11/20/2002 htt
p://127.0.0.1:8080/audi/servlet/Dis
play?action=Goto&t
yp
e=re
pair&id=AUDI.B5.SU01.42.1
Page 18 of 26
42-15
Guide bushing installation position
The guide bushing must be pulled into the rear axle with the arrow on the
3128/1a installation piece pointing in direction -B-.
Pulling in guide bushing
The remainder of the installation is the reverse of removal.
CAUTION!
Vehicle must be standing on its wheels when tightening guide
bushing to rear axle bolts. Otherwise bonded rubber bushings will
be subjected to torsion resulting in shortened service life
Pa
ge 18 of 26 Rear axle, servicin
g (front-wheel-drive vehicles
)
11/20/2002 htt
p://127.0.0.1:8080/audi/servlet/Dis
play?action=Goto&t
yp
e=re
pair&id=AUDI.B5.SU01.42.1
Page 19 of 26
42-16
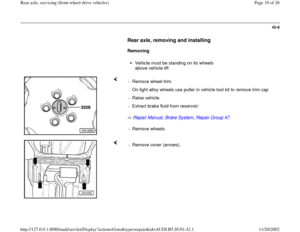
Rear wheel bearing and wheel hub,
servicing
Before carrying out work on the wheel bearings or
wheel hub the wheel and brake caliper must be
removed:
Repair Manual, Brake System, Repair Group 46
CAUTION!
Notes:
Suspend the brake caliper using a piece of
wire.
Do not allow the caliper to hang by the brake
hose. The unsupported weight can stretch
and damage the brake hose.
Do not attempt to weld or straighten the load
bearing components or parts of the
suspension
Only re-install clean bearings; do not wash out
bearings.
Make sure wheel bearing clearance is set
carefully.
Pa
ge 19 of 26 Rear axle, servicin
g (front-wheel-drive vehicles
)
11/20/2002 htt
p://127.0.0.1:8080/audi/servlet/Dis
play?action=Goto&t
yp
e=re
pair&id=AUDI.B5.SU01.42.1
Page 20 of 26
42-17
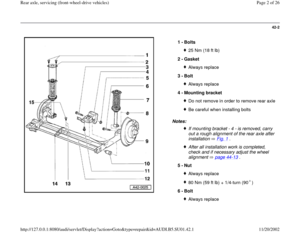
1 -
Axle beam
Contact surface for stub axle must be free
of dirt
2 -
Stub axle Different versions parts catalog
microfiche
3 -
Splash shield
4 -
Combi-bolt
30 Nm (22 ft lb)
5 -
Cotter pin Always replace
6 -
Grease cap Always replaceForcing off Fig. 1Driving in Fig. 2
7 -
Slotted ring
Install over nut - 8 -
8 -
Nut Setting wheel bearing clearance Fig. 3
9 -
Thrust washer
Pa
ge 20 of 26 Rear axle, servicin
g (front-wheel-drive vehicles
)
11/20/2002 htt
p://127.0.0.1:8080/audi/servlet/Dis
play?action=Goto&t
yp
e=re
pair&id=AUDI.B5.SU01.42.1
Page 21 of 26
42-18
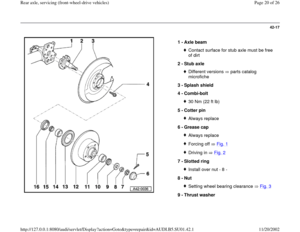
10 -
Outer wheel bearing
Do not wash out if bearing is to be re-used
11 -
Outer wheel bearing outer race Use copper arbor to drive outPressing in Fig. 4Apply small quantity of wheel bearing
grease to wheel bearing seat before
pressing in bearing race
12 -
Brake disc with wheel hub
13 -
ABS wheel speed sensor rotor Drive off evenly using copper arbor through
tapped holes in wheel hub Pressing in Fig. 5
14 -
Inner wheel bearing outer race
Use copper arbor to drive out outer raceApply small quantity of wheel bearing
grease to wheel bearing seat before
pressing in bearing race
Pa
ge 21 of 26 Rear axle, servicin
g (front-wheel-drive vehicles
)
11/20/2002 htt
p://127.0.0.1:8080/audi/servlet/Dis
play?action=Goto&t
yp
e=re
pair&id=AUDI.B5.SU01.42.1
Page 22 of 26
42-19
15 -
Inner wheel bearing
Do not wash out if bearing is to be re-used
16 -
Seal Always replaceDifferent versions parts catalog
microfiche Fill area between sealing lips with multi-
purpose grease Fig. 7
Pa
ge 22 of 26 Rear axle, servicin
g (front-wheel-drive vehicles
)
11/20/2002 htt
p://127.0.0.1:8080/audi/servlet/Dis
play?action=Goto&t
yp
e=re
pair&id=AUDI.B5.SU01.42.1
Page 23 of 26
42-20
Fig. 1 Removing grease cap
- Remove grease cap from seat by tapping gently on claw of tool.
Notes: Fig. 2 Driving on grease cap
Damaged (dented/buckled) grease caps permit the penetration of
moisture and must always be replaced. When installing a grease cap always use the tool shown to prevent
damage.
Pa
ge 23 of 26 Rear axle, servicin
g (front-wheel-drive vehicles
)
11/20/2002 htt
p://127.0.0.1:8080/audi/servlet/Dis
play?action=Goto&t
yp
e=re
pair&id=AUDI.B5.SU01.42.1
Page 24 of 26
42-21
Note:
Wheel bearing play is correct when the thrust washer can just be moved
using a screwdriver simply by applying pressure, without having to apply
force. Fig. 3 Setting wheel bearing clearance
- Secure with slotted ring and new cotter pin.
Fig. 4 Pressing in outer race for outer wheel bearing
- Apply small quantity of wheel bearing grease to wheel bearing seat
before pressing in bearing race.
Pa
ge 24 of 26 Rear axle, servicin
g (front-wheel-drive vehicles
)
11/20/2002 htt
p://127.0.0.1:8080/audi/servlet/Dis
play?action=Goto&t
yp
e=re
pair&id=AUDI.B5.SU01.42.1


5 -")


 grease caps permit the pe")
