Page 17 of 23
- Turn differential gear via both rear wheels (left and right flanges) at the
same time in one direction until drive flange/driveshaft flange has made
on complete revolution.
- Mark largest radial run-out on outer edge of flange with colored
marking (equivalent to largest distance from turning axis).
- Remove old marking on driveshaft flange.
- Installing driveshaft page 39
-83
.
Pa
ge 17 of 23 Driveshaft, servicin
g
11/20/2002 htt
p://127.0.0.1:8080/audi/servlet/Dis
play?action=Goto&t
yp
e=re
pair&id=AUDI.B5.AT01.39.5
Page 18 of 23
39-88
Driveshaft, adjusting
Special tools and equipment
Adjustments must be made very carefully as a poorly adjusted driveshaft
is usually the cause of vibrations and humming noises.
Repair Manual, Engine Mechanical, Repair Group 26; removing and
installing exhaust system
3405 alignment fixture
- Observe notes page 39
-73
.
- Remove crossmember below exhaust system if installed.
- Remove rear part of exhaust system starting at clamp to gain access to
the driveshaft: - Remove heat shields above driveshaft.
- Release mounting bolts for center support slightly.
Pa
ge 18 of 23 Driveshaft, servicin
g
11/20/2002 htt
p://127.0.0.1:8080/audi/servlet/Dis
play?action=Goto&t
yp
e=re
pair&id=AUDI.B5.AT01.39.5
Page 19 of 23
39-89
Only for carbon fiber driveshafts:
Spacer pieces are attached to 3405 alignment fixture via a chain.
Arrow -A- points in direction of travel.
WARNING!
Assembly tool must rest on both steel rings -1- before tightening
plastic nut -A-. If that is not the case, the surface of the carbon fiber
driveshaft can be damaged and must be replaced see Important
notes page 39
-74
- Place spacer pieces -2- onto 3405 alignment fixture (distance
dimension = 10 mm).
- Using spacer pieces -2-, hook in 3405 alignment fixture according to
illustration.
Note:
Never set alignment fixture on balance plates. - Carefully tighten plastic nuts -A- and -B-.
Pa
ge 19 of 23 Driveshaft, servicin
g
11/20/2002 htt
p://127.0.0.1:8080/audi/servlet/Dis
play?action=Goto&t
yp
e=re
pair&id=AUDI.B5.AT01.39.5
Page 20 of 23
39-90
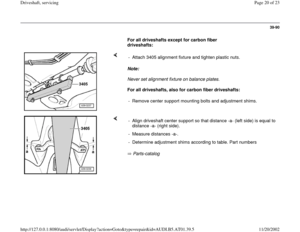
For all driveshafts except for carbon fiber
driveshafts:
Note:
Never set alignment fixture on balance plates.
For all driveshafts, also for carbon fiber driveshafts: - Attach 3405 alignment fixture and tighten plastic nuts.
- Remove center support mounting bolts and adjustment shims.
Parts-catalog - Align driveshaft center support so that distance -a- (left side) is equal to
distance -a- (right side).
- Measure distances -a-.
- Determine adjustment shims according to table. Part numbers
Pa
ge 20 of 23 Driveshaft, servicin
g
11/20/2002 htt
p://127.0.0.1:8080/audi/servlet/Dis
play?action=Goto&t
yp
e=re
pair&id=AUDI.B5.AT01.39.5
Page 21 of 23
39-91
Available adjustment shims
Distance -a-
(mm) Shim thickness
(mm)
0 to 3.0 -
3.1 to 5.0 2
5.1 to 7.0 4
7.1 to 9.0 6
9.1 to 11.0 8
11.1 to 13.0 10
- Install left and right shims determined from
table.
Pa
ge 21 of 23 Driveshaft, servicin
g
11/20/2002 htt
p://127.0.0.1:8080/audi/servlet/Dis
play?action=Goto&t
yp
e=re
pair&id=AUDI.B5.AT01.39.5
Page 22 of 23
39-92
Centering driveshaft lengthwise
- Slide driveshaft with alignment fixture toward rear to stop.
- Mark position of center support on body (arrow A).
- Slide driveshaft with alignment fixture toward front to stop.
- Mark position of center support on body -(arrow B).
- Center driveshaft (arrow C):
Center support must be centered between markings -A- and -B-.
- Install mounting bolts for driveshaft center support and the pre-
determined shims and tighten.
- Remove alignment fixture.
- Install heat shield above driveshaft.
Pa
ge 22 of 23 Driveshaft, servicin
g
11/20/2002 htt
p://127.0.0.1:8080/audi/servlet/Dis
play?action=Goto&t
yp
e=re
pair&id=AUDI.B5.AT01.39.5
Page 23 of 23
39-93
Installation is reverse of removal, noting the
following:
- Install exhaust system free of stress:
Repair Manual, Engine Mechanical, Repair
Group 26; removing and installing exhaust
system
Tightening torques
Component
Nm
Center driveshaft support to body 23
Crossmember to body 25
Nuts for clamping sleeve 40
Pa
ge 23 of 23 Driveshaft, servicin
g
11/20/2002 htt
p://127.0.0.1:8080/audi/servlet/Dis
play?action=Goto&t
yp
e=re
pair&id=AUDI.B5.AT01.39.5
Page:
< prev 1-8 9-16 17-24


 at the
same time in one direction until drive flange/driveshaft flange has made
on complete revolution.
- Mark largest radia")


 Shim thickness
(mm)
0 to 3.0 -
3.1 to 5.0 2
5.1 to 7.0 4
7.1 to 9.0 6
9.1 to 11.0 8
11.1 to 13.0 10")
.
- Slide driveshaft with align")
