Page 57 of 3115
AC1LC-02
I06698
I06699
AC-76
- AIR CONDITIONINGFRONT A/C EVAPORATOR
2801 Author�: Date�:
2004 LAND CRUISER (RM1071U)
DISASSEMBLY
1. PULL OUT EVAPORATOR TEMPERATURE SENSOR
2. REMOVE EXPANSION VALVE
Using a hexagon wrench (5.0mm, 0.20 in.), remove the 2 bolts
and separate the expansion valve and the evaporator.
Torque: 3.4 N´m (35 kgf´cm, 30 in.´lbf)
NOTICE:
Cap the open fittings immediately to keep moisture or dirt
out of the system.
HINT:
At the time of reassembly, lubricate 4 new O-rings with com-
pressor oil and install them to the valve. If evaporator is re-
placed, add compressor oil to the evaporator.
Add: 40 cc (1.4 fl.oz.)
Compressor oil: ND-OIL8 or equivalent
Page 64 of 3115

AC1K7-06
I06697
I06698
I06699
AC-26
- AIR CONDITIONINGFRONT COOLING UNIT
2751 Author�: Date�:
2004 LAND CRUISER (RM1071U)
DISASSEMBLY
1. REMOVE EVAPORATOR
(a) Disconnect the connector clamp.
(b) Remove the 8 screws and No. 1 cooler cover.
(c) Pull out the evaporator
HINT:
At the time of reassembly, if evaporator is replaced, add com-
pressor oil to the evaporator.
Add: 40 cc (1.4 fl.oz.)
Compressor oil: ND-OIL 8 or equivalent
2. PULL OUT EVAPORATOR TEMPERATURE SENSOR
FROM EVAPORATOR
3. REMOVE EXPANSION VALVE
(a) Remove the grommet.
(b) Pry out the packing.
HINT:
At the time of reassembly, do not reuse the packing.
(c) Using a hexagon wrench (5.0 mm, 0.20 in.), remove the
2 bolts and separate the expansion valve, tube and evap-
orator.
Torque: 3.4 N´m (35 kgf´cm, 30 in.´lbf)
NOTICE:
Cap the open fittings immediately to keep moisture or dirt
out of the system.
HINT:
At the time of reassembly, lubricate 4 new O-rings with com-
pressor oil and install them in the tube.
4. REMOVE DRAIN HOSE
Page 67 of 3115

AC1K6-04
I07892
I03838
SST
I03839
SST
SST Push Pull
Release
Lever
I06878
CorrectWrong AC-24
- AIR CONDITIONINGFRONT COOLING UNIT
2749 Author�: Date�:
2004 LAND CRUISER (RM1071U)
REMOVAL
1. DISCHARGE REFRIGERANT FROM REFRIGERATION
SYSTEM
HINT:
At the time of installation, first evacuate air from refrigeration
system.
Then, charge the system with the refrigerant and inspect for
leaks of the refrigerant.
Specified amount: 1,050 ± 50 g (37.03 ± 1.76 oz.)
2. DISCONNECT LIQUID AND SUCTION TUBES
(a) Using SST, remove the 2 piping clamps.
SST 09870-00025 (Liquid tube)
09870-00015 (Suction tube)
(1) Insert SST to piping clamp.
HINT:
Confirm the direction of the piping clamp claw and SST referring
to the illustration on the caution label.
(2) Push down SST and release the clamp lock.
NOTICE:
Be careful not to deform the tubes when pushing SST.
(3) Pull SST slightly and push the release lever, then re-
move the piping clamp with SST.
(4) Remove the piping clamp from SST.
(b) Disconnect the both tubes.
NOTICE:
Cap the open fittings immediately to keep moisture or dirt
out of the system.
HINT:
At the time of installation:
�Lubricate 4 new O-rings with compressor oil and install
them to the tubes.
�After connection, check the fitting for claw of the piping
clamp.
3. REMOVE INSTRUMENT PANEL AND REINFORCE-
MENT (See page BO-84)
Page 91 of 3115

I06703
I06702
I06704
I06705
- AIR CONDITIONINGREAR COOLING UNIT
AC-35
2760 Author�: Date�:
2004 LAND CRUISER (RM1071U)
(c) Pull out the thermistor from the evaporator.
(d) Remove the screw and the piping clamp.
(e) Loosen the 2 nuts and remove the tube and accessory.
Torque:
Liquid line: 14 N´m (140 kgf´cm, 10 ft´lbf)
Suction line: 32 N´m (330 kgf´cm, 24 ft´lbf)
NOTICE:
Cap the open fittings immediately to keep moisture or dirt
out of the system.
HINT:
At the time of reassembly, lubricate 2 new O-rings with com-
pressor oil and install them in the tubes.
(f) Remove the evaporator.
HINT:
At the time of reassembly, if evaporator was replaced, add com-
pressor oil to the new evaporator.
Add 40 cc: (1.4 fl.oz.)
Compressor oil: ND-OIL 8 or equivalent
6. REMOVE EXPANSION VALVE
Using a hexagon wrench (5.0 mm, 0.20 in.), remove the 2 bolts
and separate the expansion valve and evaporator.
Torque: 5.4 N´m (55 kgf´cm, 48 in.´lbf)
HINT:
At the time of reassembly, lubricate 4 new O-rings with com-
pressor oil and install them in the tubes.
Page 96 of 3115

AC1KC-05
I06687
I15822
I15823
AC-32
- AIR CONDITIONINGREAR COOLING UNIT
2757 Author�: Date�:
2004 LAND CRUISER (RM1071U)
REMOVAL
1. DISCHARGE REFRIGERANT FROM REFRIGERATION
SYSTEM
HINT:
At the time of installation, first evacuate air from refrigeration
system.
Then, charge the system with the refrigerant and inspect for
leaks of the refrigerant.
Specified amount: 1,050 ± 50 g (37.04 ± 1.76 oz.)
2. DISCONNECT LIQUID AND SUCTION TUBES
Remove the bolt and slide the plate, then disconnect both
tubes.
Torque: 10 N´m (100 kgf´cm, 7 ft´lbf)
NOTICE:
Cap the open fittings immediately to keep moisture or dirt
out of the system.
HINT:
At the time of installation, lubricate 2 new O-rings with com-
pressor oil and install them to the tubes.
3. REMOVE REAR DOOR SCUFF PLATE RH
4. REMOVE REAR FLOOR MAT SUPPORT PLATE
5. REMOVE ROOF HEADLINING REAR TRIM
6. REMOVE QUARTER TRIM PANEL RH
7. REMOVE ROOF SIDE INNER UPPER GARNISH
(See page BO-97)
8. REMOVE NO. 1 COOLER AIR DUCT
(a) Remove the 3 roof headlining set clips.
(b) Remove the 5 clips and the No. 1 cooler air duct.
Page 118 of 3115

AT10Z-02
D12704
A B
OrangeBlue
D12739
D12704
A B
OrangeBlue AT-6
- AUTOMATIC TRANSMISSIONATF TEMPERATURE SENSOR
1860 Author�: Date�:
ATF TEMPERATURE SENSOR
ON-VEHICLE REPAIR
1. REMOVE ENGINE NO.2 UNDER COVER
2. DRAIN ATF
3. REMOVE OIL PAN (See page AT-1 1)
4. REMOVE OIL STRAINER (See page AT-1 1)
5. REMOVE ATF TEMPERATURE SENSOR
(a) Disconnect the 7 solenoid valve connectors.
(b) Remove the 2 bolts and disconnect the 2 ATF tempera-
ture sensors.
(c) Disconnect the solenoid connector.
(d) Remove the bolt and the transmission wire harness.
6. INSTALL ATF TEMPERATURE SENSOR
(a) Install the transmission wire harness.
(b) Install the bolt.
Torque: 5.4 N´m (55 kgf´cm, 48 in.´lbf)
(c) Connect the solenoid connector.
(d) Connect the 7 solenoid valve connectors.
(e) Connect the 2 ATF temperature sensors with the 2 bolts.
Torque:
A: 11 N´m (112 kgf´cm, 8 ft´lbf)
B: 10 N´m (100 kgf´cm, 7 ft´lbf)
Bolt length:
Bolt A: 36 mm (1.42 in.)
Bolt B: 12 mm (0.47 in.)
Sensor wire harness:
Wire harnessColor
for linear controlOrange
for oil temp warning lampBlue
7. INSTALL OIL STRAINER (See page AT-8)
8. INSTALL OIL PAN (See page AT-8)
9. FILL ATF AND CHECK ATF LEVEL (See page AT-3-1)
10. INSTALL ENGINE NO.2 UNDER COVER
Page 122 of 3115

A04550
9 1011 12 13141516 12345678
DLC3 CG
TC
- AUTOMATIC TRANSMISSIONAUTOMATIC TRANSMISSION SYSTEM
AT-3-2
1856 Author�: Date�:
2004 LAND CRUISER (RM1071U)
3. TRANSMISSION FILL
(a) Fill the transmission with the correct amount of fluid as
listed in the table below.
(b) Reinstall the refill plug to avoid fluid splash.
RepairFill Amount
Transmission pan and drain plug remov-
al1.3 liters (1.37 US qts, 1.14 Imp. qts)
Transmission valve body removal3.9 liters (4.12 US qts, 3.43 Imp. qts)
Torque converter removal5.3 liters (5.60 US qts, 4.66 Imp. qts)
Entire transmission assembly5.3 liters (5.60 US qts, 4.66 Imp. qts)
HINT:
If you cannot add the listed amount of fluid, do the following:
(1) Install the refill plug.
(2) Allow the engine to idle with air conditioning OFF.
(3) Move the shift lever through entire gear range to cir-
culate fluid.
(4) Wait for 30 seconds with the engine idling.
(5) Stop the engine.
(6) Remove the refill plug and add fluid.
(7) Reinstall the refill plug.
4. FLUID CIRCULATION
(a) Allow the engine to idle with the air conditioning OFF.
(b) Move the shift lever through entire gear range to circulate
fluid.
5. FLUID TEMPERATURE CHECK
NOTICE:
The fluid temperature should be less than 30�C (86�F) be-
fore beginning the fluid temperature check.
(a) With hand-held tester
(1) Connect the hand-held tester to the DLC3.
(2) Select the tester menus: OBD/MOBD, ENGINE,
DATA LIST and A/T.
(3) Check A/T OIL TEMP.
(4) Allow the engine to idle until the fluid temperature
reaches 46�C (115�F).
Page 125 of 3115
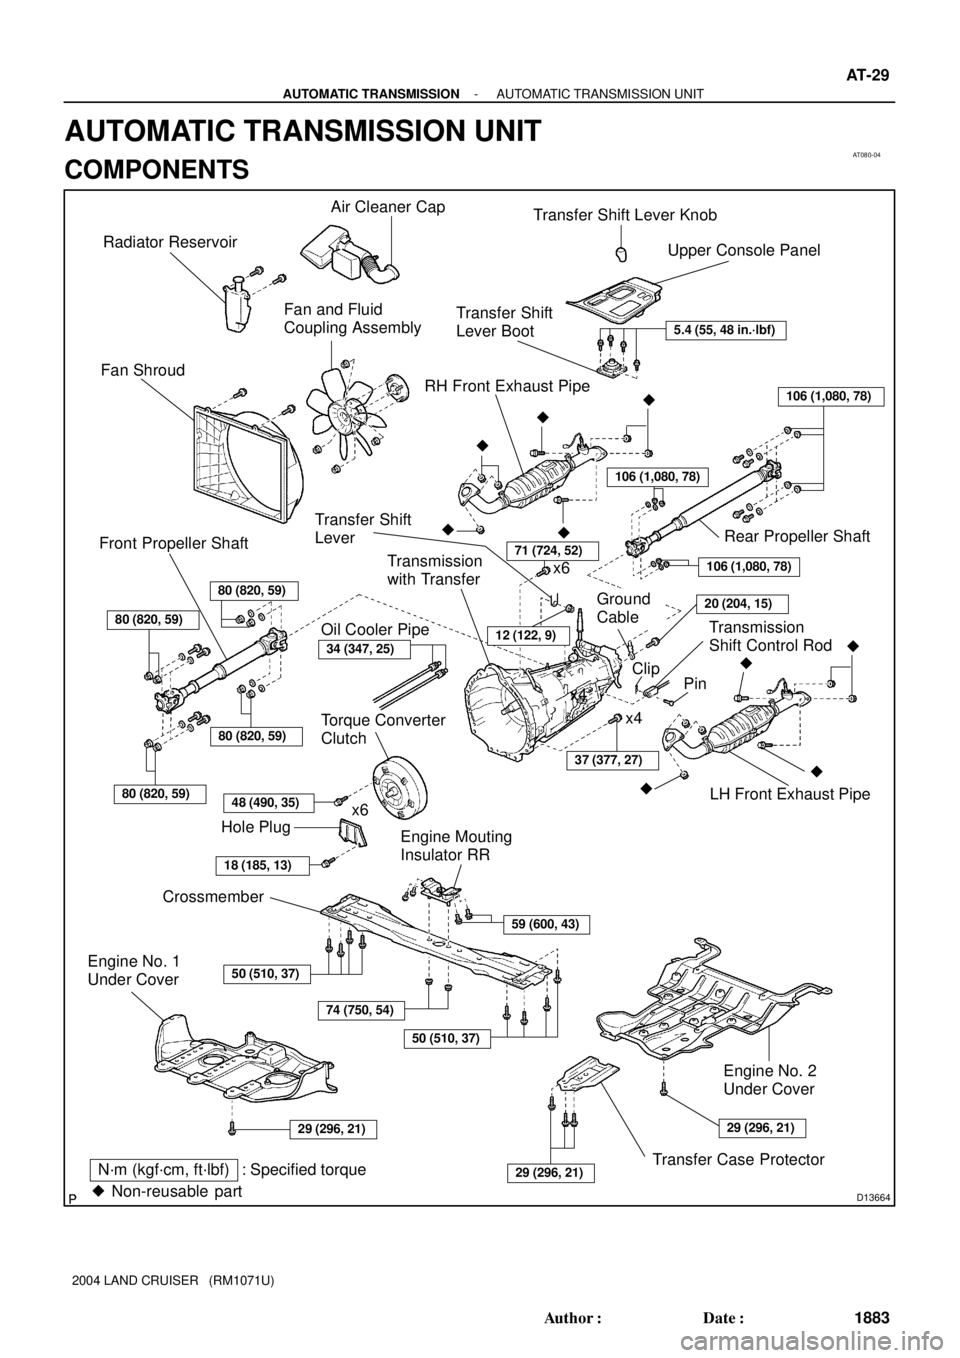
AT080-04
D13664
Air Cleaner Cap
Radiator Reservoir
Fan and Fluid
Coupling Assembly
Fan Shroud
x6x4
80 (820, 59)
80 (820, 59)
80 (820, 59)
80 (820, 59)
Front Propeller Shaft
48 (490, 35)
Hole Plug
18 (185, 13)
Torque Converter
Clutch
50 (510, 37)
74 (750, 54)
50 (510, 37)
N´m (kgf´cm, ft´lbf) : Specified torque
� Non-reusable partTransfer Case Protector
Engine Mouting
Insulator RRx4 x6
37 (377, 27)
71 (724, 52)
�LH Front Exhaust Pipe
�
�
� Transmission
with Transfer
106 (1,080, 78)
106 (1,080, 78)
106 (1,080, 78)
Ground
Cable
Transmission
Shift Control Rod
Pin
Rear Propeller Shaft
�
��
� RH Front Exhaust Pipe
Transfer Shift
Lever Boot
Upper Console Panel Transfer Shift Lever Knob
5.4 (55, 48 in.´lbf)
Clip
Transfer Shift
Lever
Engine No. 1
Under Cover
Crossmember
12 (122, 9)
59 (600, 43)
29 (296, 21)
Engine No. 2
Under Cover �
20 (204, 15)
34 (347, 25)
Oil Cooler Pipe
29 (296, 21)29 (296, 21)
- AUTOMATIC TRANSMISSIONAUTOMATIC TRANSMISSION UNIT
AT-29
1883 Author�: Date�:
2004 LAND CRUISER (RM1071U)
AUTOMATIC TRANSMISSION UNIT
COMPONENTS