Page 90 of 1463

M162 ENGINE MECHANICAL 1B1-17
Operation at Idling and Mid-Load
lIt show that the throttle valve (19) is closed or very partially
opened and the vacuum pressure in intake manifold is high.
The blowby gas in the crankcase in partial load flows into
the intake manifold through the vent line (20) after passing
the air conditioner bracket (6) and the filter (4). The air
reentered into the intake manifold will be dilluted on the flow
through the restriction hole (11) in the vent line (10).
The circulated engine oil is separated at the air conditioner
bracket (6) and then returns into the oil pan through the
drain pipe (7).
The vacuum pressure generated at the crankcase sucks
fresh air from intake air line(13) through the air admission
and vent connection (17,18).
The fresh air prevents engine oil from being contami-nated
and the air admission and vent connection (17,18) is
designed to control the rapid pressure changes in intake
air line (13).
Operation at Full-Load
lThe throttle valve (19) is fully opened.
All the blowby gases flow into the intake air duct (13) after
passing through the oil separator (15,16) of the cylinder
head cover (14) when fully loaded. This dilluted air will be
supplied to the combustion chamber through the intake
manifold (12).
Page 91 of 1463
1B1-18 M162 ENGINE MECHANICAL
ALTERNATOR
1 Nut (M8).........................................22.5-27.5 Nm
2 Bolt (M8 x 30, 3 pieces).................22.5-27.5 Nm
3 Bolt (M8 x 40, 1 piece)...................22.5-27.5 Nm
Removal & Installation Procedure
1. Remove the drive belt.
2. Remove the alternator.
3. Unscrew the alternator carrier bolts and remove the carrier.
Installation Notice4 Bolt (M8 x 70, 1 piece)...................22.5-27.5 Nm
5 Bolt (M8 x 75, 1 piece)...................22.5-27.5 Nm
Tightening Torque 10 - 15 Nm
4. Installation should follow the removal procedure in the
reverse order.
Page 92 of 1463
M162 ENGINE MECHANICAL 1B1-19
POWER STEERING PUMP AND A/C BRACKET
Preceding Work : Removal of cooling fan and shroud
1 Vent Hose
2 Bolt (M8 x 91, 2 pieces).................22.5-27.5 Nm
3 Power Steering Pump
4 Bolt (M8 x 105, 4 pieces)...............22.5-27.5 Nm
5 Washer
6 A/C Compressor
7 Bolt (M8 x 40, 3 pieces,
M8 x 95, 2 pieces)..........................22.5-27.5 Nm8 A/C Bracket
9 Gasket ................................................... Replace
10 Bracket
11 Bolt (M8 x 22, 2 pieces).................22.5-27.5 Nm
12 Tensioning Pulley
13 Nut .................................................40.5-49.5 Nm
Page 93 of 1463
1B1-20 M162 ENGINE MECHANICAL
Removal & Installation Procedure
1. Remove the belt pulley.
Installation Notice
2. Disconnect the hydraulic pipe of the power steering pump
and drain the oil.
3. Unscrew the bolts (arrows) and remove the steering pump.
Installation Notice Notice
Pull the tensioning pulley clockwise as shown in the figure.
4. Remove the compressor after disconnecting the wiring
connector and refrigerant pipe of A/C compressor.
Notice
Discharge all the refrigerant before removing the pipes.
Tightening Torque 40.5 - 49.5 Nm
Tightening Torque 22.5 - 27.5 Nm
Page 94 of 1463
M162 ENGINE MECHANICAL 1B1-21
5. Disconnect the vent hose from the A/C bracket.
6. Unscrew all the mounting bolts (arrows) and remove the
A/C bracket and the gasket.
Installation Notice
7. Clean the sealing surface.
8. Replace the gasket with new one.
9. Installation should follow the removal procedure in the
reverse order.
10. Check the oil leakage by operating the engine after
installation.
Tightening Torque 22.5 - 27.5 Nm
Page 95 of 1463
1B1-22 M162 ENGINE MECHANICAL
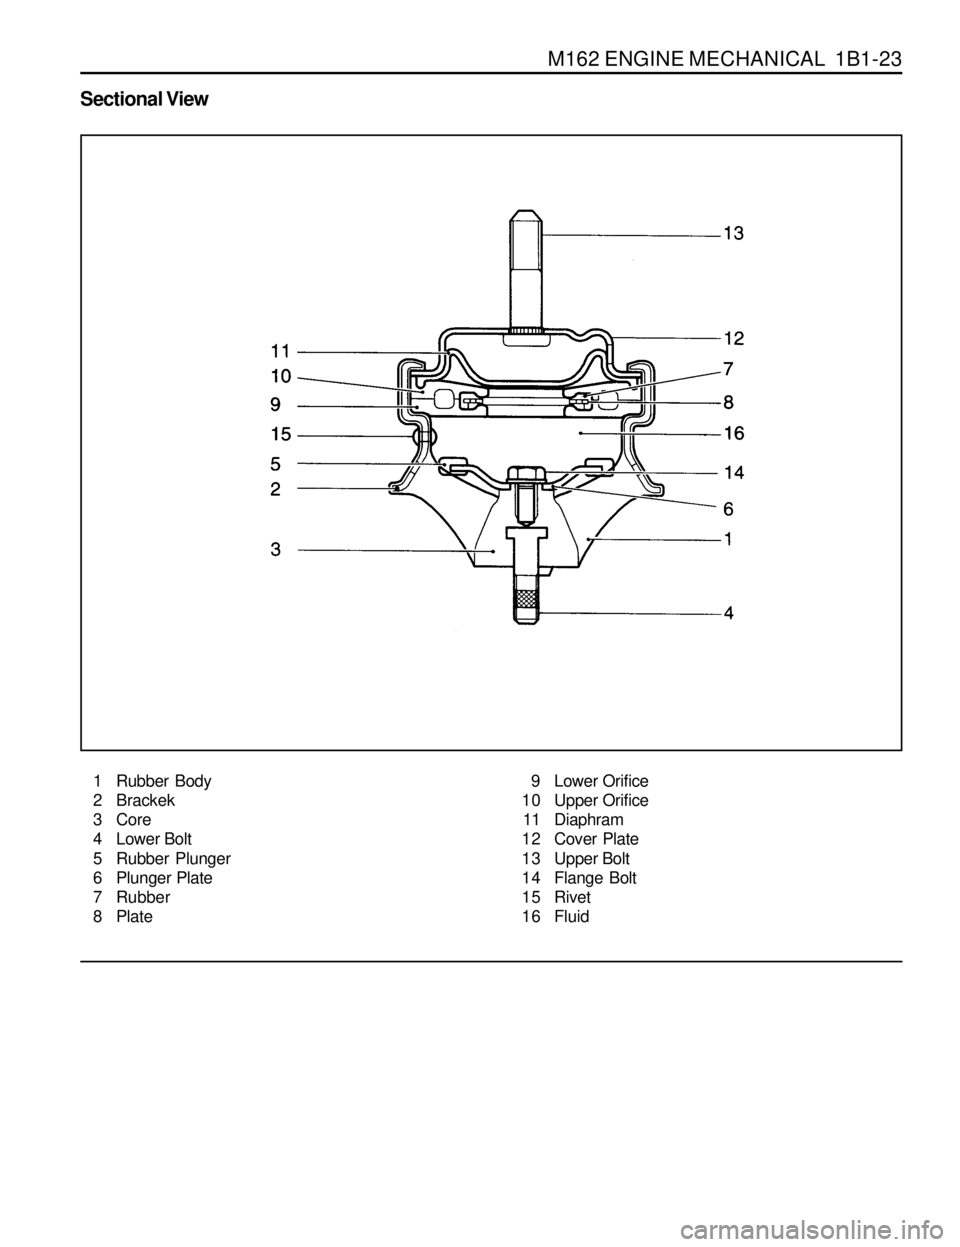
HYDRAULIC ENGINE MOUNTING INSULATOR
Service Data
Page 96 of 1463
M162 ENGINE MECHANICAL 1B1-23
Sectional View
1 Rubber Body
2 Brackek
3 Core
4 Lower Bolt
5 Rubber Plunger
6 Plunger Plate
7 Rubber
8 Plate9 Lower Orifice
10 Upper Orifice
11 Diaphram
12 Cover Plate
13 Upper Bolt
14 Flange Bolt
15 Rivet
16 Fluid
Page 97 of 1463
1B1-24 M162 ENGINE MECHANICAL
1 Upper Nut
2 Hydraulic Installor.................62-93 Nm
3 Lower Nut.............................28-47 Nm
Removal and Installation Procedure
1. Unscrew the upper nut(1) on engine mounting and remove
the engine.
Installation Notice
3. Installation should follow the removal procedure in the
reverse order.
Tightening Torque 62 - 93 Nm
2. Unscrew the lower nut(3) and remove the hydraulic engine
mounting insulator.
Installation Notice
Tightening Torque 28 - 47 Nm
Notice
If the insulator is spotted with oil, replace the hydraulic
insulator assembly.