Page 1376 of 1463
INSTRUMENTATION/DRIVER INFORMATION 9E-3
COMBINATION METER
COMPONENT LOCATOR
1. Speedometer
2. Odometer
3. Trip odometer
4. Tachometer
5. Coolant temperature gauge
6. Fuel gauge
7. Low fuel level warning light
8. Turn signal indicator (left)
9. Turn signal indicator (right)
10. Outside rearview mirror & tailgate heating switch
11. Reset button
12. Auto shift indicator*
13. Door open warning light
14. TCS indicator (equipped with ABD)*
21. ABS warning light*22. EBD warning light*
23. ECS / SPORT warning light*
24. 4 - wheel warning light*
25. 4 - wheel high indicator
26. 4 - wheel low indicator
27. WINTER indicator
28. POWER indicator
29. High beam indicator
15. Alternator warning light
16. Engine oil pressure warning light
17. Brake system warning light
18. Glow indicator light (For Diesel engine)
19. Airbag warning light*
20. Seat belt reminder
Page 1391 of 1463
SECTION 9L
GLASS AND MIRRORS
Caution: Disconnect the negative battery cable before removing or installing any electrical unit or when a
tool or equipment could easily come in contact with exposed electrical terminals. Disconnecting this cable
will help prevent personal injury and damage to the vehicle. The ignition must also be in LOCK unless otherwise
noted.
TABLE OF CONTENTS
Schematic and Routing Diagrams . . . . . . . . 9L-2
Outside Mirror . . . . . . . . . . . . . . . . . . . . . . . . . 9L-2
Auto Dimming Room Mirror . . . . . . . . . . . . . . . 9L-3
Maintenance and Repair . . . . . . . . . . . . . . . 9L-4
On-Vehicle Service . . . . . . . . . . . . . . . . . . . . . . 9L-4
Front & Side Glass . . . . . . . . . . . . . . . . . . . . . 9L-4
Tailgate Glass . . . . . . . . . . . . . . . . . . . . . . . . . 9L-9
Auto Dimming Room Mirror . . . . . . . . . . . . . . 9L-12
Page 1392 of 1463
9L-2 GLASS AND MIRRORS
OUTSIDE MIRROR
SCHEMATIC AND ROUTING DIAGRAMS
Page 1393 of 1463
GLASS AND MIRRORS 9L-3
AUTO DIMMING ROOM MIRROR
Page 1394 of 1463
9L-4 GLASS AND MIRRORS
MAINTENANCE AND REPAIR
ON-VEHICLE SERVICE
FRONT & SIDE GLASS
Page 1395 of 1463

GLASS AND MIRRORS 9L-5
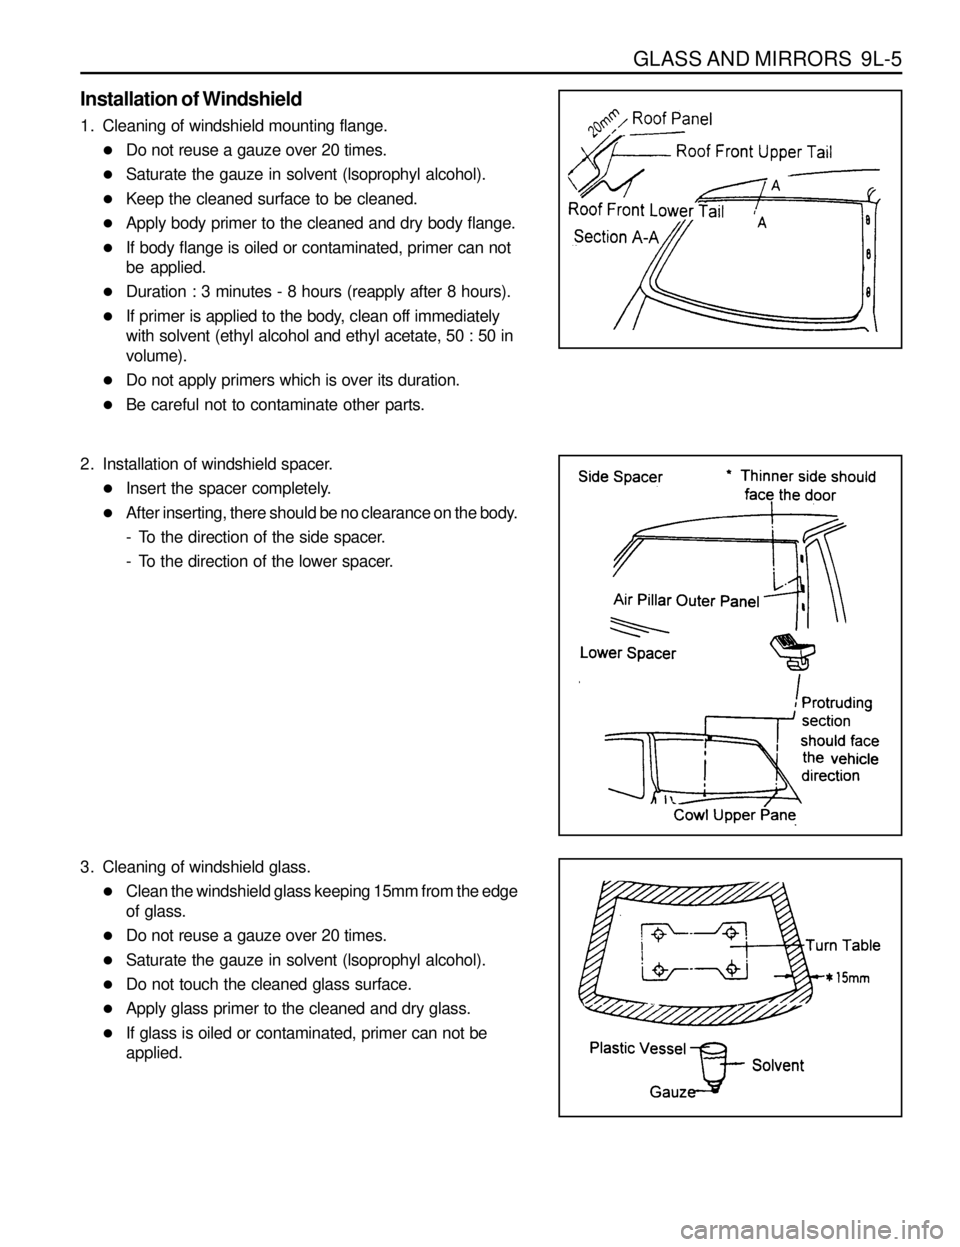
Installation of Windshield
1. Cleaning of windshield mounting flange.
lDo not reuse a gauze over 20 times.
lSaturate the gauze in solvent (lsoprophyl alcohol).
lKeep the cleaned surface to be cleaned.
lApply body primer to the cleaned and dry body flange.
lIf body flange is oiled or contaminated, primer can not
be applied.
lDuration : 3 minutes - 8 hours (reapply after 8 hours).
lIf primer is applied to the body, clean off immediately
with solvent (ethyl alcohol and ethyl acetate, 50 : 50 in
volume).
lDo not apply primers which is over its duration.
lBe careful not to contaminate other parts.
2. Installation of windshield spacer.
lInsert the spacer completely.
lAfter inserting, there should be no clearance on the body.
- To the direction of the side spacer.
- To the direction of the lower spacer.
3. Cleaning of windshield glass.
lClean the windshield glass keeping 15mm from the edge
of glass.
lDo not reuse a gauze over 20 times.
lSaturate the gauze in solvent (lsoprophyl alcohol).
lDo not touch the cleaned glass surface.
lApply glass primer to the cleaned and dry glass.
lIf glass is oiled or contaminated, primer can not be
applied.
Page 1396 of 1463

9L-6 GLASS AND MIRRORS
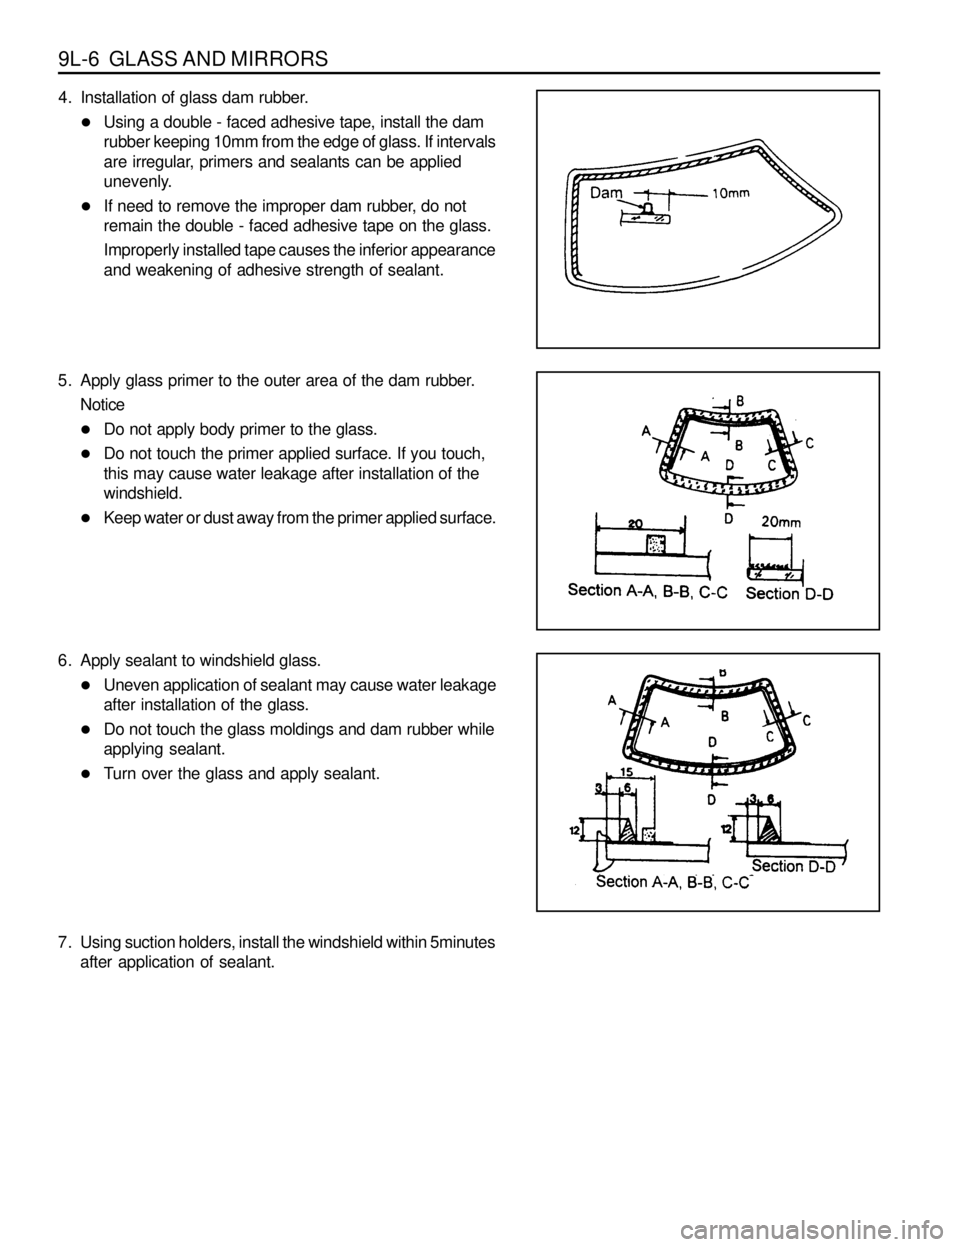
4. Installation of glass dam rubber.
lUsing a double - faced adhesive tape, install the dam
rubber keeping 10mm from the edge of glass. If intervals
are irregular, primers and sealants can be applied
unevenly.
lIf need to remove the improper dam rubber, do not
remain the double - faced adhesive tape on the glass.
Improperly installed tape causes the inferior appearance
and weakening of adhesive strength of sealant.
5. Apply glass primer to the outer area of the dam rubber.
Notice
lDo not apply body primer to the glass.
lDo not touch the primer applied surface. If you touch,
this may cause water leakage after installation of the
windshield.
lKeep water or dust away from the primer applied surface.
6. Apply sealant to windshield glass.
lUneven application of sealant may cause water leakage
after installation of the glass.
lDo not touch the glass moldings and dam rubber while
applying sealant.
lTurn over the glass and apply sealant.
7. Using suction holders, install the windshield within 5minutes
after application of sealant.
Page 1397 of 1463
GLASS AND MIRRORS 9L-7
Installation of Side Glass
For installation, refer to 'Installation of Windshield'.
1. Clean as the same procedure of windshield mounting flange
(Apply primer).
lClean as the same procedure of windshield cleaning,
however keep 20mm from the edge of glass.
2. Apply primer to the side glass.
lUse sufficiently mixed primer in a mixer over 10 minutes.
lBe careful not to contaminate other parts due to over
application.
lDuration : 1 minute - 24 hours (reapply after 24 hours).
lNever use the primer containing deposits or floating
materials.
lDo not apply primers which is over its duration.
lDo not reuse a gauze over 20 times.
lApply evenly to glass.
3. Apply seaant to the side glass.
lTurn over the glass and apply sealant.
lUneven application of sealant may cause water leakage
after installation of the glass.