Page 60 of 1463
1A3-2 GENERAL ENGINE INFORMATION
OM 662 LA
720 - 820
135 - 143
8.0 - 9.5
Forced by Gear Pump
Combined Full-Flow and Partial Flow
Filter
Diesel Application
Idle Speed (rpm)
Fuel Injection Pressure (bar)
Oil Capacity (liter)
Lubrication Type
Oil Filter Type
Fuel
ENGINE SPECIFICATIONS (Cont'd)
OM661LA
750 - 850
135 - 143
6.5 - 8.0
Forced by Gear Pump
Combined Full-Flow and Partial Flow
Filter
Diesel
Page 70 of 1463

1A3-12 GENERAL ENGINE INFORMATION
Compression Pressure Measurement
Notice
Ensure that no gear is engaged and that the vehicle is
protected from rolling.
1. Run the engine to be the coolant temperature 80°C.
2. Remove the fuel injection nozzle.
Socket Wrench Insert 001 589 65 09 00
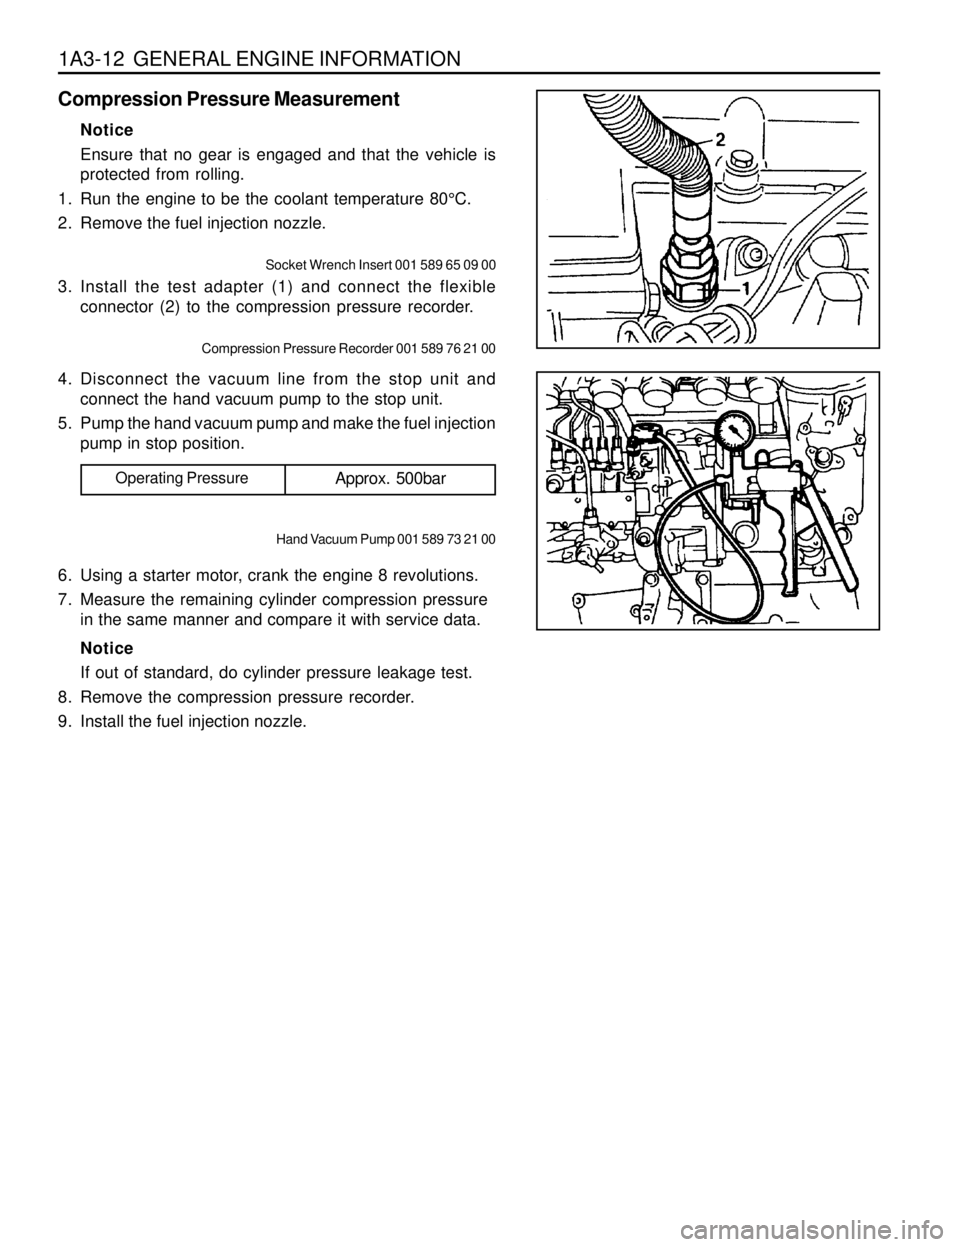
3. Install the test adapter (1) and connect the flexible
connector (2) to the compression pressure recorder.
Compression Pressure Recorder 001 589 76 21 00
4. Disconnect the vacuum line from the stop unit and
connect the hand vacuum pump to the stop unit.
5. Pump the hand vacuum pump and make the fuel injection
pump in stop position.
Operating PressureApprox. 500bar
Hand Vacuum Pump 001 589 73 21 00
6. Using a starter motor, crank the engine 8 revolutions.
7. Measure the remaining cylinder compression pressure
in the same manner and compare it with service data.
Notice
If out of standard, do cylinder pressure leakage test.
8. Remove the compression pressure recorder.
9. Install the fuel injection nozzle.
Page 72 of 1463

1A3-14 GENERAL ENGINE INFORMATION
Leakage Test
1. Run the engine to be the coolant temperature 80°C.
2. Remove the fuel injection nozzle.
3. Open the coolant subtank cap.
4. Check the coolant level and replenish if necessary.
5. Open the oil filler cap.
6. Remove the air cleaner cover and element.
7. Position the piston at TDC.
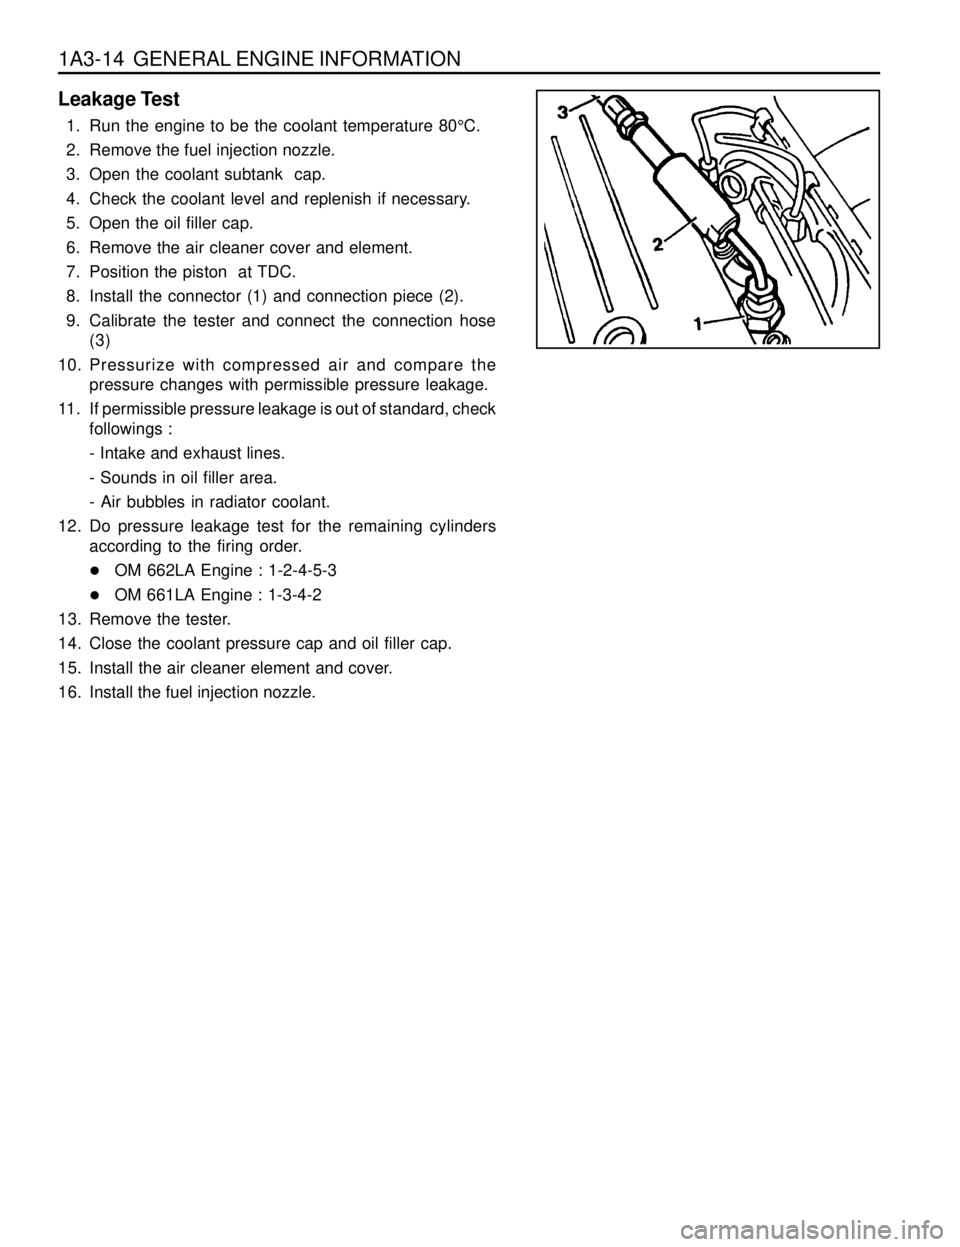
8. Install the connector (1) and connection piece (2).
9. Calibrate the tester and connect the connection hose
(3)
10. Pressurize with compressed air and compare the
pressure changes with permissible pressure leakage.
11. If permissible pressure leakage is out of standard, check
followings :
- Intake and exhaust lines.
- Sounds in oil filler area.
- Air bubbles in radiator coolant.
12. Do pressure leakage test for the remaining cylinders
according to the firing order.
lOM 662LA Engine : 1-2-4-5-3
lOM 661LA Engine : 1-3-4-2
13. Remove the tester.
14. Close the coolant pressure cap and oil filler cap.
15. Install the air cleaner element and cover.
16. Install the fuel injection nozzle.
Page 75 of 1463

1B1-2 M162 ENGINE MECHANICAL
SPECIFICATIONS
FASTENER TIGHTENING SPECIFICATIONS
N
· ·· ·
·m
35 - 40
10 - 15
5 - 10
21 - 25
30
56 - 66
50 - 60
10 - 15
41.5 - 49.5
22.5 - 27.5
22.5 - 27.5
9 - 11
9 - 11
22.5 - 27.5
9 - 11
22.5 - 27.5
10
+90°
55
+90°
+90°
22.5 - 27.5
22.5 - 27.5
9 - 10
9 - 10
200
+90°
40
+90°
45
+90°
35
9 - 11
20
+90°
20
+90°
20 / + 90°
20 / + 90°
22.5 - 27.5Application
Power Steering Hydraulic Lines
A/C High Pressure and Liquid Hose
Radiator Support Menber Bolt
Fuel Supply and Return Hose to Fuel Distributor
Exhaust Manifold and Pipe
Propeller Shaft to Transmission
Engine Mounting Nut
Alternator Carrier Bolt
Belt Pulley Bolt
Steering Pump Bolt
A/C Bracket Bolt
Intake Air Duct Bolt
Ignition Cable Cover Bolt
Cylinder Head Cover Bolt
Camshaft Adjuster Bolt
Cylinder Head Front Cover Bolt
Flange Bolt in Exhaust Camshaft Sprocket
Cylinder Head Bolt
Cooling Fan Bracket Bolt
Timing Gear Case Cover Bolt M8
M6
Crankshaft Rear Cover Bolt
Vibration Damper Center Bolt
Connecting Rod Bearing Cap Bolt
Flywheel Stretch Bolt
Amarture Bolt in Flywheel
Ring and Seal Cover Nut in Flywheel
Sprocket Bolt to Exhaust Camshaft
Camshaft Adjuster Flange Bolt
Intake Flange Shaft Bolt
Exhaust Camshaft Sprocket Bolt
Camshaft Bearing Cap Bolt
Page 84 of 1463
M162 ENGINE MECHANICAL 1B1-11
12. Discharge the refrigerant from A/C system, and disconnect
the discharge pipe and suction pipe from the compressor.
14. Remove the fuel feed and return line.
Notice
Before removing the fuel lines, release the pressure in the
fuel system.
Installation Notice 13. Remove the acceleration control cable and automatic
transmission pressure cable. 11. Remove the hydraulic pipe of power steering.
Notice
Completely drain the oil.
Tightening Torque 21 - 25 Nm
Page 191 of 1463

1B2-2 M161 ENGINE MECHANICAL
SPECIFICATIONS
FASTENER TIGHTENING SPECIFICATIONS
N
· ·· ·
·m
35 - 40
10 - 15
5 - 10
21 - 25
30
56 - 66
50 - 60
22.5 - 27.5
41.5 - 49.5
22.5 - 27.5
22.5 - 27.5
9 - 11
9 - 11
9 - 11
9 - 11
22.5 - 27.5
10
+90°
55
+90°
+90°
22.5 - 27.5
22.5 - 27.5
9 - 10
9 - 10
200
+90°
40
+90°
45
+90°
35
9 - 11
20
+90°
20
+90°
20 / + 90°
20 / + 90°
22.5 - 27.5Application
Power Steering Hydraulic Lines
A/C High Pressure and Liquid Hose
Radiator Support Menber Bolt
Fuel Supply and Return Hose to Fuel Distributor
Exhaust Manifold and Pipe
Propeller Shaft to Transmission
Engine Mounting Nut
Alternator Carrier Bolt
Belt Pulley Bolt
Steering Pump Bolt
A/C Bracket Bolt
Intake Air Duct Bolt
Ignition Cable Cover Bolt
Cylinder Head Cover Bolt
Camshaft Adjuster Bolt
Cylinder Head Front Cover Bolt
Flange Bolt in Exhaust Camshaft Sprocket
Cylinder Head Bolt
Cooling Fan Bracket Bolt
Timing Gear Case Cover Bolt M8
M6
Crankshaft Rear Cover Bolt
Vibration Damper Center Bolt
Connecting Rod Bearing Cap Bolt
Flywheel Stretch Bolt
Amarture Bolt in Flywheel
Ring and Seal Cover Nut in Flywheel
Sprocket Bolt to Exhaust Camshaft
Camshaft Adjuster Flange Bolt
Intake Flange Shaft Bolt
Exhaust Camshaft Sprocket Bolt
Camshaft Bearing Cap Bolt
Page 201 of 1463
1B2-12 M161 ENGINE MECHANICAL
12. Discharge the refrigerant from A/C system, and disconnect
the discharge pipe and suction pipe from the compressor.
14. Remove the fuel feed and return line.
Notice
Before removing the fuel lines, release the pressure in the
fuel system.
Installation Notice 13. Remove the acceleration control cable and automatic
transmission pressure cable. 11. Remove the hydraulic pipe of power steering.
Notice
Completely drain the oil.
Tightening Torque 21 - 25 Nm
Page 394 of 1463

1B3-92 OM600 ENGINE MECHANICAL
28. Remove the connecting rod bearing cap.
29. Install the piston.
30. Rotate the crankshaft by hand and check whether it rotates
smoothly.
31. If the bearings are damaged,
- replace the oil presser relief valve.
- clean the oil pump and oil filter housing carefully and
replace the hose if necessary.
Notice
After assembling the engine, check the camshaft timing,
adjust the start of fuel injection and check the TDC sensor
bracket setting.
32. Fill oil and run the engine and then check the oil pressure
and oil level.
Notice
Install the original oil filter element and then change the
engine oil and oil filter element after 1,000 - 1,500km. 27. Measure the radial clearance (L) of the connecting rod
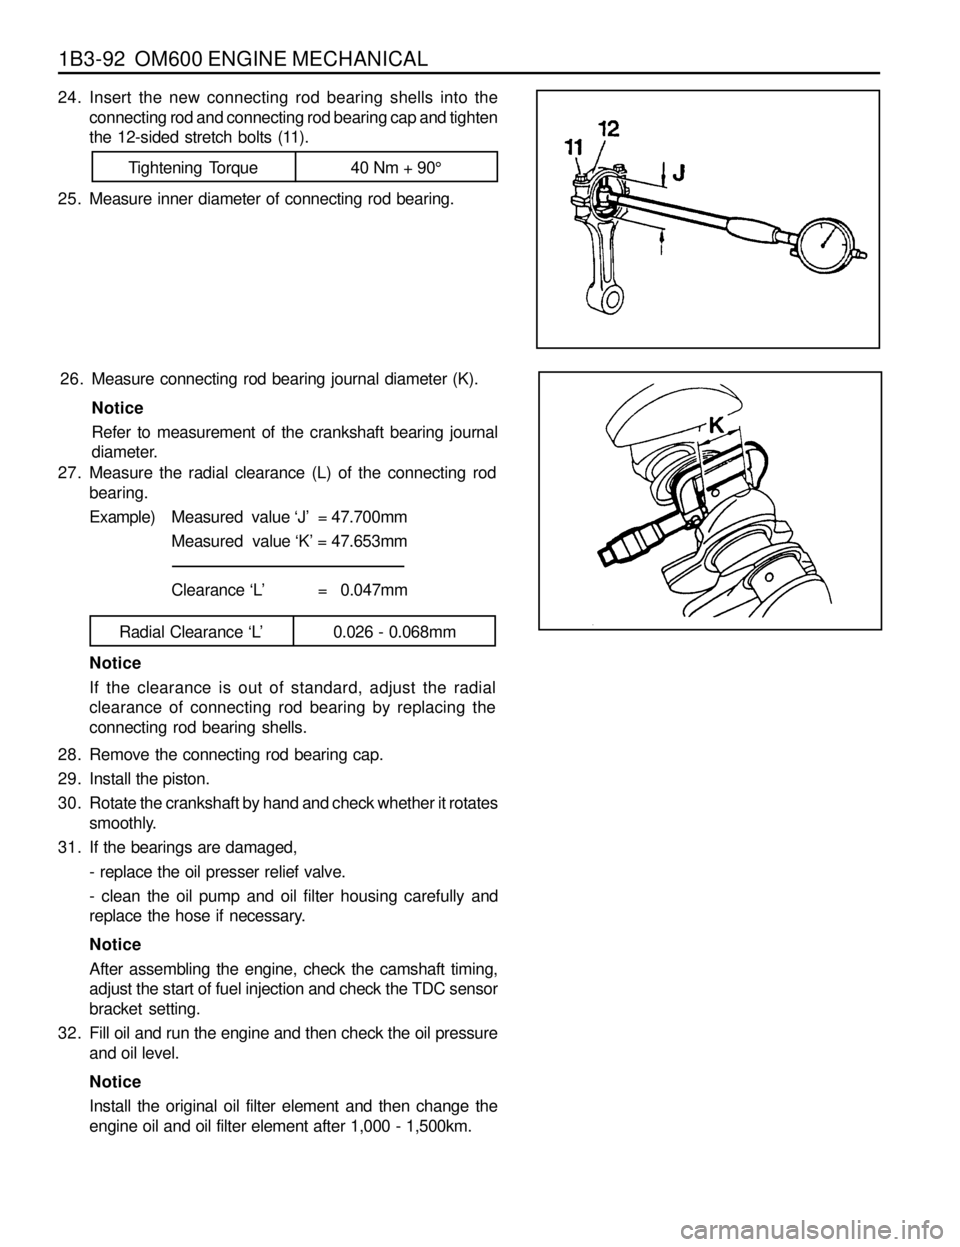
bearing.
Example)Measured value ‘J’ = 47.700mm
Measured value ‘K’ = 47.653mm
Clearance ‘L’ = 0.047mm
Radial Clearance ‘L’ 0.026 - 0.068mm
Notice
If the clearance is out of standard, adjust the radial
clearance of connecting rod bearing by replacing the
connecting rod bearing shells. 26. Measure connecting rod bearing journal diameter (K).
Notice
Refer to measurement of the crankshaft bearing journal
diameter.
24. Insert the new connecting rod bearing shells into the
connecting rod and connecting rod bearing cap and tighten
the 12-sided stretch bolts (11).
25. Measure inner diameter of connecting rod bearing.
Tightening Torque 40 Nm + 90°