Page 286 of 1463
M161 ENGINE MECHANICAL 1B2-97
OIL PAN
1 Bolt
2 Bolt
3 Bolt
4 Bolt
1. Remove the drain plug and drain the oil completely.
2. Unscrew the bolts and remove the oil pan and gasket.
Notice
Arrange the bolts according to each size.
3. Clean the inside of oil pan and sealing surface, then apply
the sealant.
4. Replace the gasket with new one.
5. Install the oil pan with gasket, and tighten each bolt in
specified torque.
6. Check for oil leaks while running the engine.
M8 X 40, 4 pieces
M6 X 35, 1 pieces
M6 X 100, 2 piece
M6 X 85, 3 pieces
M6 X 20, 20 pieces
5 Bolt
6 Oil Pan
7 Gasket
u
Page 289 of 1463

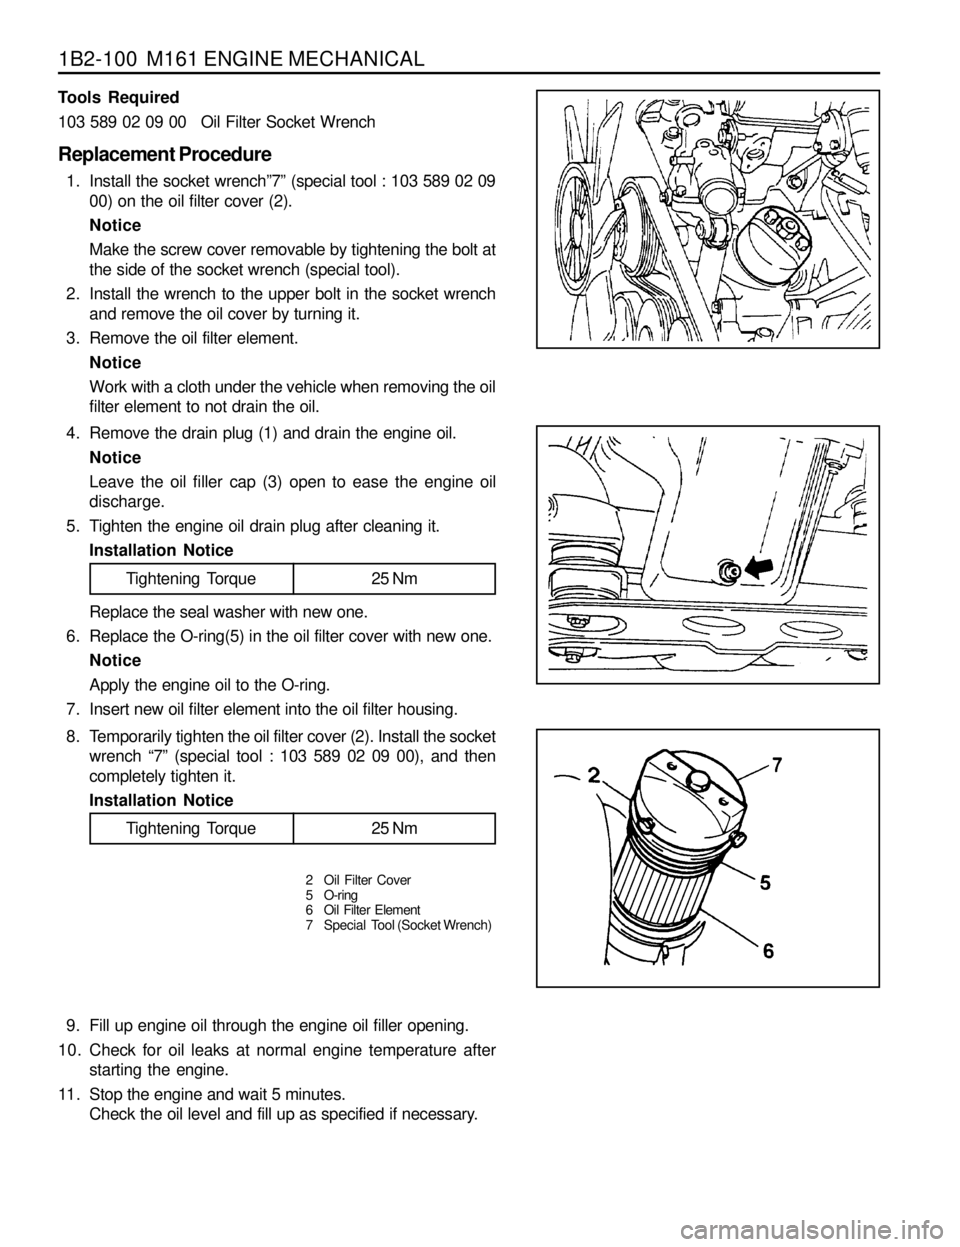
1B2-100 M161 ENGINE MECHANICAL
9. Fill up engine oil through the engine oil filler opening.
10. Check for oil leaks at normal engine temperature after
starting the engine.
11. Stop the engine and wait 5 minutes.
Check the oil level and fill up as specified if necessary. 4. Remove the drain plug (1) and drain the engine oil.
Notice
Leave the oil filler cap (3) open to ease the engine oil
discharge.
5. Tighten the engine oil drain plug after cleaning it.
Installation Notice Tools Required
103 589 02 09 00 Oil Filter Socket Wrench
Replacement Procedure
1. Install the socket wrench”7” (special tool : 103 589 02 09
00) on the oil filter cover (2).
Notice
Make the screw cover removable by tightening the bolt at
the side of the socket wrench (special tool).
2. Install the wrench to the upper bolt in the socket wrench
and remove the oil cover by turning it.
3. Remove the oil filter element.
Notice
Work with a cloth under the vehicle when removing the oil
filter element to not drain the oil.
Replace the seal washer with new one.
6. Replace the O-ring(5) in the oil filter cover with new one.
Notice
Apply the engine oil to the O-ring.
7. Insert new oil filter element into the oil filter housing.
Tightening Torque 25 Nm
8. Temporarily tighten the oil filter cover (2). Install the socket
wrench “7” (special tool : 103 589 02 09 00), and then
completely tighten it.
Installation Notice
2 Oil Filter Cover
5 O-ring
6 Oil Filter Element
7 Special Tool (Socket Wrench)
Tightening Torque 25 Nm
Page 291 of 1463
1B2-102 M161 ENGINE MECHANICAL
Removal & Installation Procedure
1. Unscrew the bolt (6) from the oil pump drive sprocket and
separate the oil pump drive chain.
Installation Notice
Tightening TorqueBolt (4) 9 - 11 Nm
Bolt (5) 9 - 11 Nm
Tightening Torque 29 - 35 Nm
2. Unscrew the bolts (4,5) and remove the oil strainer assembly
(3).
Installation Notice
Insert the steel gasket into the oil pump and bolt (4) mounting
surface.
3. Unscrew the six bolts (11) and remove the haffle plate.
Installation Notice
Tightening Torque 9 - 11 Nm
4. Unscrew the three bolt (1) and remove the oil pump.
Installation Notice
Tightening Torque 22.5 - 27.5 Nm
Page 292 of 1463
M161 ENGINE MECHANICAL 1B2-103
OIL PRESSURE RELIEF VALVE
Preceding Work : Removal of oil pan
1 Screw Plug................................................ 50 Nm
2 Compression Spring
Removal & Installation Procedure
1. Remove the screw plug (1).
Installation Notice
2. Remove the spring (2), guide pin (3) and the piston (4).
3. Installation should follow the removal procedure in the
reverse order.
Notice
Don’t use the seal for the screw plug.3 Guide Pin
4 Piston
Tightening Torque 50 Nm
Page 294 of 1463
M161 ENGINE MECHANICAL 1B2-105
OIL DIPSTICK GUIDE TUBE
1 Oil Dipstick Level Gauge
2 Oil Dipstick Guide Tube
3 O-ring
Removal & Installation Procedure
1. Pull out the oil dipstick level gauge (1).
2. Unscrew the bolt (4) and remove the oil dipstick guide
tube (2).
Installation Notice4 Bolt (M6 X 16, 1 piece)........................... 9-11 Nm
5 Clamp
Tightening Torque 9 - 11 Nm
It is very hard to remove the oil dipstick guide tube without
special tool. If it is not necessary, do not remove the guide
tube.
3. Installation should follow the removal procedure in the
reverse order.
4. Check for leaks by starting the engine.
Page 315 of 1463
OM600 ENGINE MECHANICAL 1B3-13
4. Remove the radiator drain cock and drain the coolant.
Notice
Open the coolant reservoir tank cap.
3. Remove the skid plate.
Installation Notice
Tightening Torque 28 - 47 Nm
5. Remove the drain plug (1) and seal (2) from the cylinder
block and drain the coolant completely.
6. After draining, replace the seal and reinstall the drain plug.
Installation Notice
7. Disconnect the lower coolant hose from the radiator.
Tightening Torque 30 Nm
Removal & Installation Procedure
1. Disconnect the negative terminal of battery.
2. Remove the hood.
Page 316 of 1463
1B3-14 OM600 ENGINE MECHANICAL
9. Loosen the bolt and remove the coolant pipe and cooling
fan shroud.
10. Remove the hoses (air intake to intercooler, intercooler to
intake duct). 8. Disconnect the upper coolant hose from the radiator.
Tightening Torque 3 -7 Nm
11. Remove the pipes connected to intercooler.
Page 320 of 1463
1B3-18 OM600 ENGINE MECHANICAL
27. Disconnect the preheating time relay sensor plug.
28. Disconnect the coolant temperature sensor plug.
29. Disconnect the accelerator cable from the control linkage.
Installation Notice
Tightening Torque 8 - 18 Nm
30. Loosen the connection of control pressure cable (an arrow)
used in auto transmission.