Page 121 of 1463
1B1-48 M162 ENGINE MECHANICAL
Arrangement of the Thrust Bearing and the Main Bearing
1 - 12 Weight Balance/Color Marking Point
j1 - j7 Journal Main Bearing #1 - #7
lColor Dot Marking
The color dot marking are put on the
1 , 2 , 4 , 6 , 8
,
10 ,12 and it indicates the diameter of crankshaft journal
by color as below.A Crankcase Side
B Bearing Cap Side (Oil Pan Side)
C Axial Fit Bearing (Number 5 Bearing Point)
D Radial Bearing
1 Upper Main Bearing
2 Upper Thrust Bearing
3 Crankshaft
4 Lower Main Bearing
5 Lower Thrust Bearing
Page 122 of 1463

M162 ENGINE MECHANICAL 1B1-49
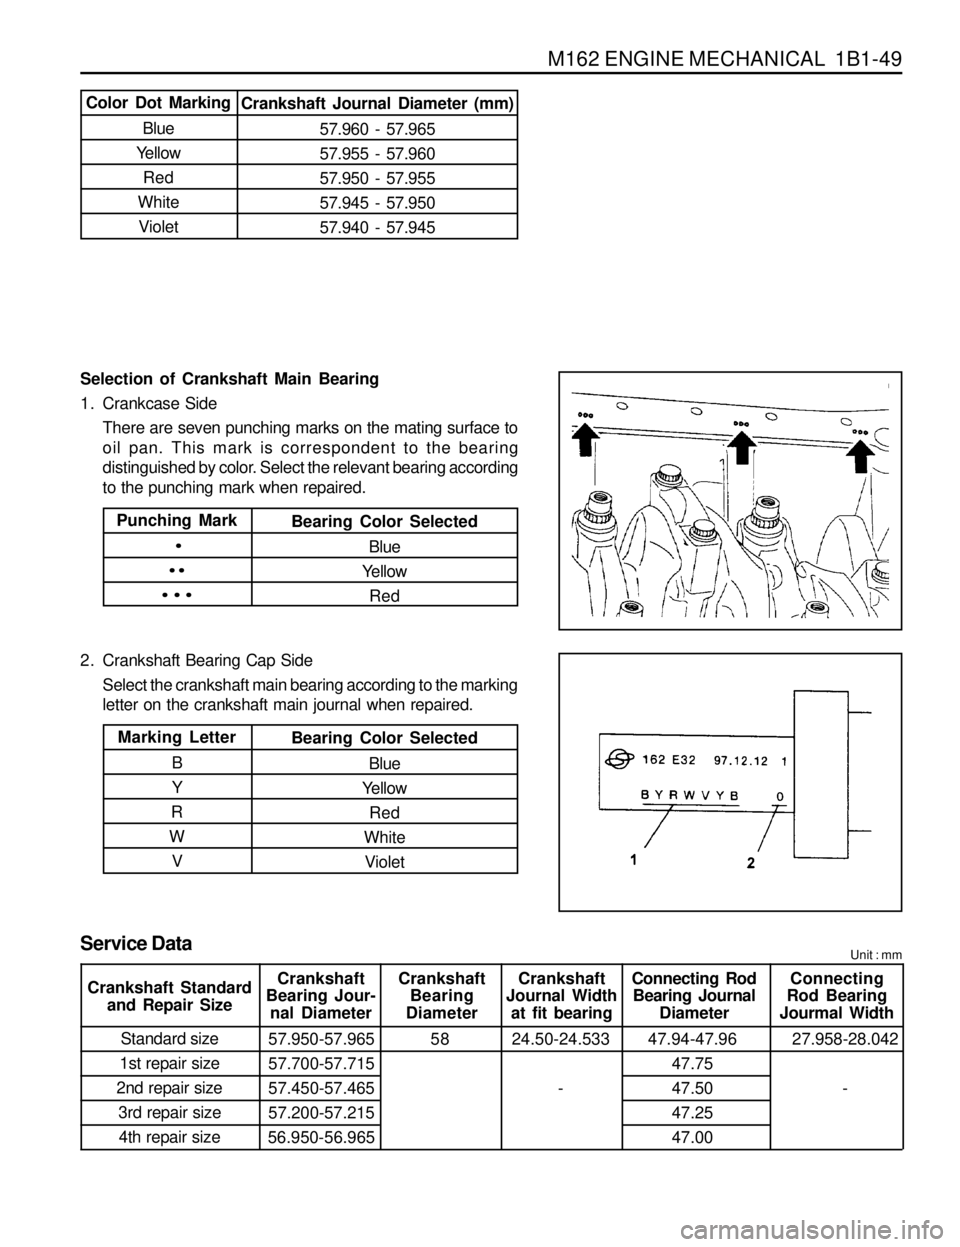
Selection of Crankshaft Main Bearing
1. Crankcase Side
There are seven punching marks on the mating surface to
oil pan. This mark is correspondent to the bearing
distinguished by color. Select the relevant bearing according
to the punching mark when repaired.
2. Crankshaft Bearing Cap Side
Select the crankshaft main bearing according to the marking
letter on the crankshaft main journal when repaired.
Color Dot Marking
Blue
Yellow
Red
White
VioletCrankshaft Journal Diameter (mm)
57.960 - 57.965
57.955 - 57.960
57.950 - 57.955
57.945 - 57.950
57.940 - 57.945
Punching Mark
·
··
···
Bearing Color Selected
Blue
Yellow
Red
Marking Letter
B
Y
R
W
VBearing Color Selected
Blue
Yellow
Red
White
Violet
Service DataUnit : mm
Crankshaft
Bearing Jour-
nal DiameterCrankshaft
Bearing
DiameterCrankshaft
Journal Width
at fit bearingConnecting Rod
Bearing Journal
DiameterConnecting
Rod Bearing
Jourmal Width
Standard size
1st repair size
2nd repair size
3rd repair size
4th repair size57.950-57.965
57.700-57.715
57.450-57.465
57.200-57.215
56.950-56.96558 24.50-24.533
-47.94-47.96
47.75
47.50
47.25
47.0027.958-28.042
- Crankshaft Standard
and Repair Size
Page 123 of 1463

1B1-50 M162 ENGINE MECHANICAL
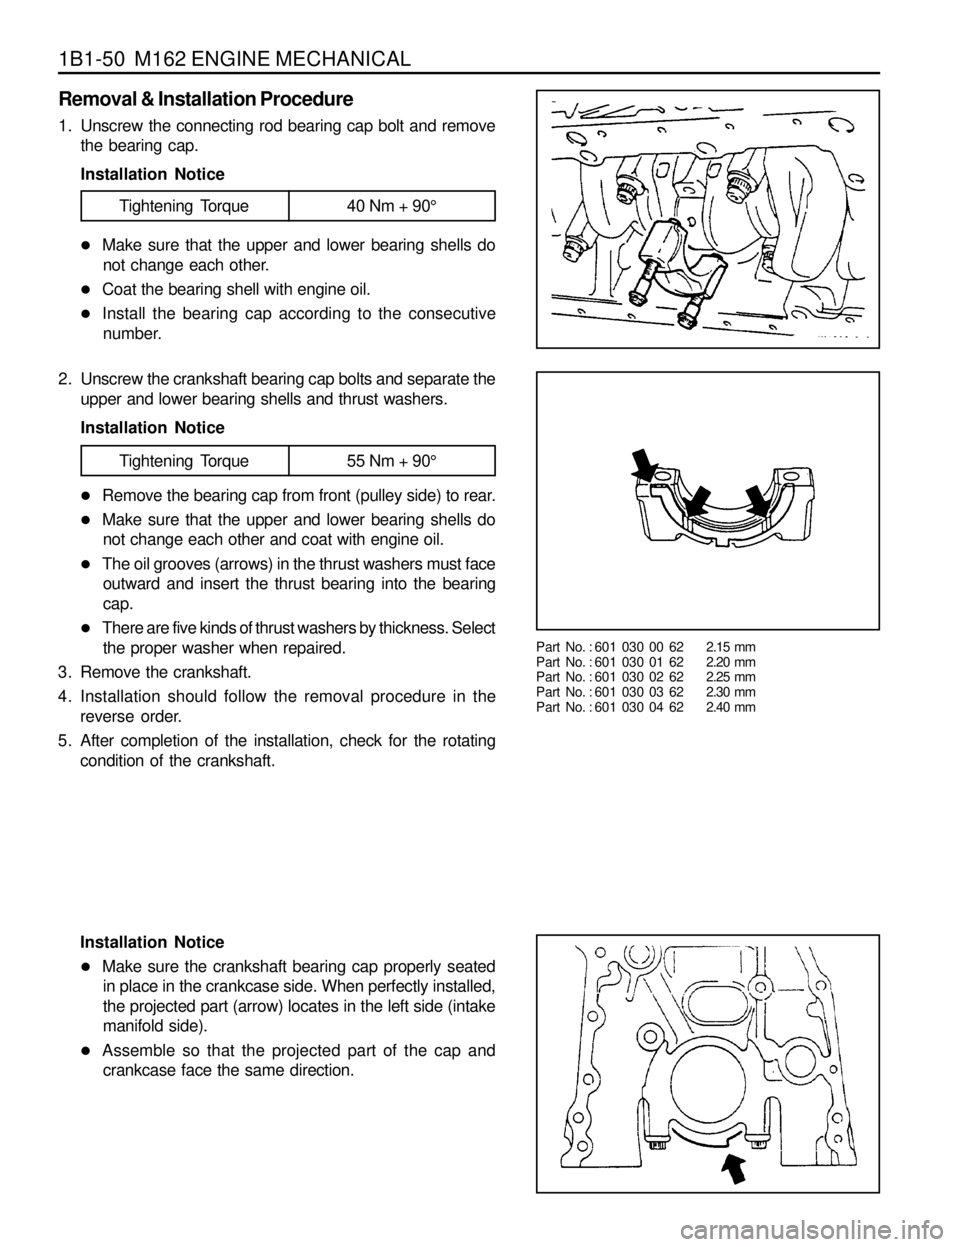
Installation Notice
lMake sure the crankshaft bearing cap properly seated
in place in the crankcase side. When perfectly installed,
the projected part (arrow) locates in the left side (intake
manifold side).
lAssemble so that the projected part of the cap and
crankcase face the same direction.
Removal & Installation Procedure
1. Unscrew the connecting rod bearing cap bolt and remove
the bearing cap.
Installation Notice
2. Unscrew the crankshaft bearing cap bolts and separate the
upper and lower bearing shells and thrust washers.
Installation Notice
lRemove the bearing cap from front (pulley side) to rear.
lMake sure that the upper and lower bearing shells do
not change each other and coat with engine oil.
lThe oil grooves (arrows) in the thrust washers must face
outward and insert the thrust bearing into the bearing
cap.
lThere are five kinds of thrust washers by thickness. Select
the proper washer when repaired.
3. Remove the crankshaft.
4. Installation should follow the removal procedure in the
reverse order.
5. After completion of the installation, check for the rotating
condition of the crankshaft.
lMake sure that the upper and lower bearing shells do
not change each other.
lCoat the bearing shell with engine oil.
lInstall the bearing cap according to the consecutive
number.
Part No. : 601 030 00 622.15 mm
Part No. : 601 030 01 622.20 mm
Part No. : 601 030 02 622.25 mm
Part No. : 601 030 03 622.30 mm
Part No. : 601 030 04 622.40 mm
Tightening Torque 40 Nm + 90°
Tightening Torque 55 Nm + 90°
Page 124 of 1463
M162 ENGINE MECHANICAL 1B1-51
Inspection
1. If the length ‘L’ of the crankshaft bearing cap bolt exceeds
63.8mm, replace it.
2. Make sure the crankshaft bearing cap is properly seated
on the cylinder block (arrows).
3. Measure and record the inner diameter of the crankshaft
bearing.
Notice
lMeasure at 2 points (1, 2).
lMeasure ‘A’,‘B’and ‘C’ as shown. If average value of ‘B’
and ‘C’is less than value ‘A’, then the average value of
‘B’ and ‘C’ is actual average value. If average value of
‘B’ and ‘C’ is more than value ‘A’is actual average value.
4. Measure and record the diameter of the crankshaft bearing
journal.
Notice
lRecord the mean value when measured at 3 points (A,
B, C).
lMeasure the inner diameter of bearing and the diameter
of journal and if it is out of the standard data, replace
the bearing shell.
Page 125 of 1463
1B1-52 M162 ENGINE MECHANICAL
Service Data Standard (Crankshaft Main Bearing Gap)
(Connecting Rod Bearing Gap)
Item
Main Bearing Journal
( NO. 1, 5, 7)
Main Bearing Journal
( NO. 3, 4, 6)Measuring Position
Radial
Axial
Radial
AxialGap (mm)
Static condition :0.015 - 0.039
Dynamic condition: 0.031 - 0.051
(Consider the expansion 0.011 - 0.016)
0.010 - 0.254
Static condition :0.011 - 0.039
Dynamic condition: 0.031 - 0.051
(Consider the expansion 0.015 - 0.022)
0.010 - 0.254
Item
Connecting Rod BearingMeasuring Position
RadialGap (mm)
0.030 - 0.050
Page 126 of 1463
M162 ENGINE MECHANICAL 1B1-53
FLYWHEEL / DRIVEN PLATE
Preceding Work : Removal of manual or automatic transmission
1 Flywheel Mounting Bolt (M10 x 22, 8 pieces)
...............................................1st step 45+5 Nm
2nd step +90° +10°
2 Plate3 Driven Plate (A/T)
4 Dowel Pin
Service Data Standard (Stretch Bolt)
Nominal Size
Stretch Side Diameter
Bolt Length
Tightening TorqueM x 1.5
8.5 - 0.2 mm
8.0 mm
21.8 - 22.2 mm-
When New
Min. Diameter
When NewD
d
L
1st step 50 Nm, 2nd step 90°
Page 127 of 1463
1B1-54 M162 ENGINE MECHANICAL
Removal & Installation Procedure
1. Unscrew the stretch bolt.
Installation Notice
Sectional View
1 Oil Pan
2 Cover
3 Crankshaft Front Seal
4 Flywheel MTG Bolt
5 Crankshaft
6 Dowel Pin
7 Plate
8 TGCC
9 Bolt
10 Front Drive Plate
11 Rear Drive Plate
12 Rivet
13 Segment
14 Ring Gear
lReplace the bolt when the stretch side diameter (d) of
the flywheel mounting bolt is less than 8.0mm.
lFor the stretch bolt tightening, keep the socket wrench
and Tommy-bar to be 90° and tighten as specified.
2. Remove the flywheel for manual transmission vehicles, or
the driven plate (3), and plate (2) for Auto. transmission
vehicle.
3. Installation should follow the removal procedure in the
reverse order.Tightening Torque1st step 45+5 Nm
2nd step 90° + 10°
Page 128 of 1463
M162 ENGINE MECHANICAL 1B1-55
CAMSHAFT ADJUSTER
1 Bolt (M6 x 16, 3 pieces)........................ 9-11 Nm
2 Electromagnetic Actuator (2 Pin Connector)
3 Bolt........................................................... 35 Nm
4 Armature
5 Roll Pin
6 Nut (M20 x 1.5)....................................60-70 Nm
7 Front Cover
8 Seal
9 Camshaft Position Sensor
10 Bolt (M6 x 16, 2 pieces)......................... 9-11 Nm
11 Seal
12 Seal Cover13 Camshaft Sprocket and Position Indicator (b)
14 Adjuster piston
15 Flange bolt (M7 x 13, 3 pieces)
..............................................1st step 18-22 Nm
2nd step 90° ± 5°
16 Flange Shaft
17 Compression Spring
18 Control Piston
19 Circlip
20 Oil Gallery
21 Pin
22 Intake Camshaft