1998 PONTIAC GRAND PRIX tire pressure
[x] Cancel search: tire pressurePage 201 of 402
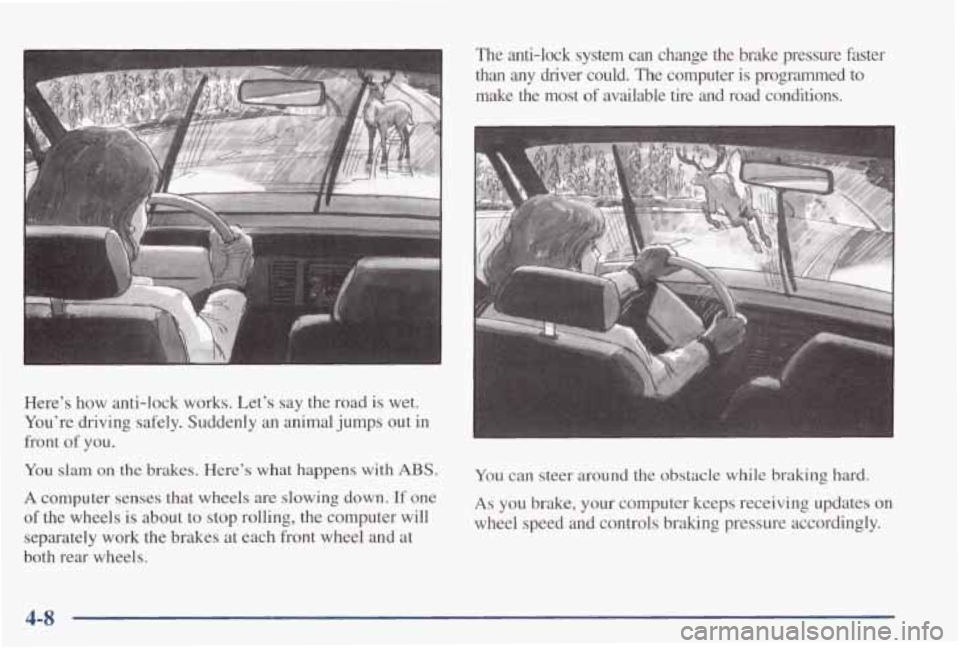
Here’s how anti-lock works. Let’s say the road is wet.
You’re driving safely. Suddenly an animal jumps out in
front
of you.
You slam on the brakes. Here’s what happens with ABS.
A computer senses that wheels are slowing down. If one
of the wheels is about to stop rolling, the computer will
separately work the brakes at each front wheel and at
both rear wheels.
The anti-lock system can change the brake pressure faster
than any driver could. The computer
is programmed to
make the most
of available tire and road conditions.
You can steer around the obstacle while braking
hard.
As you brake, your computer keeps receiving updates on
wheel speed and controls braking pressure accordingly.
4-8
Page 214 of 402
Hydroplaning
Hydroplaning is dangerous. So much water can build up
under your tires that they can actually ride
on the water.
This can happen if the road is wet enough and you’re
going fast enough. When your vehicle is hydroplaning,
it has little or
no contact with the road.
Hydroplaning doesn’t happen often. But it can if your
tires do not have much tread or if the pressure in one or
more is low. It can happen if a lot
of water is standing on
the road. If you can see reflections from trees, telephone
poles or other vehicles, and raindrops “dimple” the water’s surface, there could be hydroplaning.
Hydroplaning usually happens at higher speeds. There
just isn’t a hard and fast rule about hydroplaning. The
best advice is to slow down when it is raining.
Driving Through Deep Standing Water
NOTICE:
If you drive too quickly through deep puddles or
standing water, water can come in through your
engine’s air intake and badly damage your
engine. Never drive through water that is slightly
lower than the underbody
of your vehicle. If you
can’t avoid deep puddles or standing water, drive
through them very slowly.
Some Other Rainy Weather Tips
Besides slowing down, allow some extra following
distance. And be especially careful when you pass another vehicle. Allow yourself more clear room
ahead, and be prepared to have your view restricted
by road spray.
“Tires”
in the Index.)
Have good tires with proper tread depth. (See
4-21
Page 217 of 402
The exit speed is usually posted.
Reduce your speed according
to your speedometer, not
to your sense
of motion. After driving for any distance
at higher speeds, you may tend to think you are going
slower than you actually
are.
Before Leaving on a Long Trip
Make sure you’re ready. Try to be well rested. If you
must
start when you’re not fresh -- such as after a day’s
work
-- don’t plan to make too many miles that first part
of the journey. Wear comfortable clothing and shoes you
can easily
drive in.
Is your vehicle ready for a long trip? If you keep it
serviced
and maintained, it’s ready to go. If it needs
service, have it done before starting out.
Of course,
you’ll find experienced
and able service experts in
Pontiac dealerships all across North America. They’ll be
ready and willing to help if you need it. Here are some things you can check before a trip:
0
0
0
0
0
0
0
Windshield Washer Fluid: Is the reservoir
full? Are
all windows clean inside and outside?
Wiper Blades: Are they in good shape?
Fuel, Engine Oil, Other Fluids: Have you checked
all levels?
Lamps: Are they all working? Are the lenses clean?
Tires: They are vitally important to a safe,
trouble-free trip.
Is the tread good enough for
long-distance driving? Are the tires all inflated to the
recommended pressure?
Weather Forecasts: What’s the weather outlook
along
your route? Should you delay your trip a short
time to avoid
a major storm system?
Maps: Do you have up-to-date maps?
4-24
Page 224 of 402

Run your engine only as long as you must. This saves
fuel. When you run the engine, make it
go a little faster
than just idle. That is, push the accelerator slightly. This
uses less fuel for the heat that you get and it keeps the
battery charged. You will need
a well-charged battery to
restart the vehicle, and possibly for signaling later on
with your headlamps. Let the heater
run for a while.
Then, shut the engine off and close the window almost
all the way to preserve the heat. Start the engine again
and repeat this only when you feel really uncomfortable
from the cold. But do it as little as possible. Preserve the
fuel as long as you can.
To help keep warm, you can get
out
of the vehicle and do some fairly vigorous exercises
every half hour or
so until help comes.
Loading Your Vehicle
TIRE - LOADING INFORMATION A
OCCUPANTS
MAX. LOADING @ GVWR SAME
1 1
r
'U
IT, ADD 28KPA (4LBS)
Manual for tire pressure needed at
himlH(100 mph) or higher speeds, where legal, kr nrlrlitinnal tira inlnrmo+inn
Two labels on your vehicle show how much weight it
may properly carry. The Tire-Loading Information label
is on the inside of the trunk lid. The label tells you the
proper size, speed rating and recommended inflation pressures for the tires on your vehicle. It also gives you
important information about the number
of people that
can be in your vehicle and the total weight you can
carry. This weight is called the vehicle capacity weight
and includes the weight
of all occupants, cargo and all
nonfactory-installed options.
4-3 1
Page 261 of 402
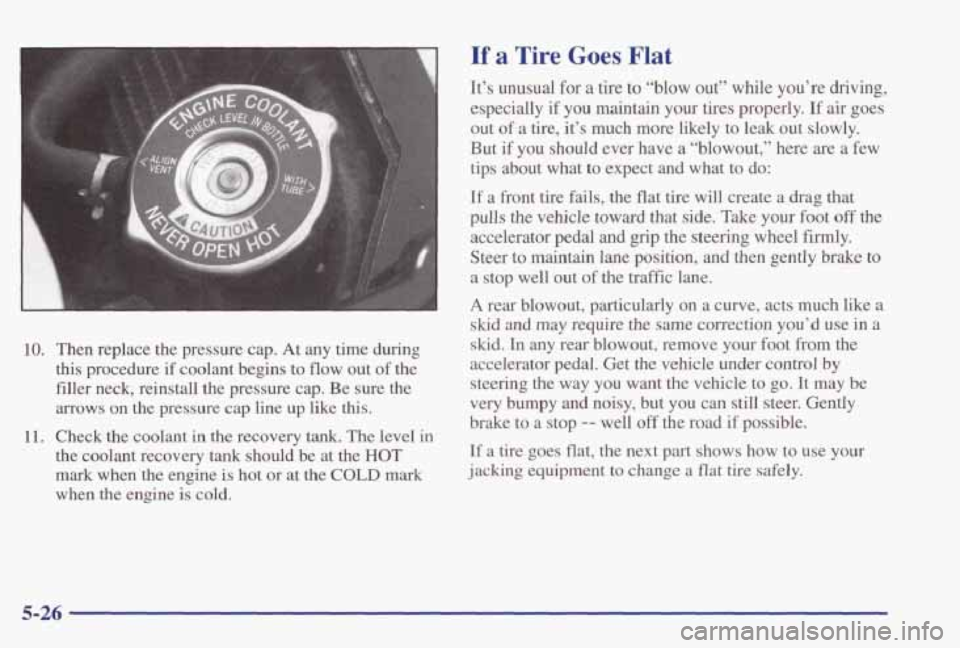
10. Then replace the pressure cap. At any time during
this procedure if coolant begins to flow out of the
filler neck, reinstall the pressure cap. Be sure the
arrows on the pressure cap line up like this.
11. Check the coolant in the recovery tank. The level in
the coolant recovery tank should be at the
HOT
mark when the engine is hot or at the COLD mark
when the engine
is cold.
If a Tire Goes Flat
It’s unusual for a tire to “blow out” while you’re driving,
especially if
you maintain your tires properly. If air goes
out
of a tire, it’s much more likely to leak out slowly.
But if
you should ever have a “blowout,” here are a few
tips about what to expect and what to do:
If a front tire fails, the flat tire will create a drag that
pulls the vehicle toward that side. Take your foot
off the
accelerator pedal
and grip the steering wheel firmly.
Steer to maintain lane position,
and then gently brake to
a stop well out of the tr&k lane.
A rear blowout, particularly on a curve, acts much like a
skid and may require the same correction you’d use in a
skid. In any rear blowout, remove your foot from the
accelerator pedal. Get
the vehicle under control by
steering the way you want the vehicle to
go. It may be
very bumpy and noisy, but you can still steer. Gently
brake to a stop
-- well off the road if possible.
If a tire goes flat, the next part shows how to use your
jacking equipment
to change a flat tire safely.
5-26
Page 272 of 402
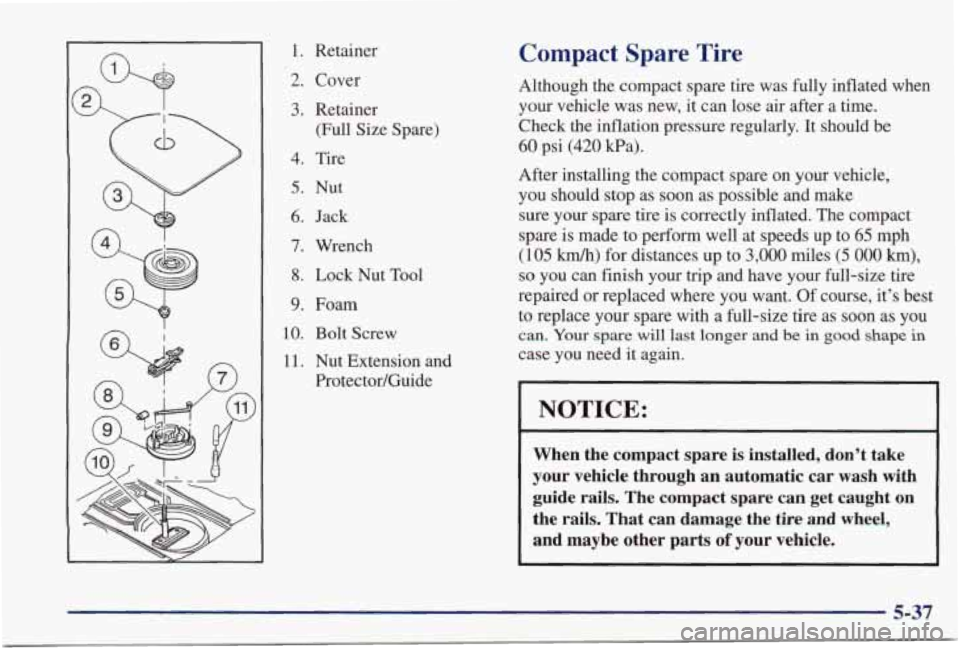
1. Retainer
2. Cover
3. Retainer (Full Size Spare)
4. Tire
5. Nut
6. Jack
7. Wrench
8. Lock Nut Tool
9. Foam
10. Bolt Screw
11. Nut Extension and
Protector/Guide
Compact Spare Tire
Although the compact spare tire was fully inflated when
your vehicle was new,
it can lose air after a time.
Check
the inflation pressure regularly. It should be
60 psi (420 Pa).
After installing the compact spare on your vehicle, you should stop as soon as possible and make
sure your spare
tire is correctly inflated. The compact
spare is made to perform well at speeds up to
65 mph
(105 km/h) for distances up to 3,000 miles (5 000 km),
so you can finish your trip and have your full-size tire
repaired or replaced where you want. Of course, it’s best
to replace your spare with a full-size tire as soon as you
can. Your spare will last longer and be in good shape in
case you need it again.
I I
NOTICE:
When the compact spare is installed, don’t take
your vehicle through an automatic car wash with guide rails. The compact spare can get caught on
the rails. That can damage the tire and wheel,
and maybe other parts
of your vehicle.
5-37
Page 320 of 402

CAUTION: (Continued)
Underinflated tires pose the same danger
as overloaded tires. The resulting accident
could cause serious injury. Check all tires
frequently to maintain the recommended pressure. Tire pressure should be checked
when your tires are cold.
cut, punctured or broken by a sudden
impact
-- such as when you hit a pothole.
Keep
tires at the recommended pressure.
Worn, old tires can cause accidents. If your
tread
is badly worn, or if your tires have
been damaged, replace them.
Overinflated tires are more likely to be
Inflation -- Tire Pressure
The Tire-Loading Information label, which is on the
inside of the
trunk lid, shows the correct inflation
pressures for your tires when they’re cold. “Cold”
means your vehicle has been sitting for at least three
hours or driven no more than 1 mile (1.6 km).
NOTICE:
Don’t let anyone tell you that underinflation or
overinflation
is all right. It’s not. If your tires
don’t have enough air (underinflation), you can
get the following:
0 Too much flexing
Too much heat
Tire overloading
Bad wear
Bad handling
Bad fuel economy.
If your tires have too much air (overinfla
you can get the following:
Unusual wear
Bad handling
Rough ride
Needless damage from road hazards. .tion),
6-45
Page 321 of 402
When to Check
Check your tires once a month or more.
Don’t forget your compact spare
tire. It should be at
60 psi (420 Pa).
How to Check
Use a good quality pocket-type gage to check tire
pressure. You can’t tell
if your tires are properly inflated
simply by looking at them. Radial tires
may look
properly inflated even when they’re underinflated.
Be sure to put the valve caps back on the valve stems. They help prevent leaks
by keeping out dirt
and moisture.
Tire Inspection and Rotation
Tires should be rotated every 6,000 to 8,000 miles
(10 000 to 13 000 km). Any time you notice unusual
wear, rotate your tires as soon as possible and check
wheel alignment.
Also check for damaged tires or
wheels. See “When It’s Time for New Tires” and
“Wheel Replacement” later
in this section for
more information. The purpose
of regular rotation
is to achieve more
uniform wear for
all tires on the vehicle. The first
rotation is the most important. See “Scheduled
Maintenance Services”
in the Index for scheduled
rotation intervals.
I I
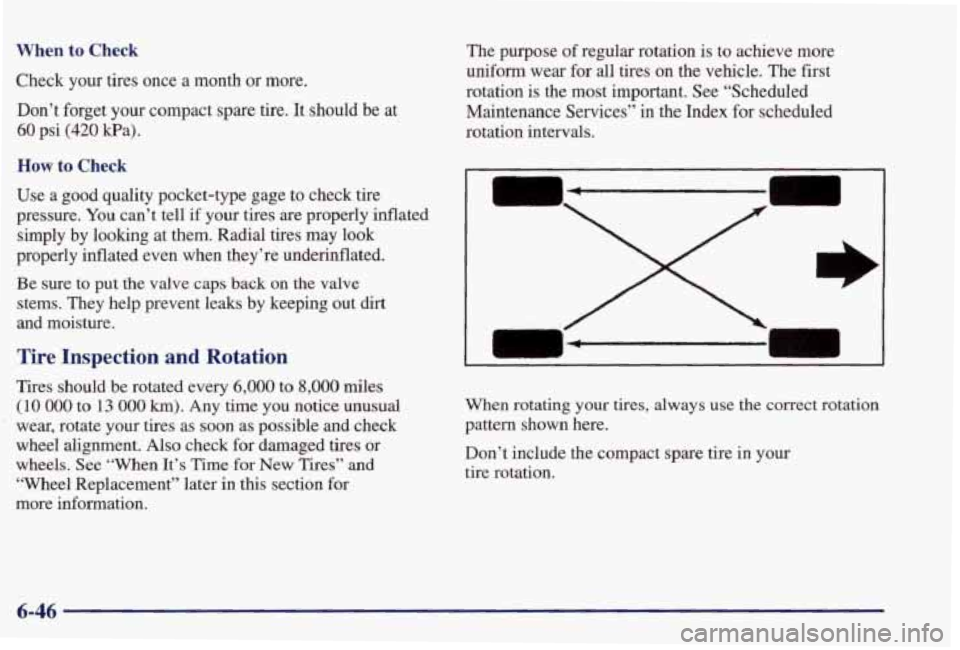
I When rotating your tires, always use the correct rotation
pattern shown here.
Don’t include the compact spare tire
in your
tire rotation.
6-46